This solution has worked incredibly well from the outset and over time I’ve added extra functionality that I’ve found to be useful to enhance the overall setup.
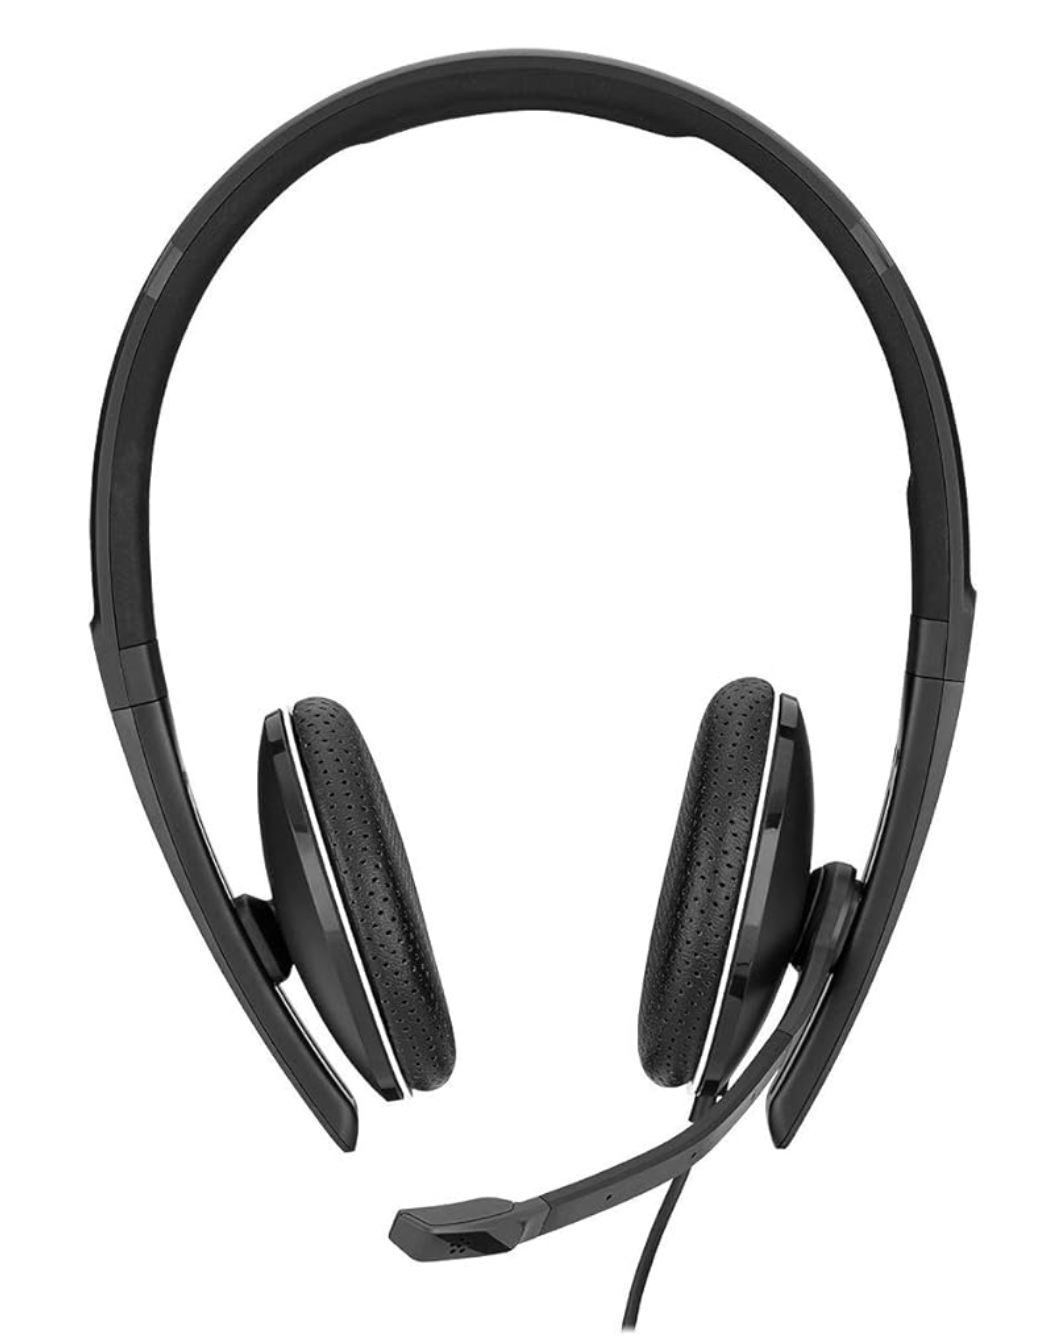
The latest addition to the ground station solution is a Sennheiser Headset that I picked up for just £56 on Amazon (Much cheaper than the Heil equivalents at the HAM stores!) and have found it to be excellent. The audio quality from both the mic and the headphones is extremely good whilst being light and comfortable to wear for extended periods.
M0AWS – Sennheiser SC 165 Headset
To incorporate this into the ground station the headset is connected to my Kubuntu PC and the audio chain to the IC-705 is sent wirelessly using the latest version of WFView. This works extremely well. The receive audio comes directly from the GQRX SDR software to the headphones so that I have a full duplex headset combination.
Audio routing is done via pulse audio on the Kubuntu PC and is very easy to setup.
Since I no longer have a mic connected to the IC-705 directly I found that I needed a way to operate the PTT wirelessly and this is where the latest addition to my NodeRed QO-100 Dashboard comes in.
Adding a little functionality to the NodeRed flow I was able to create a button that toggles the IC-705 PTT state on and off giving me the ability to easily switch between receive and transmit using a simple XMLRPC node without the need for a physical PTT button.
M0AWS – Additional NodeRed PTT Flow
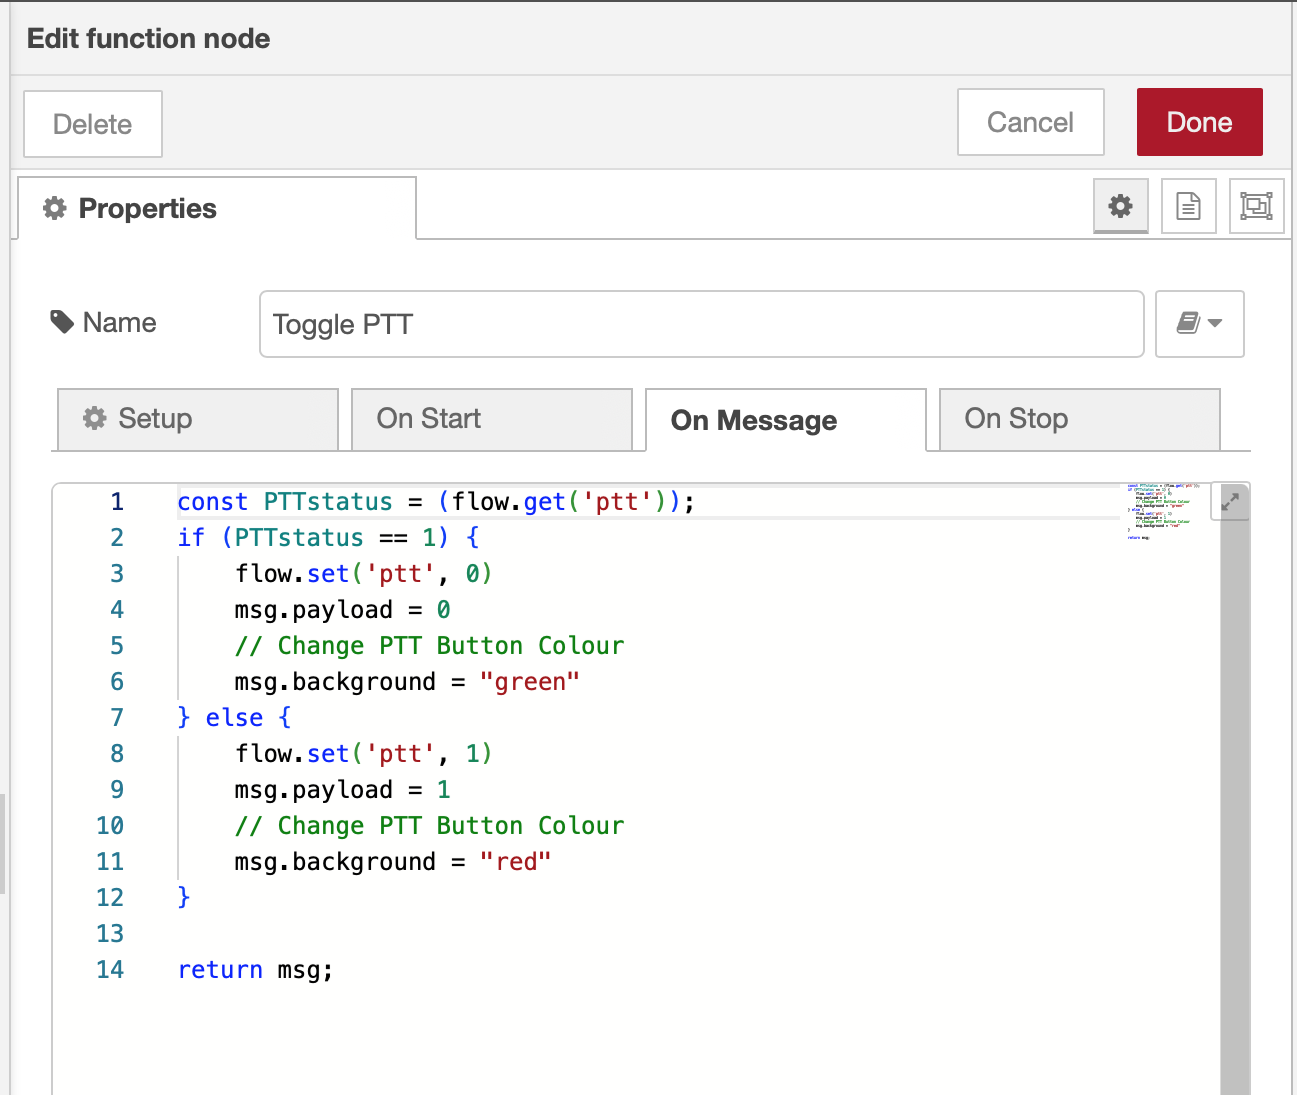
The PTT state and PTT button colour change is handled by the Toggle PTT function node shown in the above flow. The code to do this is relatively simple as shown below.
M0AWS – NodeRed Toggle PTT Function to change button colour
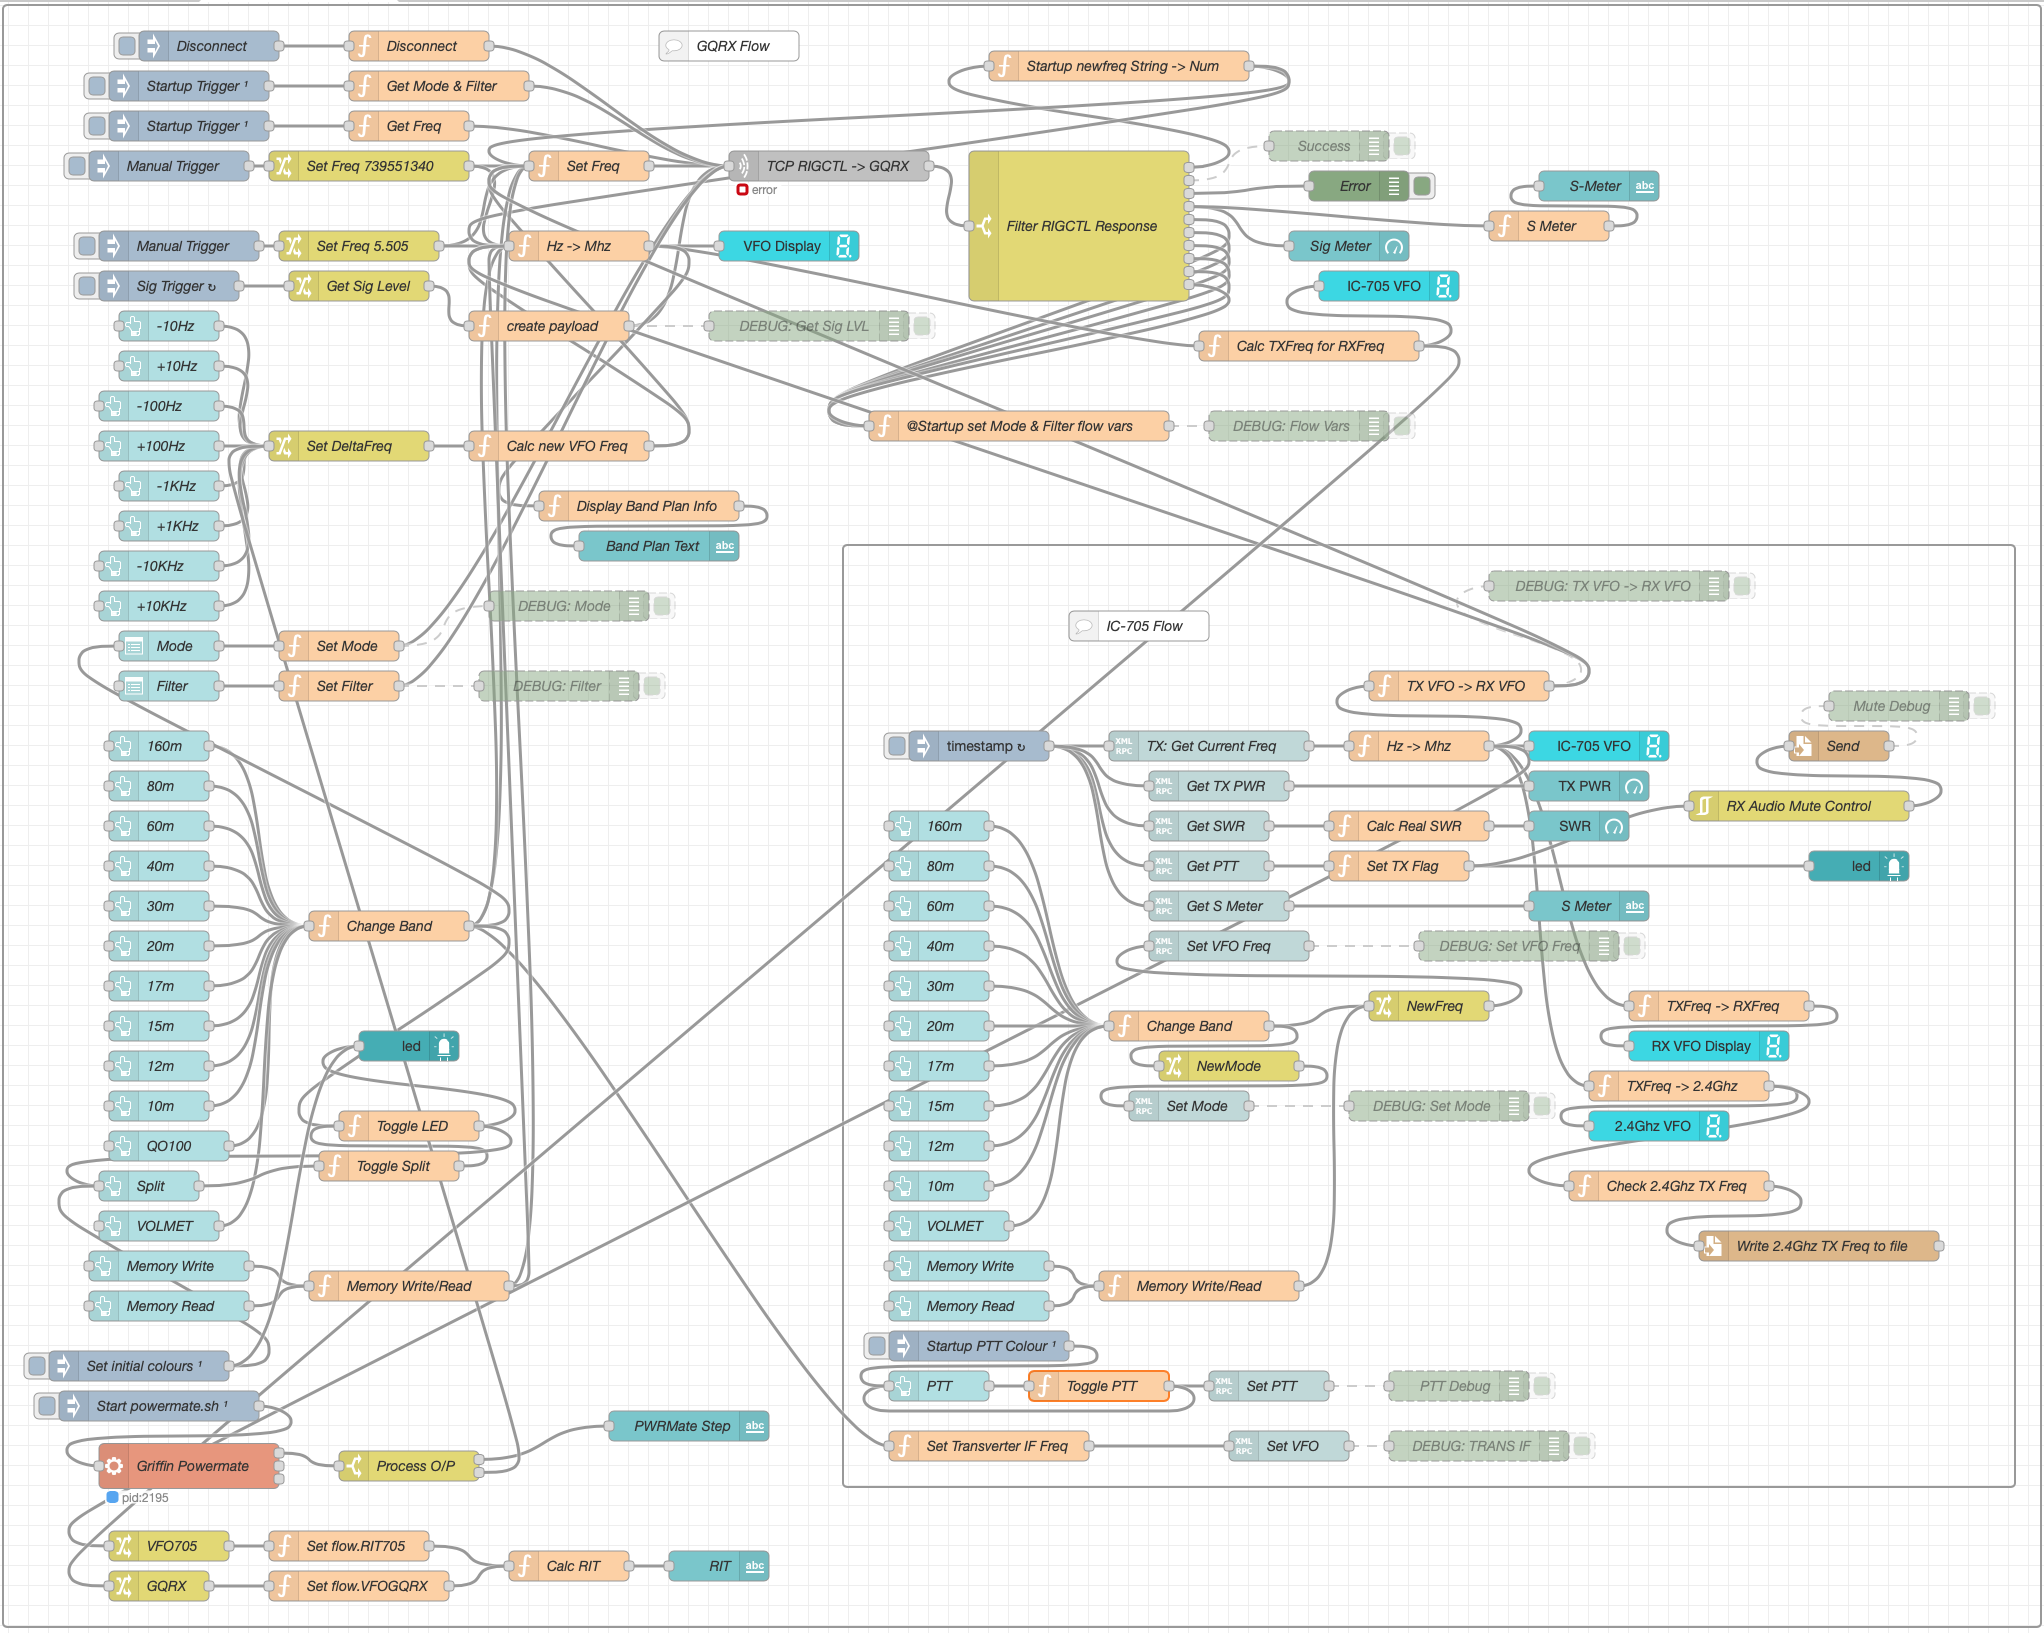
The entire QO-100 Dashboard flow has grown somewhat from it’s initial conception but, it provides all the functionality that I require to operate a full duplex station on the QO-100 satellite.
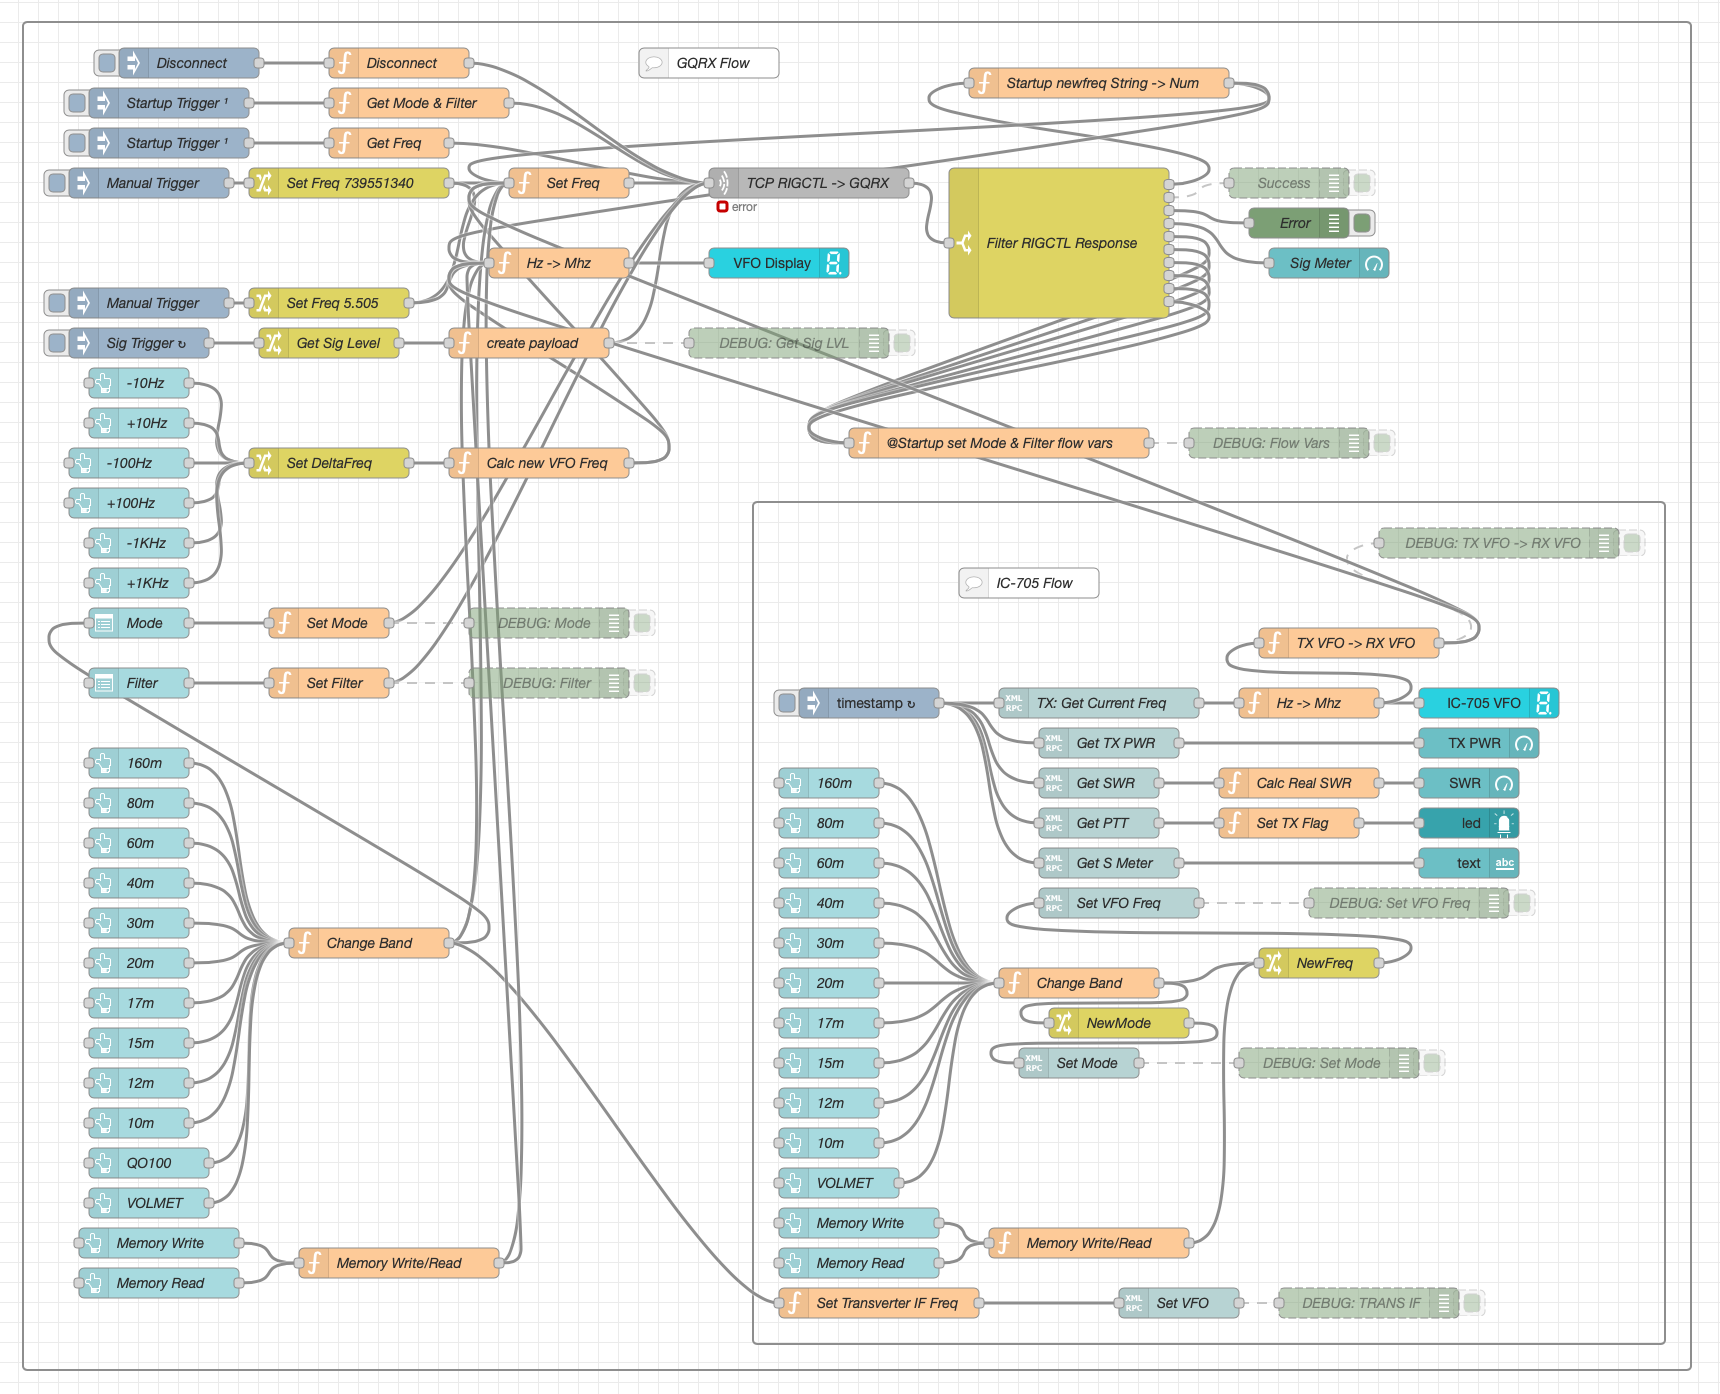
M0AWS – NodeRed QO-100 Dashboard complete flow
This simple but, effective PTT solution works great and leaves me hands free whilst talking on the satellite or the HF bands when using the IC-705. This also means that when using my IC-705 it only requires the coax to be connected, everything else is done via Wifi keeping things nice and tidy in the radio shack.
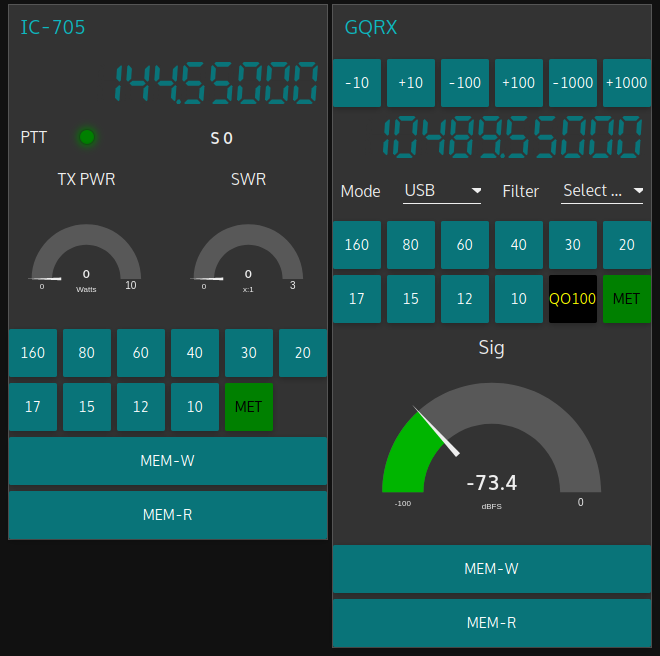
M0AWS – Updated NodeRed QO-100 Dashboard with PTT button
The image above shows the QO-100 ground station in receive cycle with the RX/TX VFO’s in split mode as the DX station was slightly off frequency to me. The PTT button goes red when in TX mode just like the split button shown above for visual reference.
As you can probably tell, I’m a huge fan of NodeRed and have put together quite a few projects using it, including my HF Bands Live Monitoring web page.
I’ve now completed the GQRX Receive and Icom IC-705 Transmit dashboard in Node Red. It was a fun project to put together and needed some javascript coding to get the functionality I wanted but, I got there in the end.
M0AWS QO-100 GQRX/IC-705 control dashboard
The dashboard looks fairly simple but, there is a lot behind the scenes to get it to this stage.
On the left is the Icom IC-705 transmit control panel. It shows the transmit frequency, power output and SWR reading. The SWR is so that I can check that the input into the 2.4Ghz transverter doesn’t have any connectivity issues. The “S0” will actually display the S Meter reading when the IC-705 is being used as a normal transceiver rather than being in QO-100 Duplex mode as shown above where the GQRX app and Funcube Dongle SDR are being used as the receiver.
The GQRX side of the dashboard shows the downlink frequency which tracks the uplink frequency of the VFO on the IC-705. This will ensure that the Funcube Dongle Pro+ SDR receiver will always be on the correct downlink frequency relative to the uplink frequency, thus I should always be able to hear my own signal coming from the QO-100 satellite.
Once taken out of QO-100 mode the two radios can be used independently on any of the HAM bands and can be switched using the buttons on the dashboard.
I also coded in a simple memory facility where a frequency can be stored in Node Red and recalled later on both the transmit and receive sides.
Looking at the dashboard it all looks simple and straight forward however, if you look at the Node Red flow it becomes obvious that this isn’t the case.
QO-100 Dashboard Flow in the Node Red Editor (Click for larger image)
There’s a lot to the flow to get the information from the receiver and transmitter so that it can be presented on the dashboard. There’s also some code to convert between Rigctl protocol used by the GQRX application and XMLRPC used by the IC-705 via FLRig and WFview. I had to also code around a bug in the Node Red XMLRPC node whereby you have to add 0.1 onto the VFO frequency for it to be passed onto the radio otherwise the information is never sent. This was a real pain of a bug to find but, with a little experimentation I found the problem and managed to code around it. The strange thing about this is that the 0.1 added onto the frequency isn’t actually passed onto the radio via the XMLRPC node, it just has to have that on input otherwise it doesn’t work at all. A very strange bug and hopefully one that will be fixed by the node developer in future releases.
All that is left to do now is add the temperature sensors dashboard to complete the dashboard. These haven’t arrived yet and so I’ve not been able to create the necessary flow to collect the data from them.
Hopefully this coming week the weather will improve and I’ll start getting the dish antenna up and the get the receive side working.
UPDATE: Further development of my QO-100 Dashboard has taken place, you can read all about it here.
Whilst I’ve been waiting for the weather to improve so that I can get my QO-100 dish antenna up I’ve been working on my QO-100 Node Red dashboard.
The idea of the dash board is to bring together the operating of the receiver and transmitter into one control centre so that the two separate devices are able to communicate and behave as if they were actually one device, like a transceiver rather than being individual components.
Ideally I would like to have the transmitter and receiver talking to each other such that when the VFO on the transmitter is incremented/decremented the receiver VFO also moves by the same amount.
By doing this the receiver VFO should always be in the right place on the 10Ghz band to hear my 2.4Ghz uplink signal and of course, any station coming back to my CQ calls.
So far I’ve only been working on the receive part of the Node Red flow, it’s certainly been a lot of fun getting it put together.
I control my Funcube Dongle Pro+ (FCD) using GQRX SDR on my Kubuntu PC. This software is working extremely well with the FCD and I’m happy with the level of functionality it offers.
GQRX SDR has the ability built in to control the SDR via remote TCP connection using RIGCTL protocol. Currently there isn’t a RIGCTL node available for Node Red so I have written a number of Javascript function nodes that provide the appropriate functionality in conjunction with a standard Node Red TCP node. This is working extremely well on the local LAN in the radio room and is proving to be very stable and responsive.
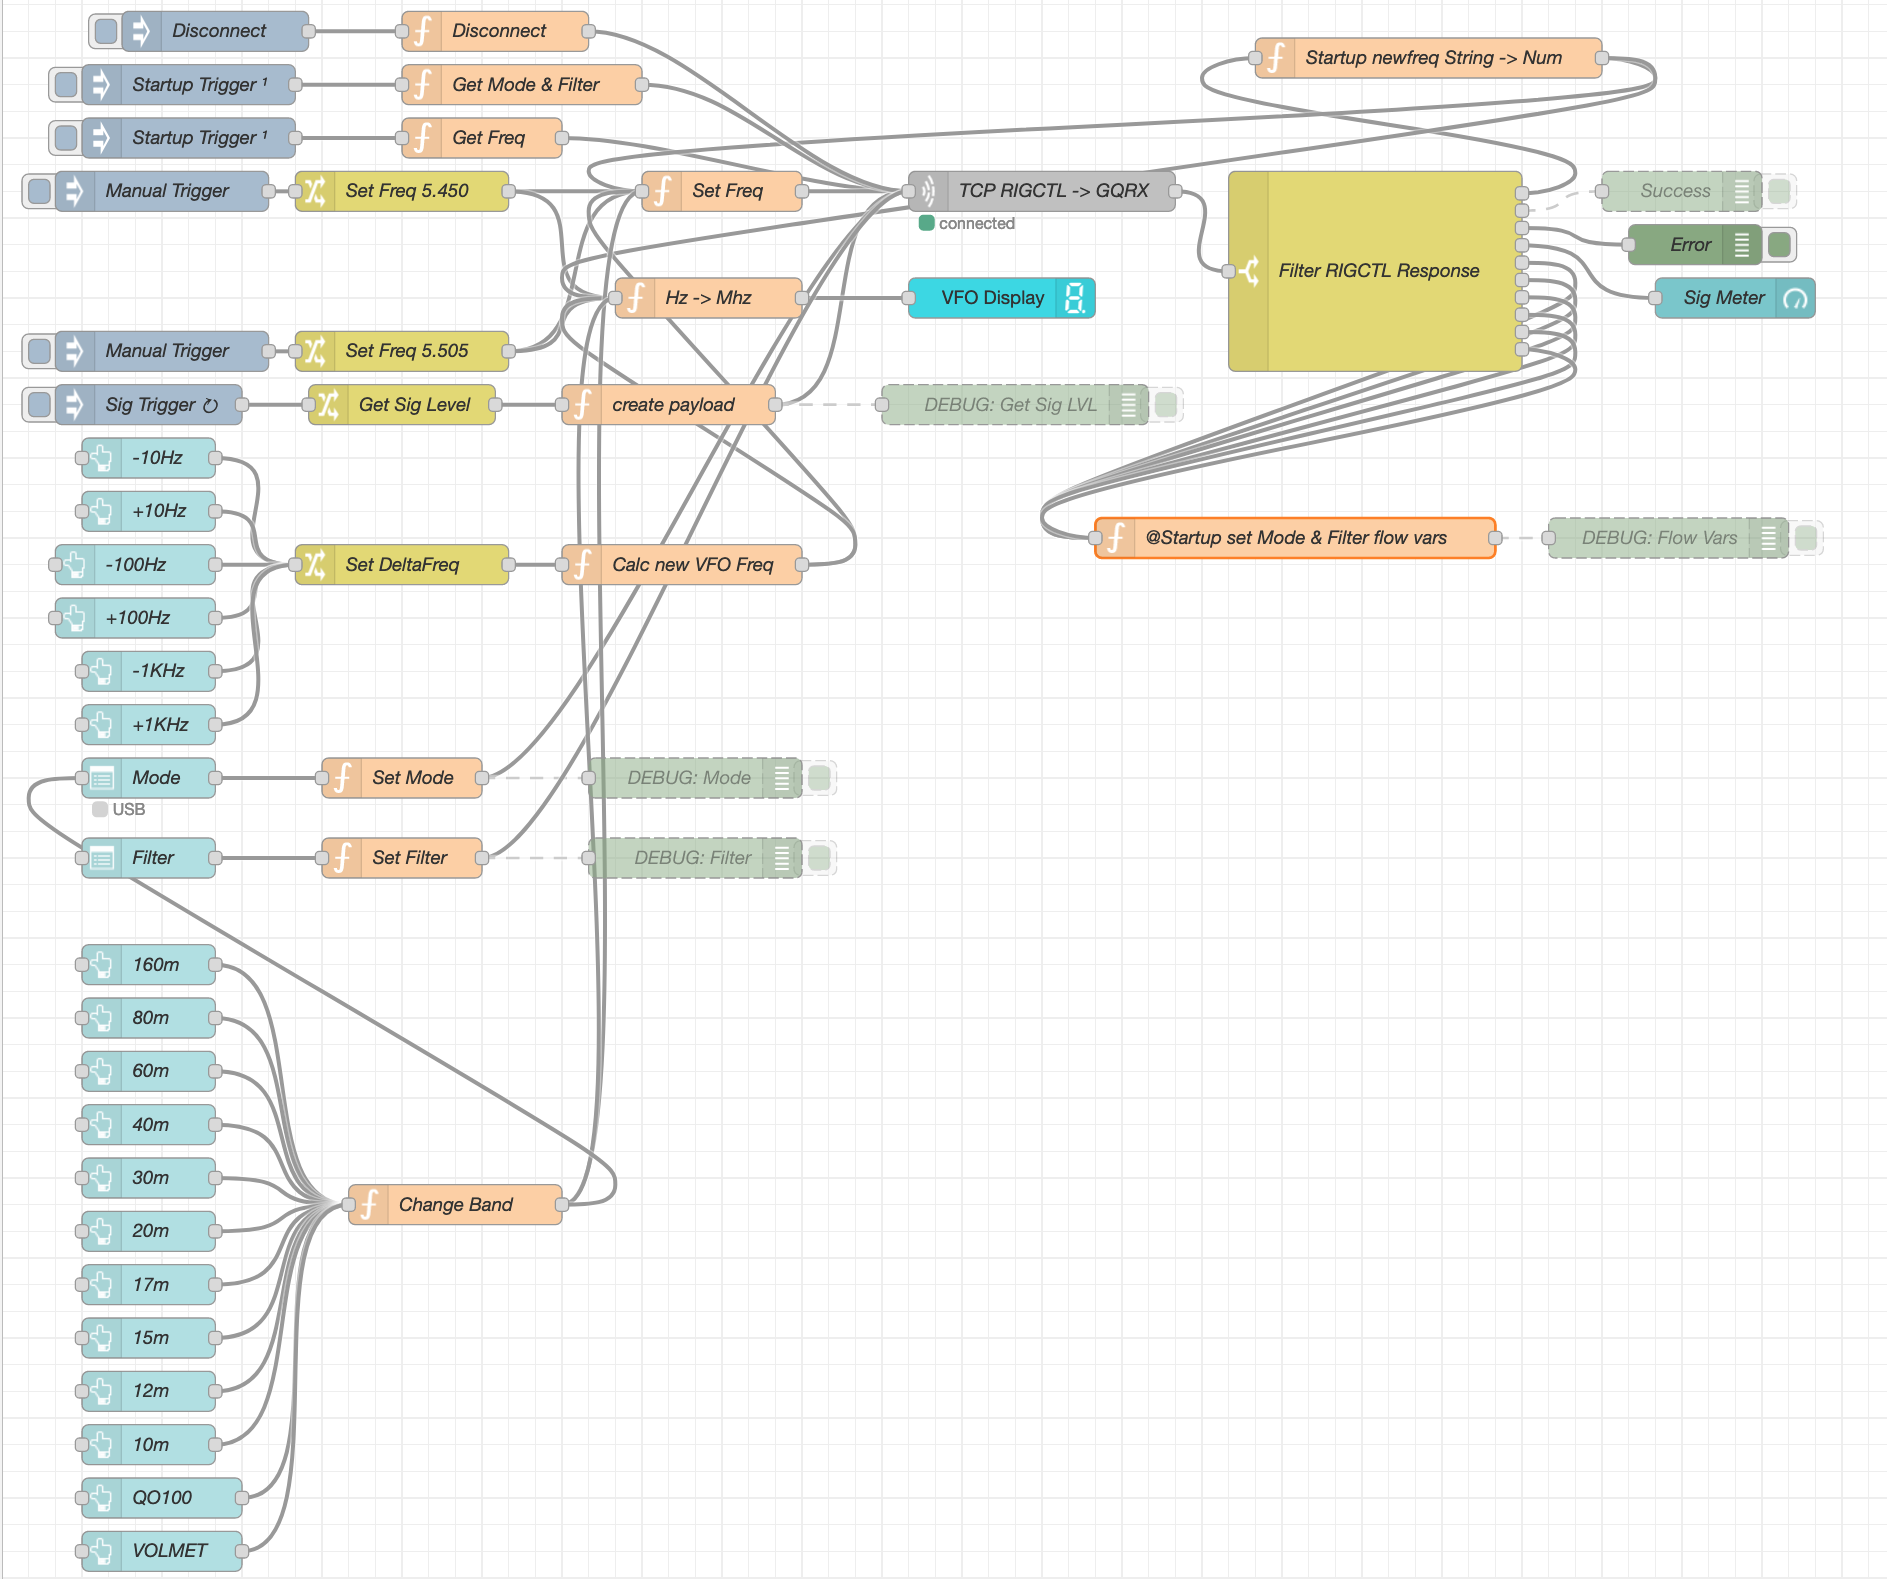
M0AWS QO-100 Node Red Flow – Receive Section
The flow for the receive section of the dashboard looks fairly complicated but, in reality it’s really not too difficult to get to grips with. The receive flow provides the facility to switch bands, switch modes, change receiver filter band width, display a realtime signal strength meter, receive +/- clarifier in 10/100/1000Hz increments and put the receiver into QO-100 mode where the SDR VFO is tuned to 739.550Mhz whilst the dashboard VFO shows the QO-100 downlink frequency in the 10Ghz band. This is all working very well and I’m happy with the initial result.
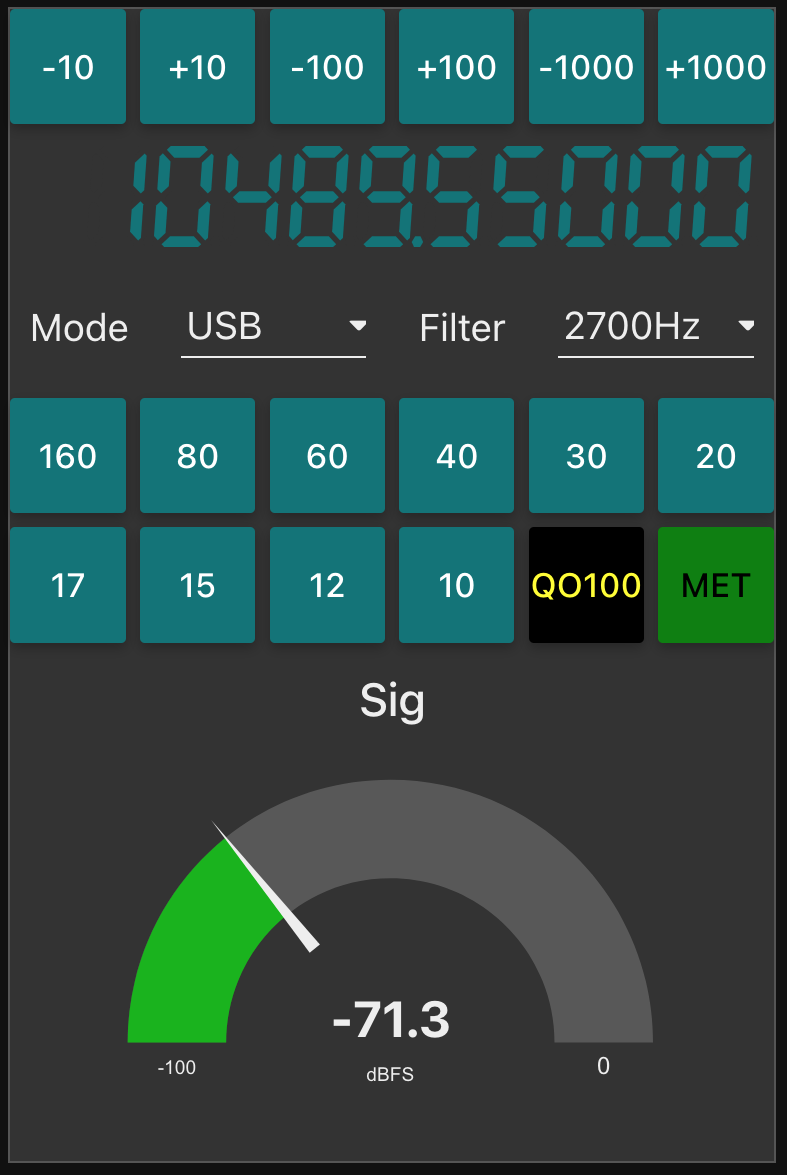
M0AWS QO-100 Receive Dashboard in QO-100 mode
I now need to start work on the transmit side of the QO-100 dashboard and get communications between my IC-705 transceiver and the FCD SDR working via Node Red. This could be a little more challenging as it will involve communicating with the IC-705 via WFView over wifi.
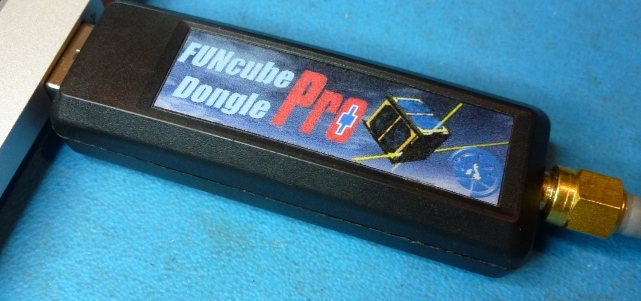
Many years ago I purchased a Funcube Dongle Pro+ (FCD) SDR. Since it’s arrival it has just been stored in my “Get round too it” drawer.
It’s been many years but, today is the day it comes out into the light and finally gets powered up.
Funcube Dongle Pro+ USB SDR
I’m hoping to be able to use the FCD as the receiver in my QO-100 satellite ground station setup.
The output from the 10Ghz dish mounted LNB is around 739Mhz, well within the FCD receiver range of 150khz to 2Ghz. This will save me from having to transvert from 739Mhz to 430Mhz (70cm band) on the receive path.
This will also give me full duplex operation as I will use my Icom IC-705 on the 2m band (144-146Mhz) to drive the 2.4Ghz transverter for the satellite uplink whilst listening to my own signal via the 10Ghz downlink fed into the FCD.
Before I can even start to build the QO-100 satellite ground station I need to get to grips with the FCD, get the software installed, configured, resolve audio routing via virtual audio cables and get it decoding FT8/JS8/WSPR etc.
Checking the Ubuntu repo’s I found that GQRX v2.12 is available for installation.
sudo apt install gqrx-sdr
Once installed I fired up GQRX and set about configuring it. Initially it appeared to have automatically detected and configured the FCD however, when I started the FCD the software ran for 5 seconds and then just hung.
Diving into the configuration settings I found that the FCD actually appears twice in the list of available devices and all I had to do was select the other one in the list and start the software again and all was well.
I connected my 20m Band EFHW Vertical antenna and trawled up and down the band. The receiver performed well even with fairly strong signals so, I spent some time listening to a few of the stations coming in from the USA.
Next I wanted to sort out the configuration for digital modes. I already have a couple of virtual audio cables in the form of loopback audio devices configured on my Kubuntu PC as this is how I connect the audio between WFView for the IC-705 and WSJT-X/JS8CALL.
Sadly, GQRX doesn’t recognise the loopback audio devices that already exist and so I had to do a little further research to get to the bottom of the issue.
Digging deeper I discovered that GQRX requires loopback audio devices created using Pulse Audio and not the kind I had already created at the O/S level. A quick read of the pactl man page and some further searching online I found all the info I needed to create the correct kind of loopback audio devices.
Two commands are required to create the pulse audio server audio loopback devices:
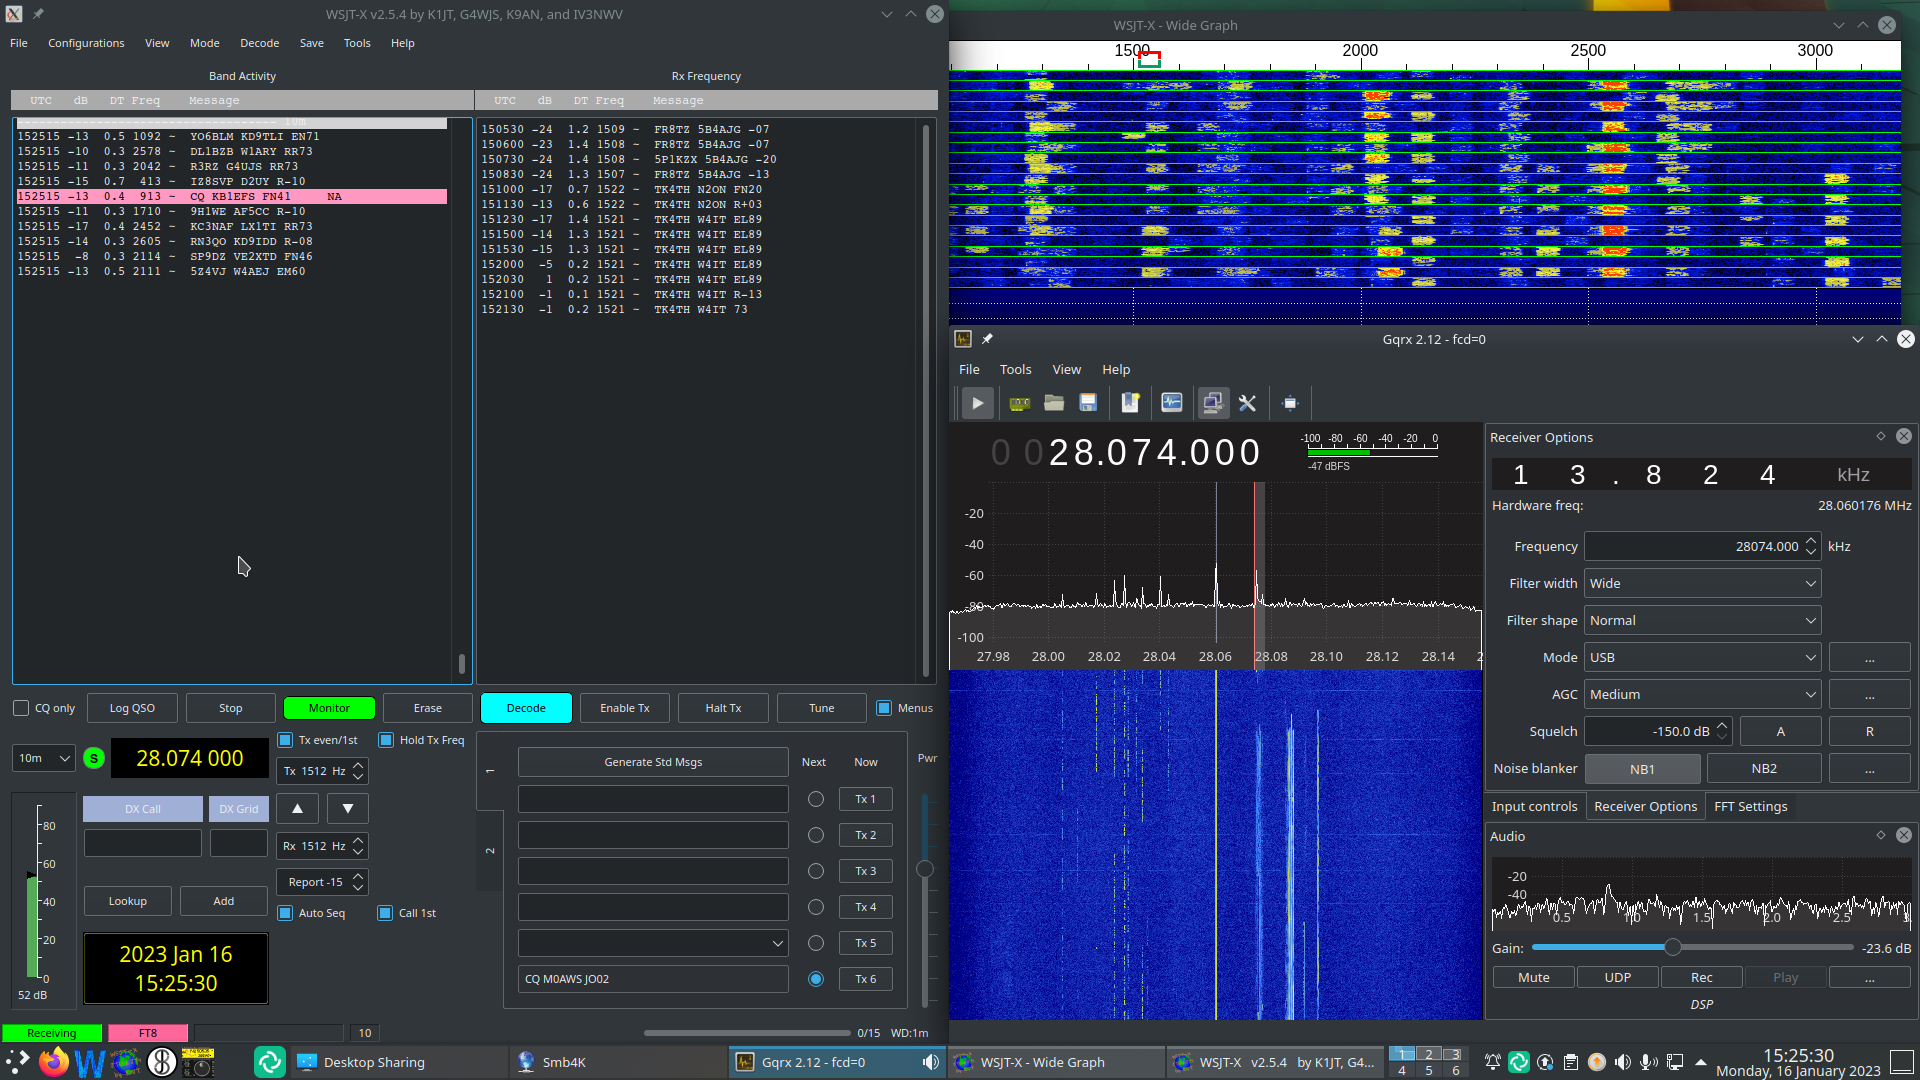
Once I’d created the loopback audio devices I was able to select the gq2jt devices in both GQRX and WSJT-X/JS8CALL so that the audio was routed correctly.
GQRX SDR and WSJT-X working with the Funcube Dongle Pro+
The overall solution works well and doesn’t put much load on the CPU of my Kubuntu PC, leaving plenty of horse power for me to do other things at the same time.
So I now have the Funcube Dongle Pro+ working perfectly on my Kubuntu PC, all I need now is a 1.2m dish, a 10Ghz LNB and some high quality coax cable.
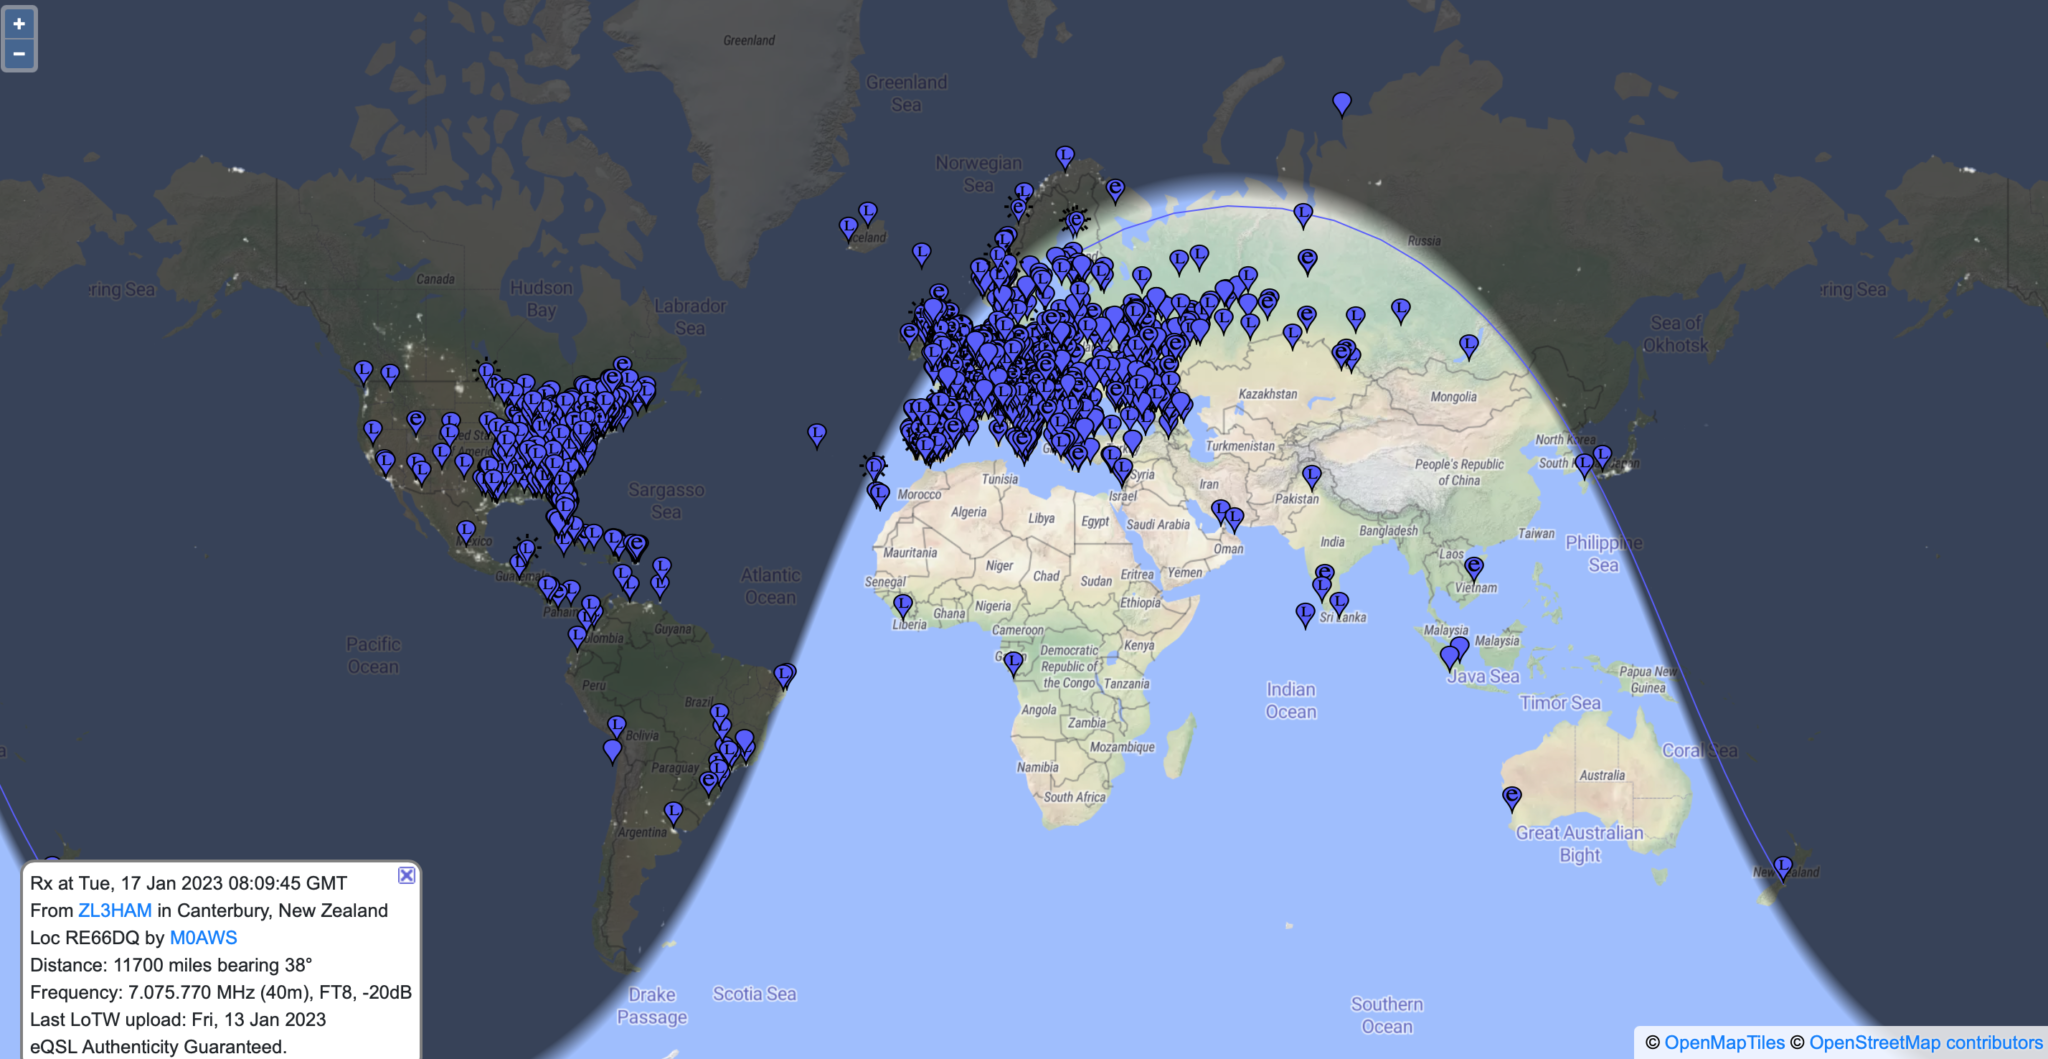
UPDATE: I decided to leave the FCD connected to the 20m Band EFHW Vertical overnight and monitor FT8 on the 40m band. The EFHW antenna isn’t anywhere near resonant on the 40m band and so I thought it would be interesting to see how well the FCD performed on a completely non-resonant antenna.
To my surprise it did exceptionally well, stations from all over the world were heard with ease, the FCD really is an excellent little SDR receiver.
Map showing stations heard on 40m Band FT8 over night 16/17 Jan 2023
If you’re looking for a relatively cheap but, effective receiver for FT8/WSPR monitoring then I can highly recommend the FCD. If paired with a RaspberryPi then it would be a really cheap to purchase/operate solution for any HAM operator or short wave listener (SWL).
I’ve been chasing the DX on the HF bands using FT8 for a while now and I have to say it’s been very successful however, it does get rather boring after a while just exchanging SNR reports and nothing else. I noticed that my time spent in the shack was getting less and less, not a good sign after all the work I’d put into building the new radio shack.
Since there’s not a lot of CW on the bands these days (everyone is on FT8) I thought I’d give JS8CALL a go.
Initially I started with trying to get JS8CALL working on my Kubuntu PC to my Icom IC-705 wirelessly. This turned out not to be as straight forward as I’d hoped but, I persevered.
I found that to communicate with the IC-705 via WFview wirelessly I needed to use FLRig as a go between. I installed FLRig from the Ubuntu repo’s only to find it’s an old version that doesn’t have support for the IC-705. Downloading the IC-705.xml file didn’t help either so I uninstalled it and headed to the source forge website to grab the source code for the latest version of FLRig.
Once I had the right development libraries installed compiling the code was easy enough and I soon had FLRig talking to the IC-705 via WFview wirelessly from my Kubuntu PC.
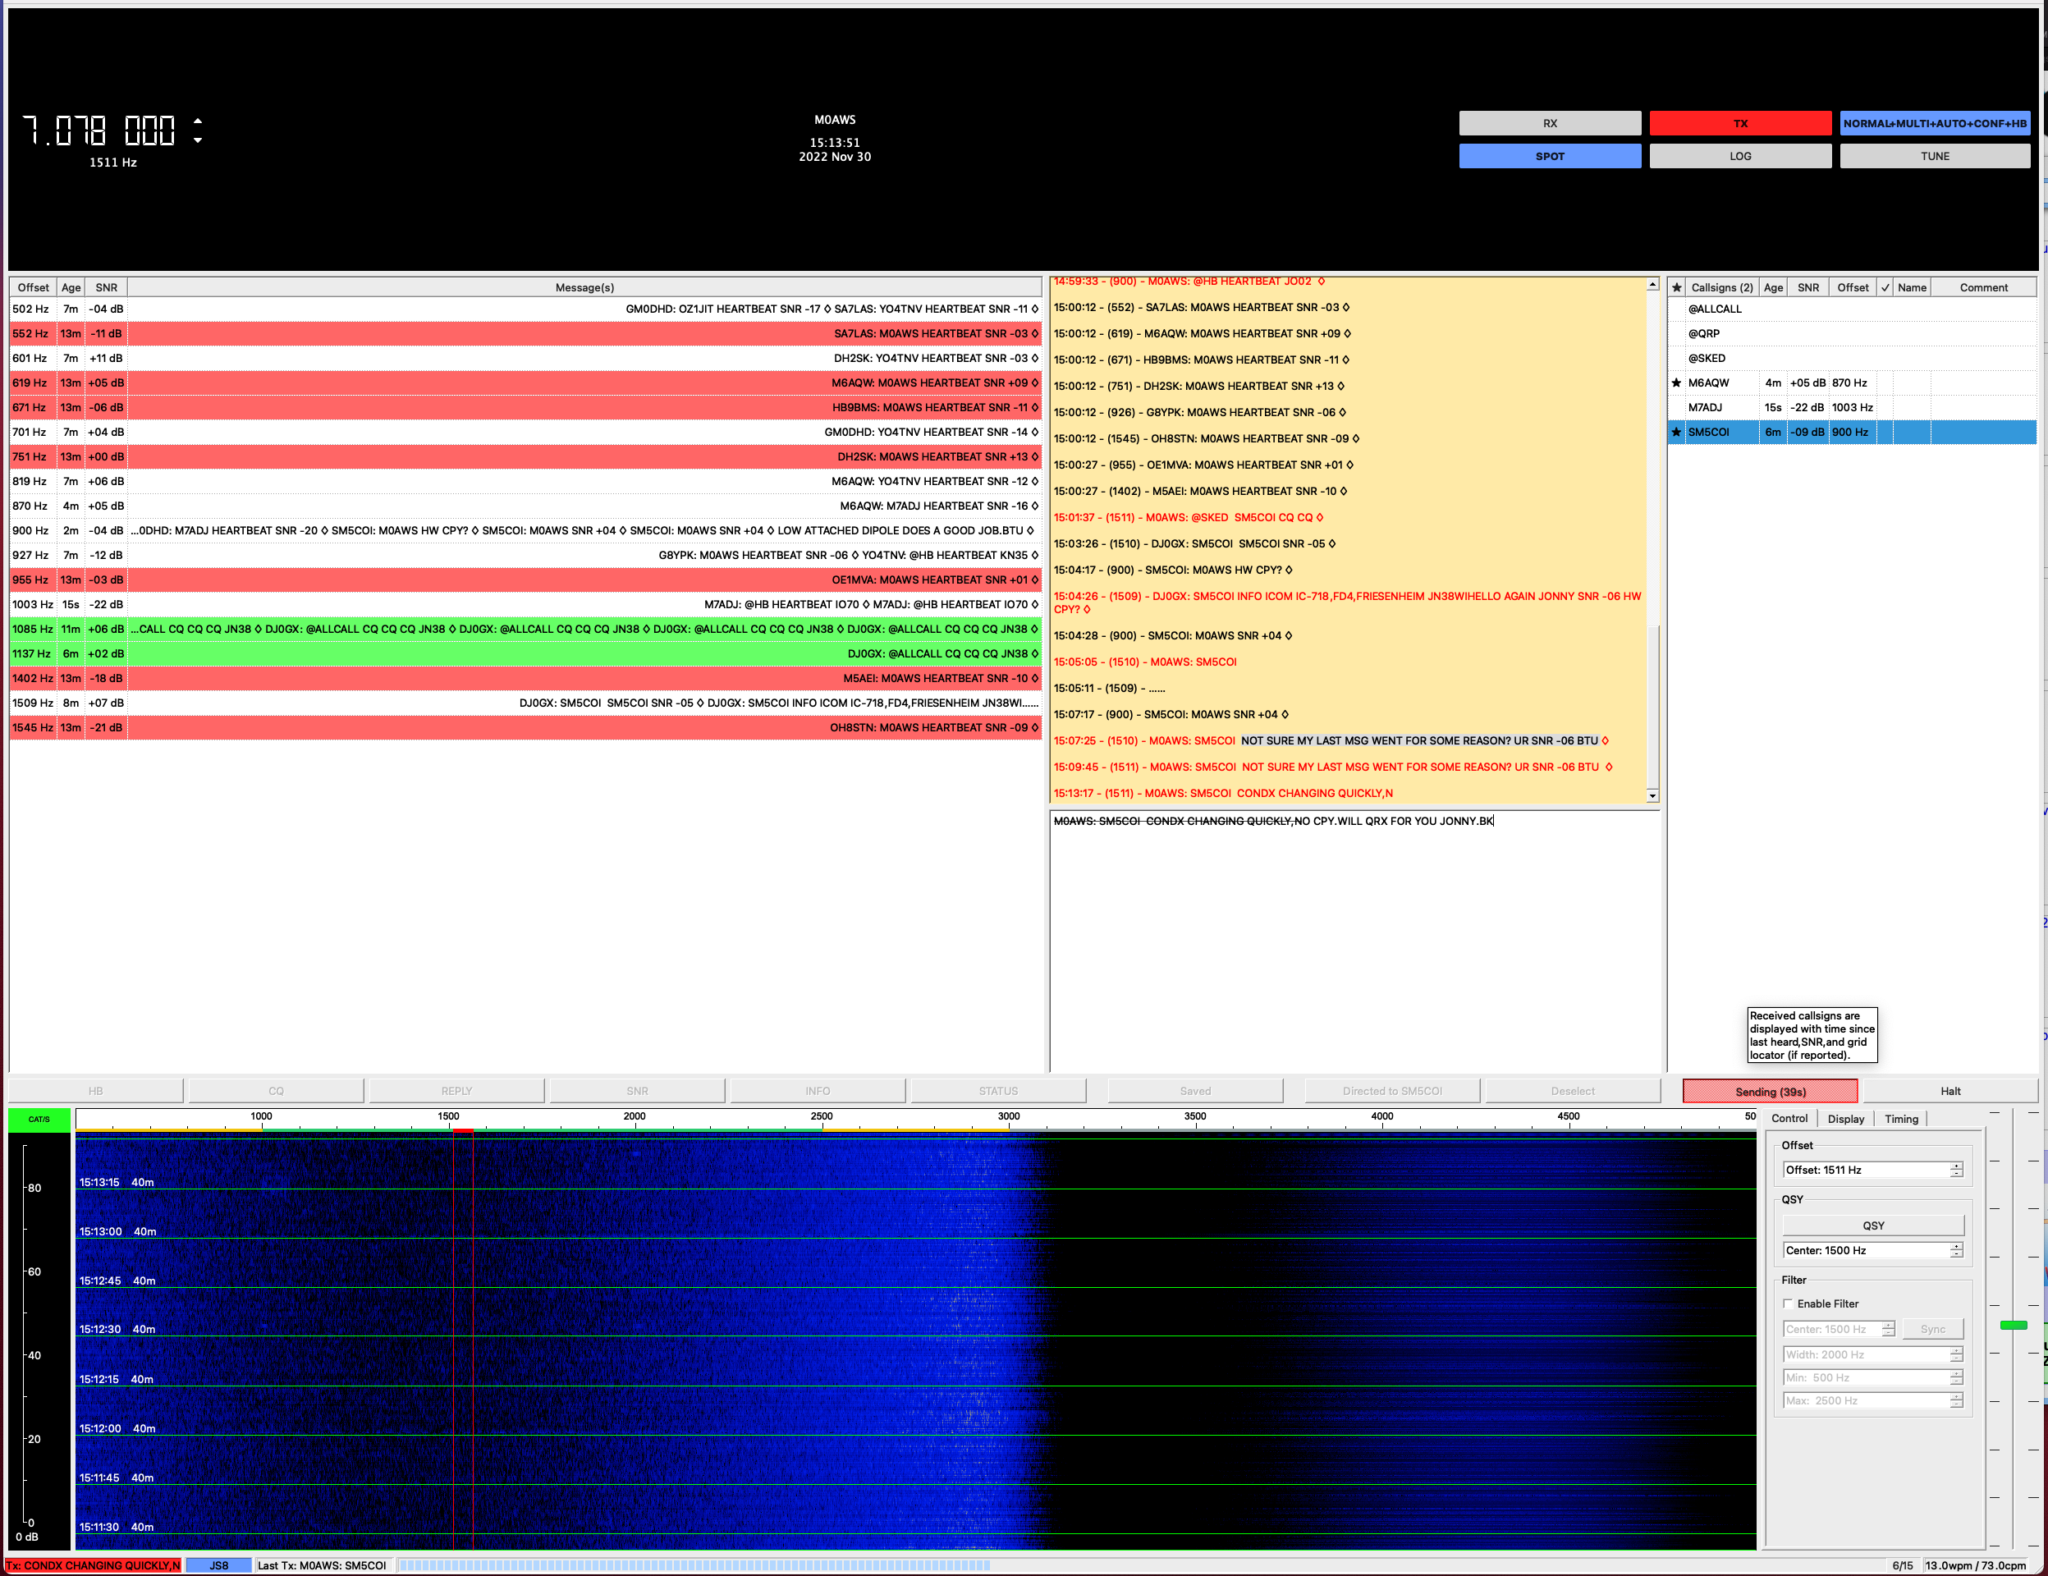
My first JS8 QSO was with Jonny, SM5COI in Sweden on the 20m band, using just 2.5w I had a very reliable link from my 20m band EFHW vertical antenna to his 20m band yagi antenna.
I also worked GM0DHD/P via OH8XAT using the relay capability built into JS8CALL, it works incredibly well and allows you to work the stations that you cannot hear directly, very useful!
Later in the morning Jonny, SM5COI emailed me asking for a sked on the 40m band later in the afternoon, of course I agreed and decided that I’d also get my MacBook Pro setup with JS8CALL so I could give my Yaesu FTDX10 a spin on JS8 mode.
Installing and configuring JS8CALL on my MacBook Pro was much easier and I had it fully operational in minutes.
The sked went well on 40m and it was good to get Jonny on another band.
With 3 JS8 QSOs in the log it’s great to be using a digital mode again that allows you to have a good chat with other radio HAMs around the world. I think this may become my preferred digital mode going forward.
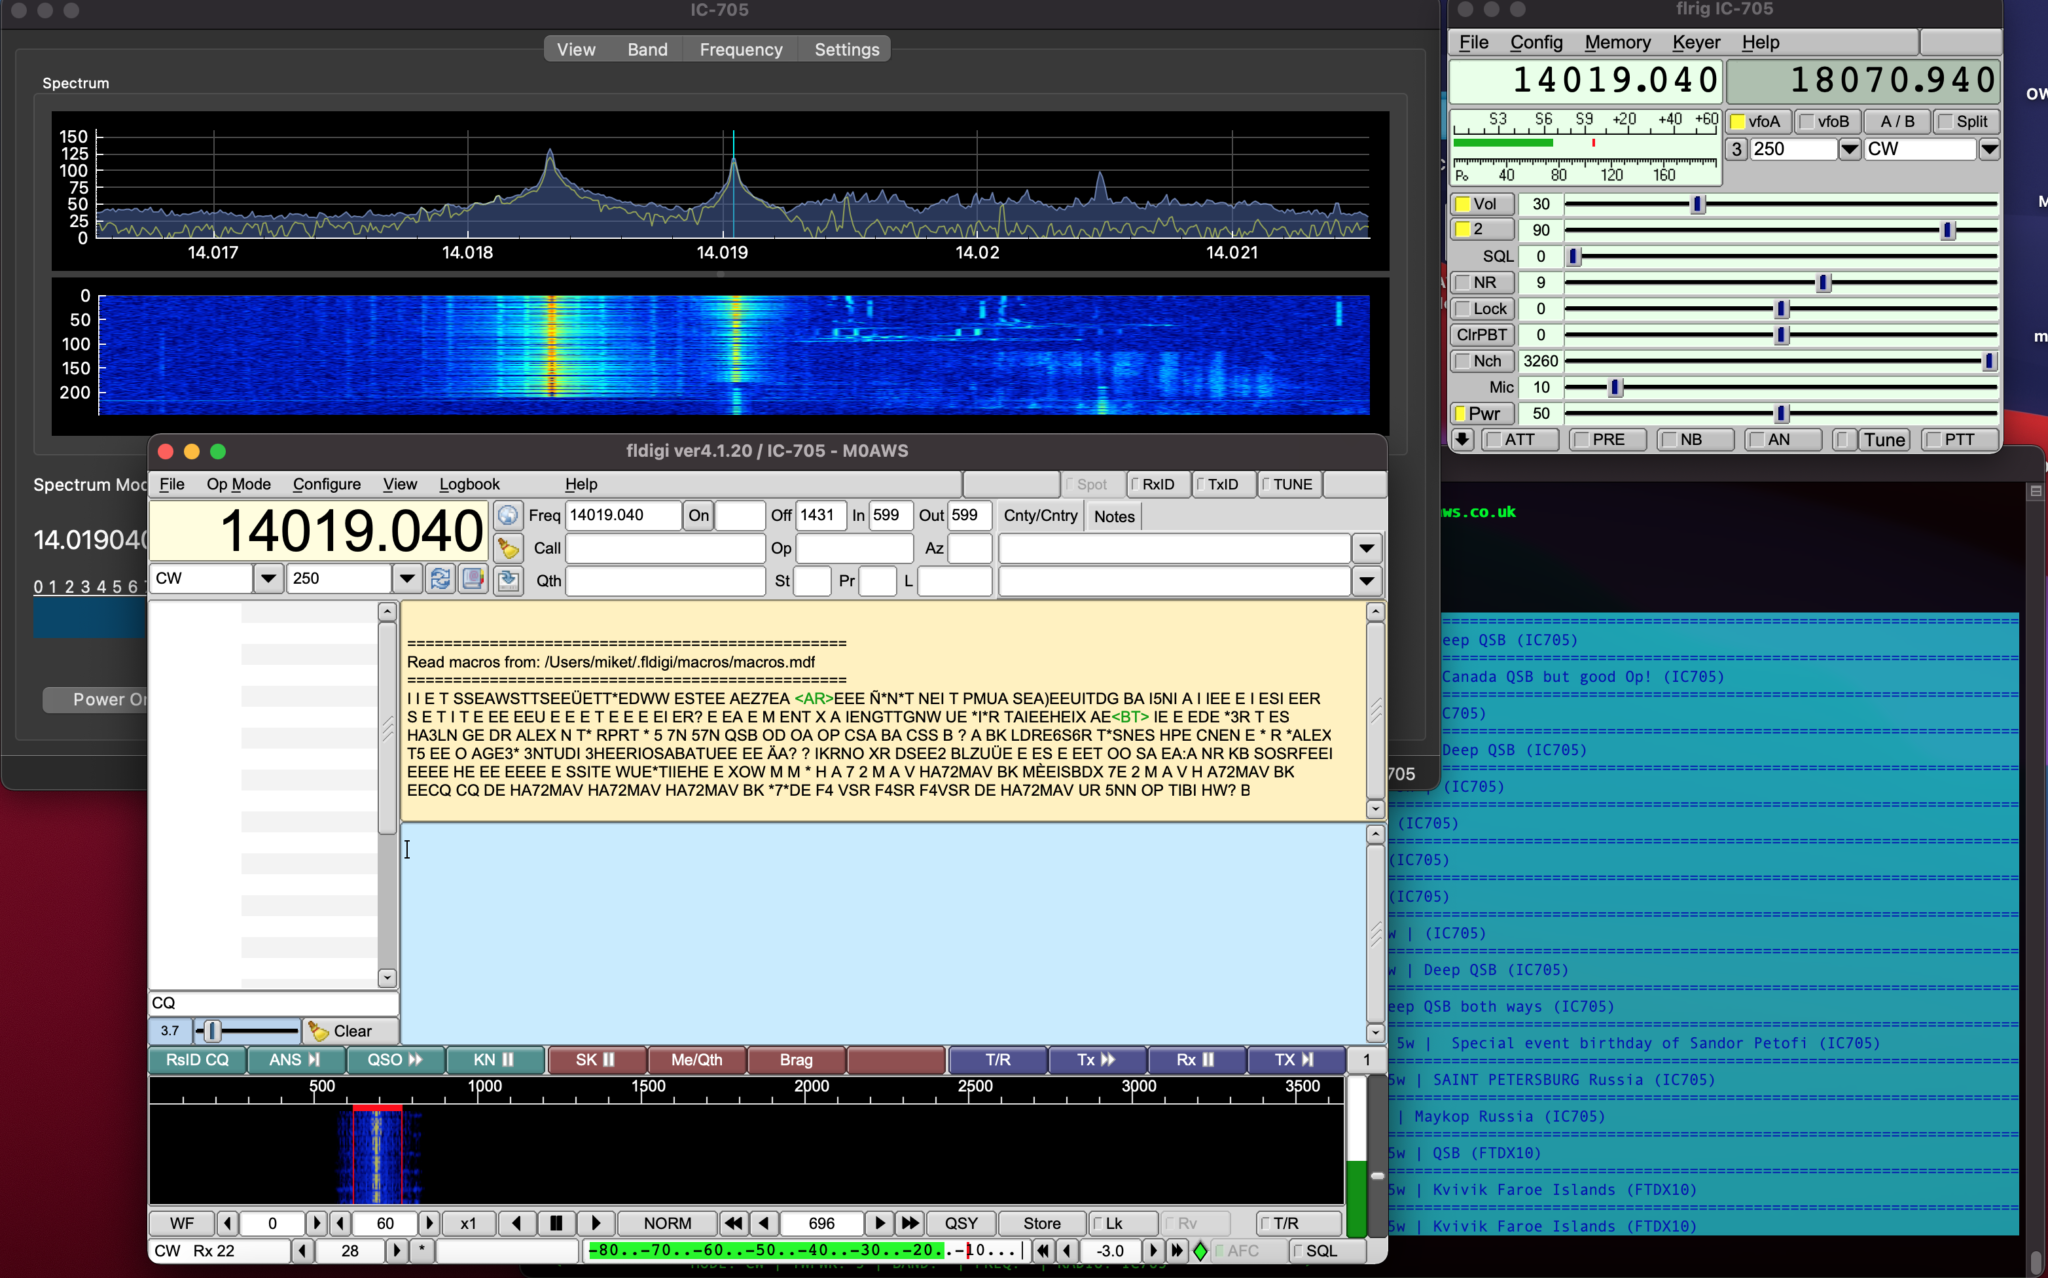
Screenshot showing WFView, FLRig and FLDigi all working wirelessly with my IC-705
In my “IC-705 Going Wireless with Apple Mac Computers” article I came across an issue whereby I couldn’t enter the correct path into FLRig to get the application to talk to WFView for CAT control of the IC-705 radio. I’m glad to say that I have now resolved this issue and detail it below.
Upon further inspection it appears that WFView uses a different /dev/ttys00x port each time it is started. It seems to round robin on ports 001 to 006. It’s quite clever in that it doesn’t actually directly use the port, each time the WFView app is started it creates a softlink to the next port after the one it last used.
The softlink is created with the same name each time the app is started but, it just points to the next /dev/ttys00x port available.
In my WFView setup I selected the first virtual serial port in the drop down list and so this soft link (AKA Symbolic link) gets created each time the WFView app is started.
Above soft link used by WFView (Replace “username” with your username)
The problem with FLRig is that it won’t allow you to type in this path to the serial port field, it only has a drop down list that doesn’t include this path.
The way around this is to edit the settings file IC-705.prefs in the .flrig folder in your home directory and manually enter the path to the correct field.
In the file there is an entry that starts with xcvr_serial_port: you just need to add the long path from WFView after the colon on the same line as shown below.
NOTE: Change username to your username as shown in the virtual serial port field in the WFView settings tab.
Once you’ve edited the file, save and close it and then start WFView and let it connect to the IC705 and then start FLRig. You’ll find it now connects to WFView directly and gains CAT control of the radio without issue.
You shouldn’t need to ever edit the IC-705.prefs file again as the settings are stored permanently. It should just work each time you start the FLRig app.
To get the frequency display on FLDigi just go into settings and switch on the FLRig CAT control, it will get all the data from FLRig and present it as shown in the screenshot above.
Since getting my Icom IC-705 I’ve had problems with computer noise causing interference when connected via USB. I solved the problem mostly by winding both the USB and coax cables around 240-31 ferrite toroids. This resolved the problem nicely on all HF bands except 10m. With further investigation I realised that the 240-31 ferrite toroid doesn’t provide much choking resistance at 28mhz and so a 240-43 would be better for the higher bands. This would mean I’d need a longer USB cable and coax to the AH-705 so that there was enough cable to wind around two ferrite toroids to cover all the HF bands.
Whilst this will almost certainly provide a complete solution to the problem there is of course another way around this issue. The IC-705 is a rare beast in that it has wifi capability built in. The wifi on the IC-705 is capable of operating in one of two different modes, Access Point (AP) and Station, a host on an existing wifi network.
Since I connected my IC-705 to my in-shack wifi I am using the radio in station mode for connectivity via wifi. By connecting it this way my MacBook Pro will also have access to the internet at the same time as connecting to the radio giving me the best of both worlds.
You can of course put the radio into AP mode and connect your computer directly to it via wifi however, you won’t have any internet access from the computer as it will be connected directly to the radio. This is how it will be used when in the field for portable operations unless you have a portable 3/4/5g wifi router.
Getting the radio connected to my shack wifi was easy, just go into the IC-705 menus, switch the WLAN on, pick the SSID of my wifi router and enter the password, the radio connects immediately. You will also need to switch on the network control option and also set up a user and password that is used when connecting to the radio from your computer. Refer to the IC-705 manual on how to do this if you haven’t done it already.
To be able to use the radio wirelessly from any Apple Mac computer you will need 2 applications, WFview and Blackhole. Both of these applications are Opensource Software, I’m a huge fan of Opensource Software and have over the years been involved in a number of opensource projects.
I’m fully aware that there is an application called SDR Control available on the Apple App Store for around £90.00 that can be used instead to connect to the IC-705 wirelessly however, I prefer to use Opensource software where possible.
Before proceeding with the instructions below make sure you have an up to date backup of your system. This installation and configuration shouldn’t cause any issues at all, it worked fine on my MacBook Pro but, it’s always best to backup before you install more complex software like this.
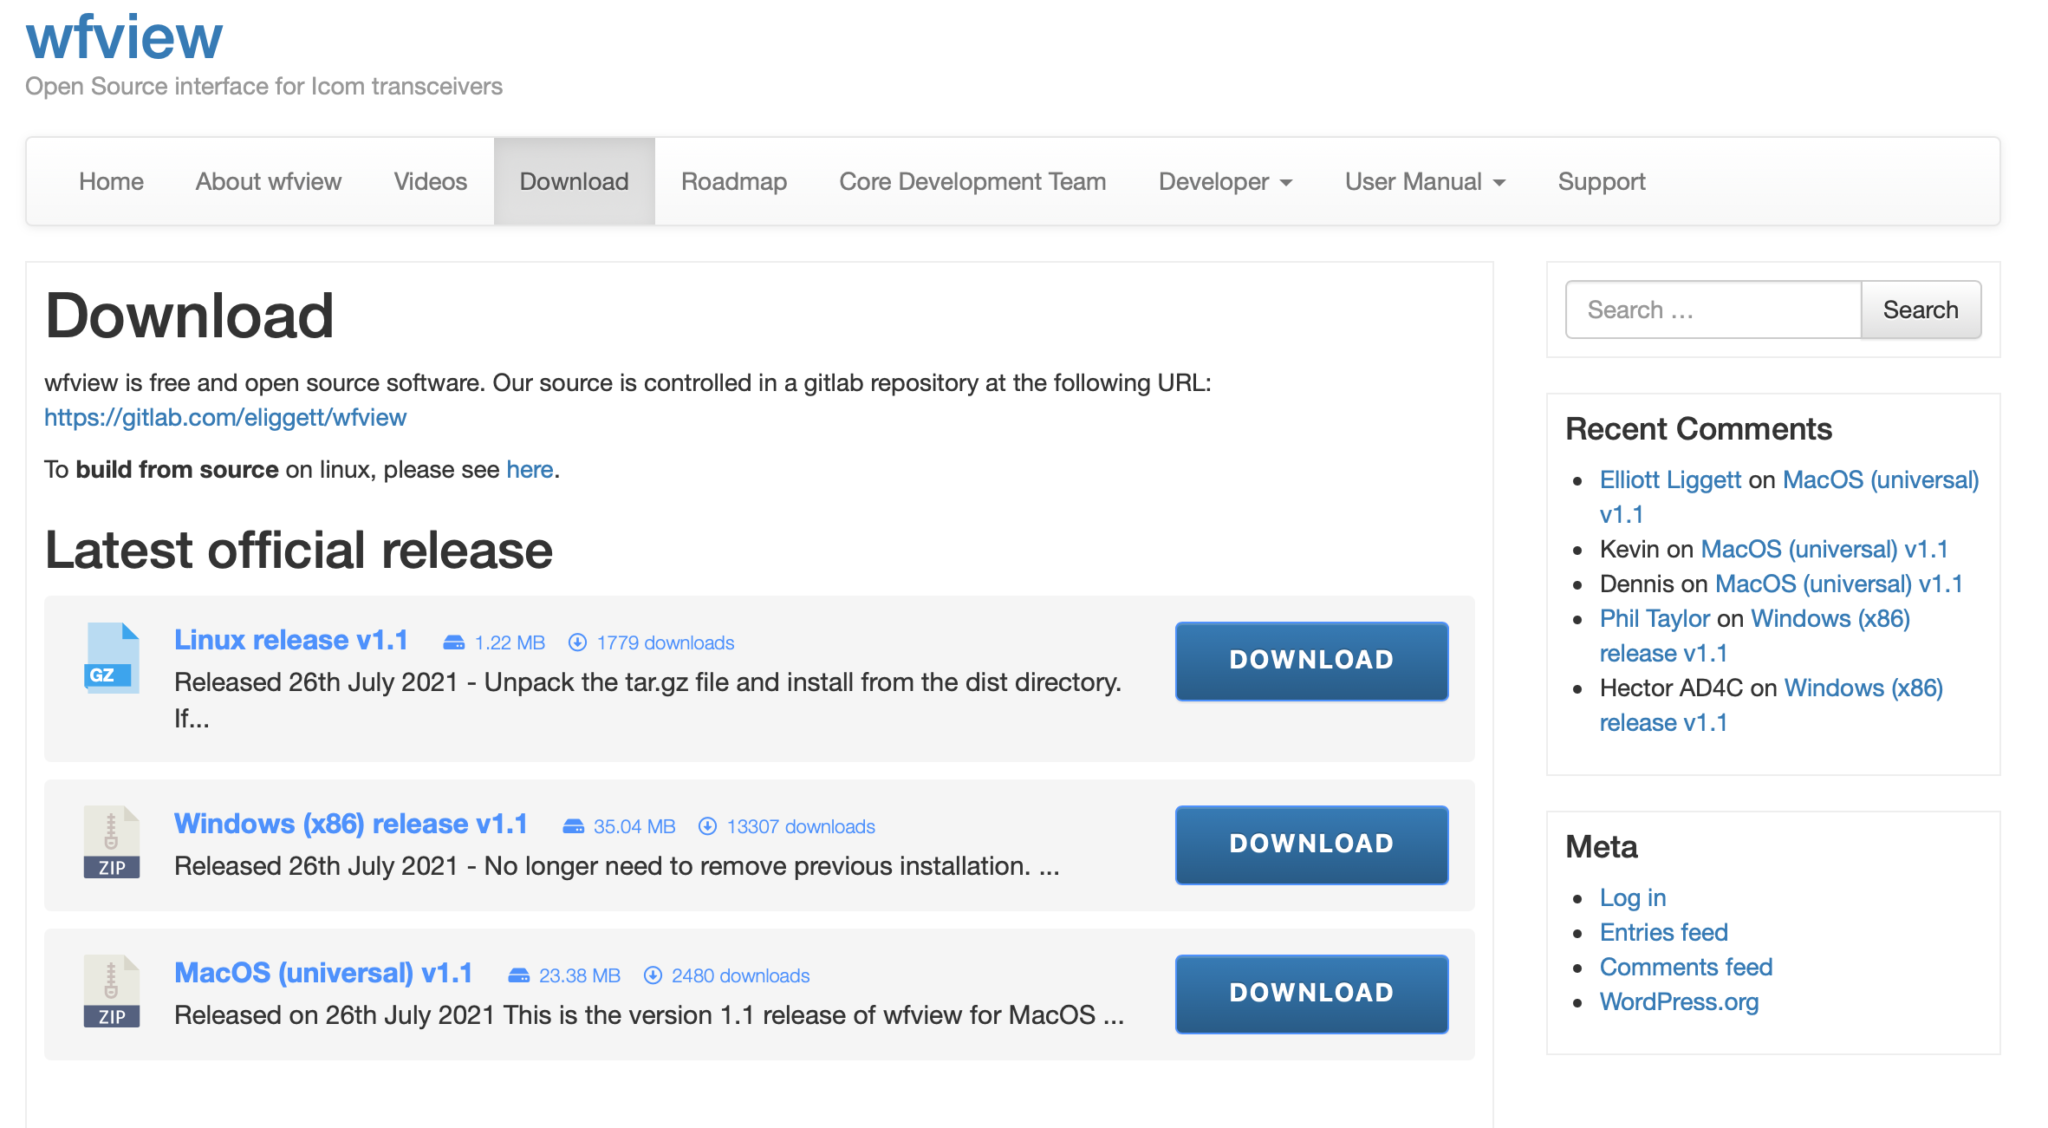
First you need to download WFView from the Download page, make sure to download the MacOS Universal package which was v1.1 at the time writing this article. Do **not** install WFView yet, the sequence of installation is important!
WFView Download page showing the MacOS (Universal) Package v1.1
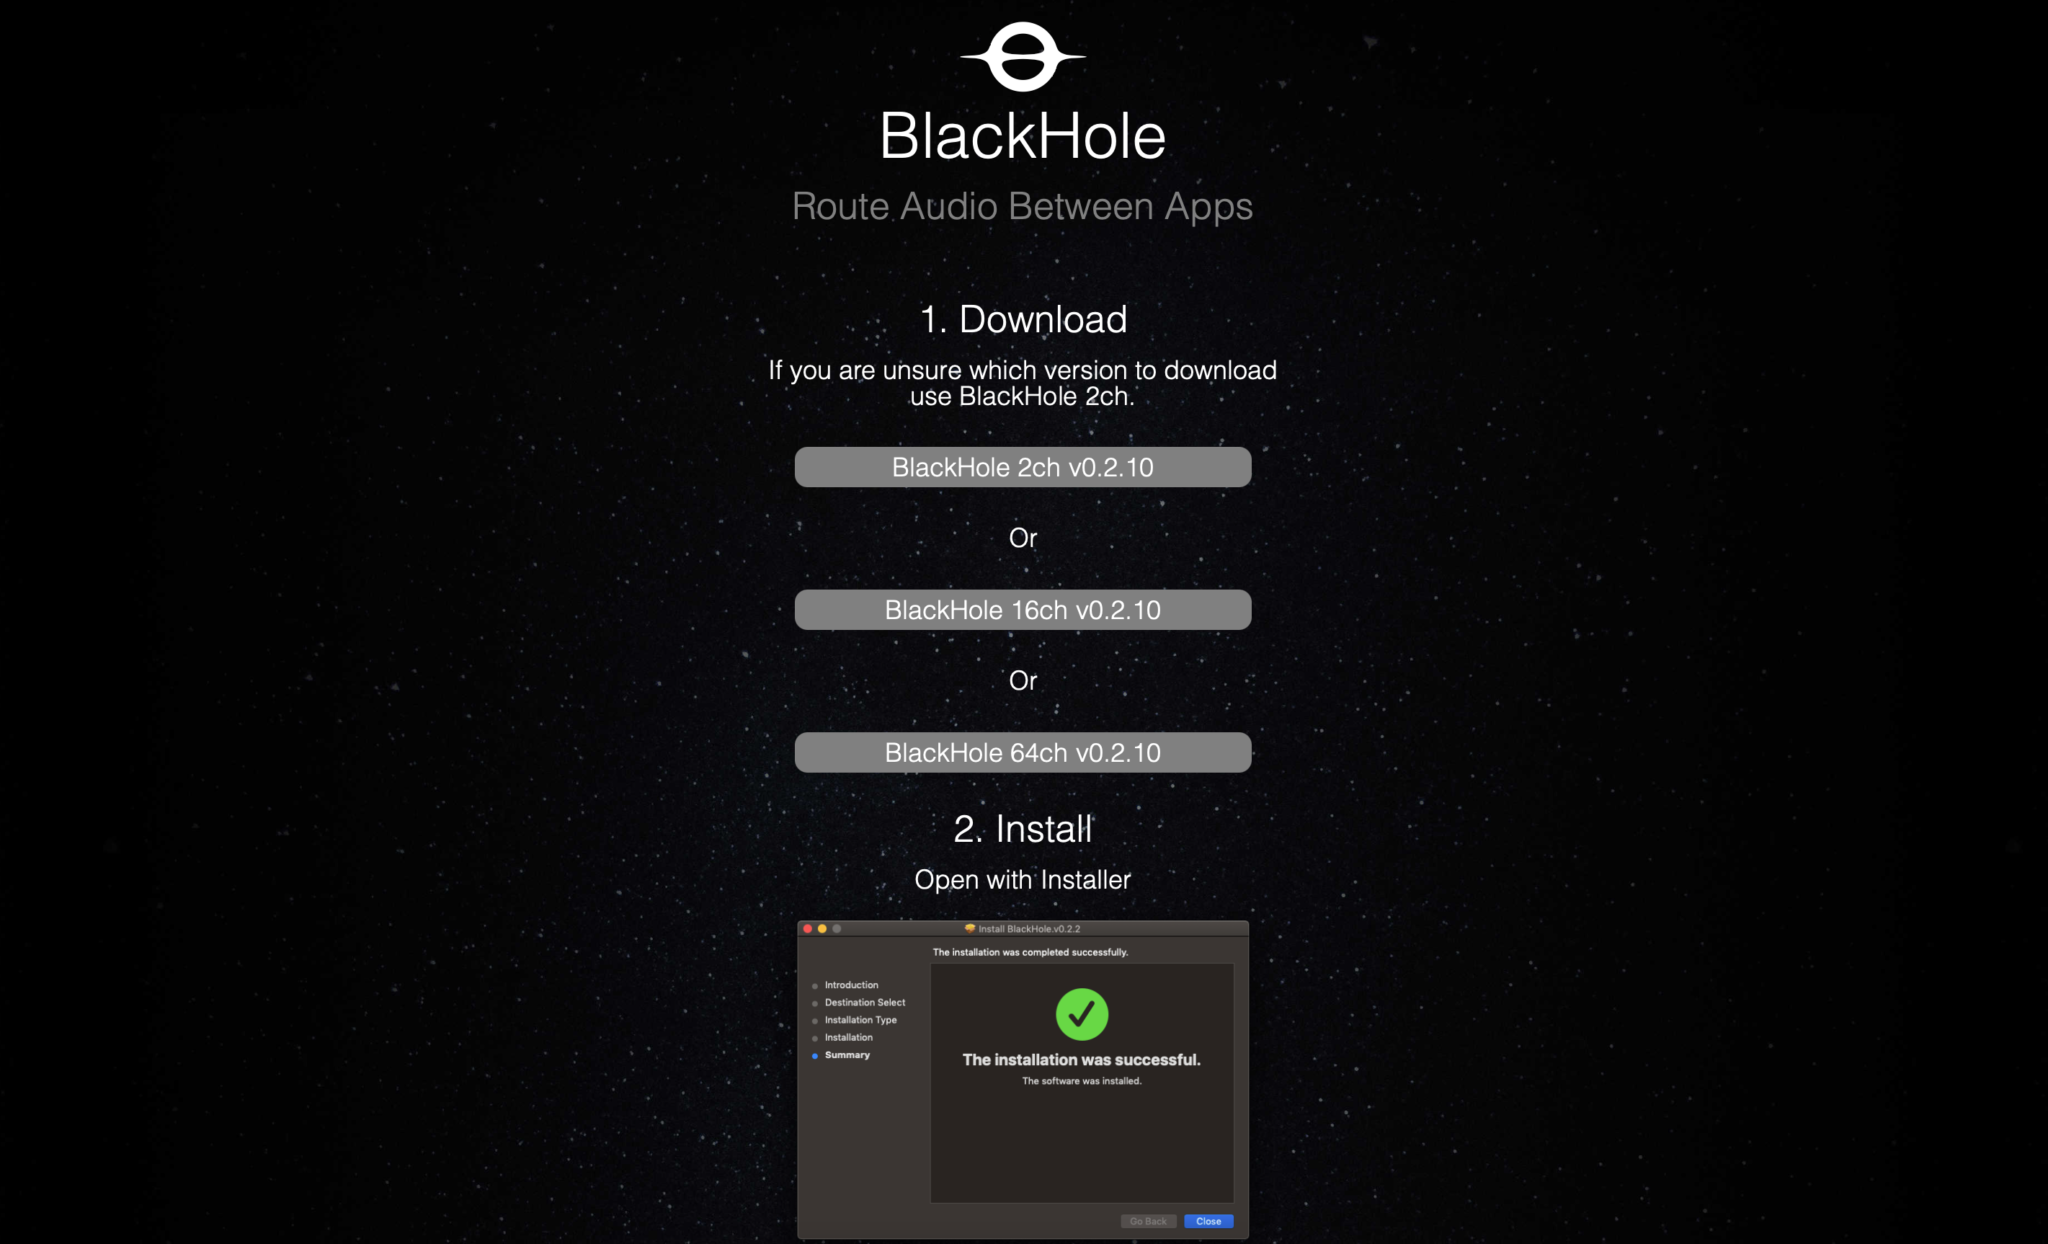
Next download the Blackhole Virtual Audio Cable application from the download page. You will need to enter an email address and your name to be able to download the application. It’s not clear how much email/spam will be sent to you but, you will need to get at least one email to obtain the download link with the authorisation code in it.
Once you’ve entered the information and submitted it you will get an email with a URL enclosed, click the URL and goto the download page. On the page there are 3 options available for download, select the “Blackhole 2 Ch” option only. At the time of writing this v0.2.10 was the current version available.
Blackhole Download page showing the 3 options available
Once downloaded you need to install the Blackhole application first as it will create the necessary virtual audio cable for WFView to use to provide sound to WSJT-X and other digital mode applications. Installation is simple and follows the normal MacOS installation process. Double click the installation package and follow the prompts accordingly.
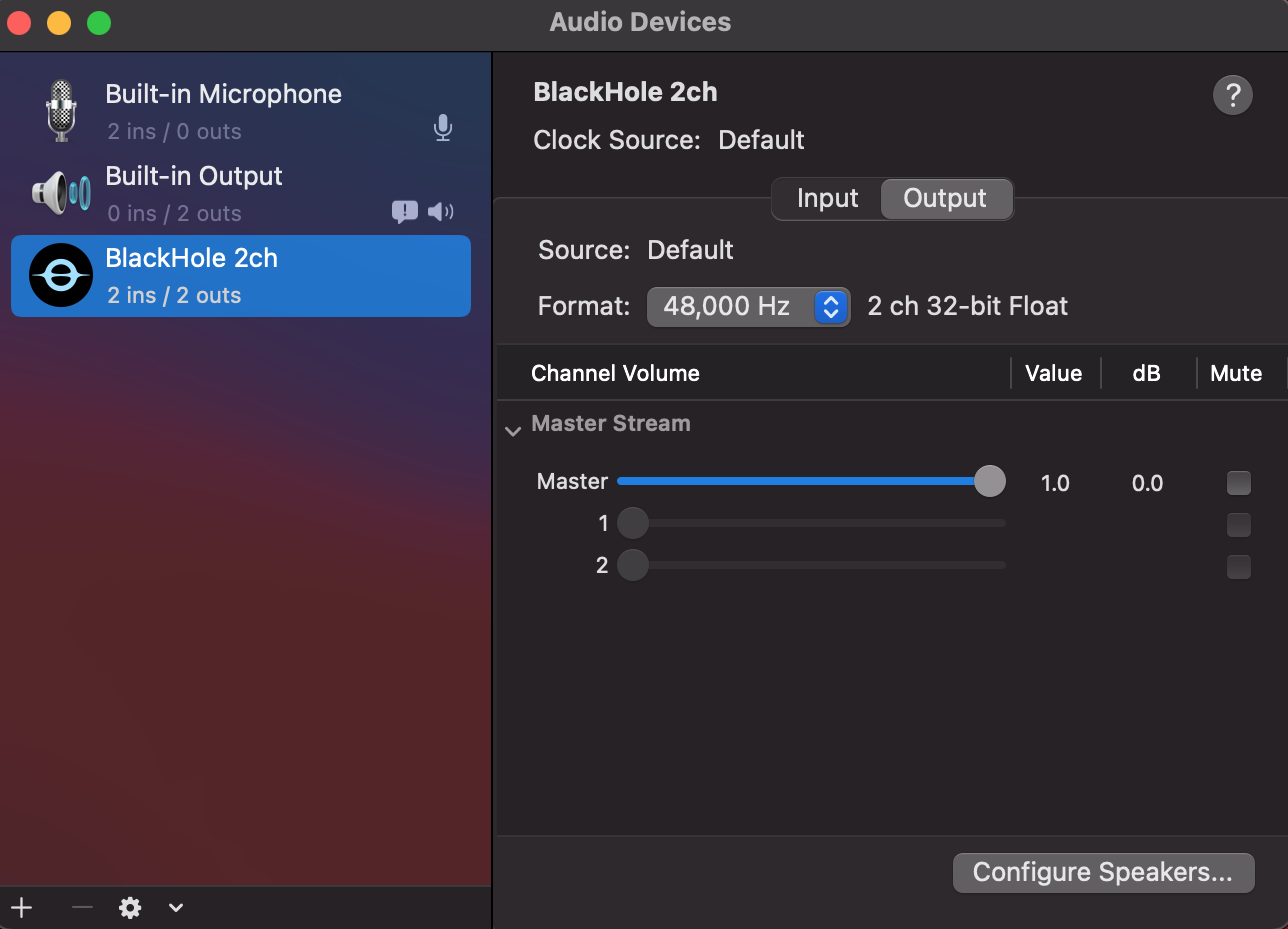
Once installed reboot your Apple computer to make sure it starts up OK with the new kernel module installed. When your system comes back up, login and open the “Audio Midi Setup” application. (The Midi app is in Applications >> Utilities)
Once the application opens you should see that you have a new audio device called “Blackhole 2ch”. On both the Input and Output tabs set the format to 48,000Hz. This setting will get the best results when using applications like WSJT-X for FT4/8 digital modes.
Apple Audio Midi Setup showing 48,000Hz selected
Leave everything else as default setting in the Audio Midi App, nothing else needs changing. Leave the Master volume at the default max as levels are controlled from the other apps.
Once you’ve set the 48,000Hz on the two tabs quit the audio midi app as it’s no longer required.
Next you need to copy the WFView app that you downloaded into the Applications folder on your Mac. Once in the applications folder you can create a shortcut to it on the dock by dragging and dropping the app icon onto your dock bar.
Next goto your IC-705 and go into the WLAN settings and make a note of the IP Address assigned to the radio from your wifi router. You will need this IP Address later.
At this point you are half way to having wireless control of your IC-705.
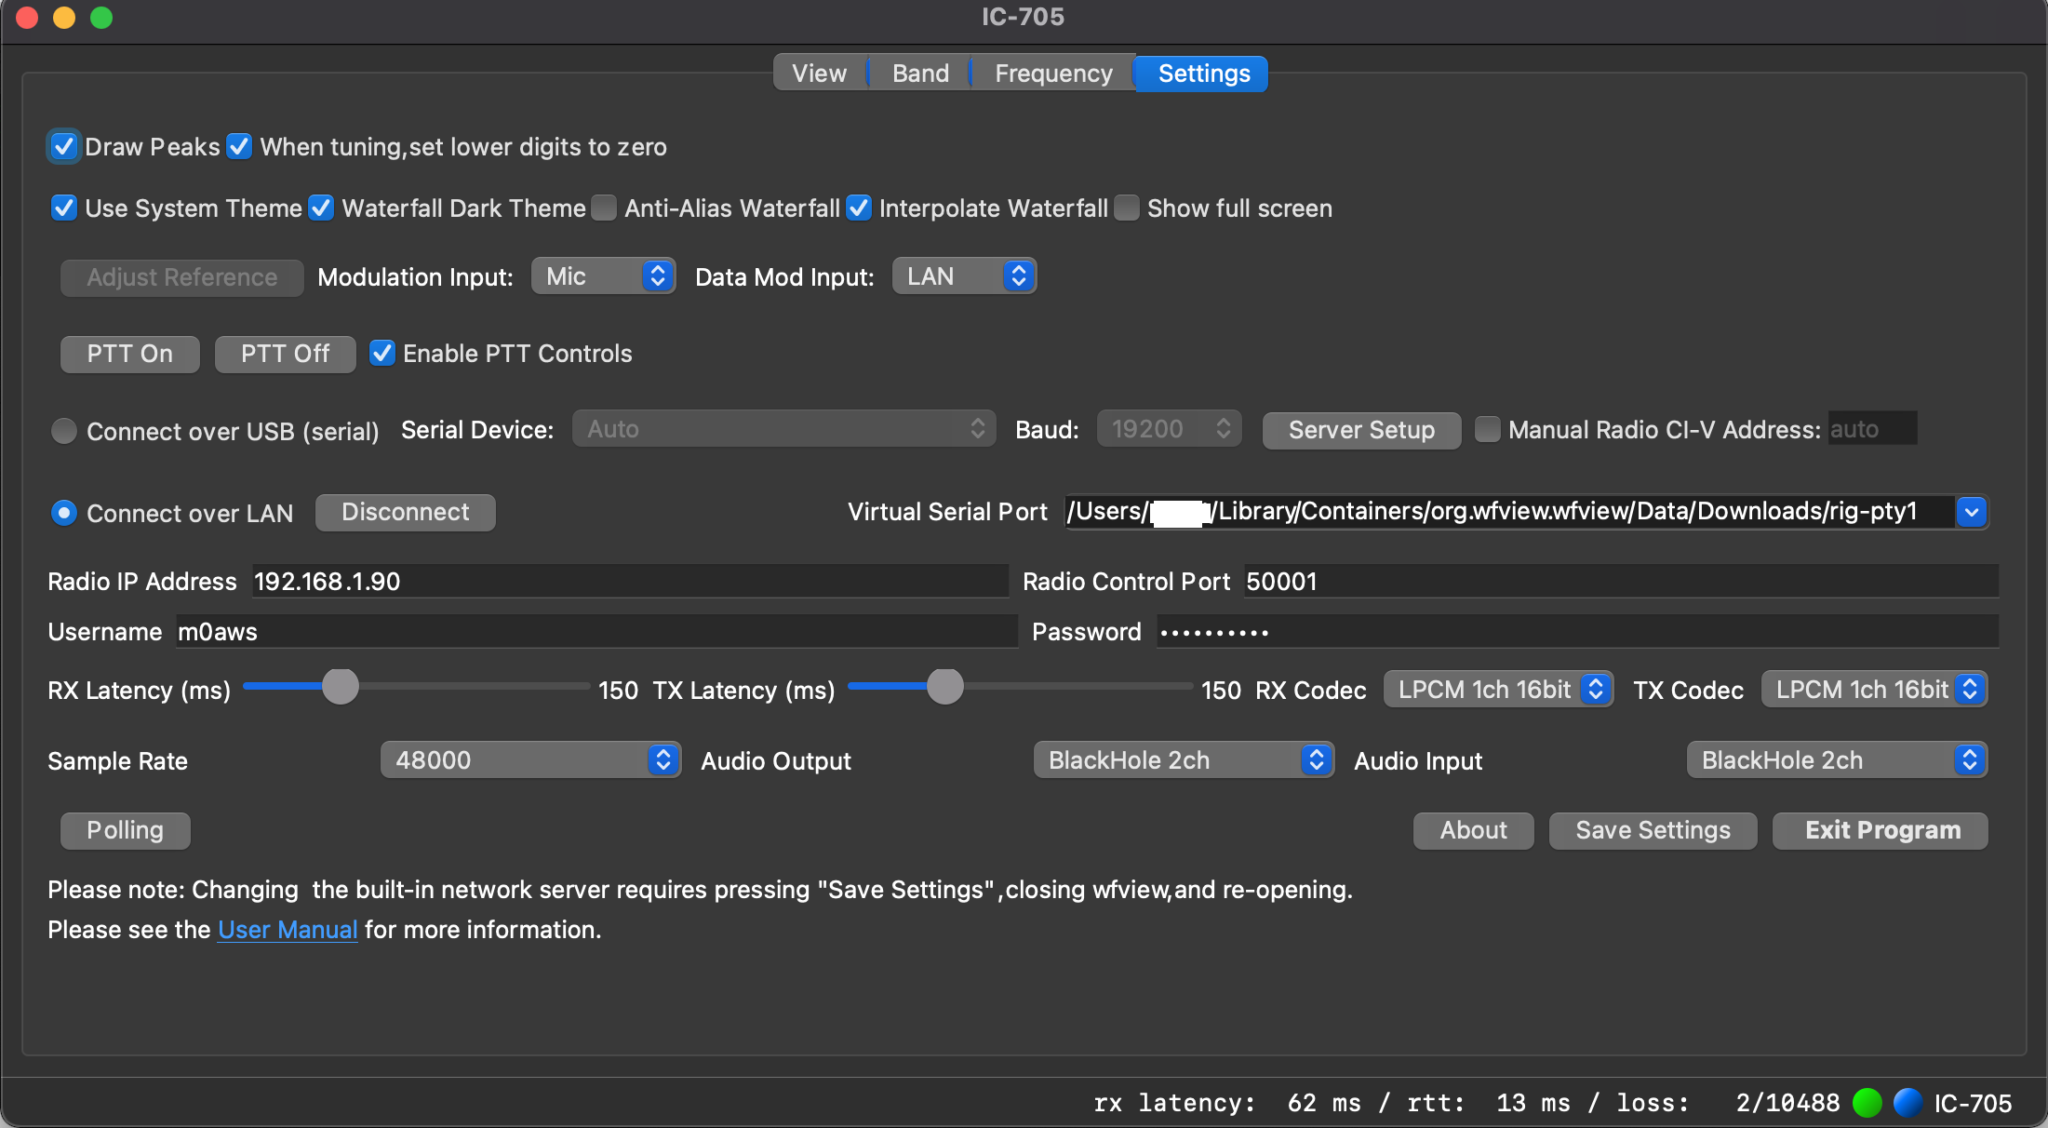
Start the WFView application and goto the settings tab.
The following settings need to be made:
1: Set Data Mod Input to LAN
2: Click the Connect Over LAN radio button.
3:Enter the IP Address from your IC-705 into the Radio IP Address field.
4: Make sure Radio Control Port is set to 50001
5: Enter the Username you configured on your IC-705 into the Username field
6: Enter the Password you configured on your IC-705 into the Password Field
7: Set Sample Rate to 48000
8:Set Audio Output and Input fields to BlackHole 2ch
9: Select the first option available in the Virtual Serial Port field. This should be as shown below:
Leave all other settings as default and click Save Settings and then Exit Program.
You must exit the application in order to restart it with all the new settings.
WFView Settings tab showing all the necessary settings whilst connected to the radio
Start the WFView application again and goto the Settings tab. Click on the Connect Button.
Once it has connected to the radio you will see the RX Latency details etc on the bottom right of the window. Click on the View tab and you should now have an active waterfall.
At this point you have full control of your IC-705 wirelessly. Have a play with the application and get familiar with it.
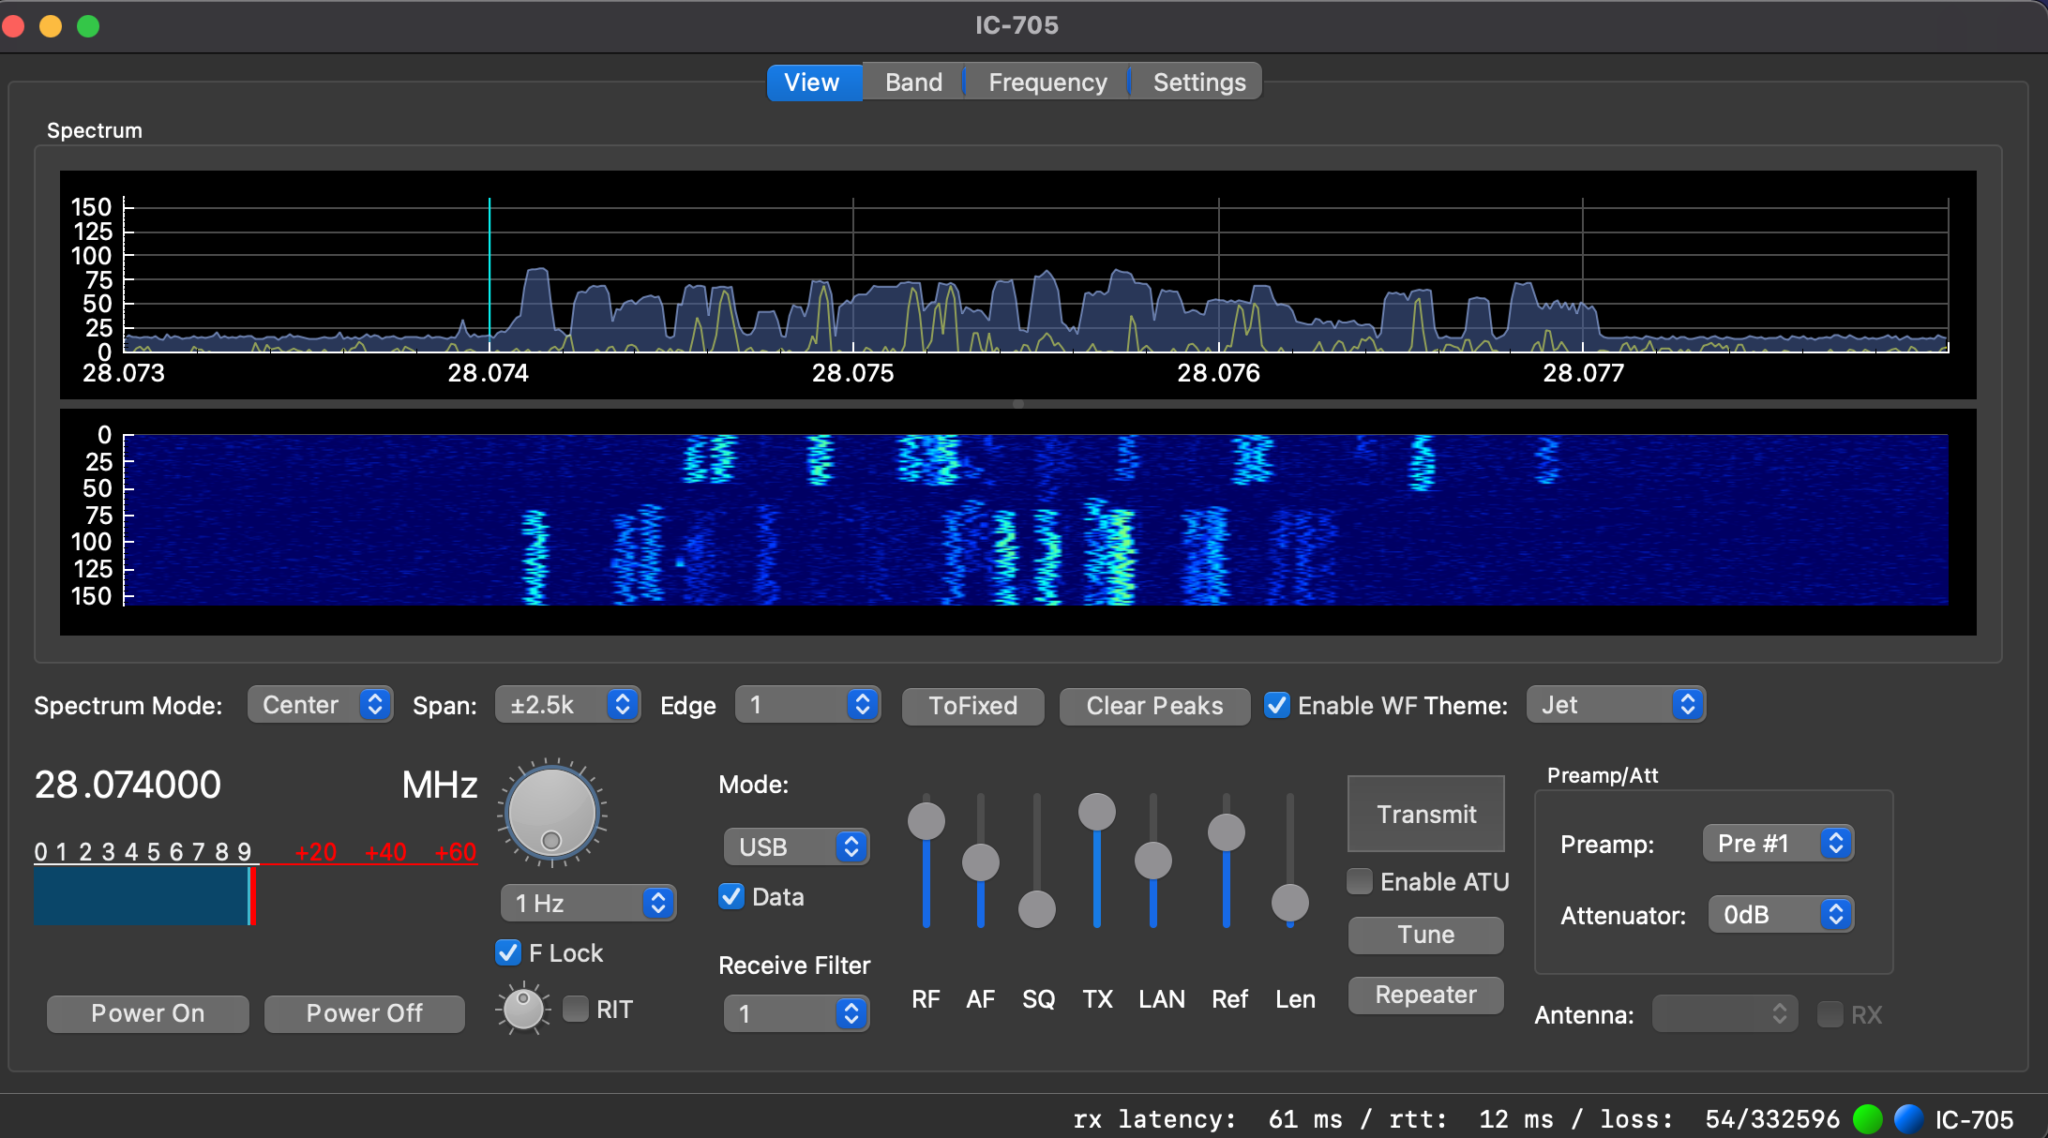
Fully operational WFView connected to my IC-705 receiving FT8 on 10m
Once I had WFView operational I set about getting WSJT-X connected to the radio wirelessly. This is actually really simple to do and just needs a couple of changes to the settings to make it work.
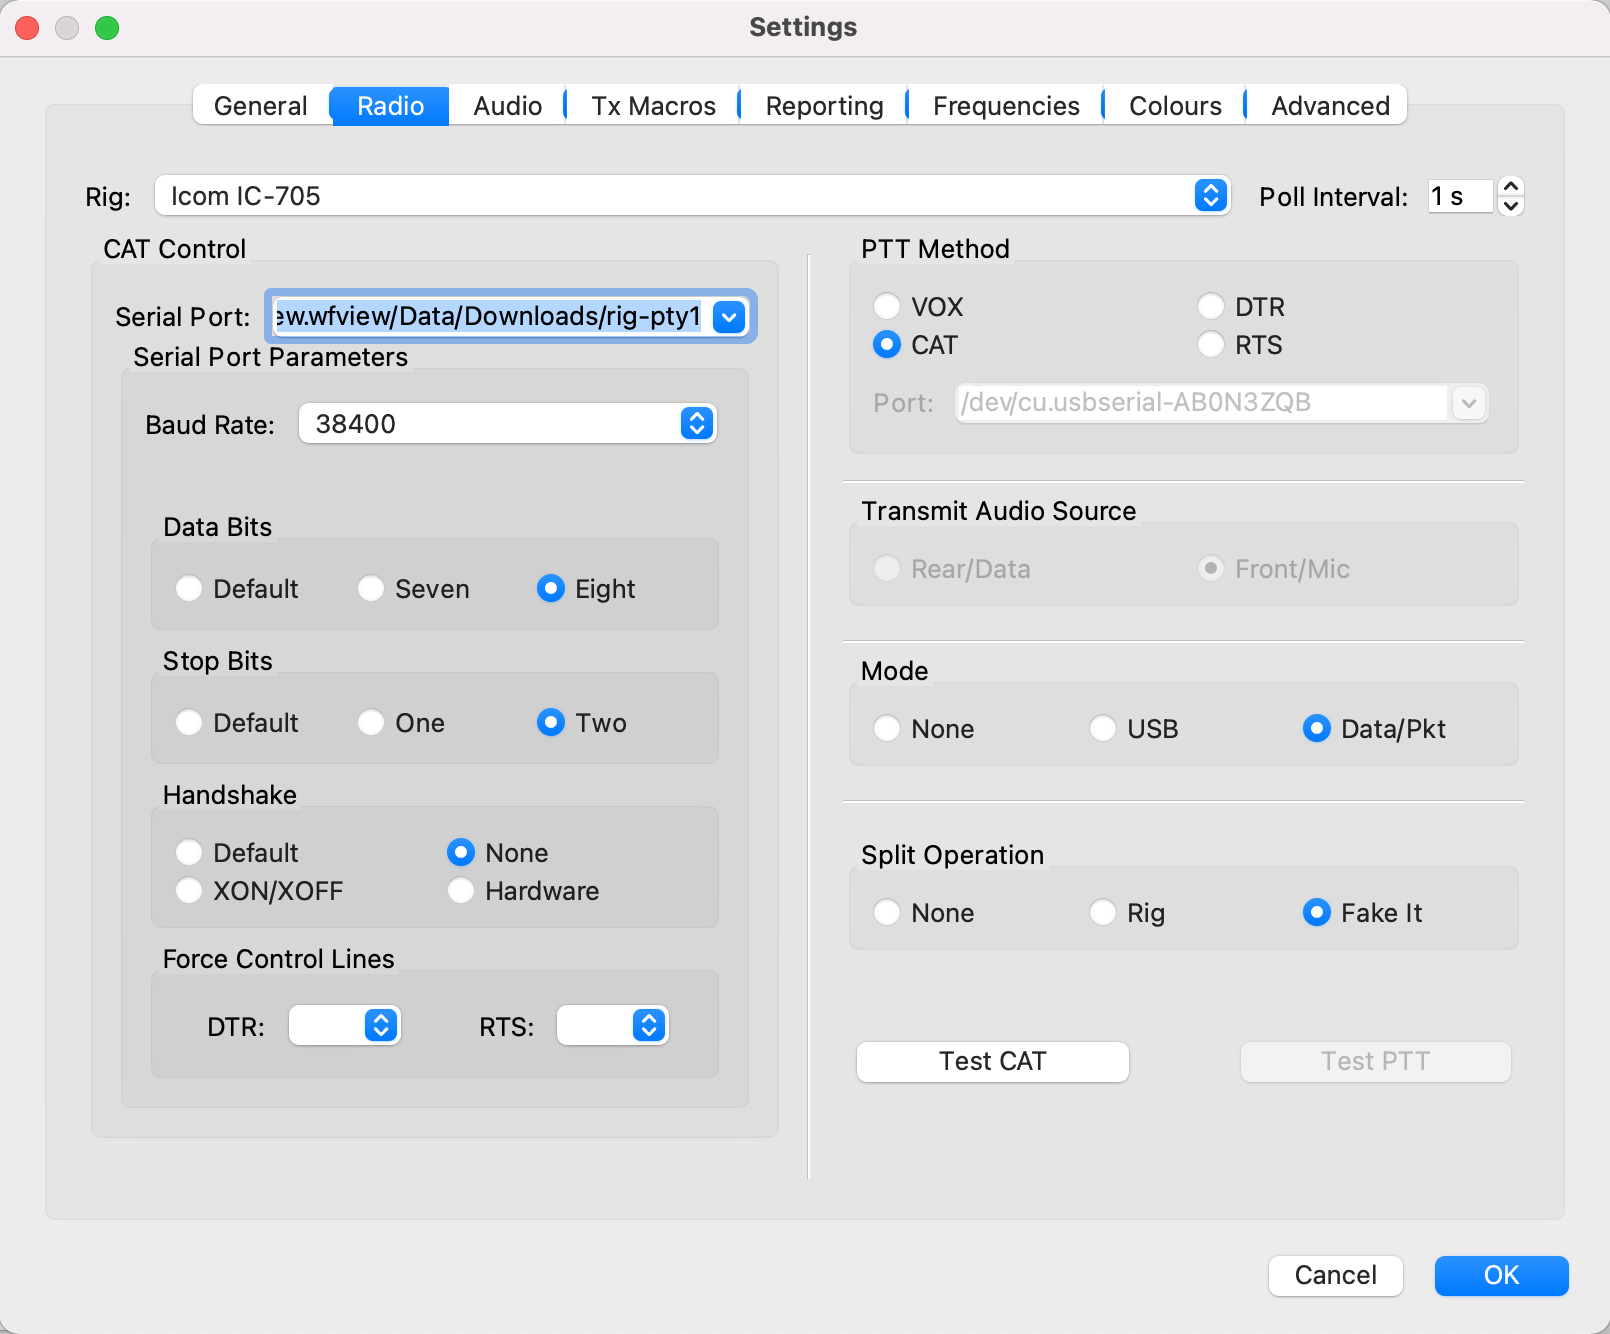
Start up the WSJT-X application and goto the Radio Settings tab. On this page you need to set the radio to IC-705, serial port to that shown below (Also shown in point 9 in the WFView section above) and Baud Rate to 38400.
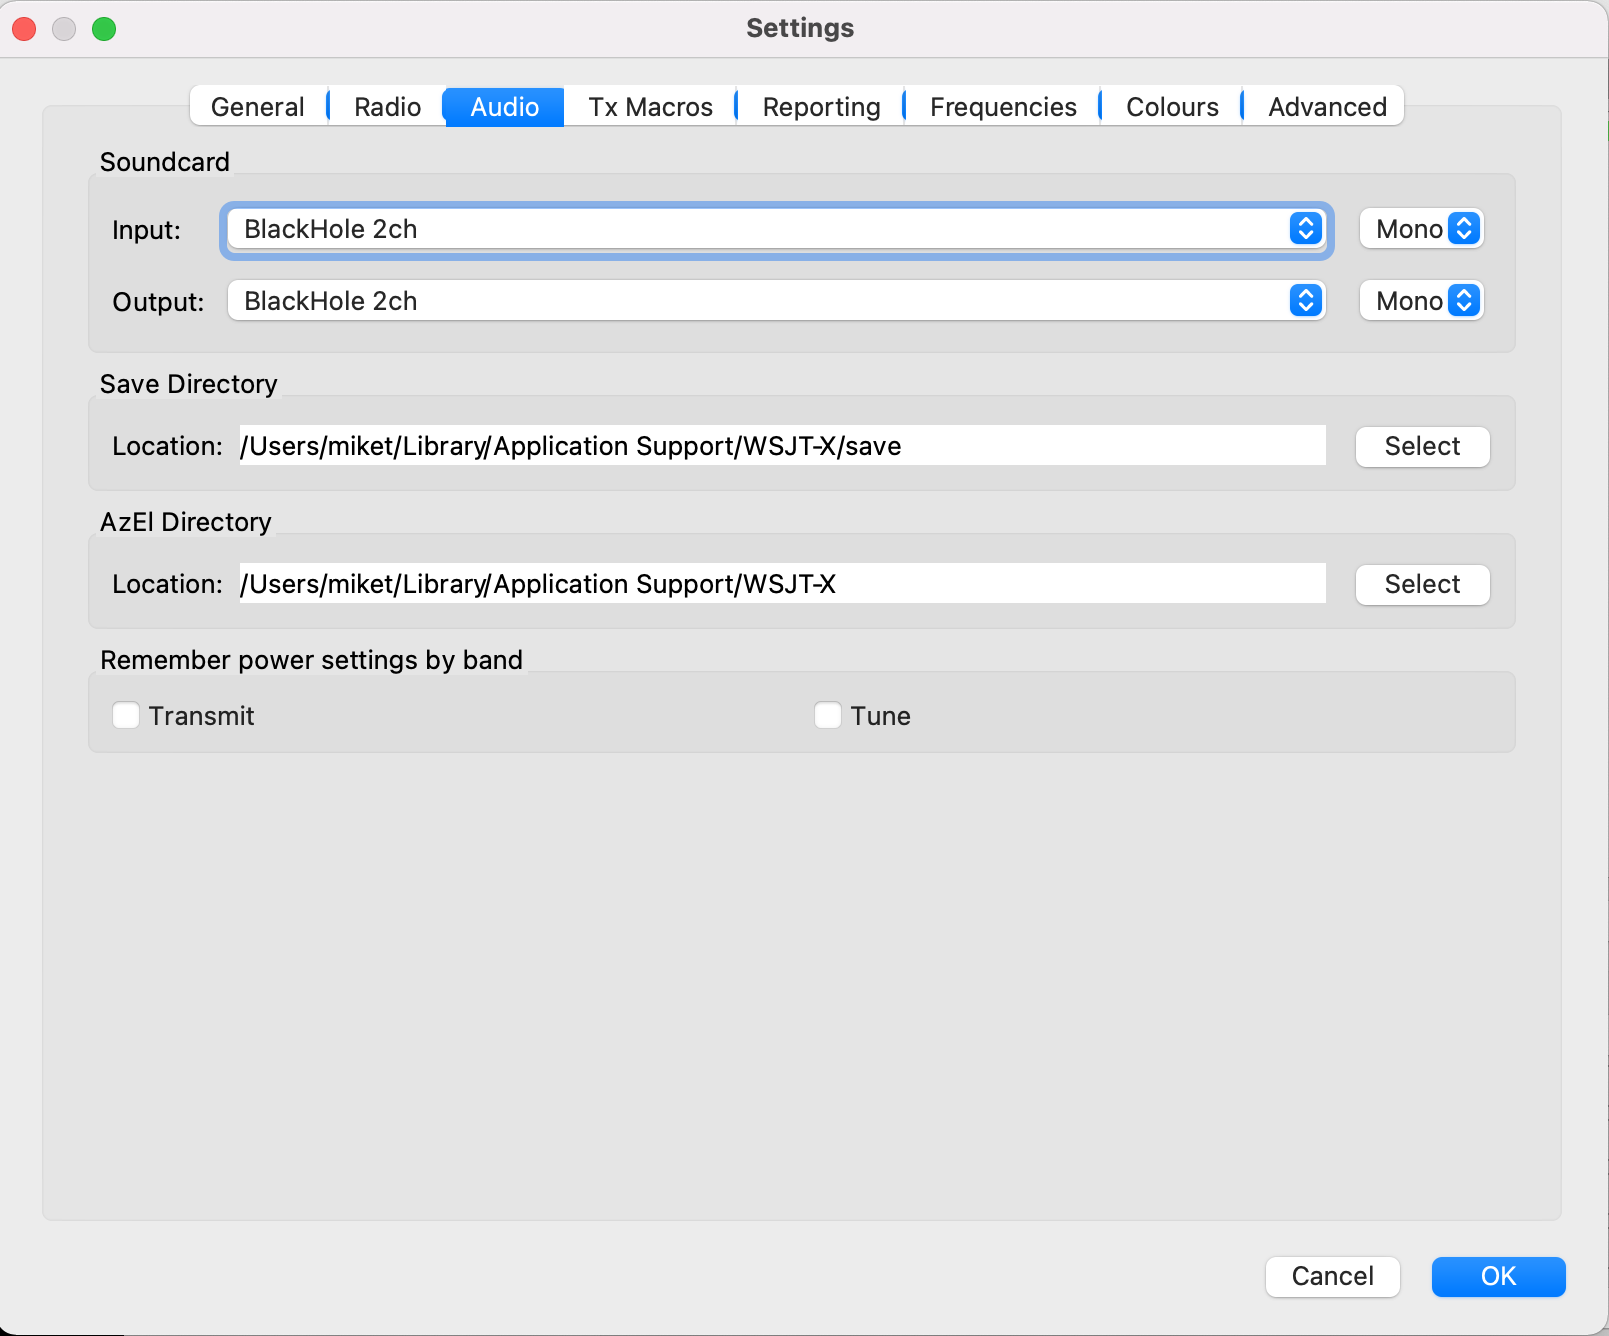
Next select the WSJT-X Audio Settings tab and set the soundcard Input/Output fields to Blackhole 2ch. Set both Input and Output to Mono as shown below.
WSJT-X Audio settings
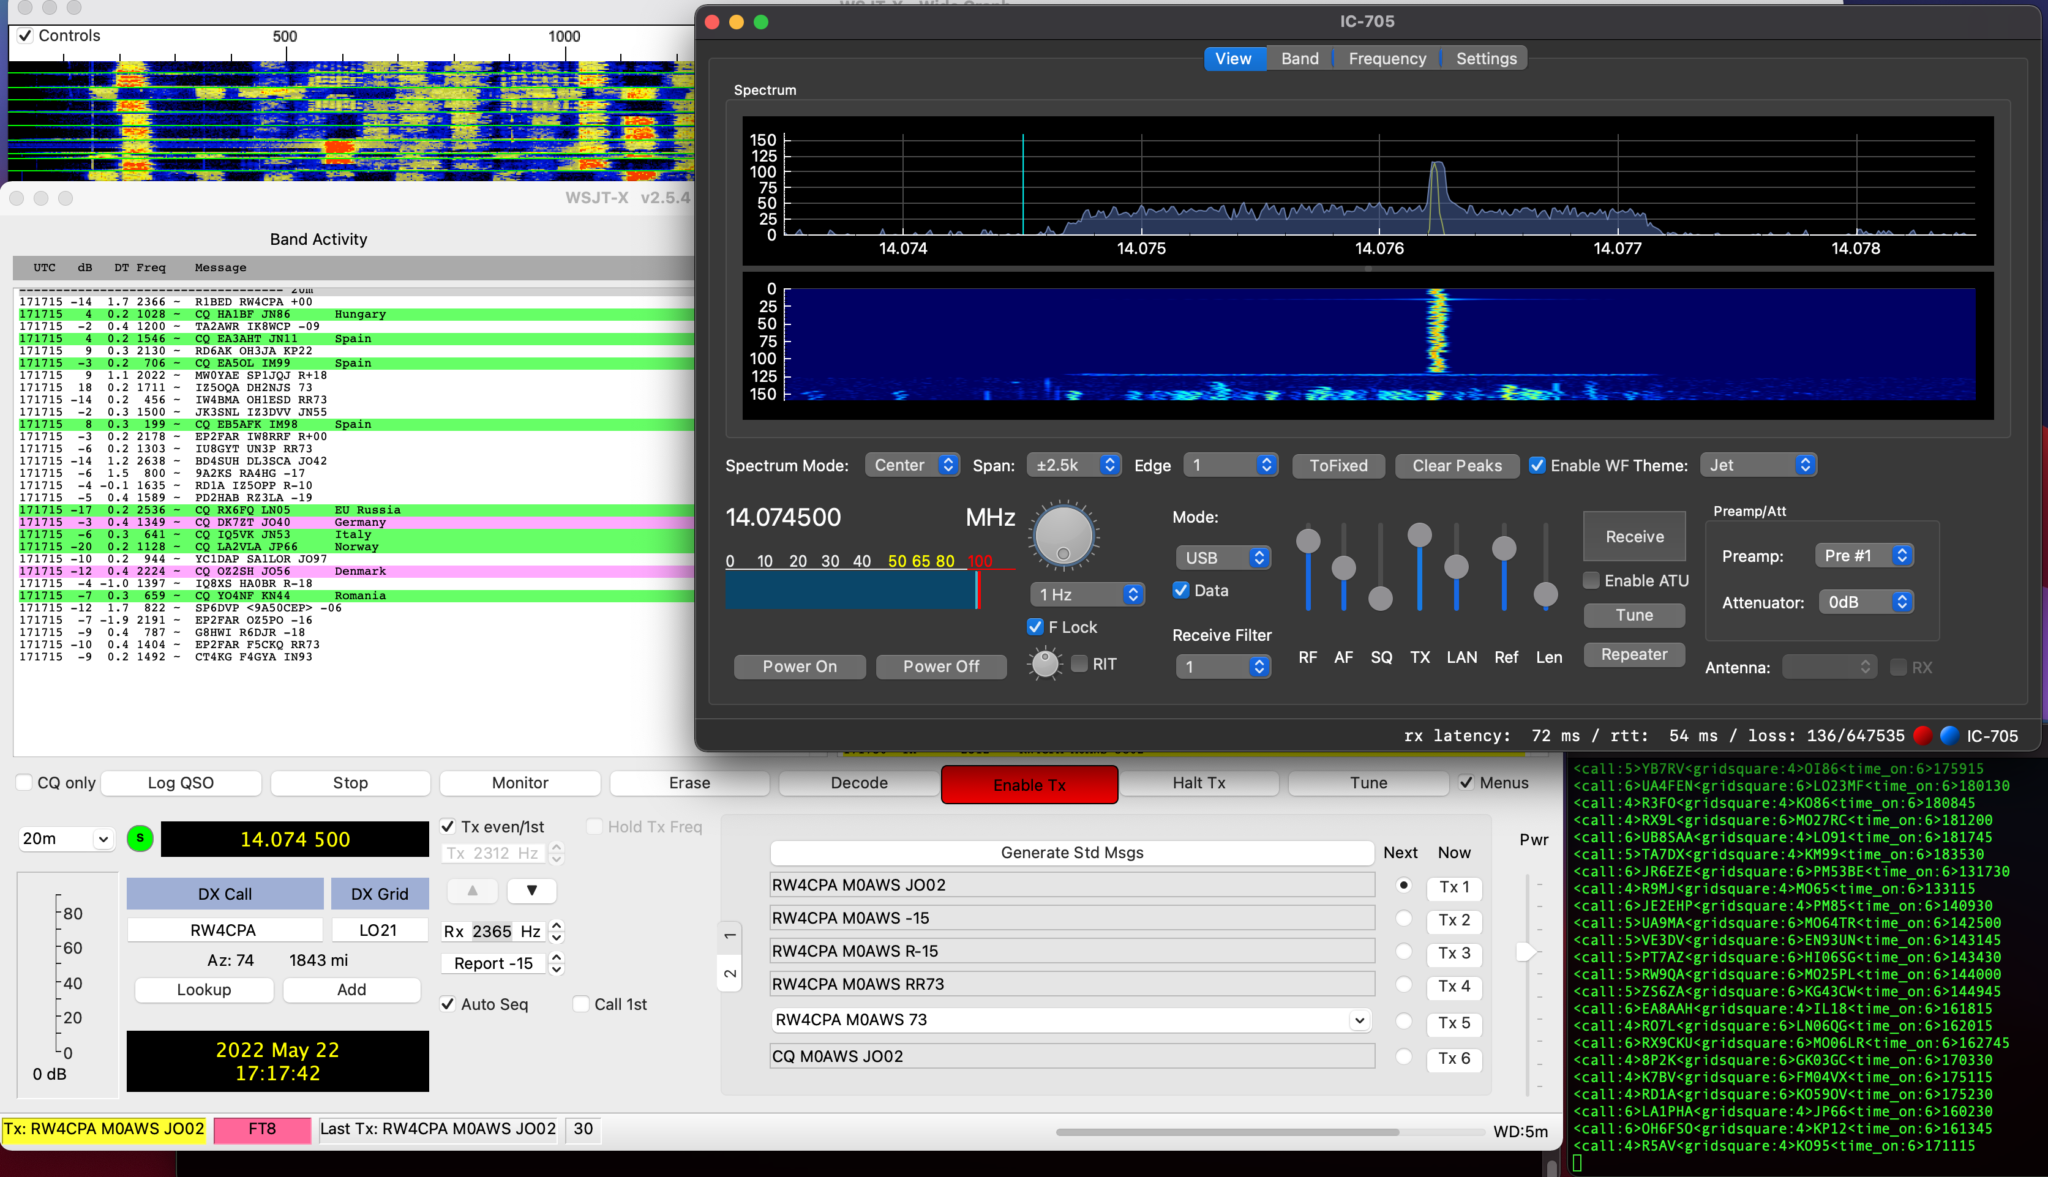
Click OK and return to the WSJT-X main screen. You should now be fully operational for WSJT-X digital modes.
WSJT-X transmitting through WFView to the IC-705
Once I’d made a few contacts with WSJT-X in FT8 mode I went on to try and get FLDigi working with WFView as well.
Unfortunately at the moment I cannot get CAT control working in either FLDigi or FLRig, neither will accept the /dev/ttys000 as the serial device however, I was able to get the audio working into FLDigi and even decoded some morse with it. I need to do little more work to fathom out why the CAT control doesn’t work in these two applications. I’m sure there is a way to resolve this but, I just need to put in a little more time to find the solution.
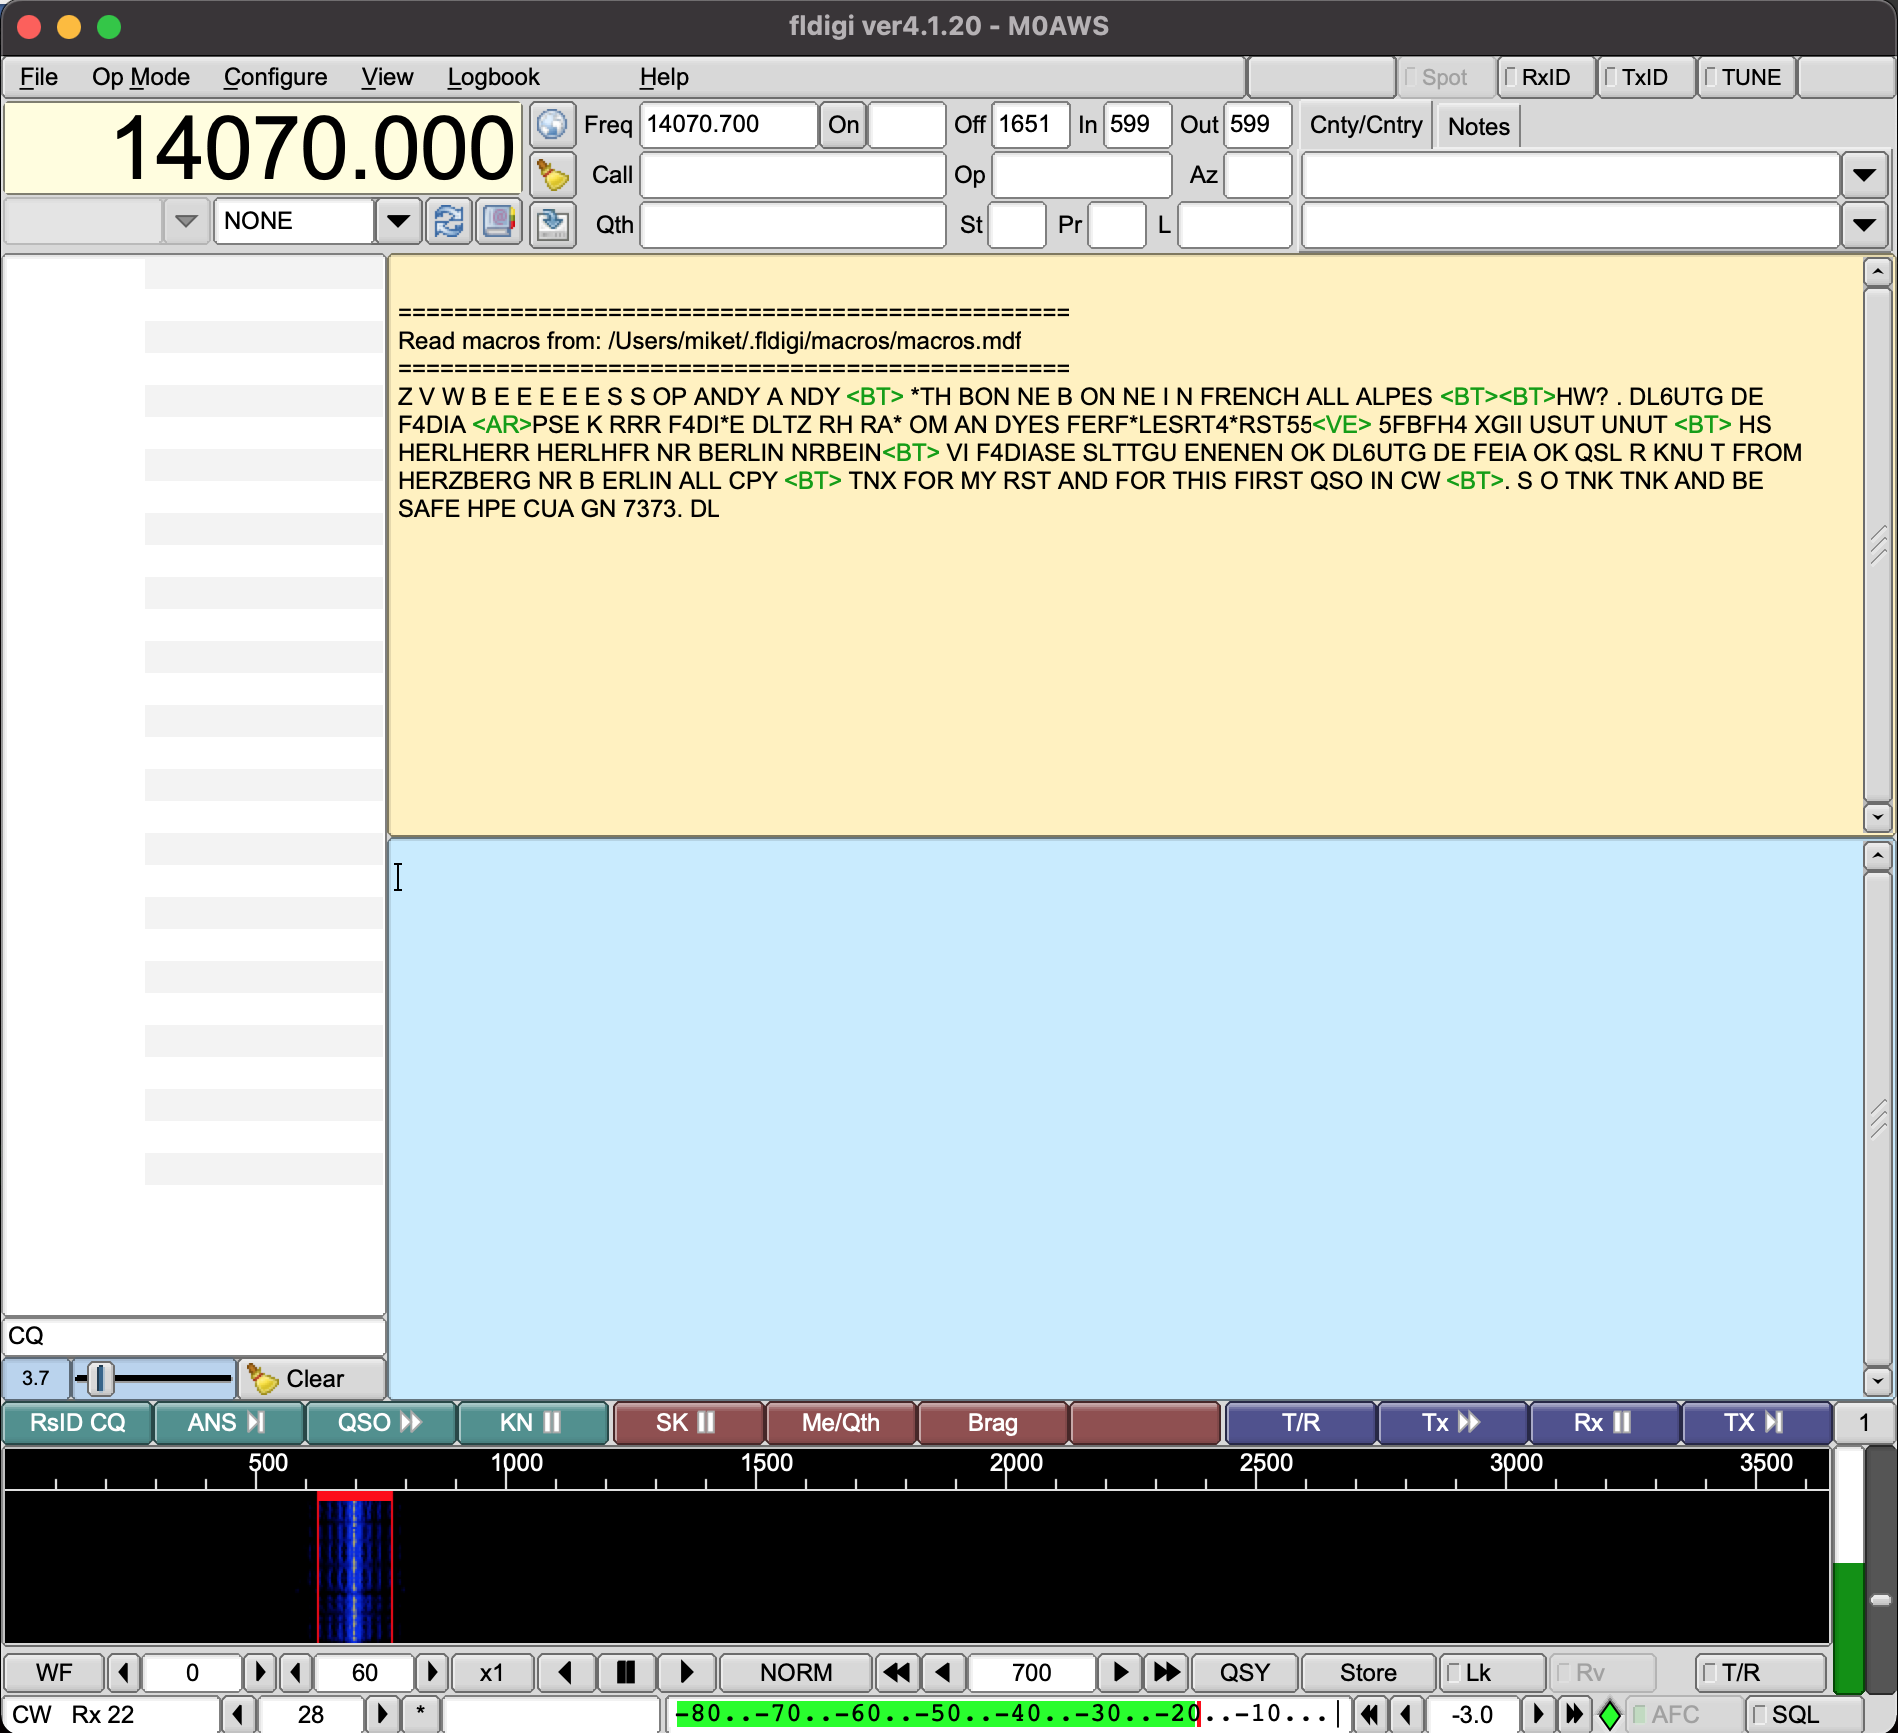
FLDigi decoding Morse code via WFView
UPDATE: There was some concern in one of the IC-705 Facebook groups that Blackhole wouldn’t work after a MacOS update. I’ve just upgraded my Macbook Pro to MacOS 11.6.6 and BlackHole is still fully functional afterwards. The MacOS update has no effect on the BlackHole service whatsoever. So you can rest easy!
More soon …
We use cookies to ensure that we give you the best experience on our website. If you continue to use this site we will assume that you are happy with it.Ok