Something for the weekend?

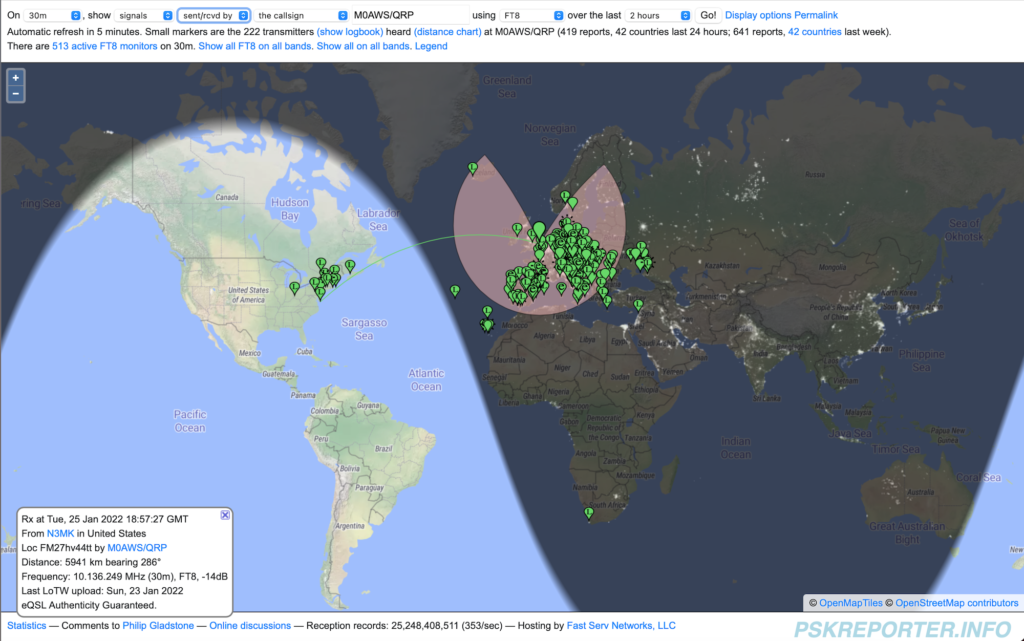
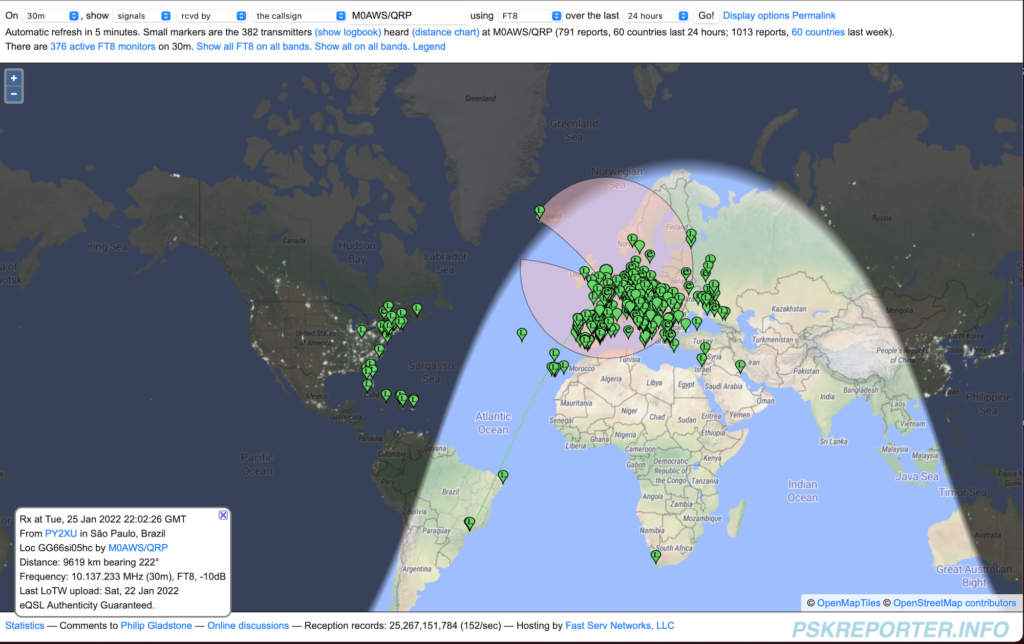
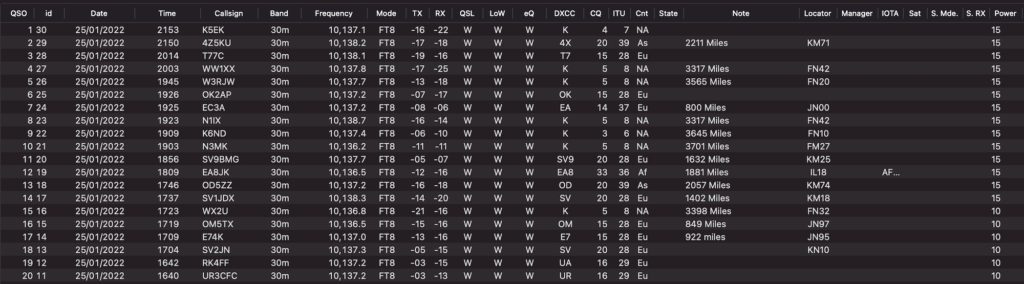
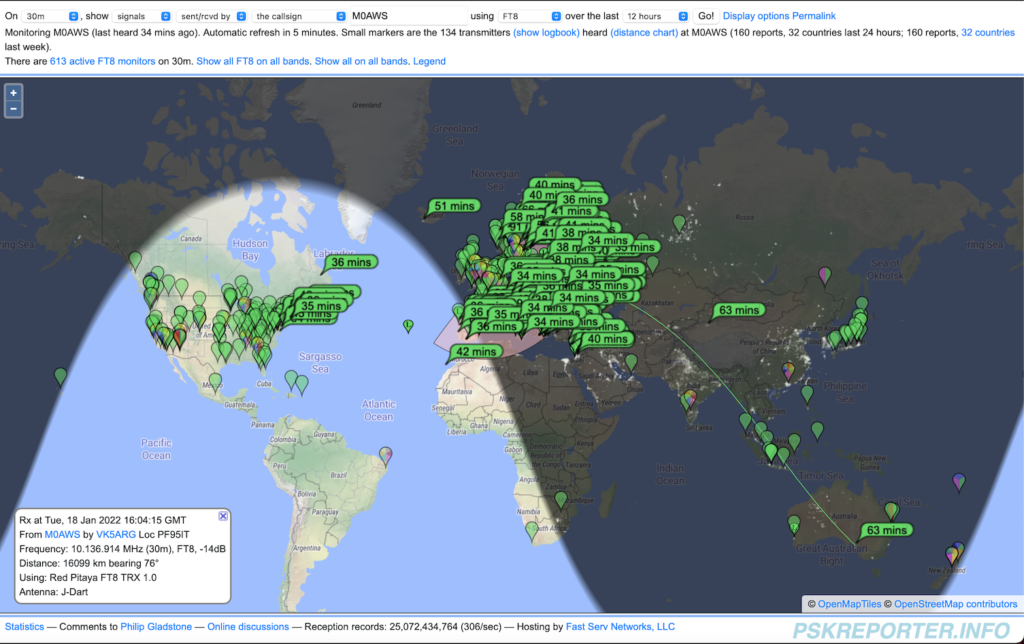
Since purchasing the Yaesu FTDX10 and getting some wire into the air I’ve been working DX all over the world with ease. So far I’ve not exceeded 25w total output and yet I’ve worked as far as Australia, South America and West Coast USA and Canada. I’m often found to be using far less than 25w, even 5w on the 60m band is a huge amount of fun!

The FTDX10 has an incredible receiver, the best I have ever owned, for the money it really is an amazing bit of kit. The only thing about it that doesn’t work for me is the size when trying to go portable. It’s just a tad too big and requires a huge battery to power it. I love everything else about the FTDX10 apart from this one thing.

So, with the FTDX10 now being the prime shack radio I decided to look into a solution for portable operations. There are many options available today from the cheap Chinese made radios to the old reliable FT817/818 (which I used to own and had a lot of fun with) through to a multitude of newer, more modern full functionality radios. We are truly spoilt for choice these days!

One radio I have read a lot about is the Icom IC-705, it’s an incredibly feature packed little radio with a max output of 10w that covers 160m all the way up to 70cms. With its large super clear colour touch screen and easy swap battery solution it ticks all the boxes.

Icom IC-705 Portable HF/VHF/UHF Transceiver

One thing many people complain about is the fact that the IC-705 doesn’t have a built in ATU. This has never bothered me as I am a firm believer that the ATU should be at the antenna and not in the radio at the end of a long coax run. Running various antenna models on my EzNEC software has shown that keeping the ATU at the antenna is by far the best solution.

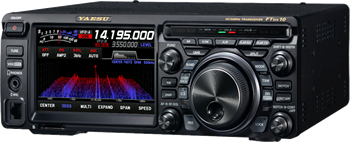
Of course Icom have this covered with their AH-705 remote auto ATU that’s specifically designed to compliment the IC-705. Powered by just two AA batteries and utilising latching relays the unit is both very quick to tune and uses next to no power at all, ideal for those Parks on the Air (POTA) or in my case, Beaches on the Air (BOTA) activations.

Being a quality Icom product the AH-705 isn’t cheap, at £299.99 it’s actually one of the most expensive auto ATUs available for the IC-705.

Icom AH-705 Remote Auto ATU

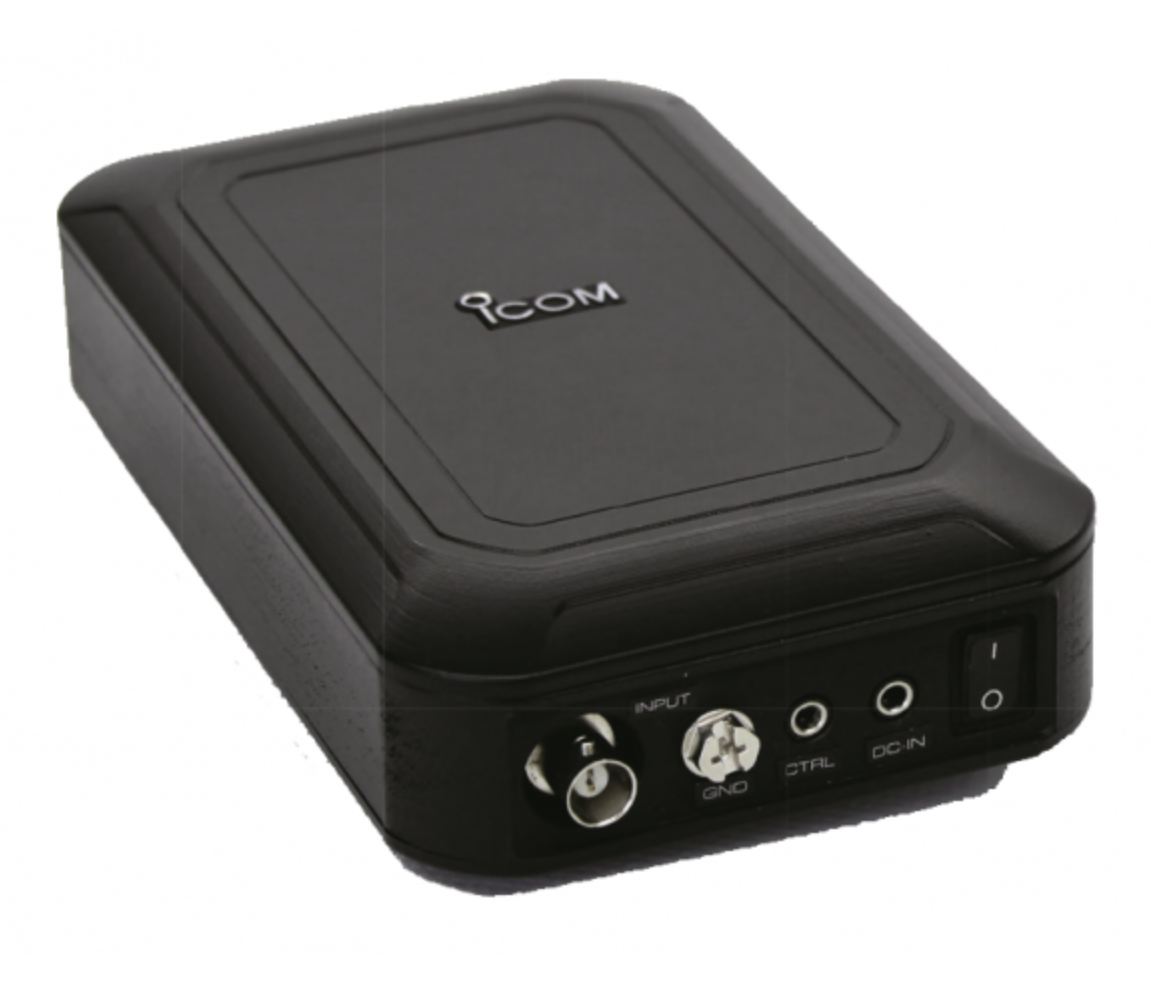
The other thing I wanted was some kind of stand for the IC-705 that would allow me to angle the radio such that the display and controls are always easily useable. On the ML&S site I found a nifty little tripod that will do the job nicely and so, that had to be included in the bundle.

Icom IC-705 Tripod stand

Fortunately for me the AH-705 was on special offer over the Easter Bank Holiday with 40% off making it the same price as the cheaper MAT tuner from china.

So I have now ordered an IC-705, matching AH-705 and the tripod all for the bundle price of £1504.87 including VAT, I even got free shipping thrown in too!

So that leaves just one more thing that I need to complete my radio solution, a morse key!

Having sold my Schurr Profi II Twin Paddle key (Been kicking myself ever since!!) a few years ago when I decided to take a break from radio I’m now in the position of not owning a morse key.

I did order a Vine Antenna RST-TP1 key from ML&S but, that had to go back (There’ll be an article about it coming very soon!) and so, I decided to spend a bit more and get a much better quality key.

Talking to many people online and Tony at ML&S it’s apparent that the Begali Morse keys are some of the best available these days. Looking on the Begali website they certainly have a great selection of high quality keys available, some for much more than I want to spend.

Begali Pearl Twin Paddle Morse Key

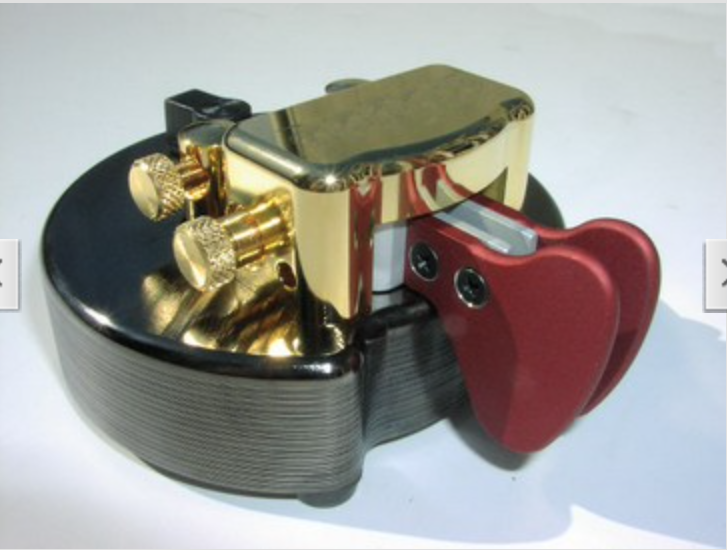
So after much consideration I decided to purchase a Begali Pearl Twin Paddle Morse key in Palladium and Gold with red paddles. It’s a super looking key and gets great write ups. It’s also their biggest seller, that says a lot.

More soon …

160m Band NVIS Antenna Experiment

Following on from the 80m Band NVIS Antenna Experiment I spent some time using the same setup on the 160m band.

To recap, the NVIS antenna is a 30m long end-fed wire that is between 3 and 4m above the ground over it’s entire length. This is the longest wire I could get into my tiny U.K. garden and so I wanted to see what was really possible with such a low short wire on the low bands. My goal was to get good Inter-G signals so that I could chat with other U.K. and close European stations during the summer months. The tuning is done automatically by the CG3000 remote ATU I picked up very cheaply on Ebay.

Having very anti-antenna neighbours I have to tread carefully not to upset them as I have already rattled some cages having the 20m EFHW Vertical on an extending fibre glass pole at the end of the garden overlooking the farmers field.

The CG3000 remote ATU matches the 30m wire nicely on the 160m band with an SWR of less than 1.2:1 across the entire band with multiple retunes. It’s certainly very convenient to have such a setup.

Setting the power output on the radio to 25w which is the maximum I use for FT4/FT8 on the Yaesu FTDX10 I started WSJT-X and waited to see what I could hear. With the background noise swinging between S7-9 most of the time I was surprised at how many stations were being decoded. Some of the stations were barely visible on the waterfall but, I got consistent reliable decodes.

Stations heard during a 1 hour period on 160m NVIS Antenna Experiment

As you can see on the map above I was hearing stations from all over Europe and well into Russia. There certainly isn’t the proliferation of stations on the 160m band that there are on the 40m band but, there were enough for me to get some good results.

It was nice to reliably copy some U.K. stations on 160m FT8 even though I didn’t hear a single SSB station on the band.

Map showing stations that heard M0AWS on 160m during the NVIS Antenna Experiment

Over a period of about 3.5 hours I was heard by a good number of European stations but, wasn’t able to work all that I heard as I was struggling to compete with the much more powerful stations. Limiting my transmit power to 25w to protect the PA on the radio does tend to limit my success at getting through to stations at times but, I am a firm believer in being able to hear better than I can shout, especially on the low bands.

Map showing all stations worked during the 160m NVIS Antenna Experiment

Over the test period I didn’t work a huge number of stations but, I did manage to work stations over a large area of Europe with the best distance being 1004 Miles into Finland, much further than I ever thought would be possible with such a simple setup.

I’m sure that when the band is in better shape with lower noise levels and better propagation the antenna will post probably perform better but, it’s certainly proved it can do the short hop NVIS comms that I was looking for.

I have designed a new NVIS antenna for the garden which manages to incorporate considerably more wire into the same space that is resonant on the 80m band. With the CG3000 remote ATU it should tune up well on 40m-160m and give much better results. This design does require a 10m fibre glass expending pole which I need to purchase before I can erect it in the garden. I’ll get all the information for the design onto the Antenna section of the website soon.

So to summarise, a 30m end-fed wire at between 3 and 4m above the ground will give good NVIS results on 40m-160m with a very low visual impact. For those like me that have a small garden, a simple antenna like this is much better than no antenna at all.

More soon …

Venturing onto the 4m Band

The 4m band isn’t a band that I’ve ever used before. The main reason for this is that I’ve never had a radio that had 4m capability built in. Most HF rigs today come with the 6m band but, very few have the 4m band, that is until now.

Having recently purchased a Yaesu FTDX10 I now have access to the 4m band with a max power of 50w. (You do need to reset the radio into UK mode to get the 4m band)

From reading online I understand that the 4m band is very much like the 6m band propagation wise but, with fewer users. Since the 2m and 70cm bands are completely dead in the Woodbridge area I thought that perhaps there might be a few local HAMs on the 4m band.

Now having a transceiver for the band I needed to think about an antenna too.

Searching online I came across an article by G4AQB referencing a 4m band antenna built by Tim, G6TM. Both of these articles incorrectly refer to the antenna design as an EFHW for 4m, it is in fact a Sleeved Dipole or sometimes referred to as an End Fed Vertical Dipole for the 4m band. If it was an EFHW it would have a very high impedance and would need a 49:1 Unun to match it to 50 ohm coax.

Since this antenna is just a dipole it presents an almost perfect impedance match to 50 Ohm coax without the need for any matching circuit.

G4AQB build notes

Working from G4AQB’s build notes as detailed on his blog it’s very quick and easy to cut the coax to the right length, strip part of the outer shield and create the choke using 8 turns of the same coax cable.

Since I wanted to make this a permanent fixture in the garden I decided to make an enclosure for the antenna so that it is weather proof and easy to mount.

Using a mix of 25mm conduit, 50mm plastic tubing, a screw cap and a reducer I put together a very tidy 4m band sleeved dipole vertical antenna.

Home brew 4m sleeved dipole in plastic enclosure

Looking at the photo above you can see I used the 25mm conduit to house the sleeved dipole, I then used a reducer to join the 50mm tube to the 25mm conduit. Drilling two holes in the 50mm tube I brought the coax out and wound it 8 times around the tube to form the choke coil and then passed the coax back into the 50mm tubing so that it continued down to the SO239 socket on the bottom cap. I used some hot glue to hold the choke coil in place.

SO239 mounted in the bottom of the 50m tubing

I strapped the antenna to the top of the washing line post to check the SWR and found it’s a perfect match. With an SWR of 1:1 at the bottom of the band and 1.1:1 at the top of the band.

Overall I’m really pleased with the simple design and build.

I listened to the 4m band for a few hours whilst doing other things and didn’t hear a single soul, I do hope it’s not dead like the 2m band!

More soon …

FTDX10, Apple Computers and the USB Audio Chain

One of the things I’ve had issues with ever since purchasing the Yaesu FTDX10 transceiver is control of the audio chain via the USB connection on the rear of the radio.

The output from the radio into my Macbook Pro is just too high, WSJT-X is constantly pushed beyond the green zone and often into the red zone when monitoring FT8 signals with the AGC off. The only way to cure this is to keep the AGC on Auto which sometimes results in not hearing the very weak DX stations due to the AGC not reacting fast enough. Putting the AGC on fast causes the red line to be hit far too often once more.

Sadly, the USB Audio Codec doesn’t provide any volume adjustment on audio coming from the radio into the MacBook Pro thus, it’s just full volume all the way. This is a flaw in the codec design and really does need to be resolved long term.

Looking at the audio going the other way, that is from the MacBook Pro into the radio via the USB port fortunately there are gain controls available both on the MacBook Pro and on the radio itself.

Ever since venturing into the world of WSJT-X & FT8/4 I’ve had an issue with only being able to move the PWR slider in the WSJT-X up to the first marker at the bottom of the screen, anymore and the ALC on the radio goes off the scale instantly!

So yesterday I decided to investigate the audio chain into the radio more thoroughly and see what could be done about the levels.

Looking at the radio manual I found that there is an RPORT GAIN setting in the menu system that can be used to alter the amount of gain applied to the incoming audio signal on the USB port in the radio.

FTDX10 Rport Gain entry in the manual

As detailed in the manual, the default setting for this is 50 in a range of 0 to 100. So that’s a 50% increase in gain applied to the incoming audio at the radio end, that’s quite a boost! (The gain is applied both in SSB and Data Modes)

I decided to experiment reducing this figure to see if it gave me greater control over the audio output from WSJT-X via the PWR control. This did indeed help however, there was still too much audio coming into the radio from the MacBook Pro and so I needed to look further along the audio chain.

Moving back onto the MacBook I opened the Midi App and took at look at the Output controls for the USB Audio Codec, sure enough this was set to max for both channels, not good.

Reducing the levels in the midi app started to make much more of a difference, I could now raise the audio level using the PWR control in WSJT-X without things immediately going wild and could now control the levels with a far greater level of granularity than ever before.

After much tinkering I eventually found the levels whereby I could drive the rig to the selected output power (20w) without the ALC going off the scale and the signal becoming horribly distorted, there was calm in my audio chain once more.

So what settings did I settle on?

On the radio itself I wound down the RPORT GAIN setting from 50 to 20, this reduced the amount of gain applied to the audio coming in on the USB port considerably and helped to tidy up the FT8 signal.

FTDX10 RPORT GAIN Setting reduced from 50 to 20

It’s great that there is the facility on the radio to reduce the gain on the inbound audio signal, if only Yaesu would do the same for the outbound audio level.

Next, on my MacBook Pro via the Midi app I reduced the output level on the USB Audio Codec from the default maximum down to 0.494 (-19). This stops the audio level from being too high going into the radio and removes all distortion from the resulting signal.

Midi App on Macbook Pro showing reduced audio output

Once these small changes have been made it becomes necessary to raise the PWR level in the WSJT-X app to roughly the centre position. At this point the radio gets a clean, distortion free audio input whilst driving the radio to the full 20w output with no movement on the ALC whatsoever.

I found I could move anywhere on the frequency spectrum on FT8 without any of the levels changing and with the ALC not moving whilst the radio delivered the full 20w output.

I also checked FT4 mode as it is an MFSK mode to see if these settings worked for it too and I’m glad to say it worked perfectly! (I also found I really liked FT4!)

WSJT-X with the PWR setting at roughly 50%

Altering the PWR level in WSJT-X doesn’t have the huge effect it had before and now it’s very easy to adjust the level without the ALC going off the scale in an instant.

It took me about an hour or so to get this just right but, it was well worth the time invested.

I hope this is of use to other Apple Mac computer users in the HAM community.

More soon …

Simple EFHW vertical on 20m works great!

I completed the fine tuning of the 20m EFHW Vertical today, I got the SWR down to 1:1 at 14.10 Mhz. This gives me a perfect match for the CW and digital section of the band with the SSB part of the band not exceeding 1.4:1 at 14.350.

I ended up removing 34.5cm of wire from the original antenna length to get the resonance where I wanted it. This was caused mainly by the extra inductance added into the circuit by the 49:1 Unun. This is to be expected and perfectly normal when feeding an antenna via an impedance matching transformer.

I bolted the 49:1 Unun directly to the earth rod, this way it’s got a solid earth connected directly to it to keep the resistance to a minimum. (The metal mounting plate is also the earth termination point).

49:1 Unun mounted on earth rod directly

I spent some time today chasing the DX on the 20m band using the FT8 digital mode.

The fun started with VK2LAW in Sydney Australia, followed by E25ETT in Thailand, KP4CAR in Puerto Rico, 9G5AR in Accra Ghana and The Sahrawi Amateur Radio Club station S01WS in Western Sahara. A nice mix of stations dotted around the world.

PSKReporter map showing all the stations that I heard on 20m today

I like to keep an eye on the PSKReporter site whilst on air to see what I’m hearing. As you can see I heard stations from the West Coast USA right across to New South Wales in Australia and down south as far as Brazil. The 20m EFHW Vertical antenna and Yaesu FTDX10 radio combination really does have good ears

As for being heard, well it’s a similar story, below is a map showing all the stations that heard me as reported on the PSKReporter website.

Stations that heard M0AWS on 20m FT8

One again, great global coverage from the antenna and transceiver combo with only 20w being used for most contacts. (25w used to break some of the pileups!)

Overall I’m really pleased with the performance of the antenna, for such a simple design it works exceedingly well. One huge advantage of a half wave over a quarter wave antenna is that the point of max current is 50% along the antenna’s length, on the 20m band EFHW Vertical this puts it some 5m above the ground lowering the angle of take off and making it a great DX antenna.

If you’ve not got a lot of space but, want to work the DX on 20m then I highly recommend you give one a try, I’m sure you’ll be amazed at how well it performs.

Can’t wait to get a 40m EFHW Inverted L up next!

Information as to why it’s best to keep the feed point at ground level for this antenna is here.

More soon …

Fun evening on 30m FT8

I spent yesterday evening on the 30m band running WSJT-X in FT8 mode whilst getting to know the new radio. I must say I am impressed with the Yaesu FTDX10, the receiver really is extremely good at pulling out the weakest of stations.

WSJT-X in FT8 mode running on my MacBook Pro

I have a very simple setup at the moment, just the one antenna for 30m currently so I don’t have a lot of bands available. Hopefully this will change in the coming months as I work on building a new multi band antenna for the station.

I’m still getting to know WSJT-X and FT8, it’s a new mode for me and quite different to how things were 15 years ago when I was last active.

With a little perseverance I soon got the hang of it and was working stations with ease. I’m very much a wait and pounce type DXer, so my QSO turn over is low but, I get the stations I want to work rather than just a multitude of European stations who are all on my doorstep.

It was interesting to watch the band conditions change as the grey line moved across the Atlantic. One by one countries further west started popping up on the band.

30m FT8 Early Evening view

At 18:00GMT PSKReporter was showing mainly the multitude of European stations running FT8 on 30m with the Azore and Canary Islands starting to appear along with a couple of stations from the East Coast USA.

30m FT8 19:00GMT

As the grey line continued west more and more DX stations started to appear including a station in South Africa. I worked a bunch of stations in the Ukraine and Russia and then started picking off the stations in the USA one by one.

30m FT8 all stations heard (Screenshot taken next day)

By the end of the evening there were stations from South America and the Caribbean coming through. I spent over an hour trying to work CO8LY in Cuba, he was coming in at -10dB at my end but, sadly he never heard my 15w signal. I did try splitting the RX and TX frequency in WSJT-X so that my signal was to the side of the pileup but alas I never got through. Later in the evening I found CO8LY calling CQ over and over but, once again he never heard my replies. A real shame as it’s rare to hear Cuba over here on the East Coast of the U.K.

At 22:30GMT I closed the station down and headed to bed, I didn’t work a huge number of stations but, I had a lot of fun chasing the ones I wanted to get.

It’s interesting to note that the closest stations worked was 800 miles away, I think that is the first hop for my 30m Delta Loop Antenna. With the antenna being so quiet on receive and the FTDX10 having such a good receiver, it was very easy to pick out the stations 2000 miles or more away from my QTH. Most of the time I was able to exchange signal reports with stations that I called. It’s impressive to be able to exchange reports with stations that are -18dB or more below the noise level.

RUMlogNG List of stations worked on 30m FT8 mode

It was nice to get into Lebanon and Israel, two countries that have always been difficult to get into from my U.K. QTH.

A total of 20 stations worked, not a huge count but, it gave me some time to get used to the radio and it’s settings.

I also had a tune around 40m, the FT8 section was packed with stations from all over the world. I can’t wait to get onto 40m, it’s one of my favourite bands and I’m hoping to be able to work some good DX with QRP power levels.

I also listened on 80m and 160m, both were very active with mainly European stations on FT8 and SSB.

With my roll of coax arriving today I’l spend some time putting together a new coaxial run to the antenna and start working on an LC tuning unit for the new vertical I’m designing.

More soon …

FTDX10 CAT Control Problem Solved!

Following on from my article about the issues I had with the Silicon Labs VCP/USB to Serial driver that’s required to be able to use the CAT controls on the FTDX10 via the USB connection I decided to take a different approach to the problem.

Since the driver was incompatible with something that is already installed on my MacBook Pro (Most likely Virtualbox) and rendered the computer unusable I decided to search for a USB to Serial converter that worked with Apple computers without the need for proprietary drivers.

It didn’t take long to find a suitable adapter, the Sabrent USB 2.0 to Serial (9-Pin) available on Amazon uses the FTDI chipset that is natively supported by Apple MacOS without the need for proprietary drivers to be installed. This makes it a simple plug and play adapter.

Unfortunately both the adapter and the FTDX10 have a male DB9 connector and so a female to female DB9 adapter is also required to make the connection.

Connecting the DB9 to the FTDX10, setting the RS232 port to 38400 on the radio and within the WSJT-X software I soon had control of the radio from the MacBook Pro.

To get the sound from the radio to the MacBook all I needed to do was connect the USB lead into the back of the radio and into the 2nd USB port on the MacBook. Since the sound card in the FTDX10 is supported natively by MacOS 11.6.2 (Big Sur) without the need for the Silicon Labs driver, this completed the setup.

So I now have full digital modes and rig control without installing any proprietary drivers on my MacBook Pro.

I tested the setup using FT8 on 30m this afternoon, it worked seamlessly.

Problem solved!

Silicon Labs VCP Driver for FTDX10 CAT Control Issues

To get my MacBook Pro talking to the Yaesu FTDX10 CAT controls so that I could use WSJT-X and FT8 I had to install the Silicon Labs CP210x VCP Driver so that it recognised the USB to Serial connection within the radio. This initially worked well however, over time I found my MacBook Pro started misbehaving.

Silicon Labs CP210x Macintosh OS VCP Driver v6 Release

The problem I had was that the MacBook Pro would wake from sleep but, the screen wouldn’t come on. The same issue occurred when booting the MacBook Pro from cold, the machine would boot but, the screen wouldn’t come on. Sometimes the screen would flicker during a cold boot and then eventually stay on, only to go off again permanently if the MacBook went to sleep.

I uninstalled the driver but, the problems continued. After much investigation the only thing left was to reinstall MacOS Big Sur.

Fortunately the way MacOS is configured, it’s possible to reinstall the O/S without losing any of the applications and data, a great relief for sure. I do have a Time Machine backup just incase though!

MacOS reinstalled and stability has returned once more, so it’s definitely the driver that has caused the screen problem.

So I’ve now raised a case with Silicon Labs asking for assistance resolving the issue, hopefully I’ll get a response.

I also put a message on the wsjtx.groups.io message board to see if anyone else has experienced this issue, so far no one has responded.

I’ll update the blog with any progress.

More soon …

First time on air in 15 years!

I had a fun couple of hours this afternoon. I found my 30m band Delta Loop antenna packed away in the loft, got it out and put it up in the garden, 1.2:1 SWR across the band and I was soon listening to Morse conversations on the band.

WSJT-X FT8 mode on the 30m Band

Connecting my MacBook Pro to the Yaesu FTDX10 I soon had WSJT-X FT8 mode running and started working a few stations. I found I needed to reduce the output from the Apple MacBook so that the ALC on the radio barely moved, this tidied up the transmitted signal and ensured I wasn’t splattering. Setting the radio O/P to 10w my first contact was into Cyprus, followed by a couple of contacts into Ukraine.

One thing I did notice was how strong many of the signals were. I’m sure some operators are using huge power levels on the FT8 part of the band with some of the signals +10db or more over S9. FT8 is supposed to be a weak signal mode, there really is no need for huge power levels. The funny thing is, many of these high powered stations are heard by DX stations but, they don’t hear the them coming back to them, classic case of shouting louder than they can hear. There really is no point being heard if your station isn’t capable of hearing the replies coming back.

I’d forgotten how good my Delta Loop antennas are, super quiet on receive and great for finding weak signals on the band.

I checked the PSK Reporter site to see where I’d been heard and was pleasantly surprised to see I was heard in Australia! I did call an Australian station but, never got a reply from him, so it was great to get confirmation that my signal was making the trip.

PSK Reporter showing where my signal was heard

Due to the direction of my garden the antenna is beaming north west / south east, long path to Australia. It’s amazing how 10w of RF can cover almost 9000 miles!

So what next?

Well, I need to purchase some coaxial cable as the bits I have from France have gone stiff/brittle and really are past their shelf life.

I also need to buy some wire to start making some antennas. I’m going to put together a top loaded vertical for the 160/80/40m bands and some delta loops for the higher bands.

I’m also going to make some end fed half wave verticals for 20m and upwards.

Lots to do, if only the weather would improve!

More soon …

New radio ordered!

Yaesu FTDX10

After much research and decision making I finally decided to purchase a Yaesu FTDX10 HF/6m transceiver. Out of all the radios on the market and there are many, this is the one that I’ve decided has the functionality I need and gives the best performance for the money.

I really liked the little Icom IC705 but, it’s a lot of money for a QRP radio and performance wise isn’t as good as the FTDX10.

I also liked the Icom IC7300 but, this is now a 7 year old radio (at the time of writing this) and the tech has moved on substantially since then.

The FTDX10 is a hybrid SDR radio that combines the best of both worlds to give a performance level that exceeds many of the other transceivers on the market today. Ranking 3rd on the Sherwood Engineering Receiver Test Data it’s a great radio for the money.

The other thing that really impressed me with the FTDX10 was the DNR and Contour noise reduction functionality. Watching videos online it is amazing how when these two tools are used correctly together extremely weak CW signals can be recovered on a noisy band.

So, with the radio ordered from Martin Lynch and Sons I now need to start building some antennas and impedance matching circuits so that I can get on air once the transceiver arrives.

More soon …