Building HAM Clock on an old RaspberryPi

I’ve got a couple of old RaspberryPi computers on the shelf in the shack and so decided it was time for me to put one of them to good use. The first model on the shelf is the oldest and is one of the very first RaspberryPi 1 computers that was released. (It’s the one with the yellow analog video signal output on the board!). This particular model is extremely slow but, I hang onto it just as a reminder of the first SBC in the line.

The second one is a RaspberryPi 2, a quad core machine that is only slightly faster than the first model but, it’s powerful enough to run HAM Clock.

It didn’t take long to install a vanilla Raspbian Desktop O/S and get it configured on the local LAN. I installed a few packages that I like to have available on all my Linux machines and then started on the HAM Clock install.

The first thing I needed to do was install the X11 development library that is required to compile the HAM Clock binary. To do this, open a terminal and enter the command below to install the package.

sudo apt install libx11-dev

You will need to type in your password to obtain root privileges to complete the installation process and then wait for the package to be installed.

The HAM Clock source code is available from the HAM Clock Website under the Download tab in .zip format. Once downloaded unzip the file and change directory into the ESPHamClock folder ready to compile the code.

cd ~/Downloads/ESPHamClock

Once in the ESPHamClock directory you can run a command to get details on how to compile the source code.

make help

This will check your system to see what screen resolutions are available and then list out the options available to you for compiling the code as shown below.

The following targets are available (as appropriate for your system)

    hamclock-800x480          X11 GUI desktop version, AKA hamclock
    hamclock-1600x960         X11 GUI desktop version, larger, AKA hamclock-big
    hamclock-2400x1440        X11 GUI desktop version, larger yet
    hamclock-3200x1920        X11 GUI desktop version, huge

    hamclock-web-800x480      web server only (no display)
    hamclock-web-1600x960     web server only (no display), larger
    hamclock-web-2400x1440    web server only (no display), larger yet
    hamclock-web-3200x1920    web server only (no display), huge

    hamclock-fb0-800x480      RPi stand-alone /dev/fb0, AKA hamclock-fb0-small
    hamclock-fb0-1600x960     RPi stand-alone /dev/fb0, larger, AKA hamclock-fb0
    hamclock-fb0-2400x1440    RPi stand-alone /dev/fb0, larger yet
    hamclock-fb0-3200x1920    RPi stand-alone /dev/fb0, huge

For my system 1600×960 was the best option and so I compiled the code using the command as follows.

make hamclock-1600x960

It’s no surprise that it takes a while to compile the code on such a low powered device. I can’t tell you how long exactly as I went and made a brew and did a few other things whilst it was running but, it took a while!

Once the compilation was complete you then need to install the application to your desktop environment and move the binary to the correct directory.

make install

Once the install is complete there should be an icon on the GUI desktop to start the app. If like mine it didn’t create the icon then you can start the HAM Clock by using the following command in the terminal.

/usr/local/bin/hamclock &

The first time you start the app you’ll need to enter your station information, callsign, location etc and then select the settings you want to use. There are 4 pages of options for configuring the app all of which are described in the user documentation.
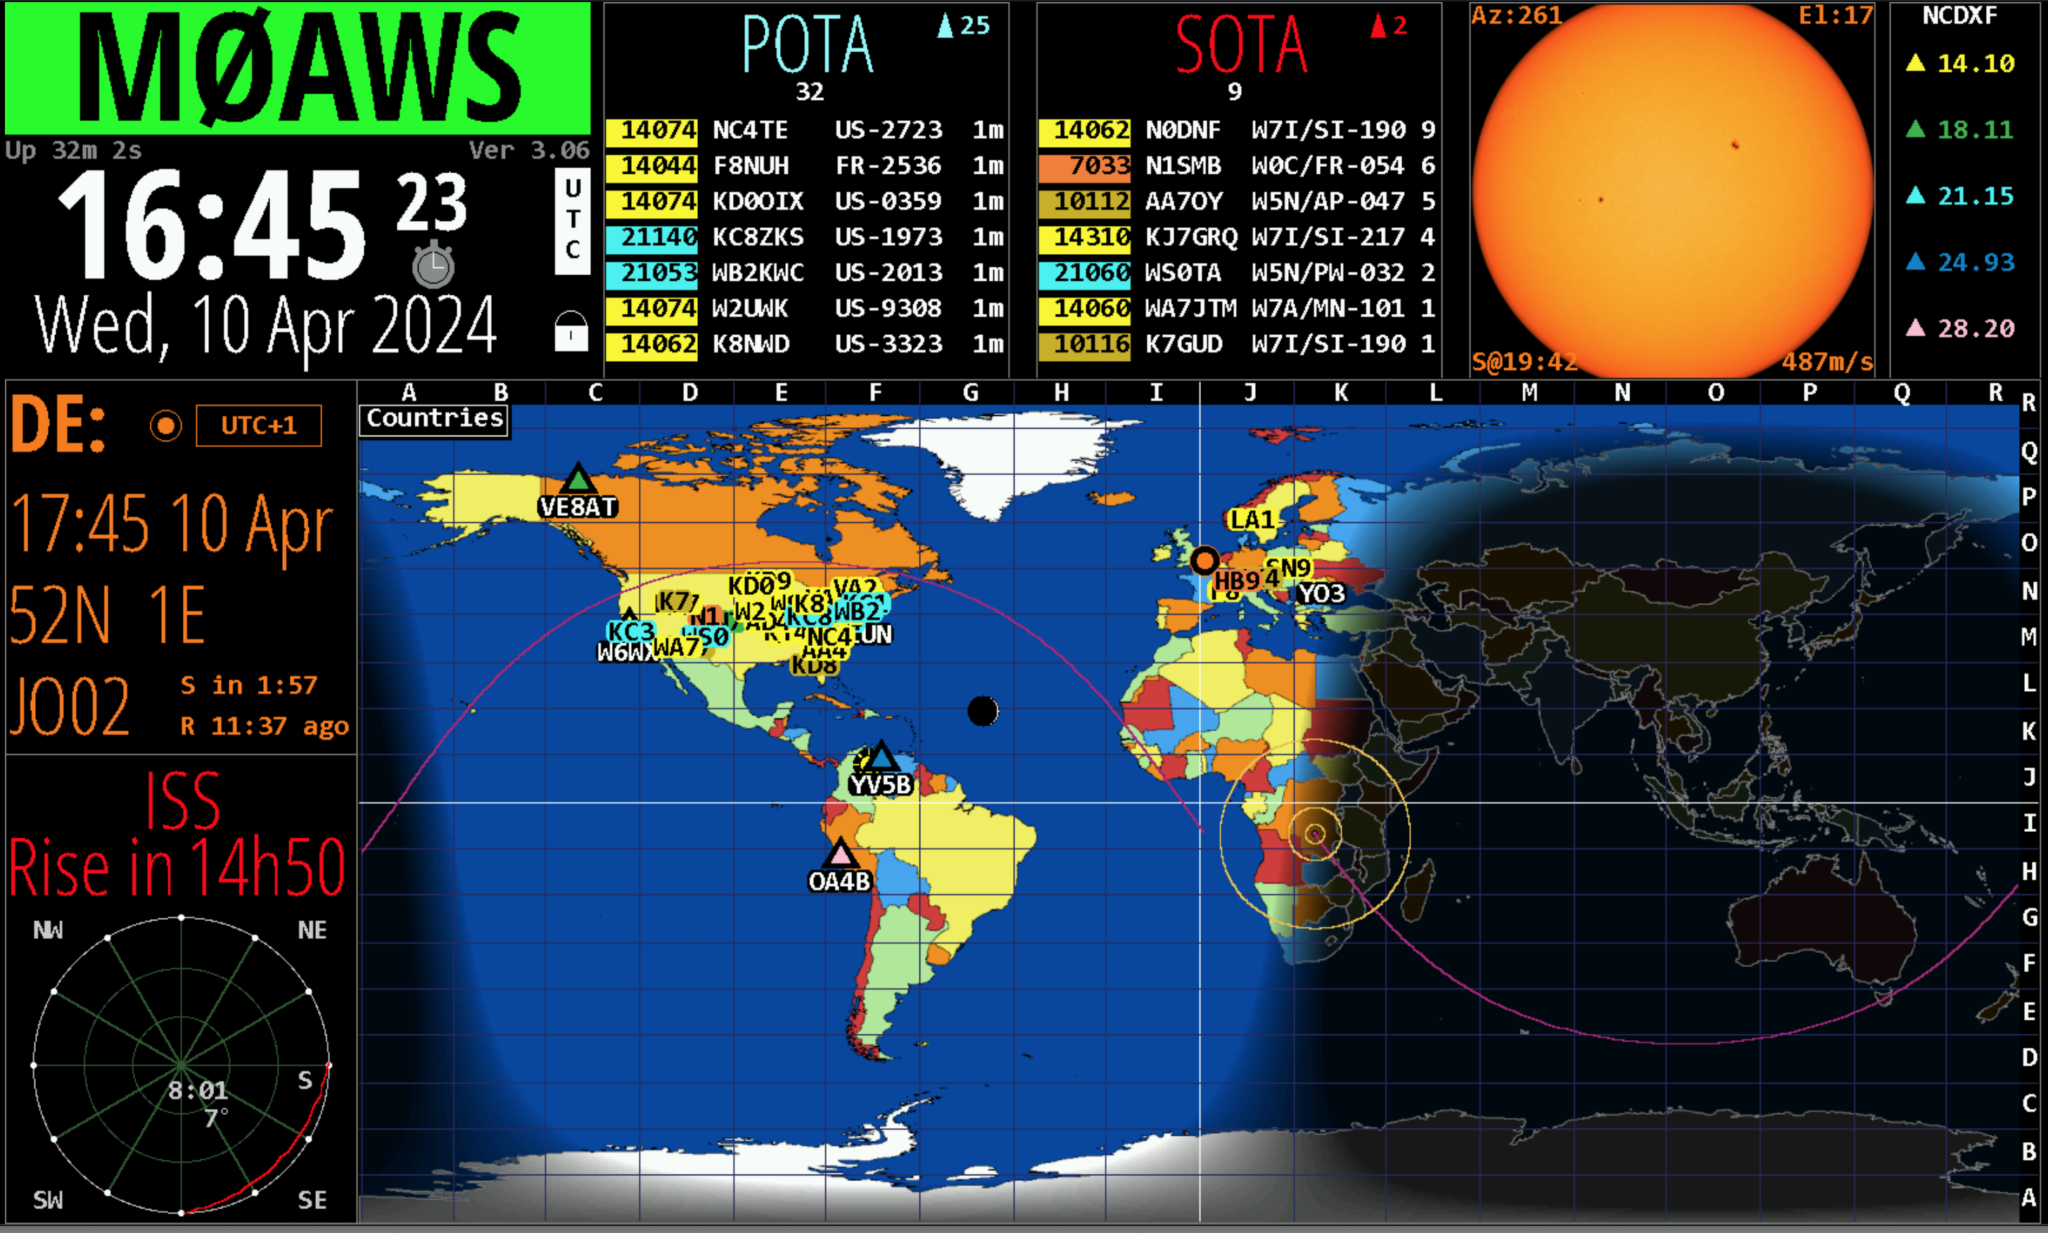
M0AWS - HAM Clock running on RaspberryPi Computer
M0AWS – HAM Clock running on RaspberryPi Computer

Once the configuration is complete the map will populate with the default panels and data. I tailored my panels to show the items of interest to me namely, POTA, SOTA, International Beacon Project and the ISS space station track. I was hoping to be able to display more than one satellite at a time on the map however, the interface only allows for one bird to be tracked at a time.

You can access the HAM Clock from another computer using a web browser pointed at your RaspberryPi on your local LAN using either the IP address or the hostname of the device.

http://<hostname>:8081/live.html

or

http://<ip-address>:8081/live.html

You can also control the HAM Clock remotely via web browser using a set of web commands that are detailed on port 8080 of the device.

http://<hostname or ip-address>:8080/
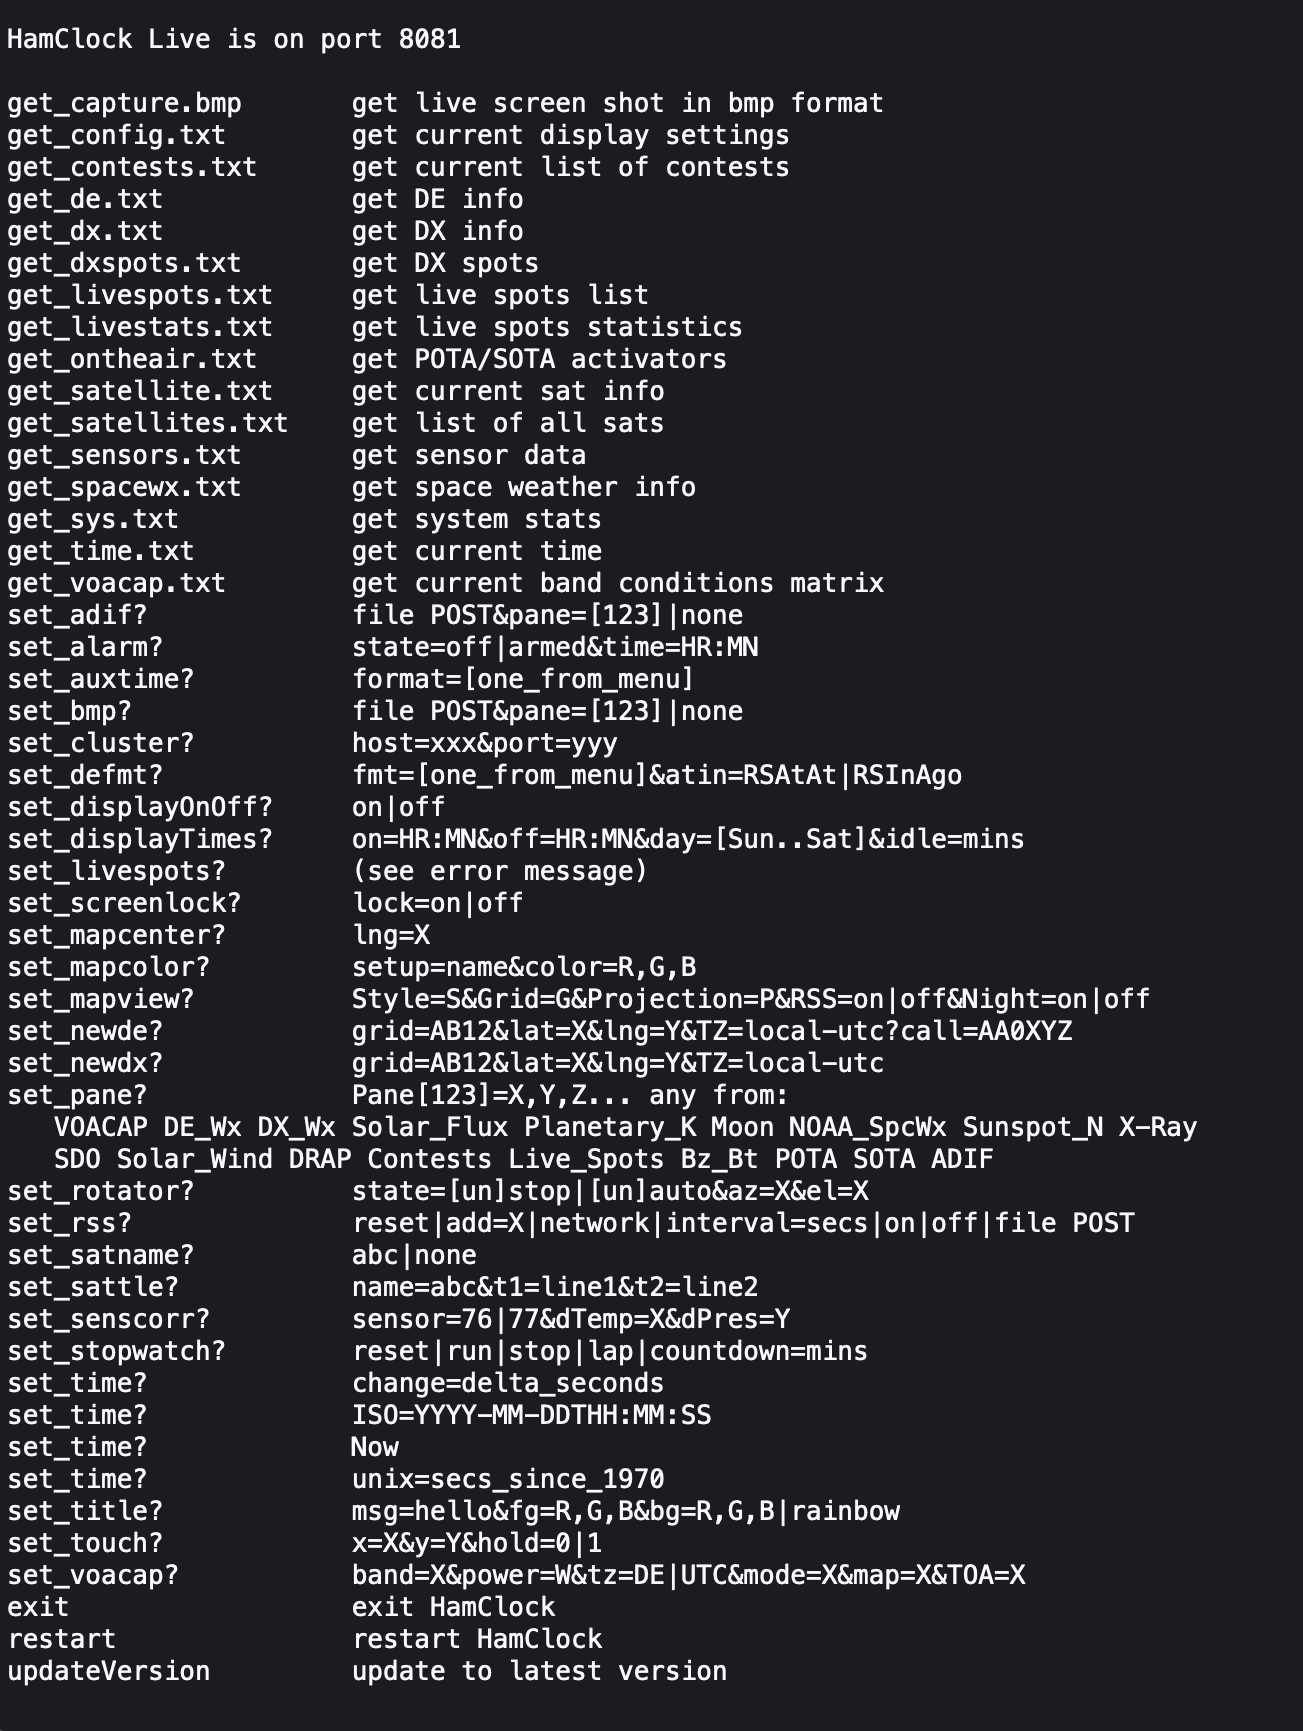
M0AWS - HAM Clock remote command set
M0AWS – HAM Clock remote command set

This is a great addition to any HAM shack especially if, like me you have an old HDTV on the wall of the shack that is crying out to display something useful.

More soon …

70cm Band Eggbeater Satellite Antenna

Following on from my 2m Band Eggbeater Satellite Antenna here’s the design for the 70cm Band version that will enable duplex satellite operation.

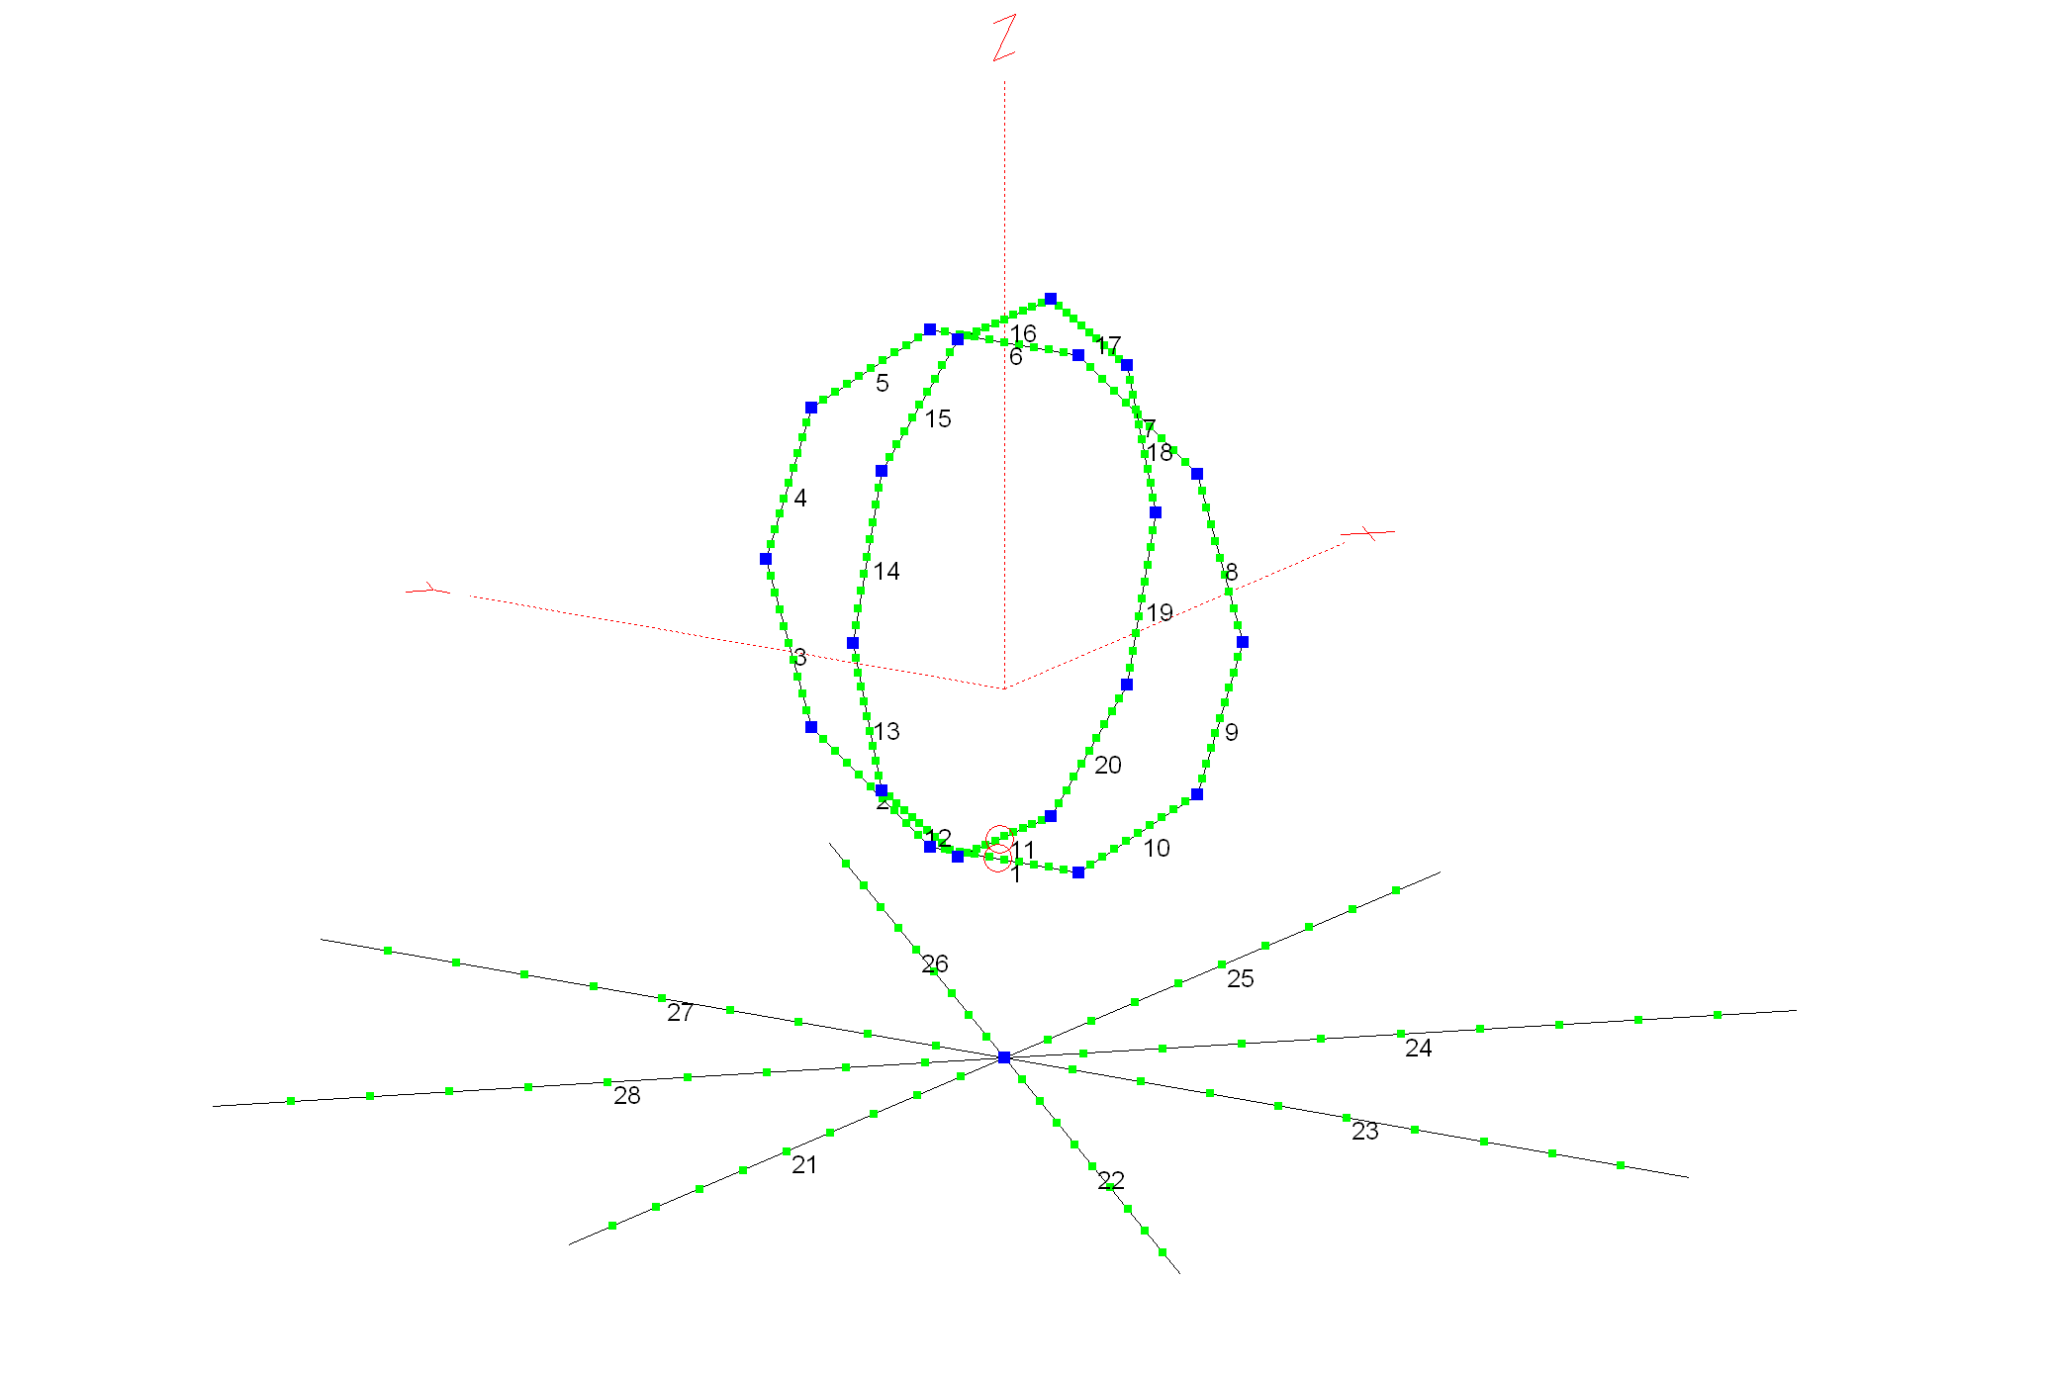
The design is basically the same as the 2m antenna but, with smaller dimensions. All modelling has been done with the antenna at 5m AGL.

70cm Band Eggbeater Satellite Antenna

Each of the Eggbeater loops has a conductor size of 5mm and a circumference of 73.5cm with the radials exactly 5cm below the bottom of the loops. The 8 radials are exactly 34.15cm long each. The distance between the bottom of the eggbeater loops and the radials must be 5cm to get the best radiation pattern from the antenna.

With these dimensions the antenna has an SWR of <1.5:1 across the whole 70cm band making it ideal for both satellite and general repeater/SSB working.

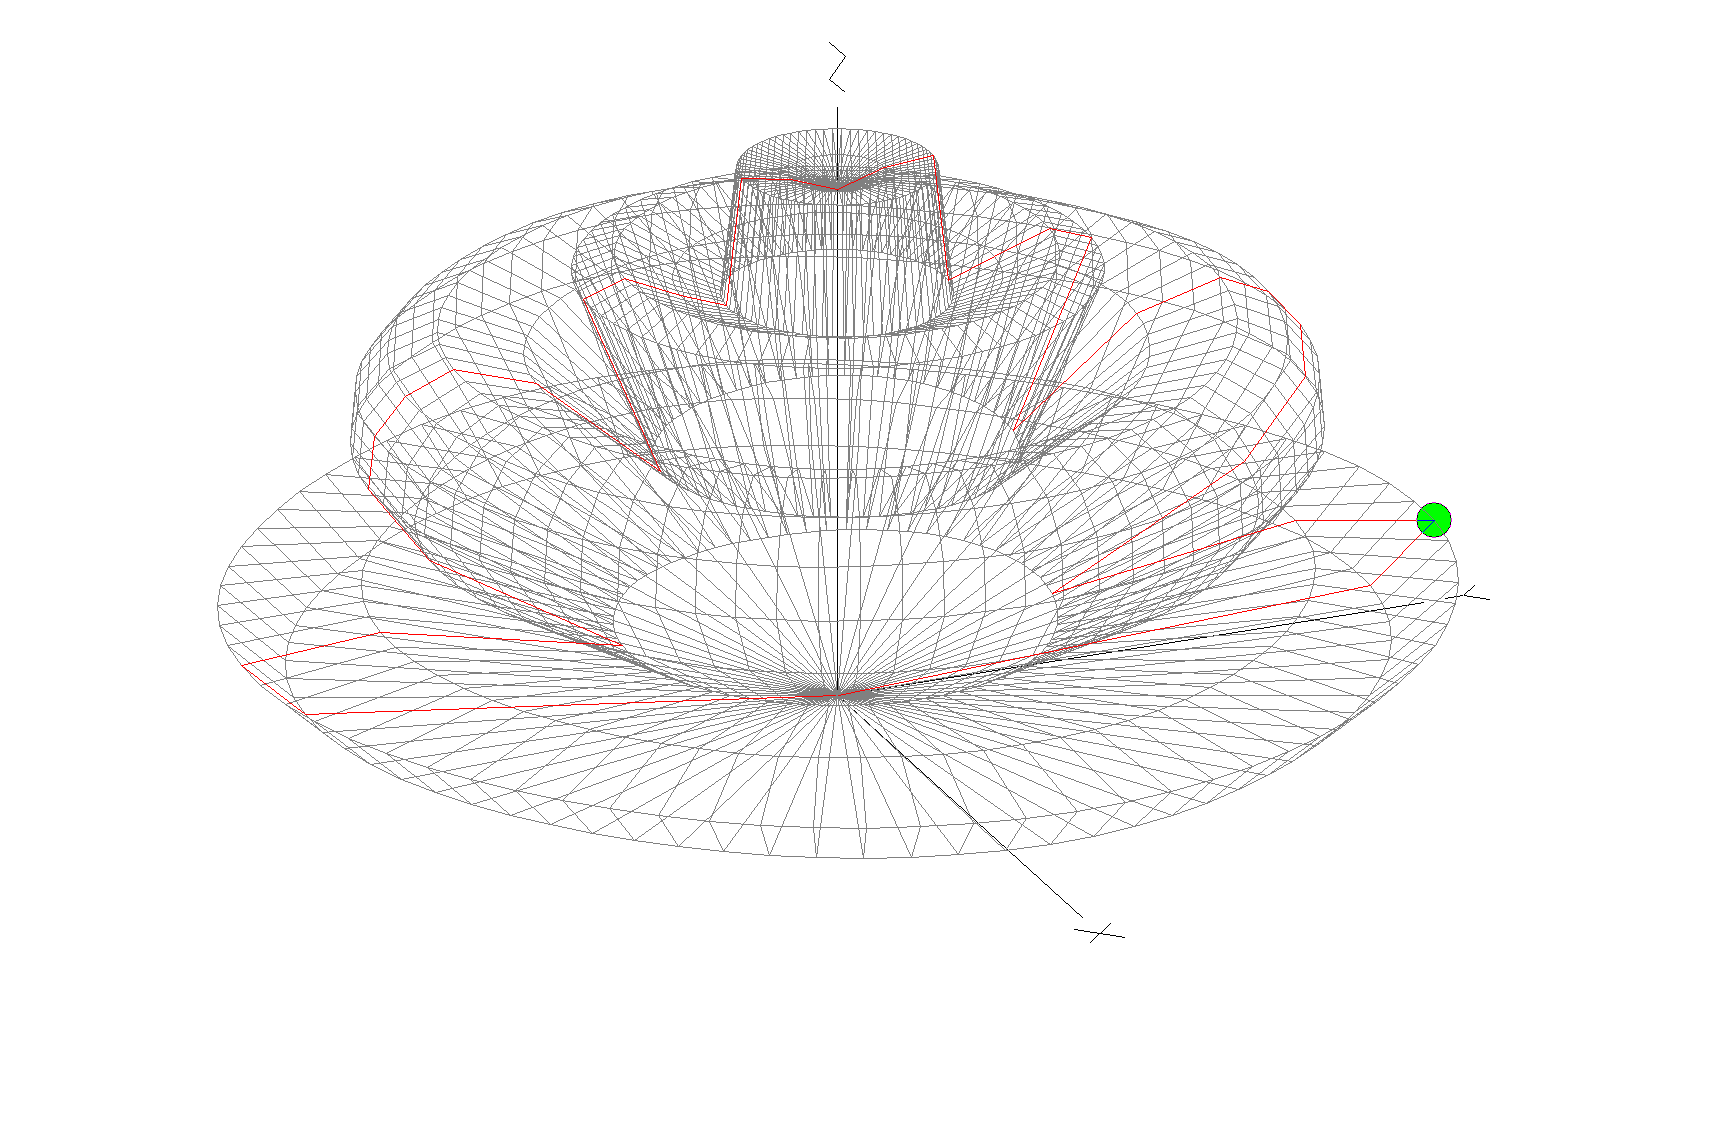
70cm Band Eggbeater Satellite Antenna 3D Far Field Plot

The 3D far field plot shows that the antenna has a good mix of high and low angle radiation that makes it ideal for working satellites at all elevation angles.

70cm Band Eggbeater Satellite Antenna 2D Far Field Plot

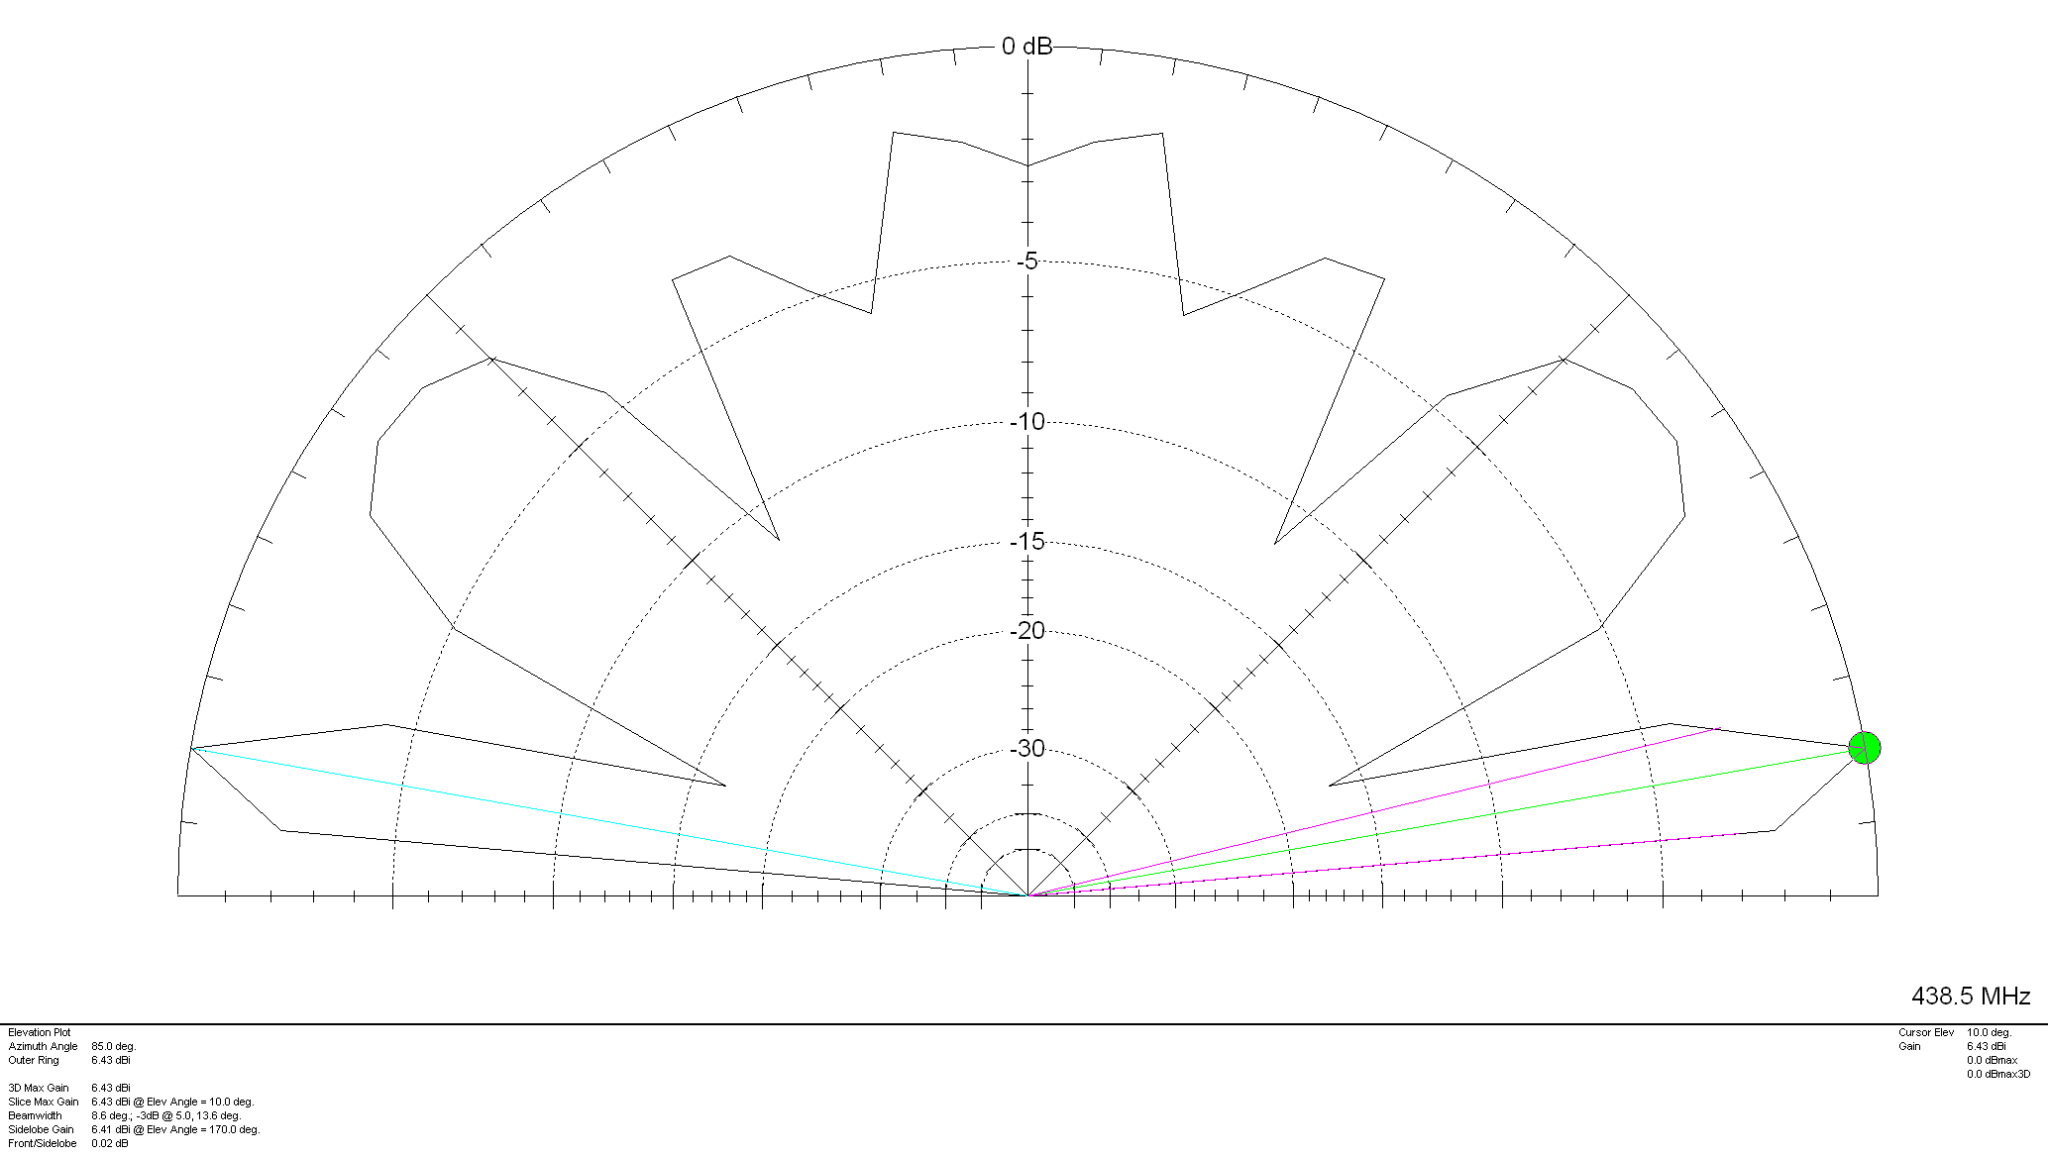
The 2D far field plot shows that the antenna has the following high gain lobes:

6.43dBi @10 Deg
5.15dBi @40 Deg
3.4dBi @60 Deg
4.83dBi @80 Deg

The null at the top of the antenna isn’t as pronounced as on the 2m model and so this antenna should perform better when the satellite is directly above. Just like on the 2m band version, this antenna must also have a feed phase angle of 90 degrees between the two eggbeater elements. It’s very important that the phasing harness is built accurately as it can impact the radiation pattern of the antenna if the phase angle isn’t correct.

ON6WG has written an excellent article on how to create the phasing harness using 2 pieces of coax cable, this is an ideal solution for this antenna.

More soon …

ISS Pass 25/04/24 AM

I had a listen for the ISS FM Repeater this morning using my Dual Band End Fed Vertical Dipole antenna. Not the best antenna for satellite chasing especially since it was a high angle pass this morning however, I did get a relatively good copy on the ISS before it got too high in the sky and fell into the null at the top of the vertical.

A short clip form the ISS pass 25/04/23 AM

I think with an eggbeater antenna reception will improve considerably.

More soon …

2m Band Eggbeater Satellite Antenna

I’ve been chatting a lot recently on Matrix about antennas for the amateur satellites.

Since I’m currently working on building a ground station for the QO-100 satellite a group of satellite enthusiasts having been talking about the other satellites that are in orbit around this little planet of ours.

The ISS FM voice repeater on 145.990Mhz is very popular and is one of the easiest satellite stations to get into apparently. Many are using Eggbeater antennas to get an all round radiation pattern.

I’ve never looked into building or modelling such antennas and so I decided to have a go at modelling one and use it as an opportunity to see how it works.

All the modelling has been done with the antenna at 5m above ground level.

2m Band Eggbeater satellite Antenna with 8 Radials

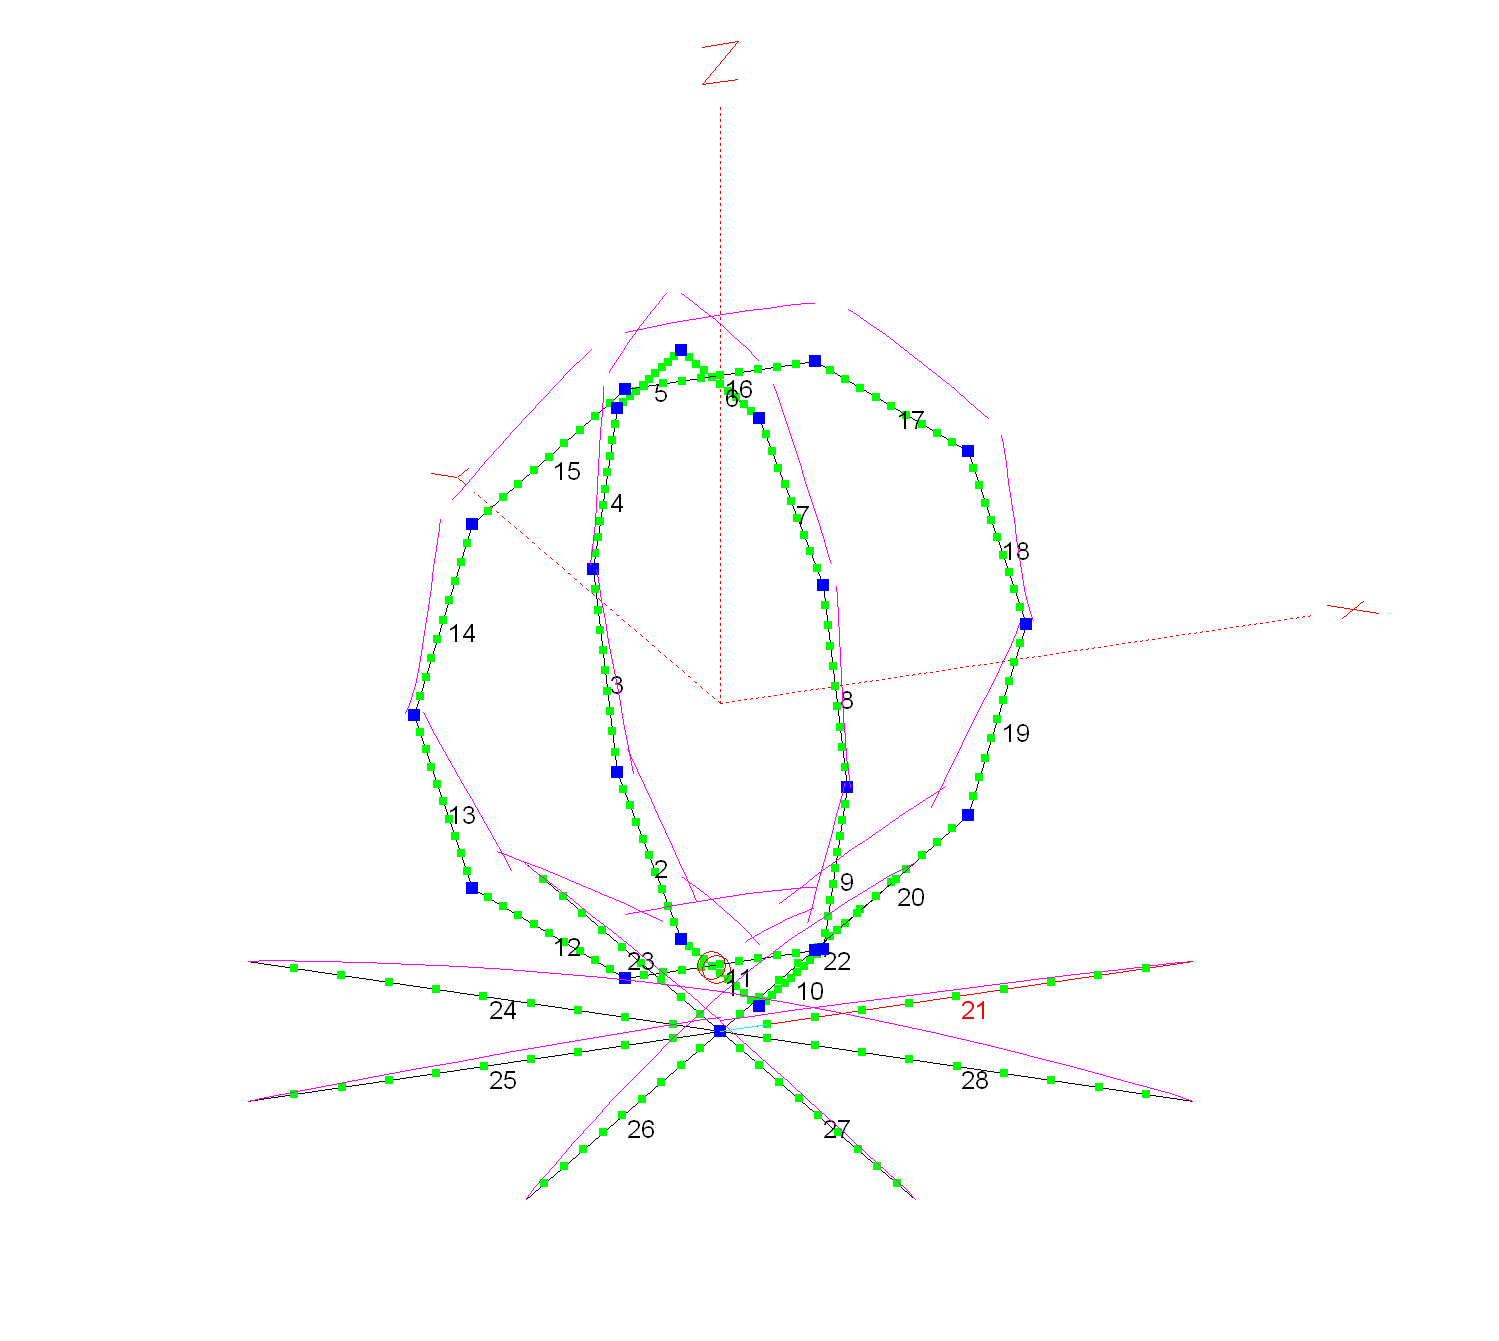
Each loop has a circumference of 2.17m and each of the 8 radials is 0.5425m long and 5cm below the eggbeater elements. I’ve modelled the antenna using 5mm diameter conductors as this should make them resistant to wind etc. I am planning on using 5mm copper tubing for the build.

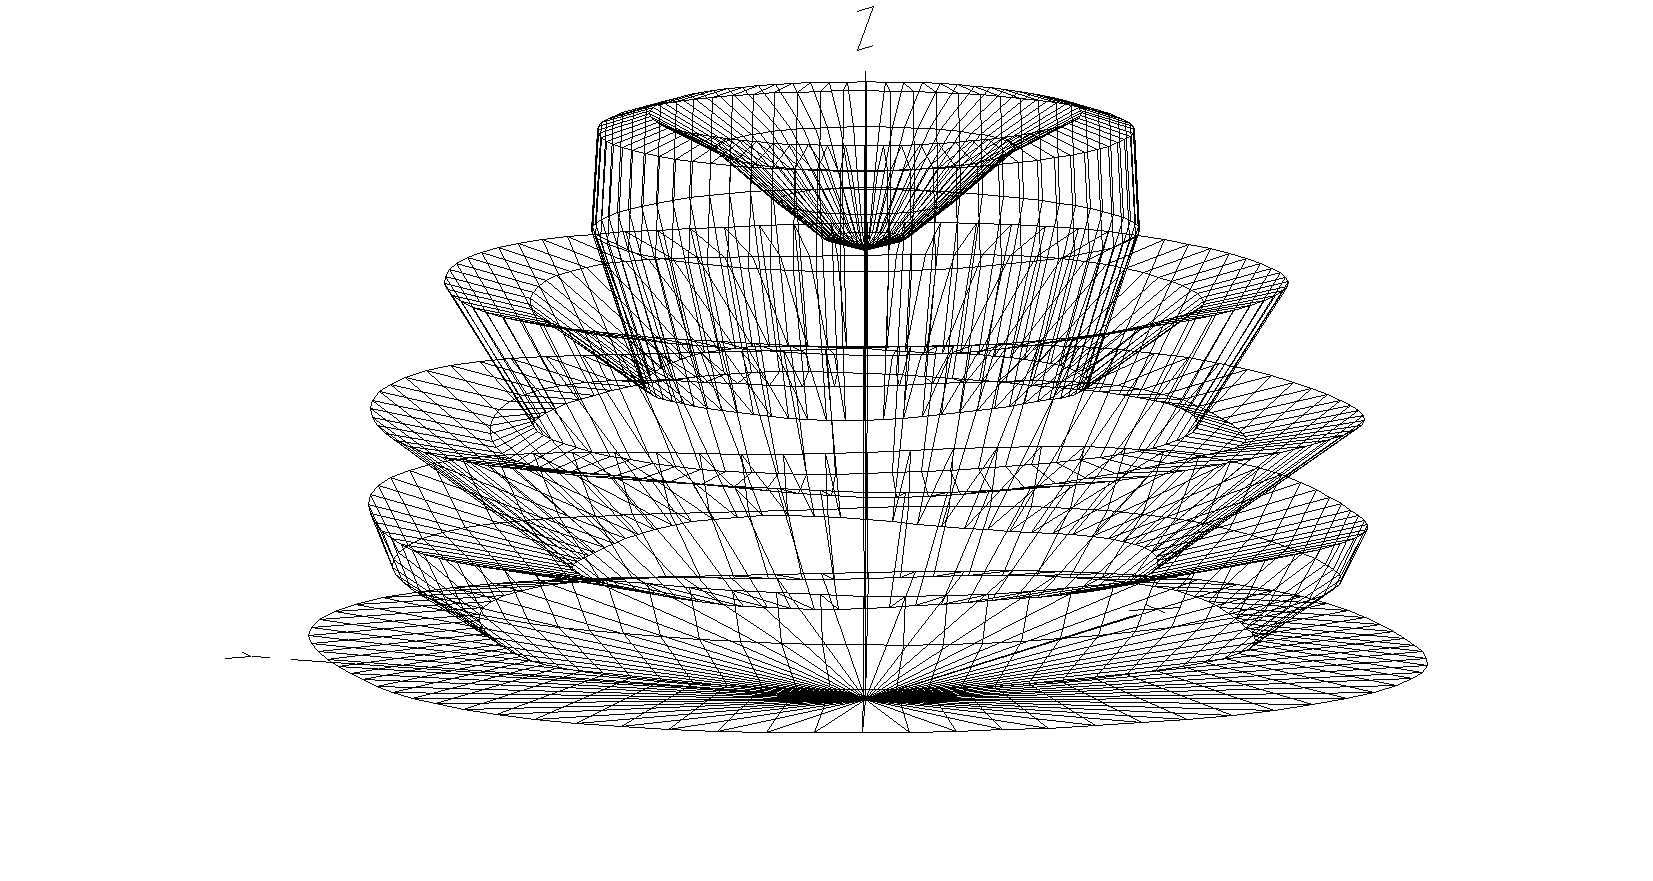
2m Band Eggbeater Satellite Antenna 3D Far Field Plot

The 3D far field plot shows a typical radiation pattern for such an antenna with a very good low angle gain for working satellites on the horizon and multiple high gain lobes as the radiation angle increases. At 5 degrees the RF is horizontally polarised, ideal for shooting directly out at the horizon. This is mainly due to the phasing of the two elements. At the higher angles the RF is vertically polarised thus giving the ability to receive both horizontal, vertical and some circular radiation at a good range of angles. There is however, a very slight null directly above the antenna and so signals to satellites directly above will be attenuated slightly compared to the other two high angle high gain lobes. This will also be the case on receive.

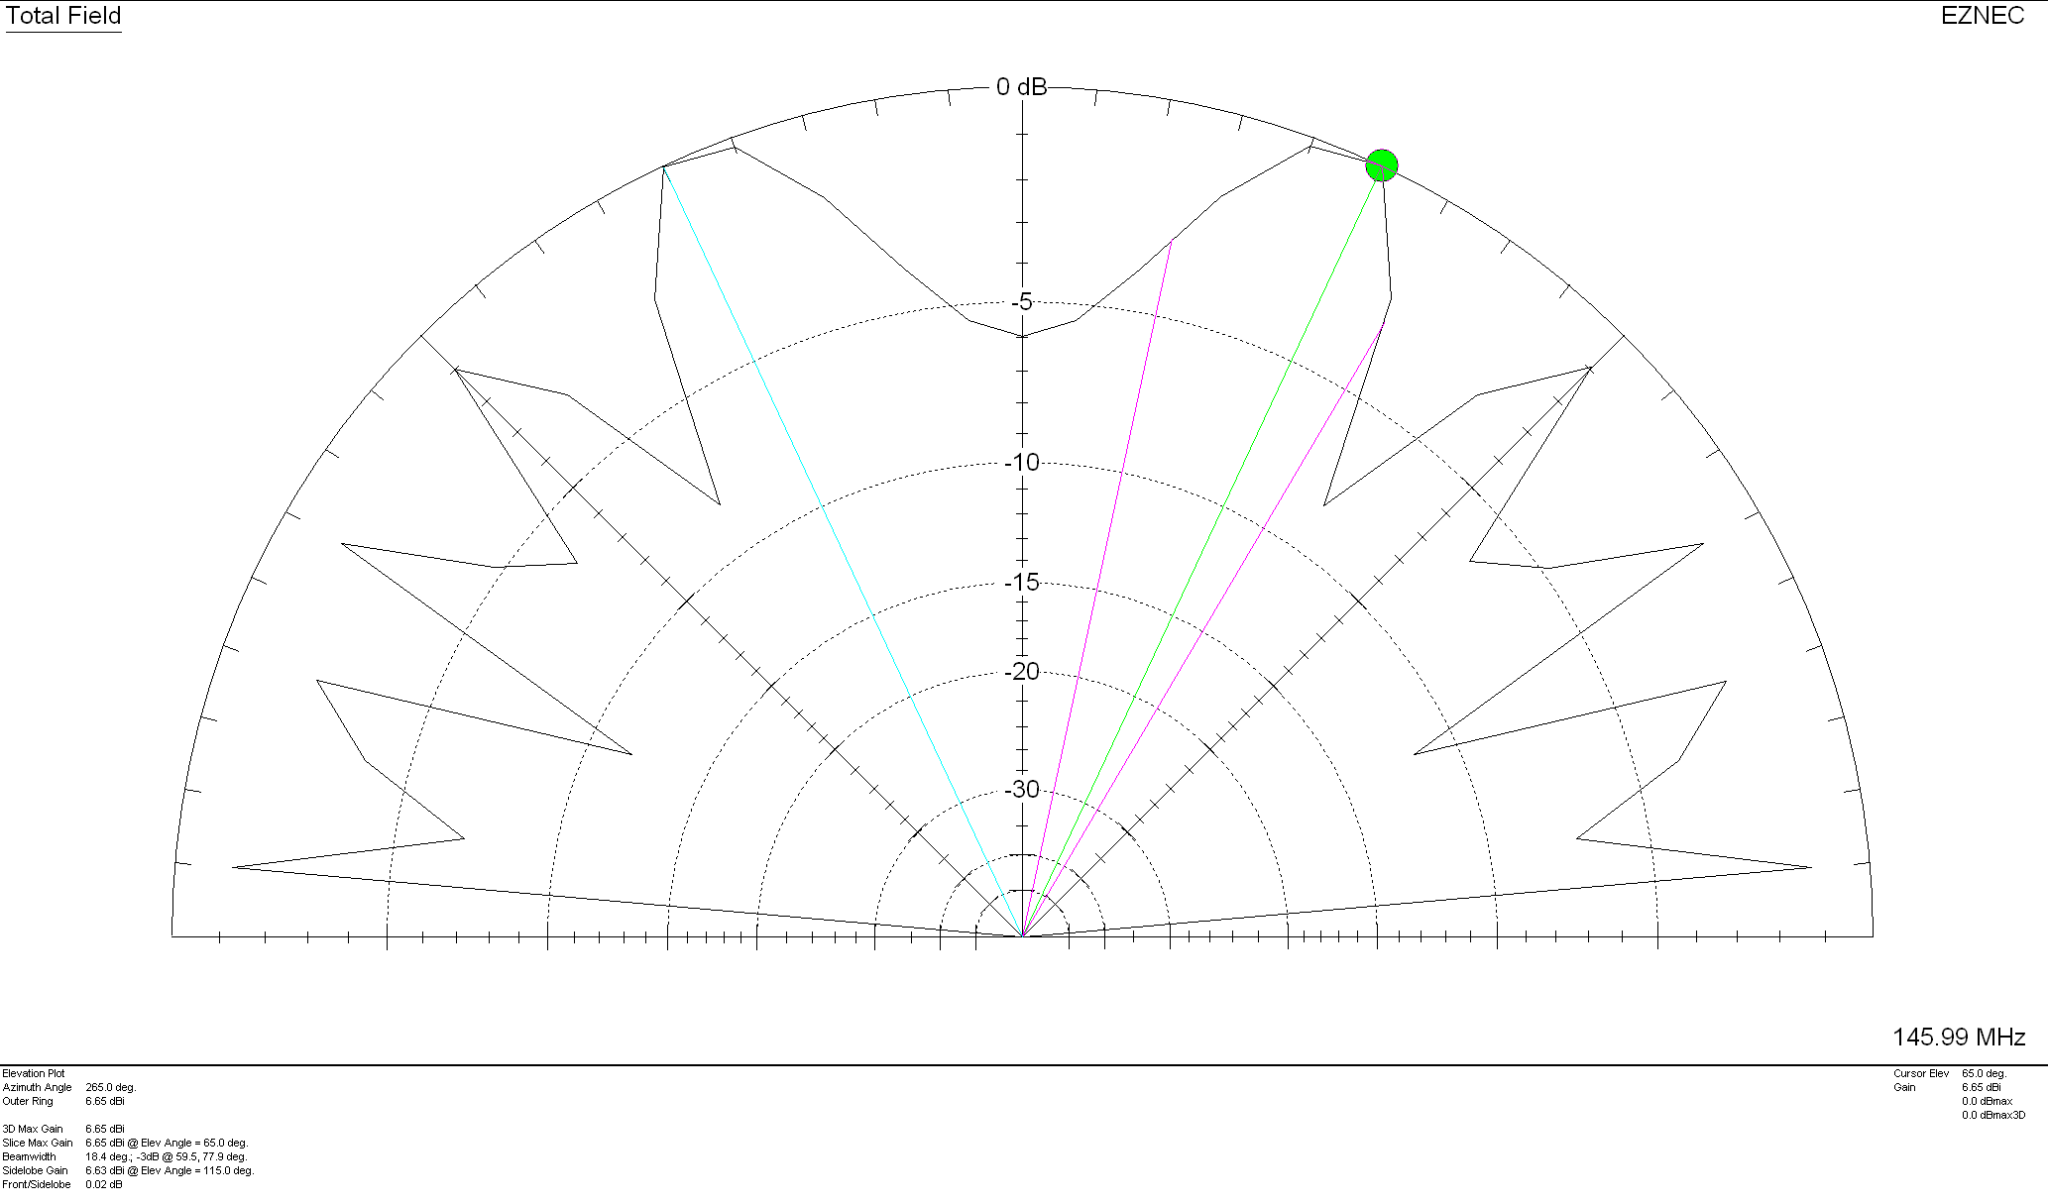
2m Band Eggbeater Satellite Antenna 2D Far Field Elevation Plot

With 5.42dBi gain at 5 Deg this antenna has a real good shot at the horizon with the maximum gain of 6.65dBi being at the much higher angle of 65 Deg. Overall this antenna should work well for all satellites from the horizon up to almost directly above the antenna.

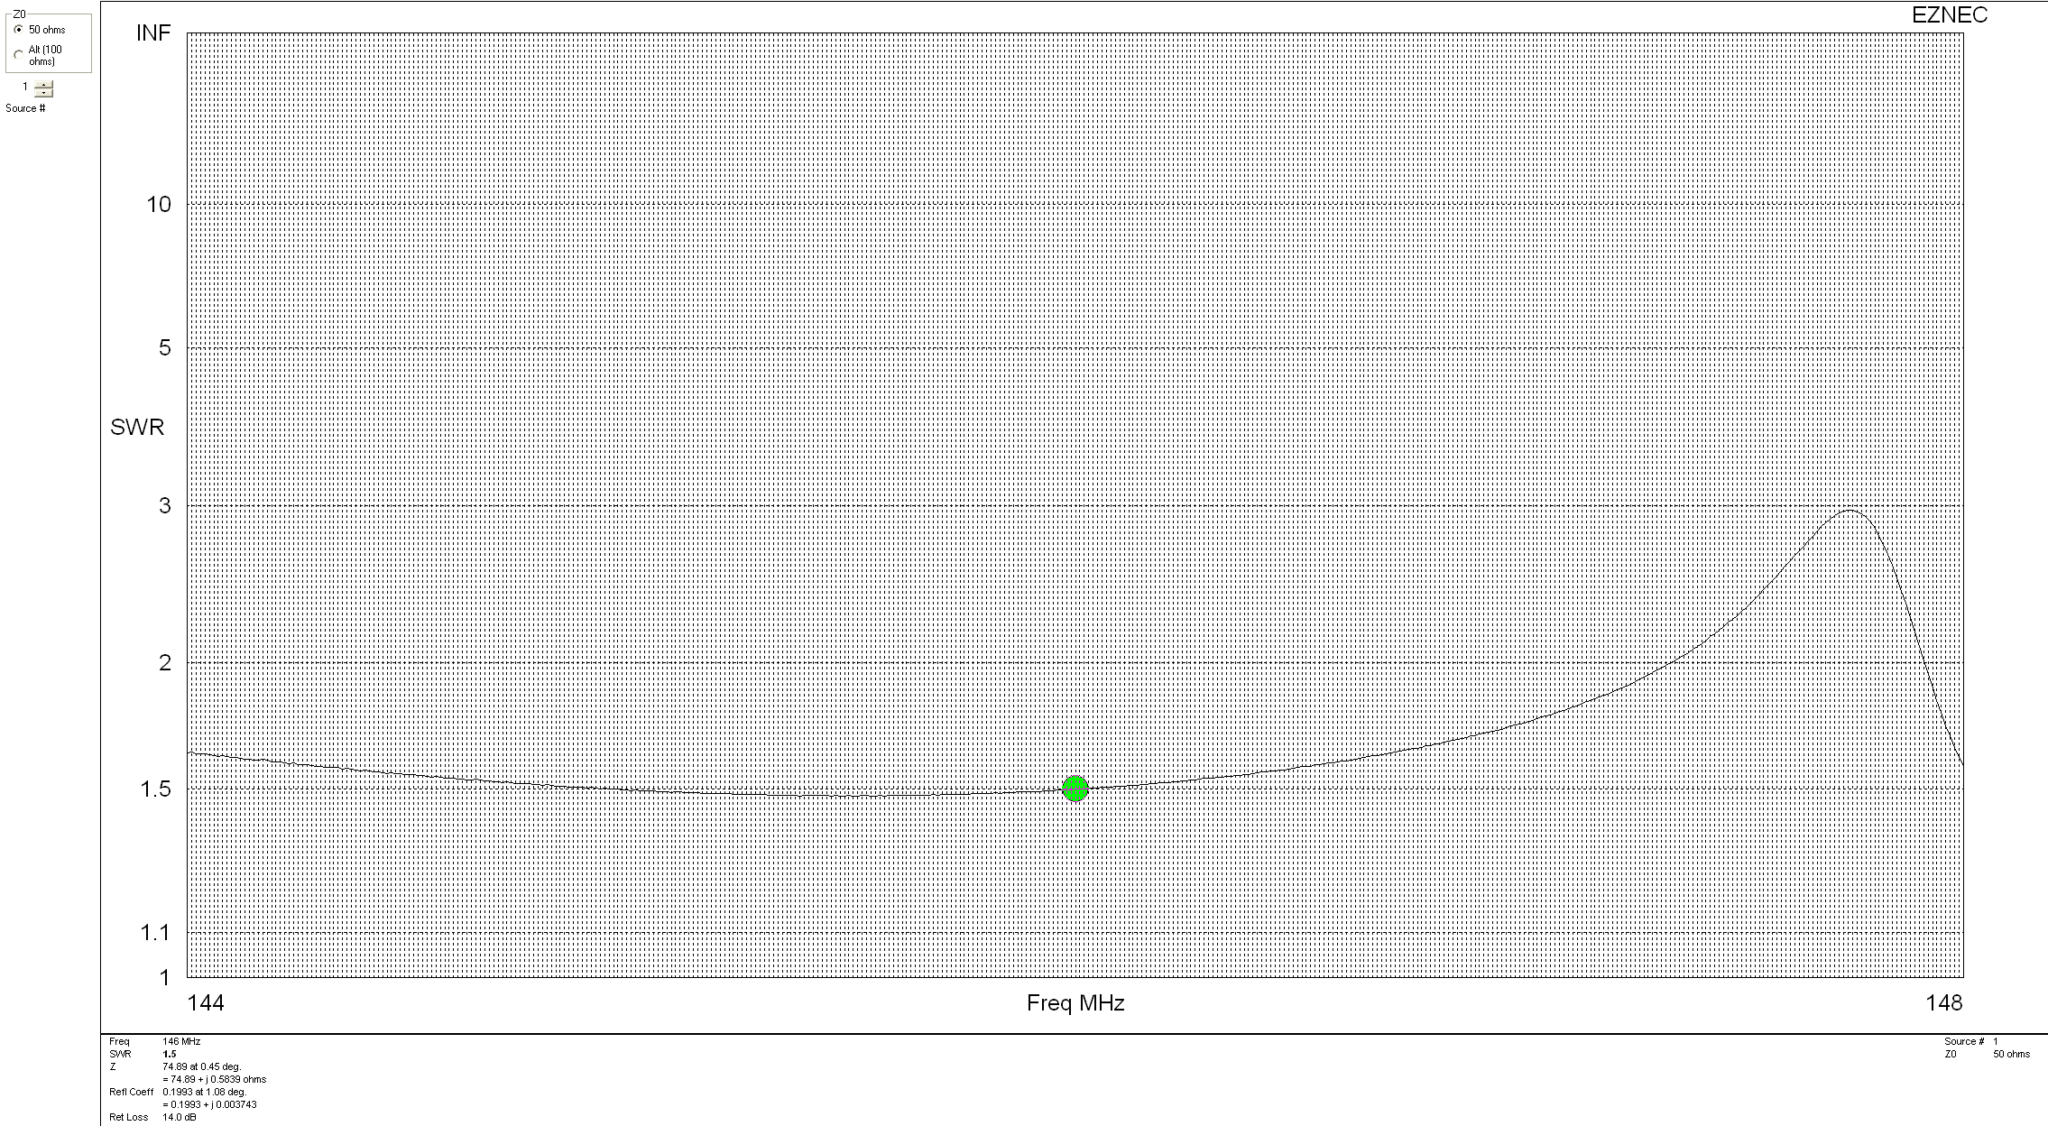
2m Band Eggbeater satellite Antenna SWR Curve

With an SWR of 1.5:1 across most of the 2m band this antenna will match perfectly to 50 Ohm coax feed. It’s really important to remember that when building this antenna the loops must be fed with a phase angle difference of exactly 90 degrees. If this isn’t accurate then the radiation pattern is affected quite drastically and spoils the overall performance of the antenna.

Details on how to create the 90 Degree phase shift between the two elements using 2 pieces of 50 Ohm coax can be found in the excellent article by ON6WG.

More soon …