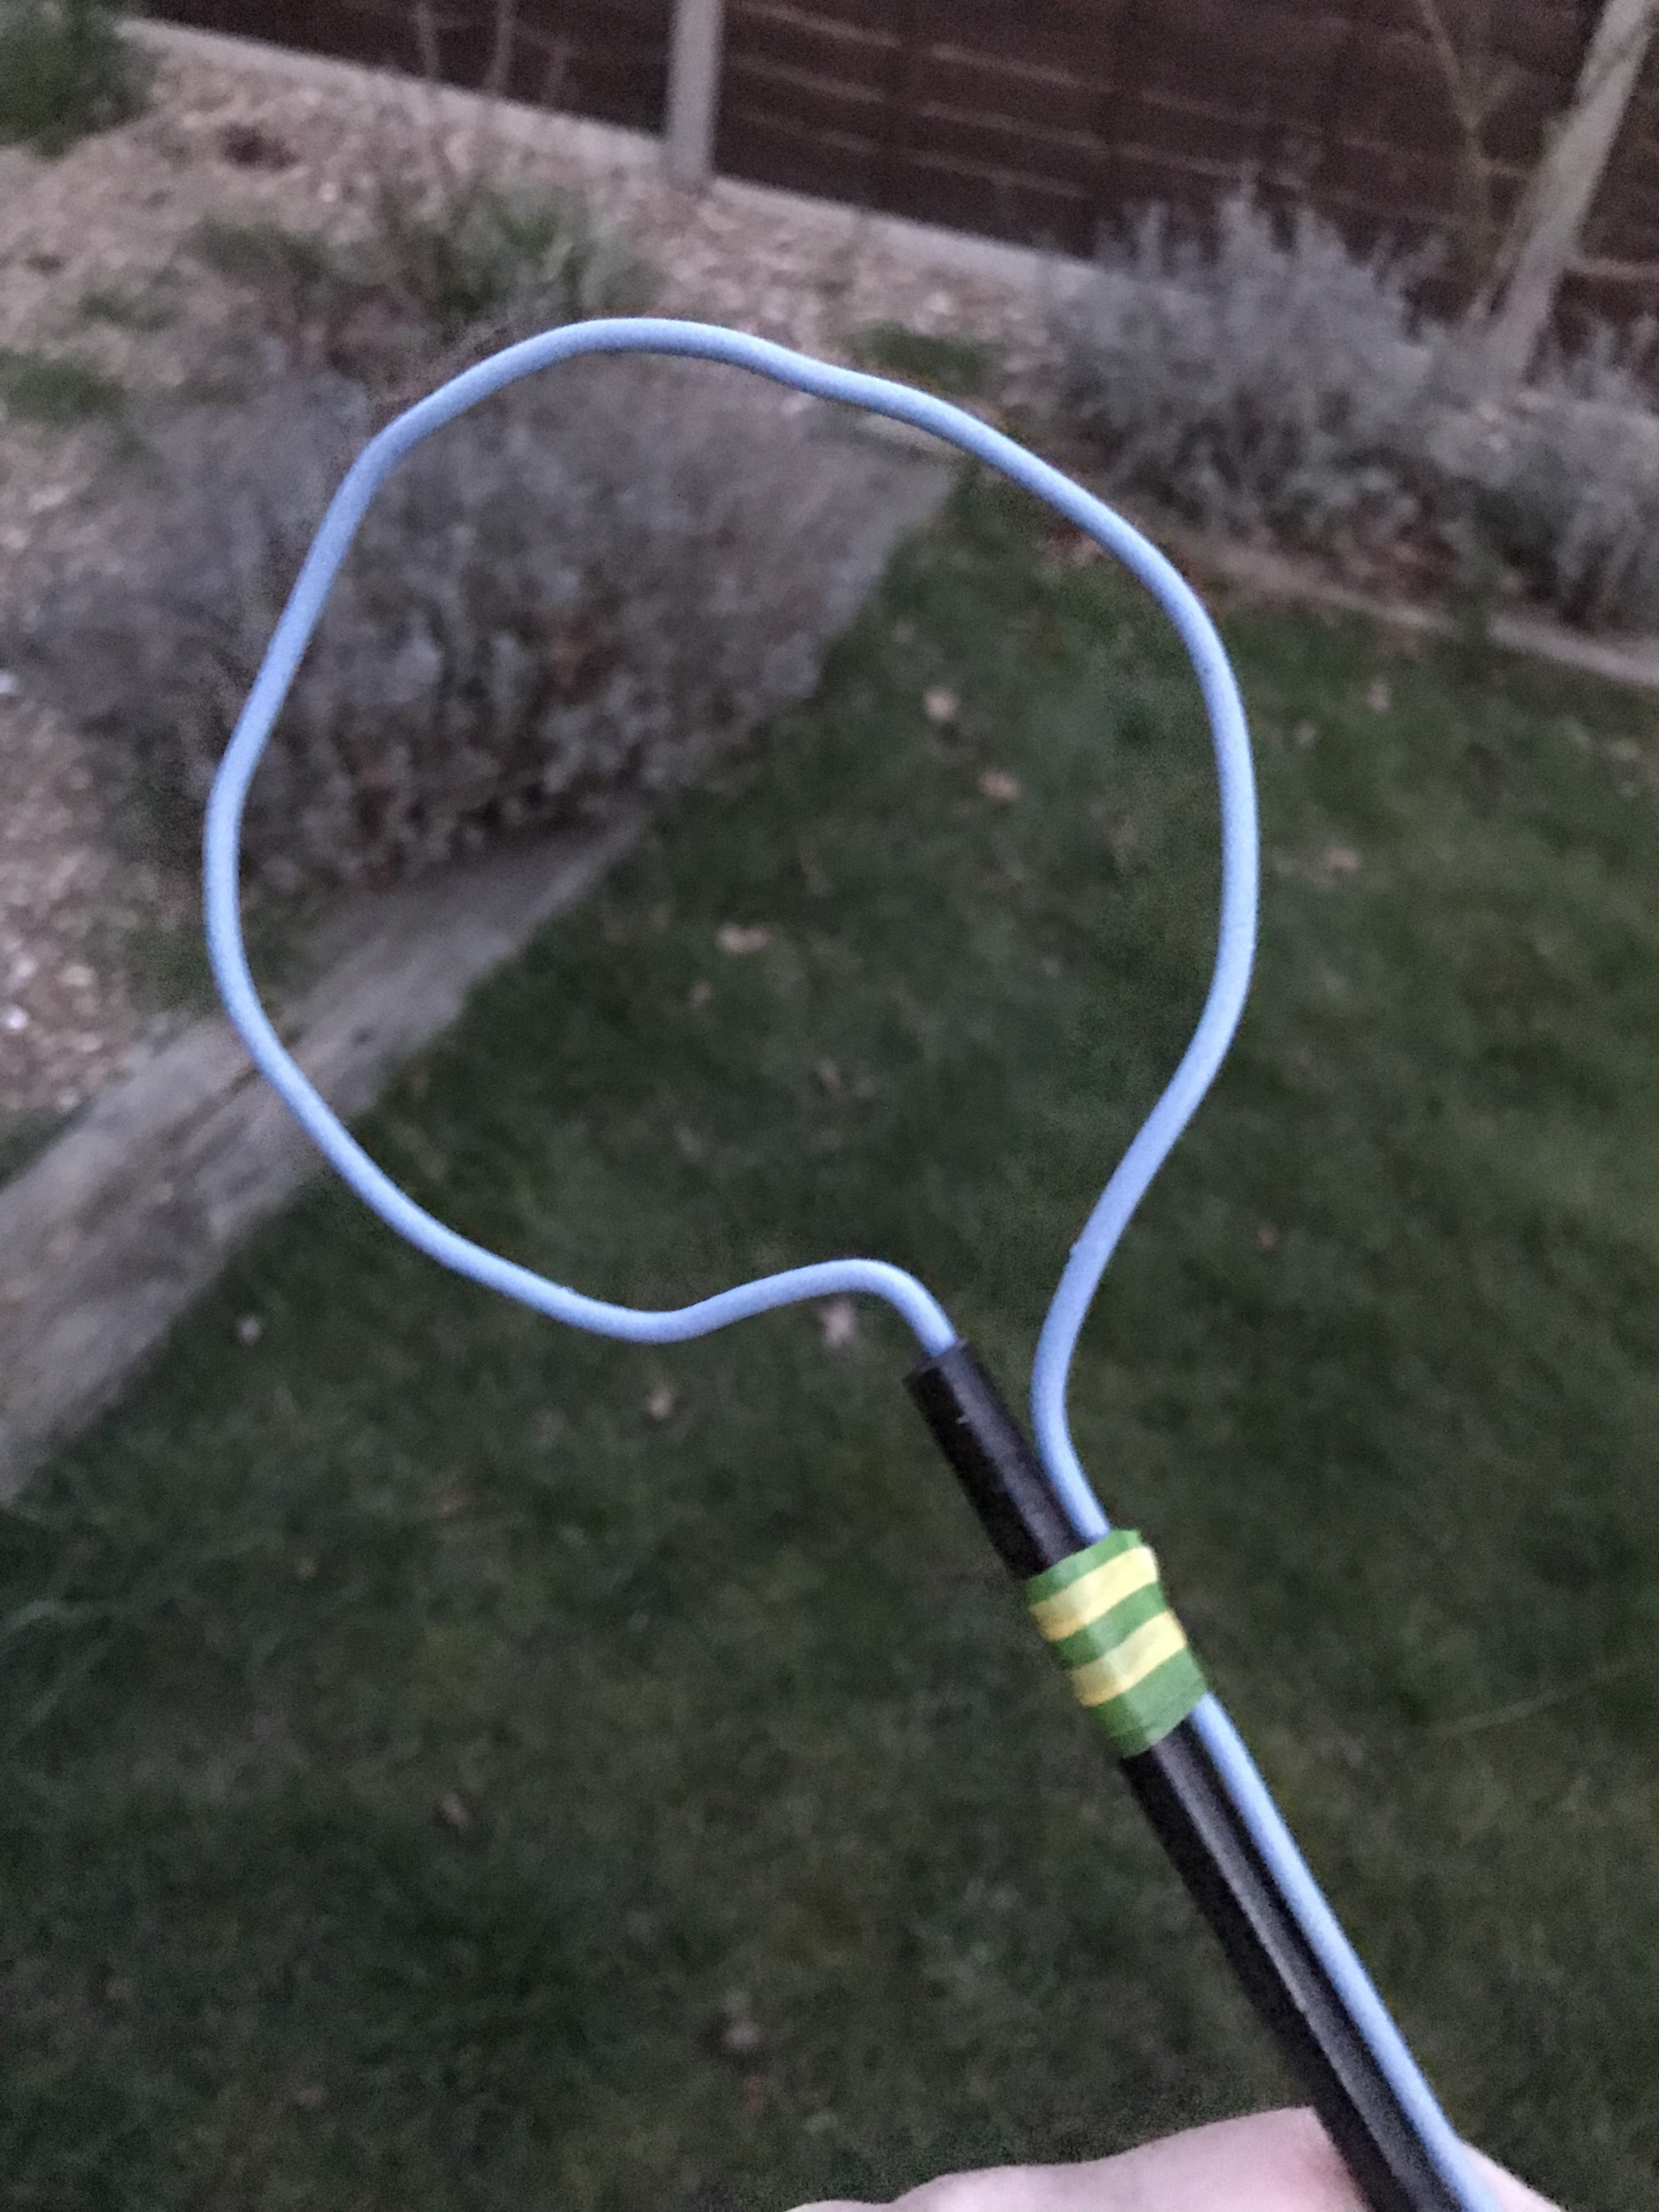
The bi-directional slot fed HF antenna isn’t mentioned very often these days for some strange reason. It’s a real shame as it is an excellent antenna that gives high gain through the loop between the frequencies of 14Mhz and 29Mhz.
M0AWS 20m – 10m Slot Fed HF Antenna
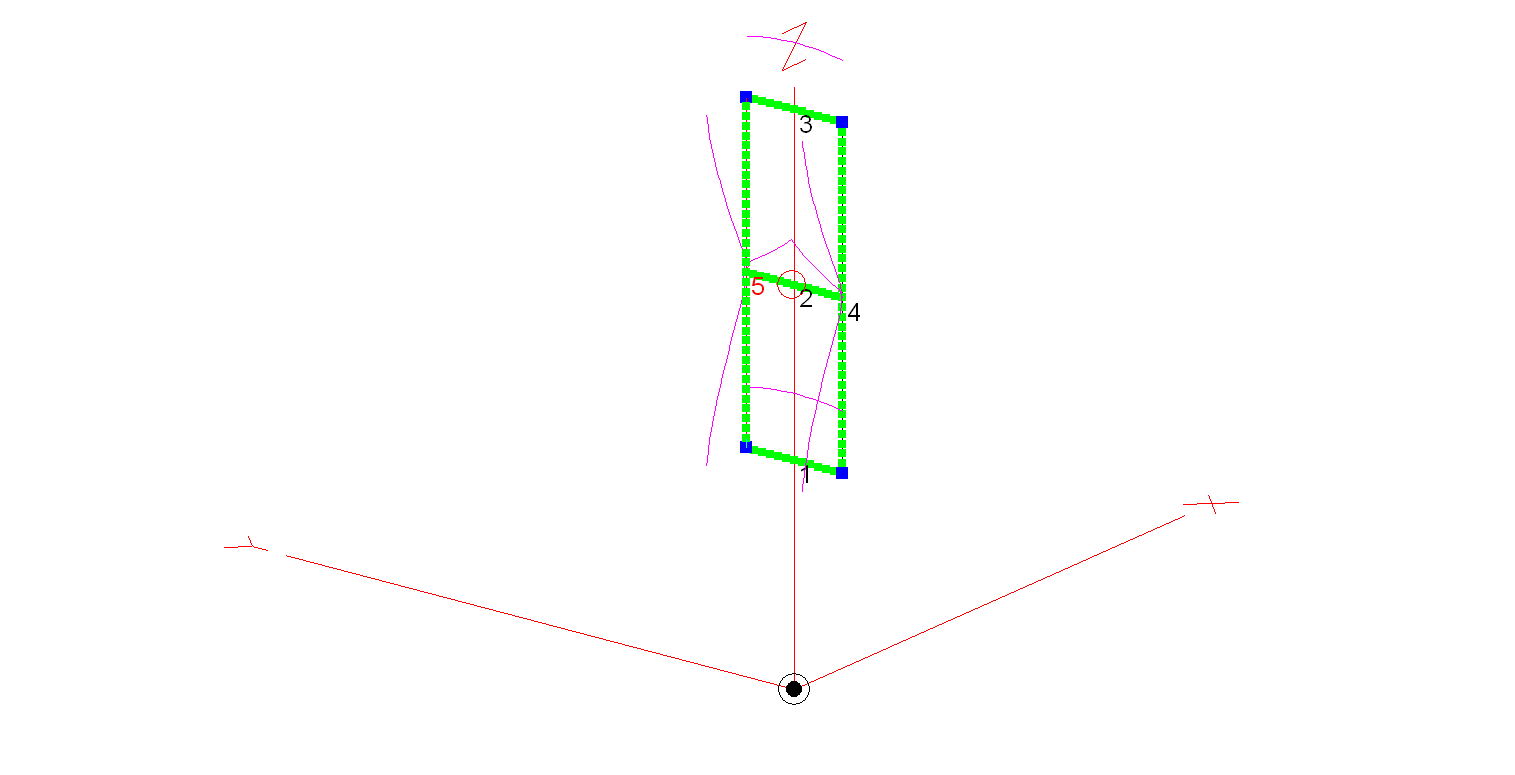
Construction of the antenna is relatively simple, 3 x 3m long horizontal wires and 2 x 9.2m long vertical wires. I’ve modelled the antenna using 20mm diameter copper tubing for the horizontal conductors and 2.5mm wire for the two vertical conductors. Using the 20mm copper tubing provides a rigid platform for the mounting of the antenna on a non-conductive mast whilst reducing weight by using 2.5mm wire for the vertical conductors. You could of course use 20mm copper tubing for all the conductors if you have a non-conductive mast that can handle the weight.
An alternative option is to hang the antenna from a high tree and secure it in position with non-conductive nylon cord. This works very well and makes it extremely easy to manually rotate.
The antenna is fed at the centre of the middle horizontal tube (conductor 2 in the image above) using one of the following methods:
Method 1 – Use a 4:1 Balun and ATU either in the radio/Radio Shack or connected directly to the Balun. Connecting a remote auto ATU to the balun directly at the feed point is the best option as you will then have a perfect 50 Ohm impedance match to the coax cable going back to the radio. (I’ve used my AH-705 and a 4:1 Balun at the feed point in the past with excellent results).
Method 2 – Connect a remote auto ATU directly to the feed point of the antenna and then 50 Ohm coax back to the radio shack. This will provide a perfect SWR match on all bands and works extremely well. (I’ve used my AH-705 remote auto ATU in this configuration as well in the past, again with excellent results and no discernible difference to method 1).
Method 3 – Feed the antenna with 450 Ohm open ladder line and use a 4:1 Balun and ATU in the radio shack to match the antenna to 50 Ohm radios. It’s important to bring the 450 Ohm ladder line away from the feed point horizontally and not vertically downwards. This will then help to protect the radiation pattern.
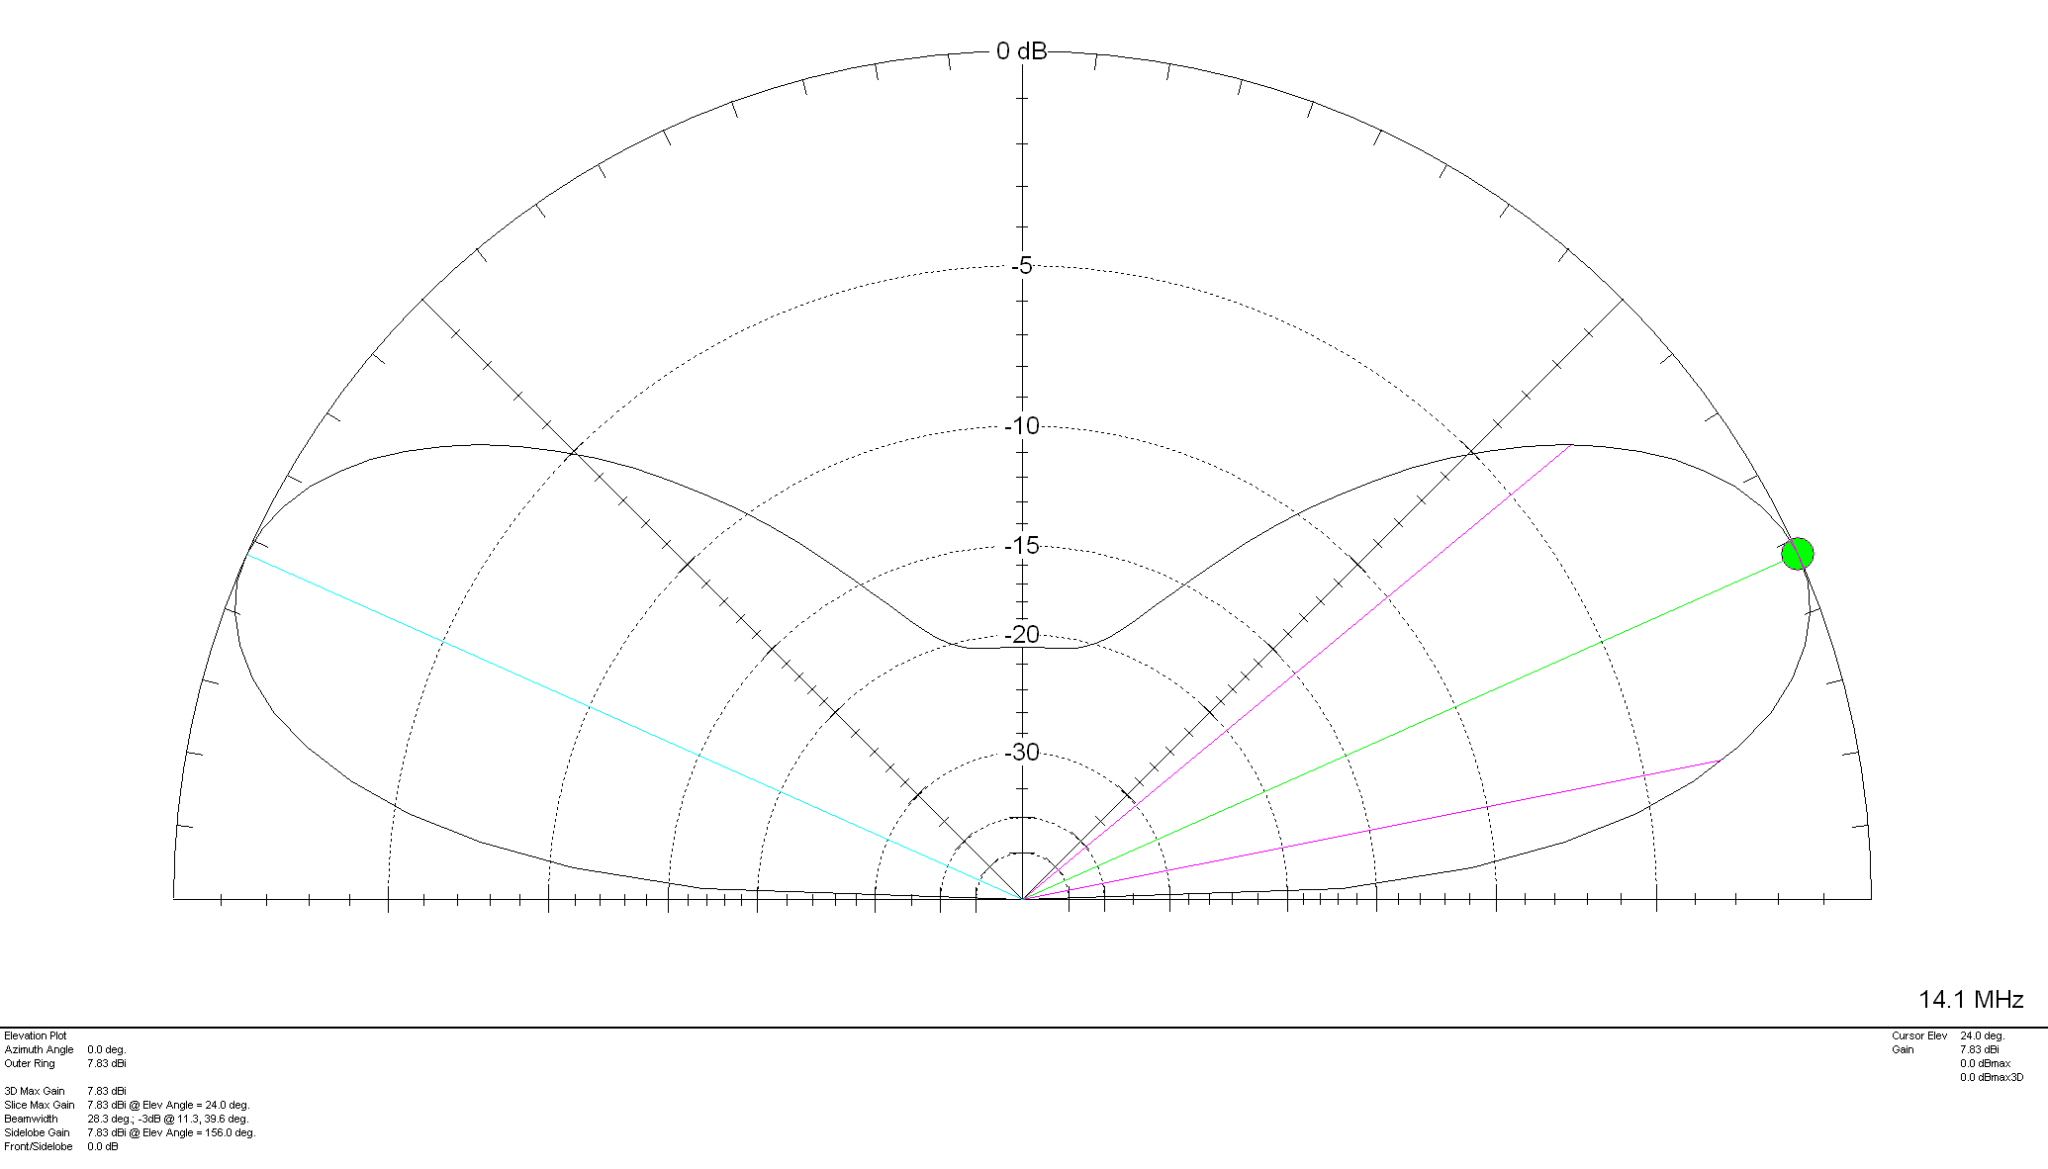
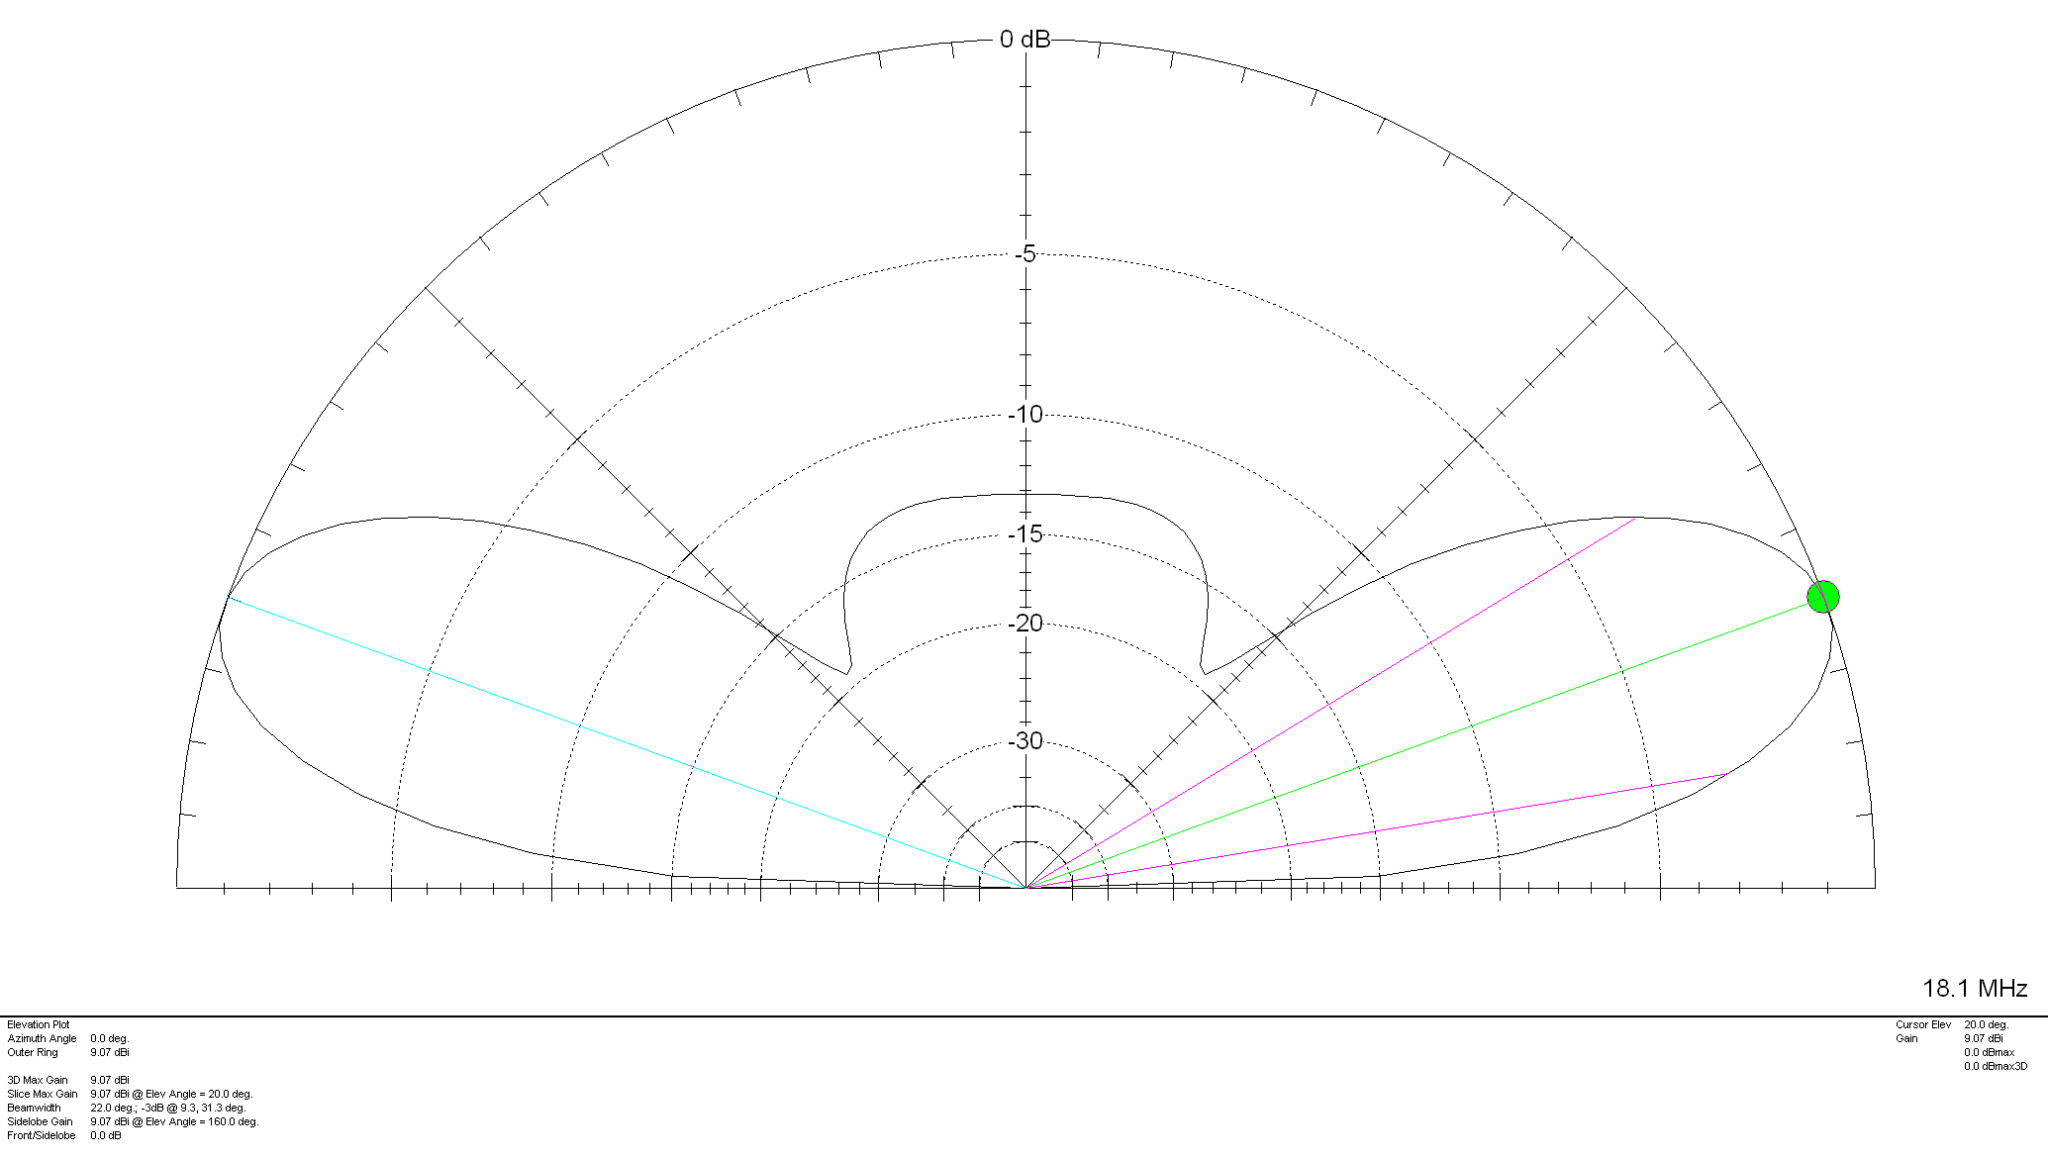
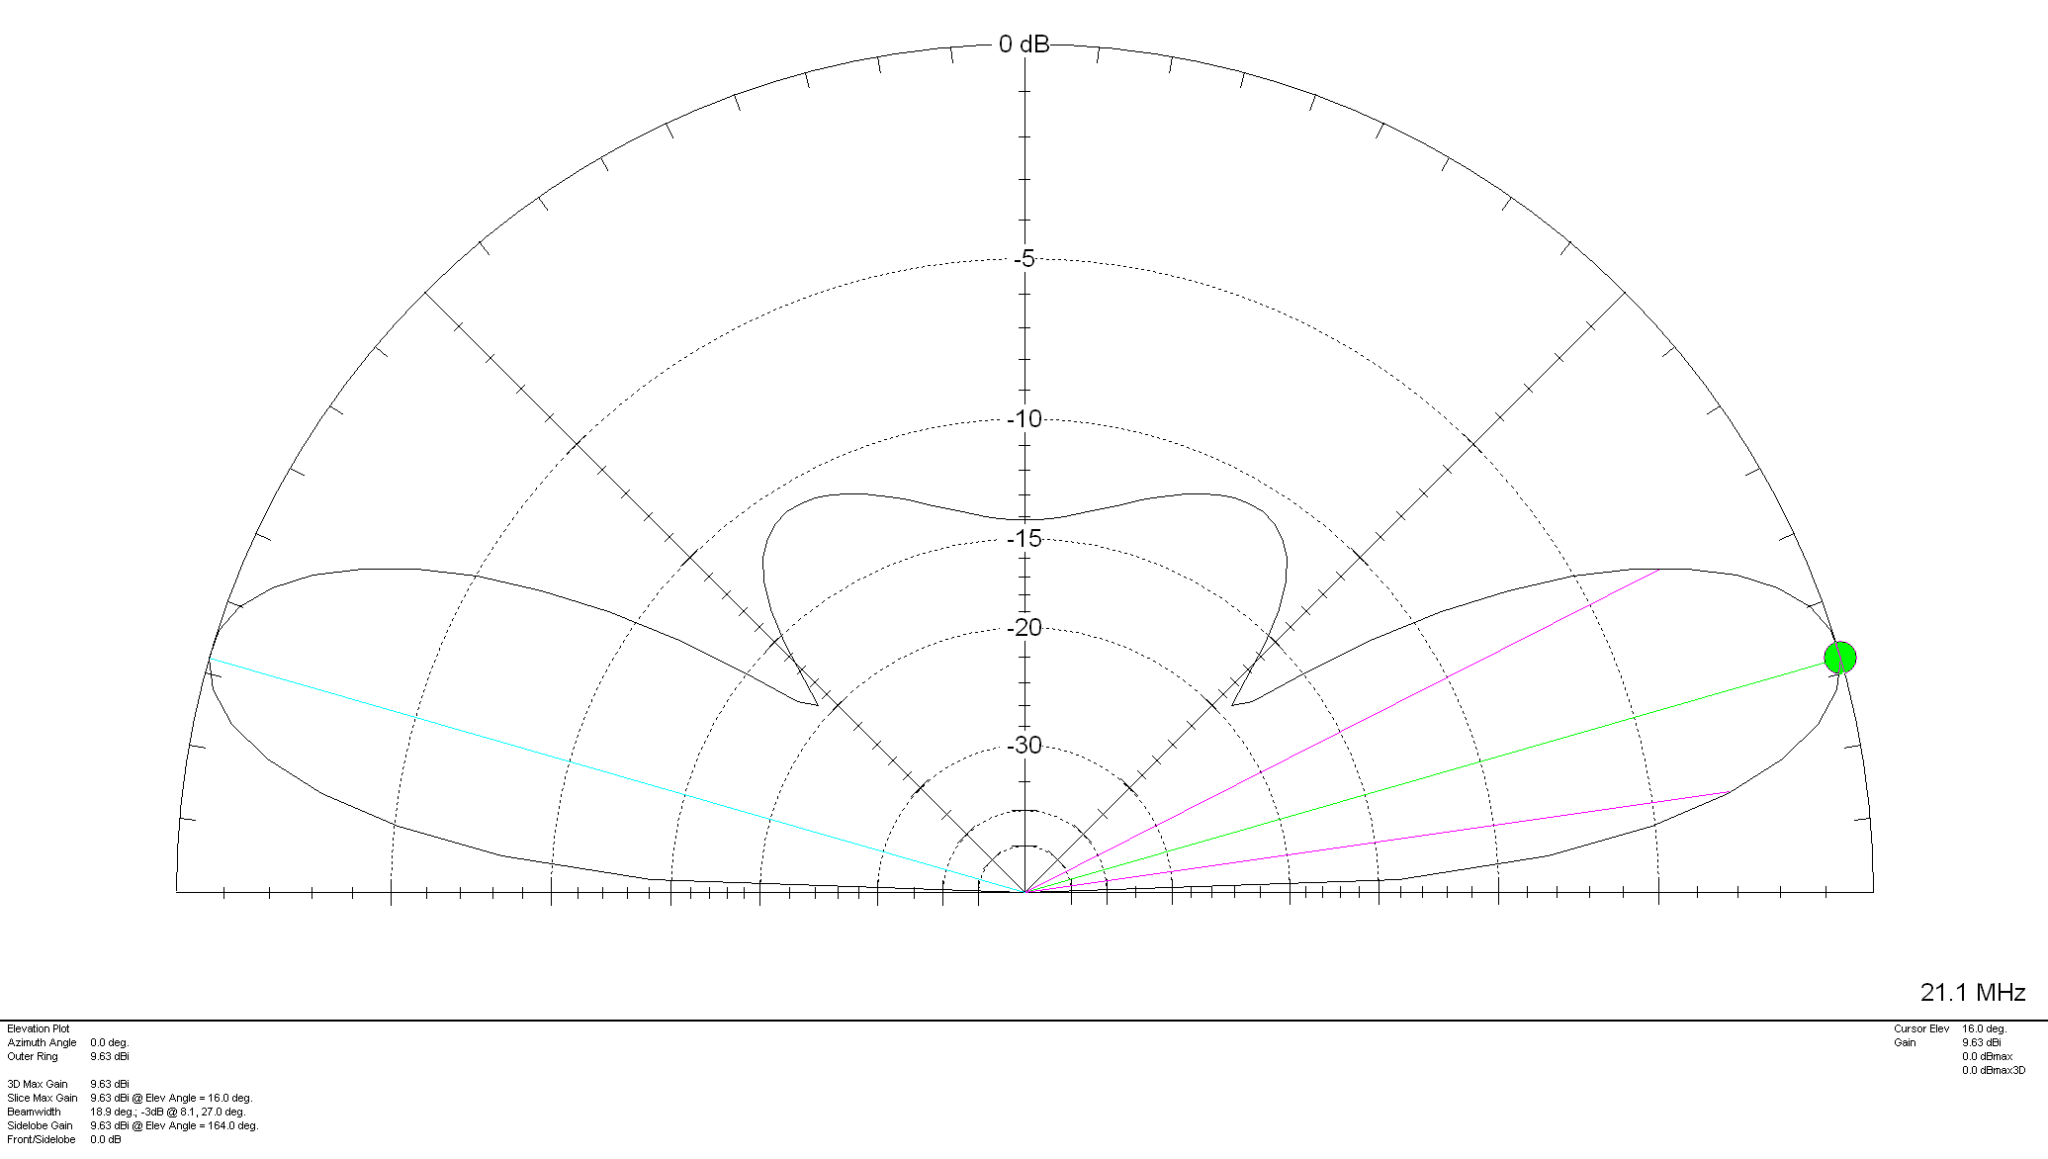
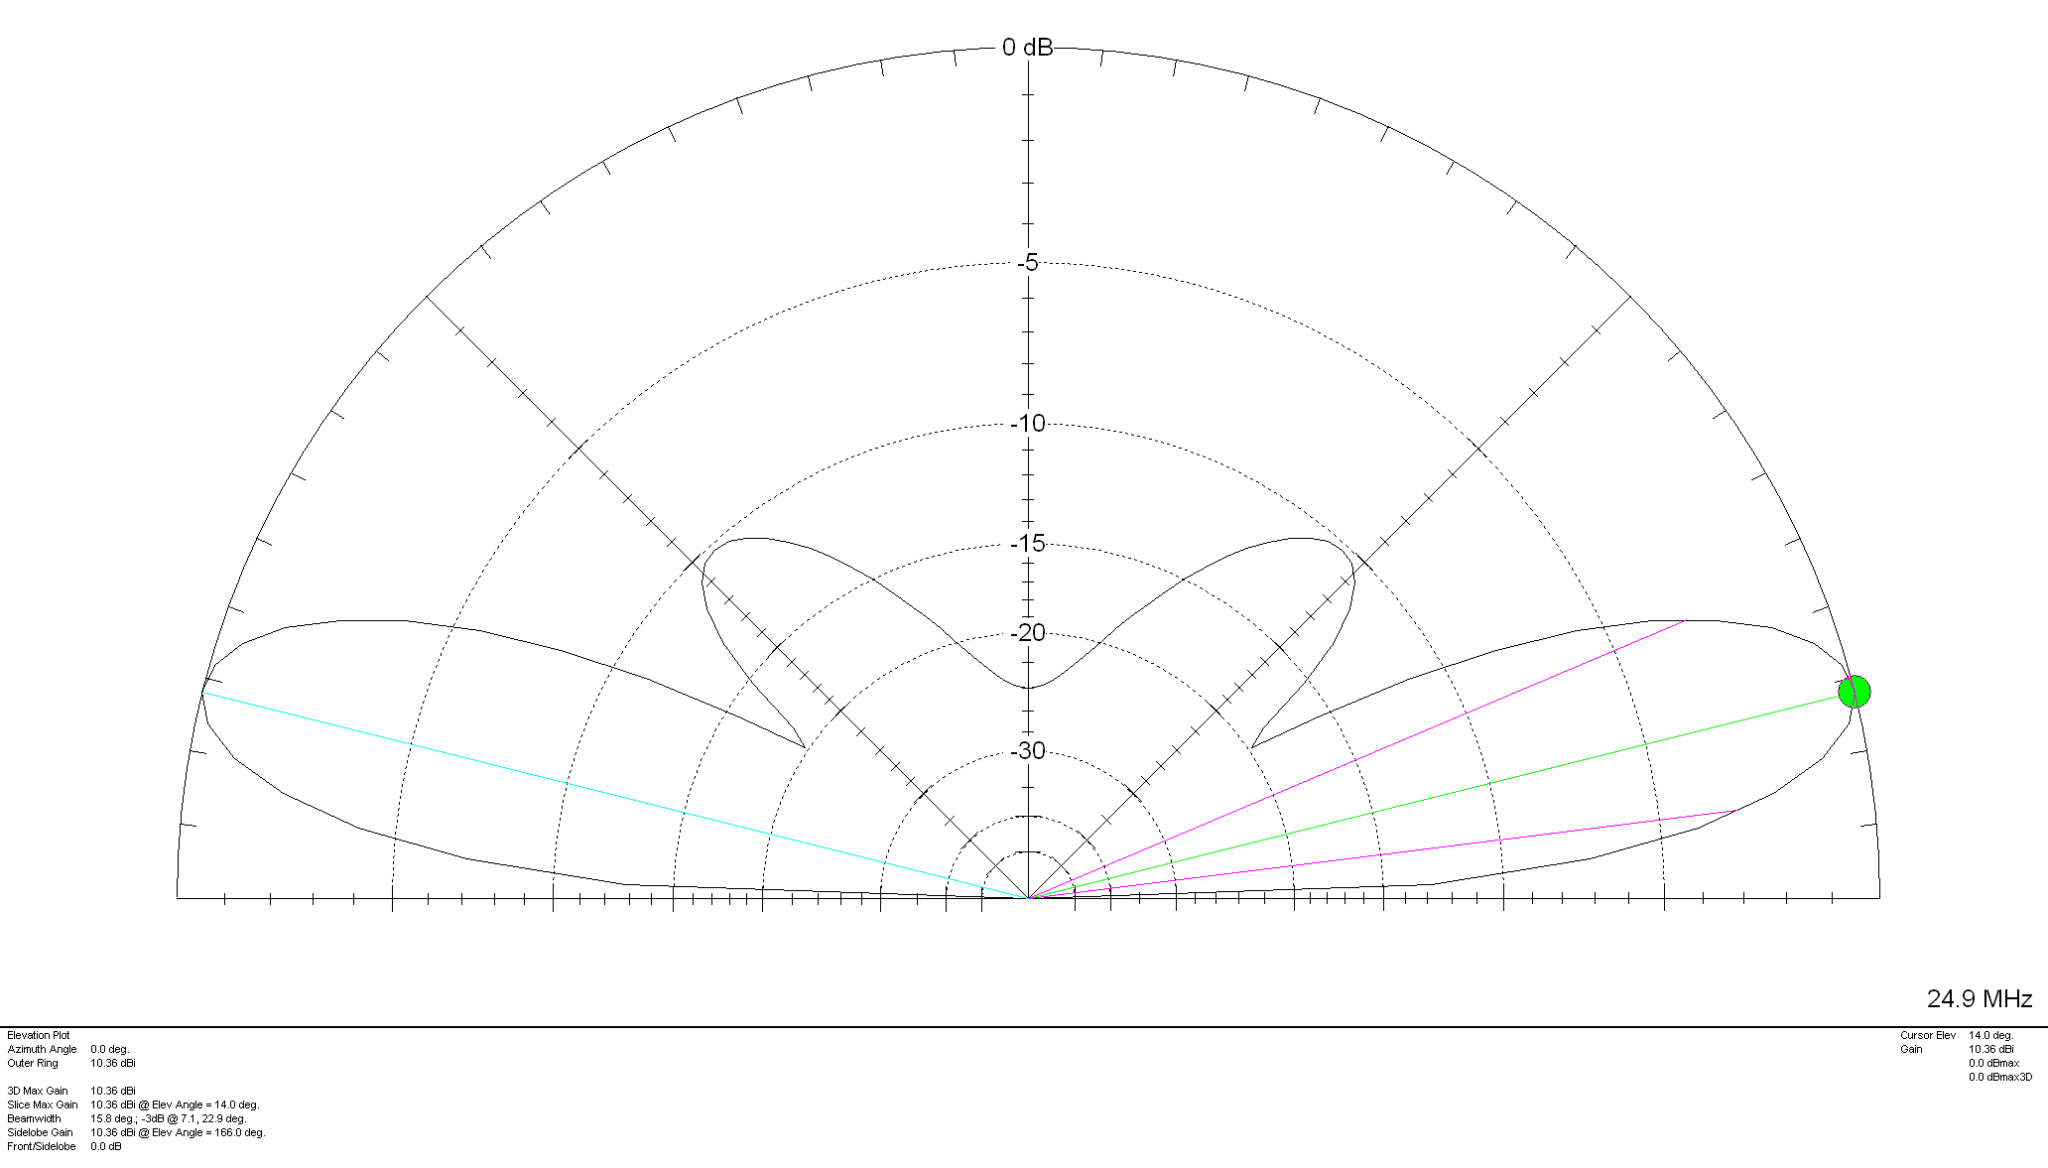
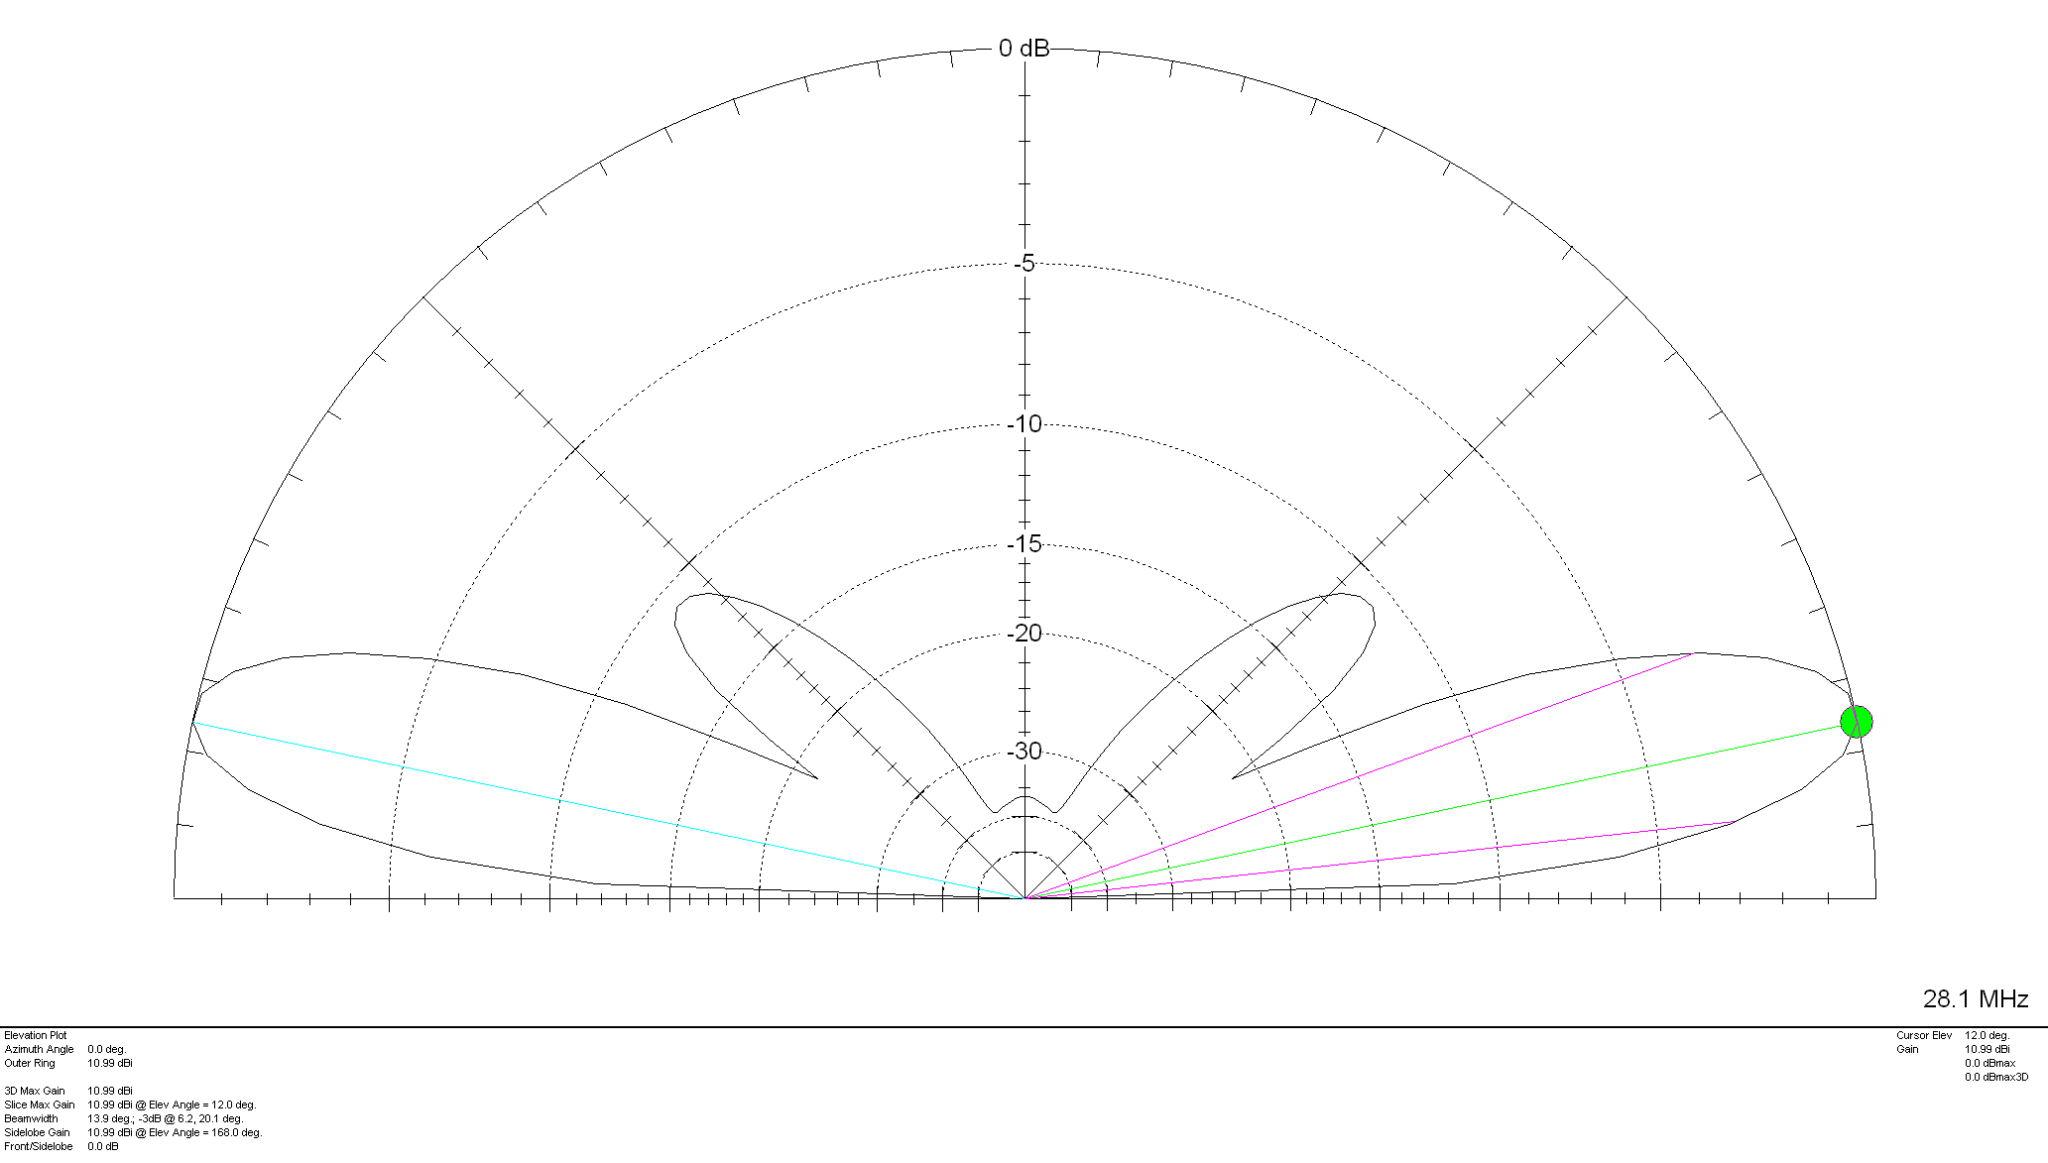
Looking at the 2D Far Field Plots this antenna provides excellent gain at relatively low radiation angles on all bands 20m – 10m making it an ideal antenna for chasing DX.
20m Band 2D Far Field Plot 17m Band 2D Far Field Plot 15m Band 2D Far Field Plot 12m Band 2D Far Field Plot 10m Band 2D Far Field Plot
The gain on each band is as follows:
20m Band – 7.83dBi at 24 Degrees 17m Band – 9.07dBi at 20 Degrees 15m Band – 9.63dBi at 16 Degrees 12m Band – 10.36dBi at 14 Degrees 10m Band – 10.99dBi at 12 Degrees
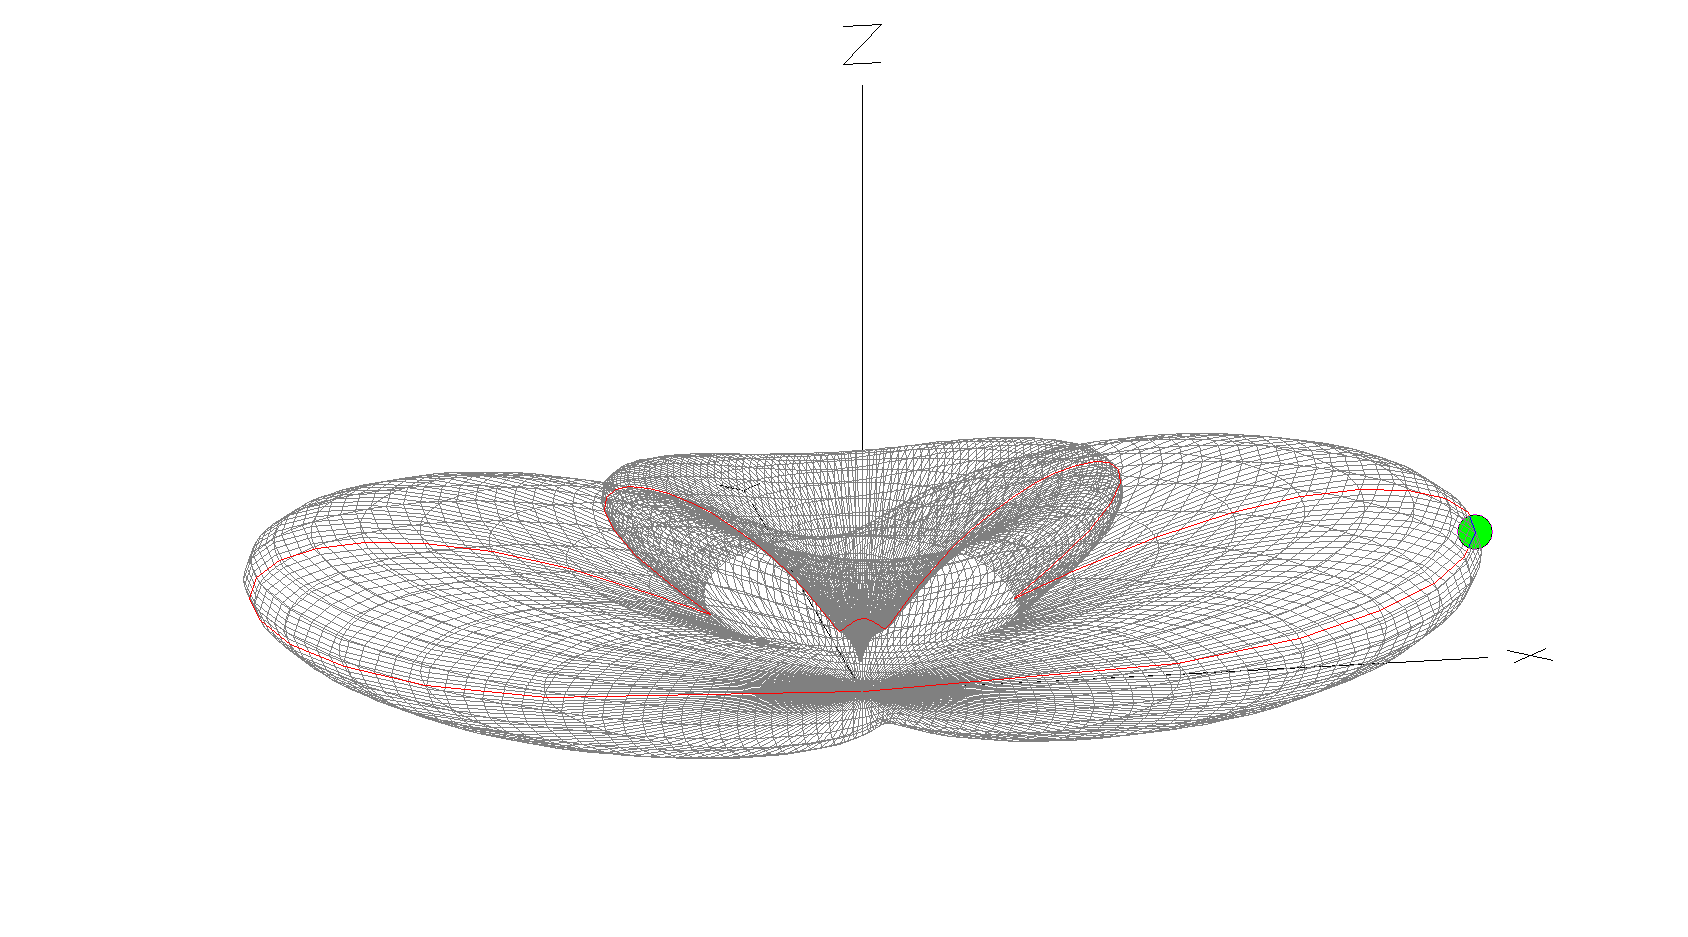
10m Band 3D Far Field Plot
The 10m Band 3D Far Field Plot above shows the typical radiation pattern for the antenna. Maximum radiation is through the loop with very little high angle radiation making it ideal for chasing DX stations. Gain increases as frequency increases however, angle of maximum radiation decreases as frequency increases improving DX capability of the antenna on the higher bands. It’s worth ensuring that the antenna is rotatable as this will then enable you to point the antenna at the DX station to maximise signal strength at the DX end. Pointing this antenna North/South makes it great for working VK/ZL over the North Pole whilst at the same time being able to work South Africa from the UK.
Summary:
Horizontal Wire Lengths: 3m @ 20mm Diameter Vertical Wire Lengths: 9.2m @ 2.5mm Diameter Modelled Height above ground at Centre (Conductor 2): 10.6m Feed Type: 4:1 Balun + ATU / Remote Auto ATU / 450 Ohm Ladder line with 4:1 Balun & ATU
Over the years I’ve built many multi band vertical HF antennas including multi-element quarter wave verticals like the DXCommander configuration, multiple end fed vertical dipoles all on the same pole and a host of other configurations. As with all multi band antennas there’s always a compromise, on some bands it performs well and on others it doesn’t, it’s the nature of the beast.
For some time now I’ve been using a multi band vertical antenna that has over the last year performed incredibly well on all bands from 80m to 10m. Don’t get me wrong, it’s not perfect however, it has out performed every other multi band HF vertical I’ve tried to date even though it’s by far the simplest antenna design and according to the antenna modelling software I have it shouldn’t be as good as it is.
So what is this magical multi band HF vertical I speak of? Well it’s nothing more than a piece of wire 13.4m long taped up a 12.4m vertical Spiderpole with 1m of wire tucked down into the top of the Spiderpole.
Obviously this is not going to be resonant on any band without some sort of impedance matching circuit at the bottom of the wire. Originally this antenna was my end fed half wave vertical antenna for the 30m band that was fed via a 49:1 Unun. This antenna worked incredibly well on the 30m band allowing me to work DX globally with ease but, it was a single band antenna and I wanted a multi band solution.
I decided to remove the 49:1 Unun and replace it with a home brew LC circuit made up of a coil made from 5mm copper tubing and a large air spaced variable capacitor I had laying around from an old ATU project I built many moons ago.
This simple LC arrangement at the bottom of the wire worked incredibly well and tuned the wire from 80m to 10m with a perfect SWR on each band using nothing more than a ground rod and 4 x 12m radials. Performance was surprisingly good on all bands 80-10m giving me the ability to get some DX stations that I’ve never been able to hit before. The only drawback to this solution was the fact that I had to go out and manually tune the antenna every time I wanted to change band. Not so much of a problem in the summer but, in the winter in the pouring rain and howling wind it’s no fun at all. (I resolve this issue further down in the article!)
Multi Band Vertical HF Antenna using a 12.4m Heavy duty Spiderpole at the end of the garden
Performance on the HF bands is incredibly impressive with this antenna. Modelling it on EzNEC software it shouldn’t be that great on bands above 20m however, it seems to defy the modelling software as it performs amazingly well on 17m, 15m and 12m, better than any other vertical antenna I’ve made for those bands. How this can be I do not know, normally my antenna builds match closely what the modelling software shows but, in this instance it doesn’t and I’ve really no idea why.
Multi Band Vertical HF Antenna showing loop at top and wire tucked down into pole
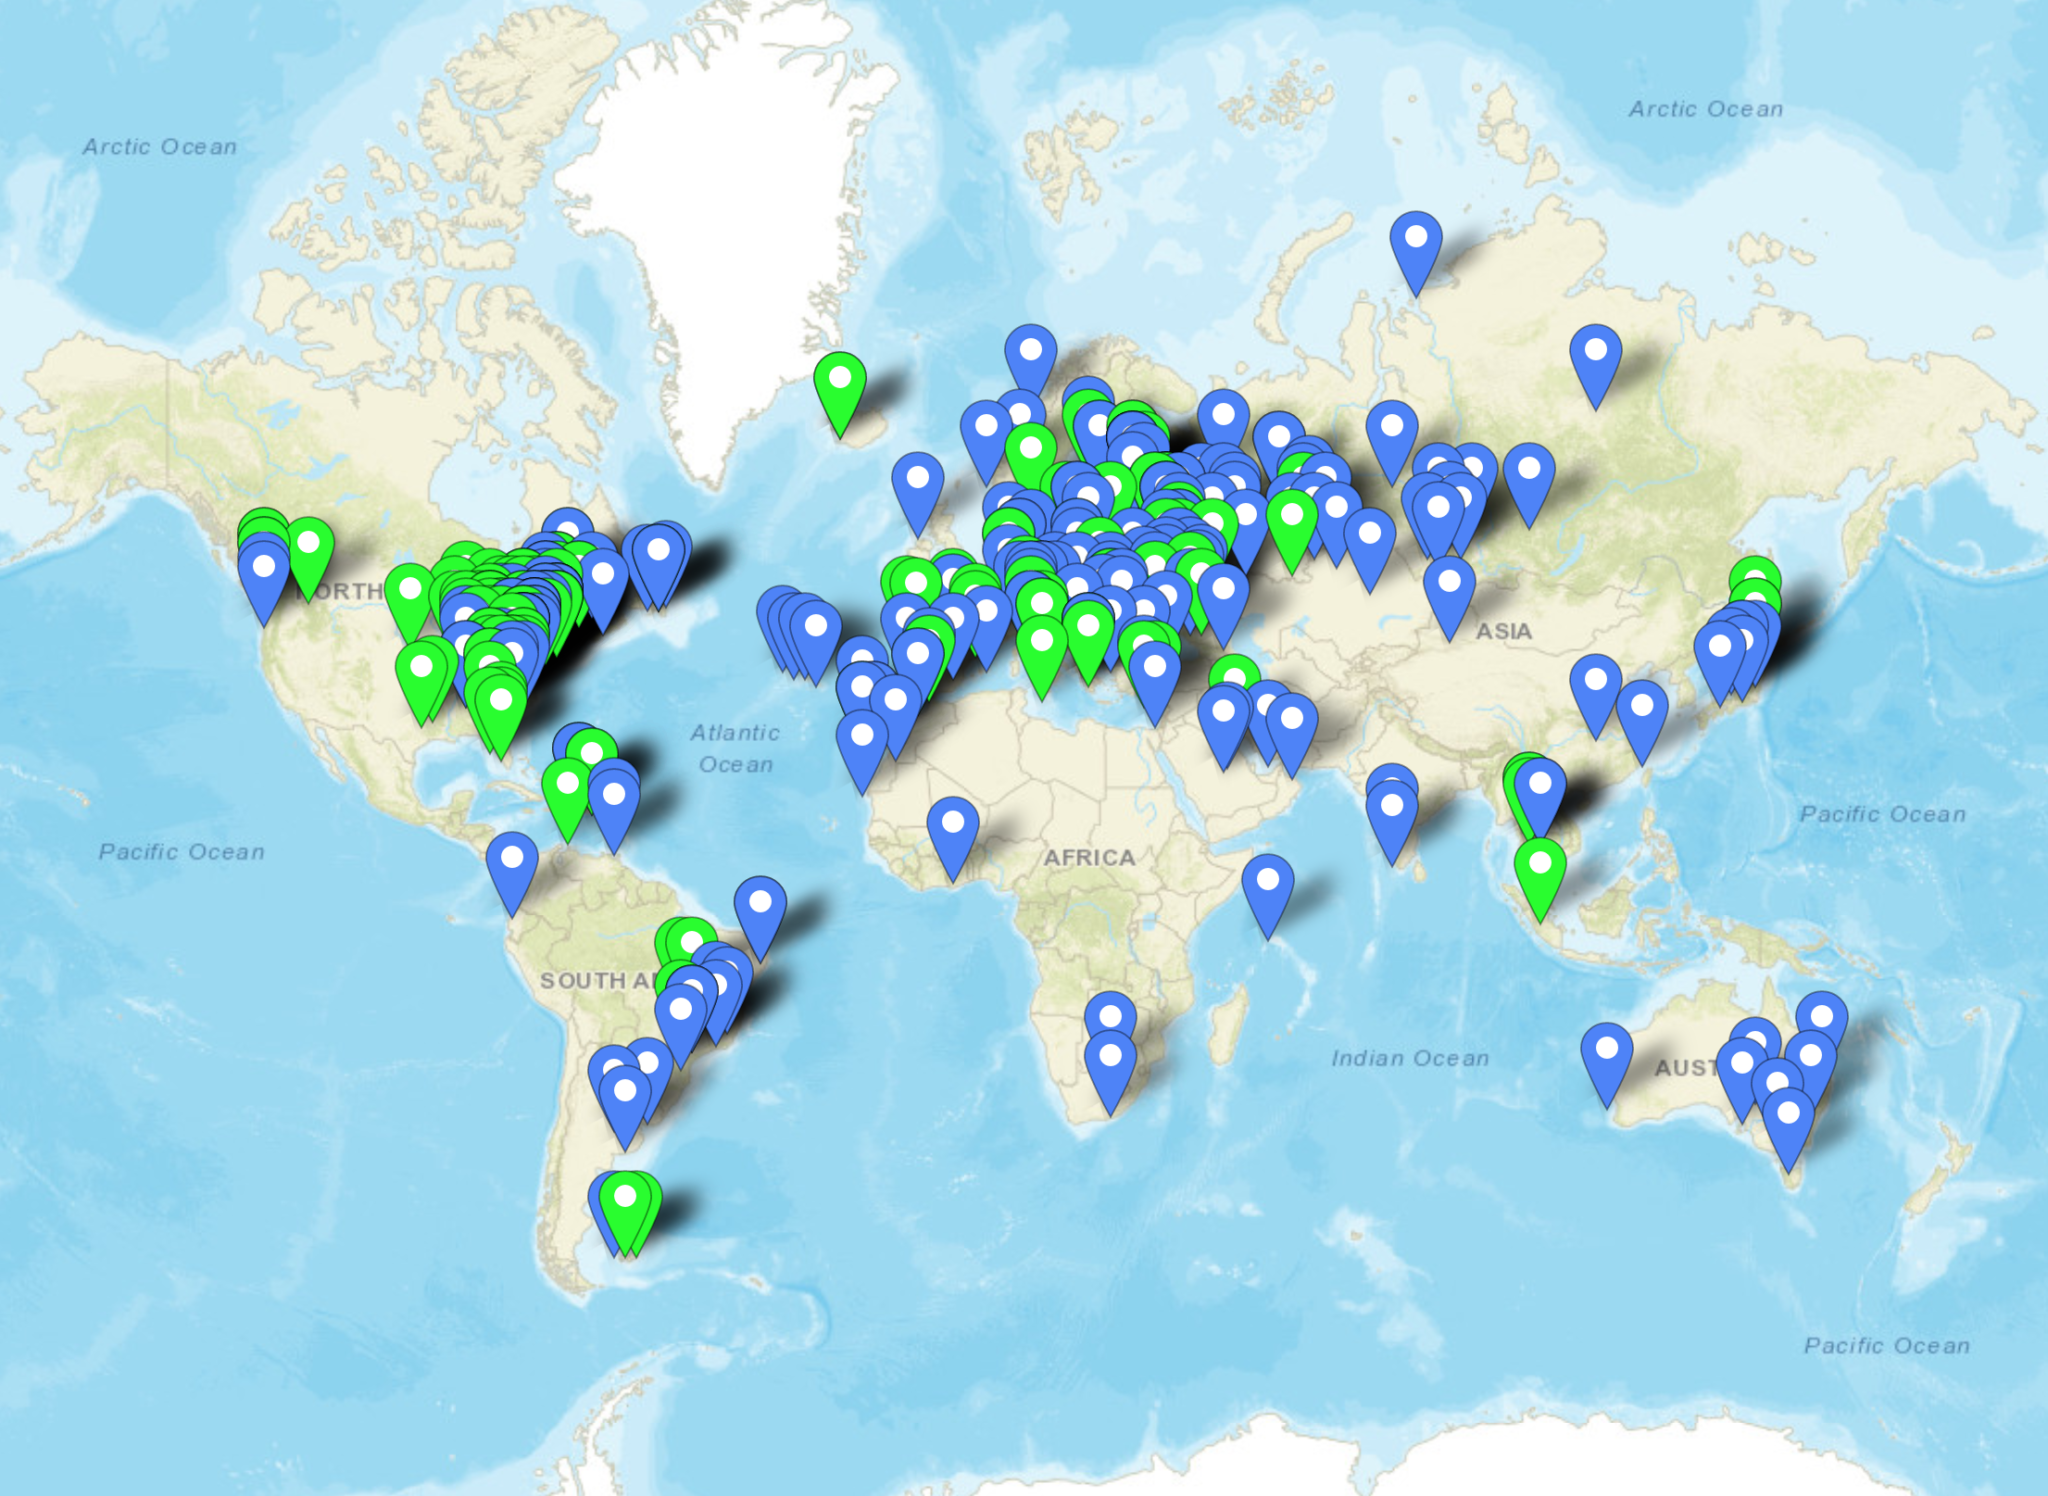
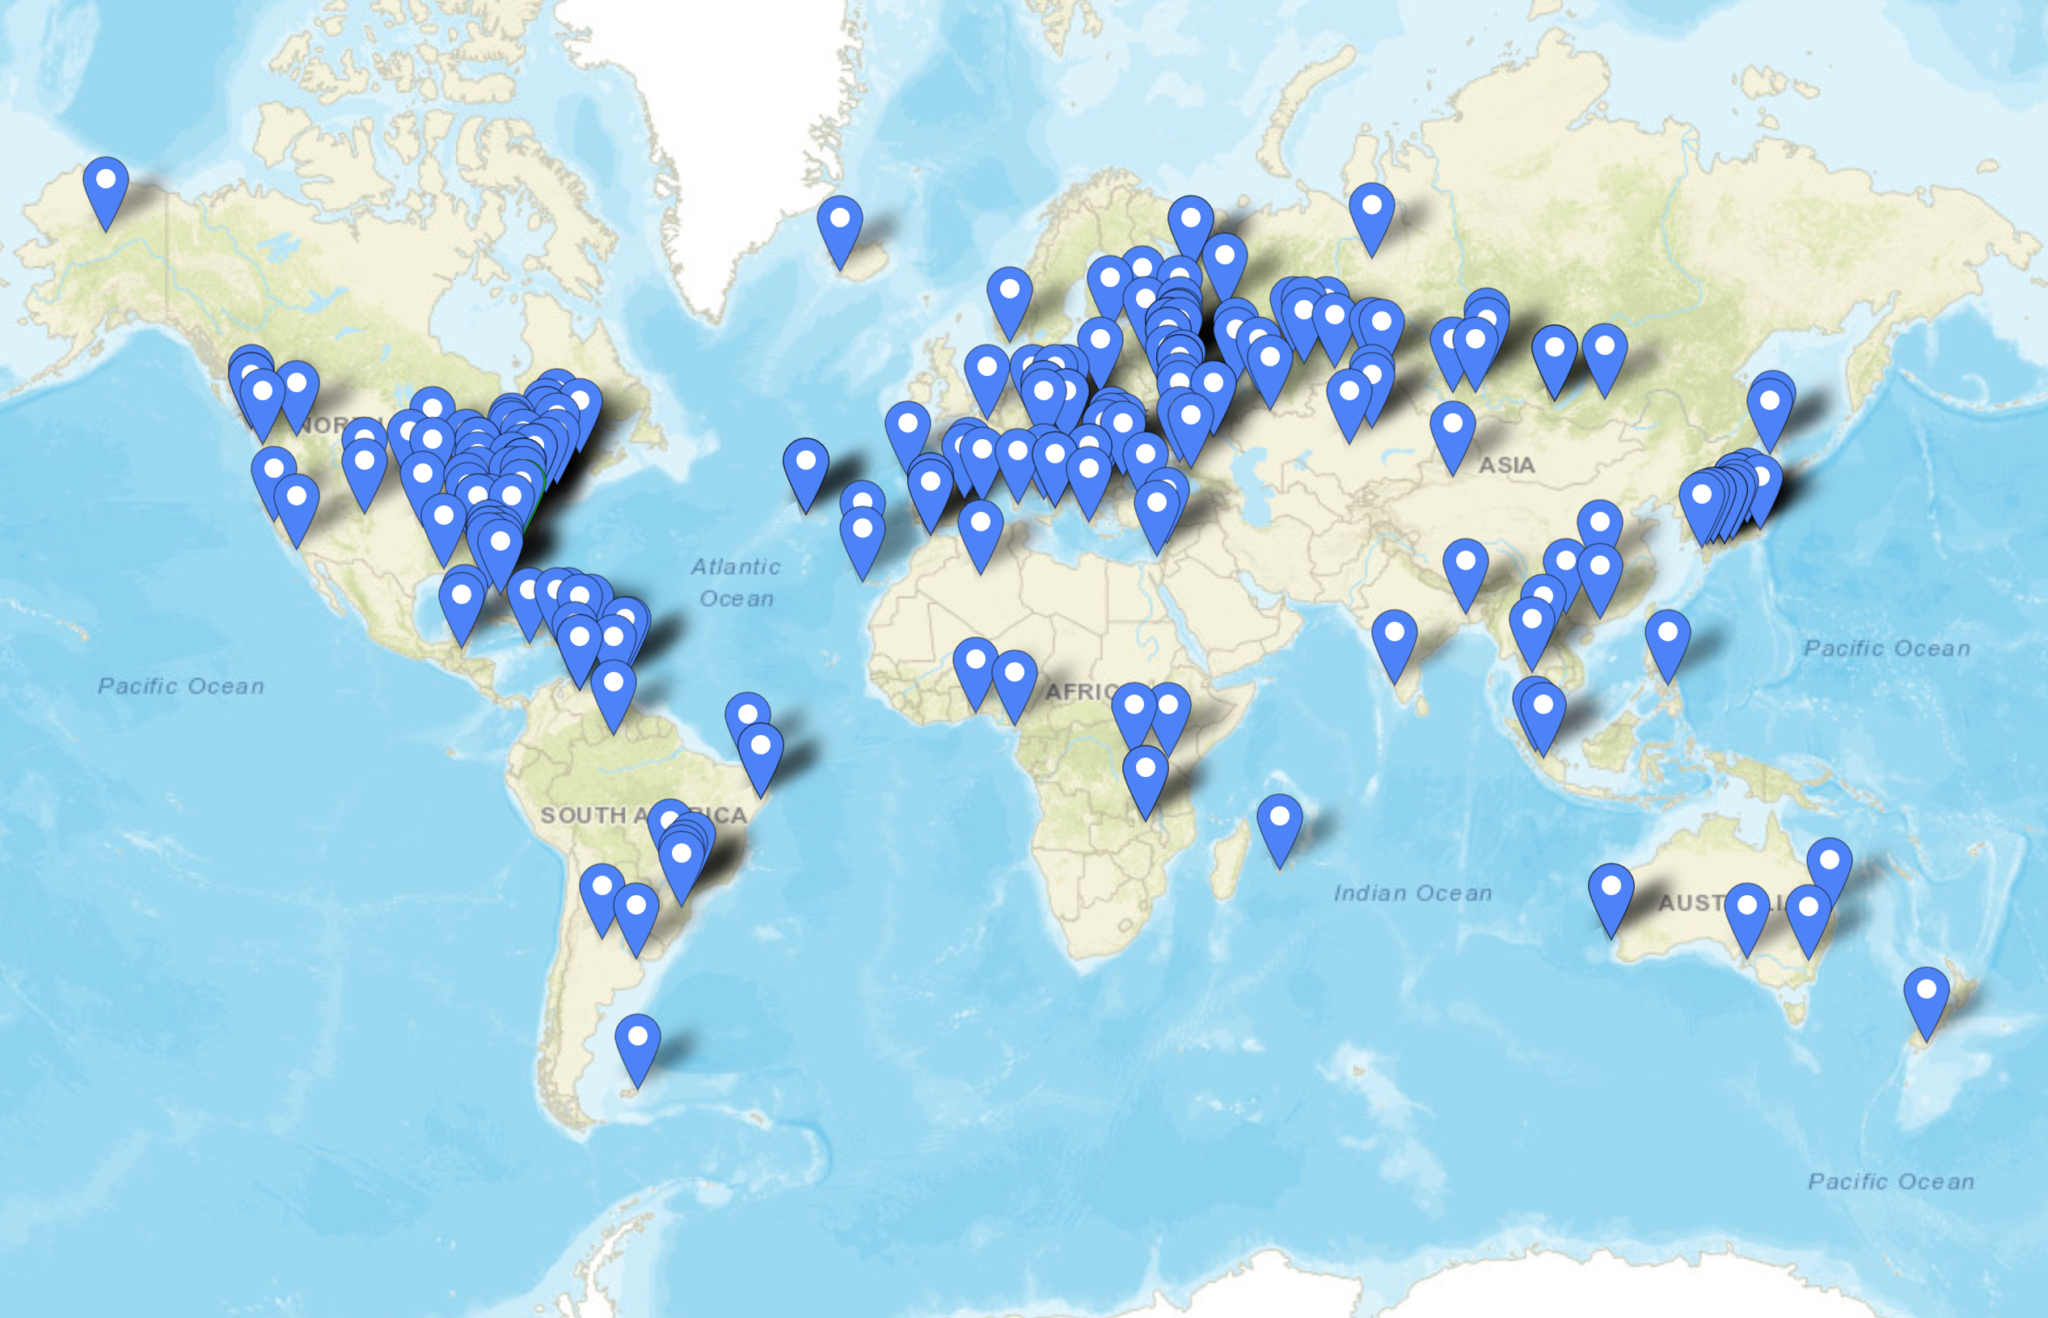
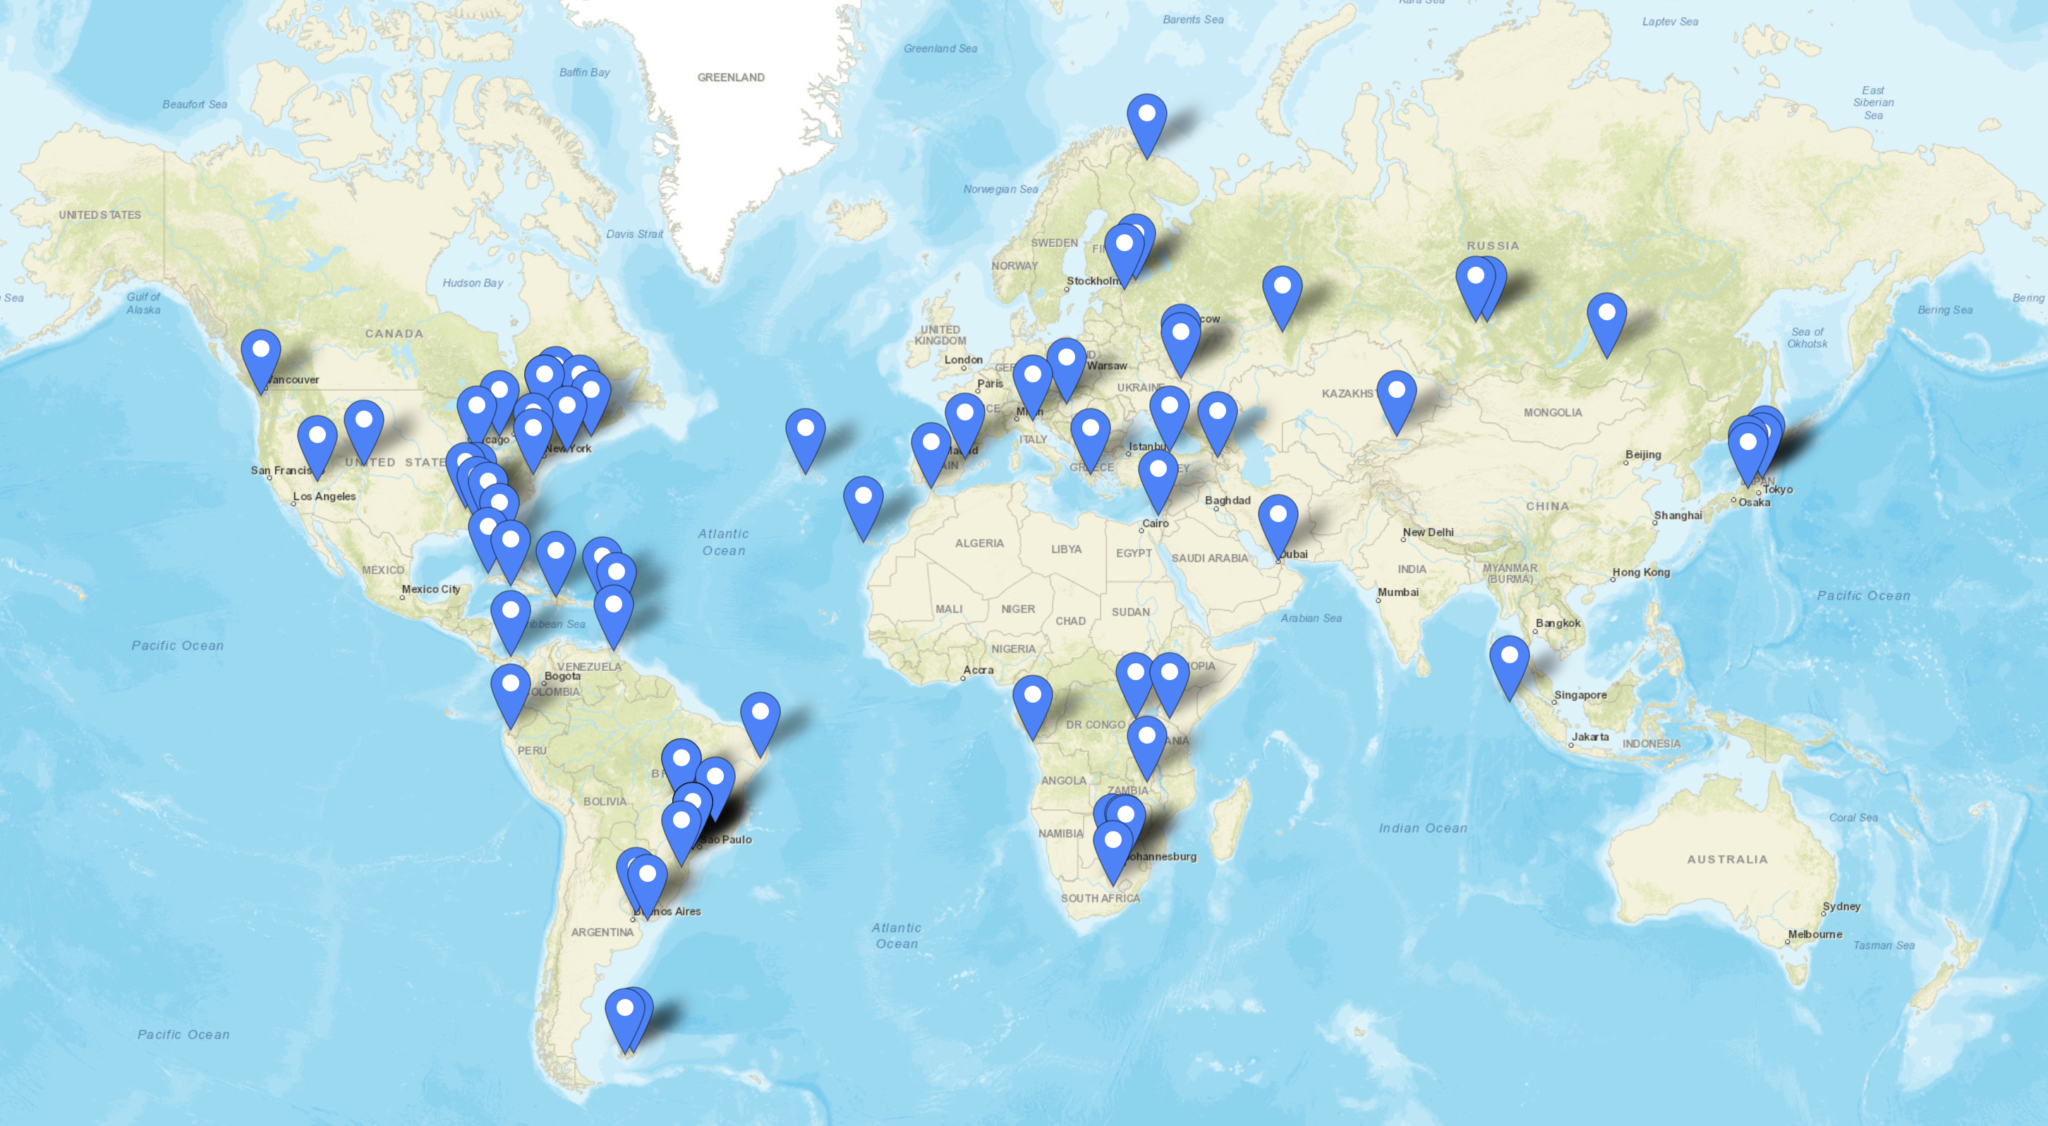
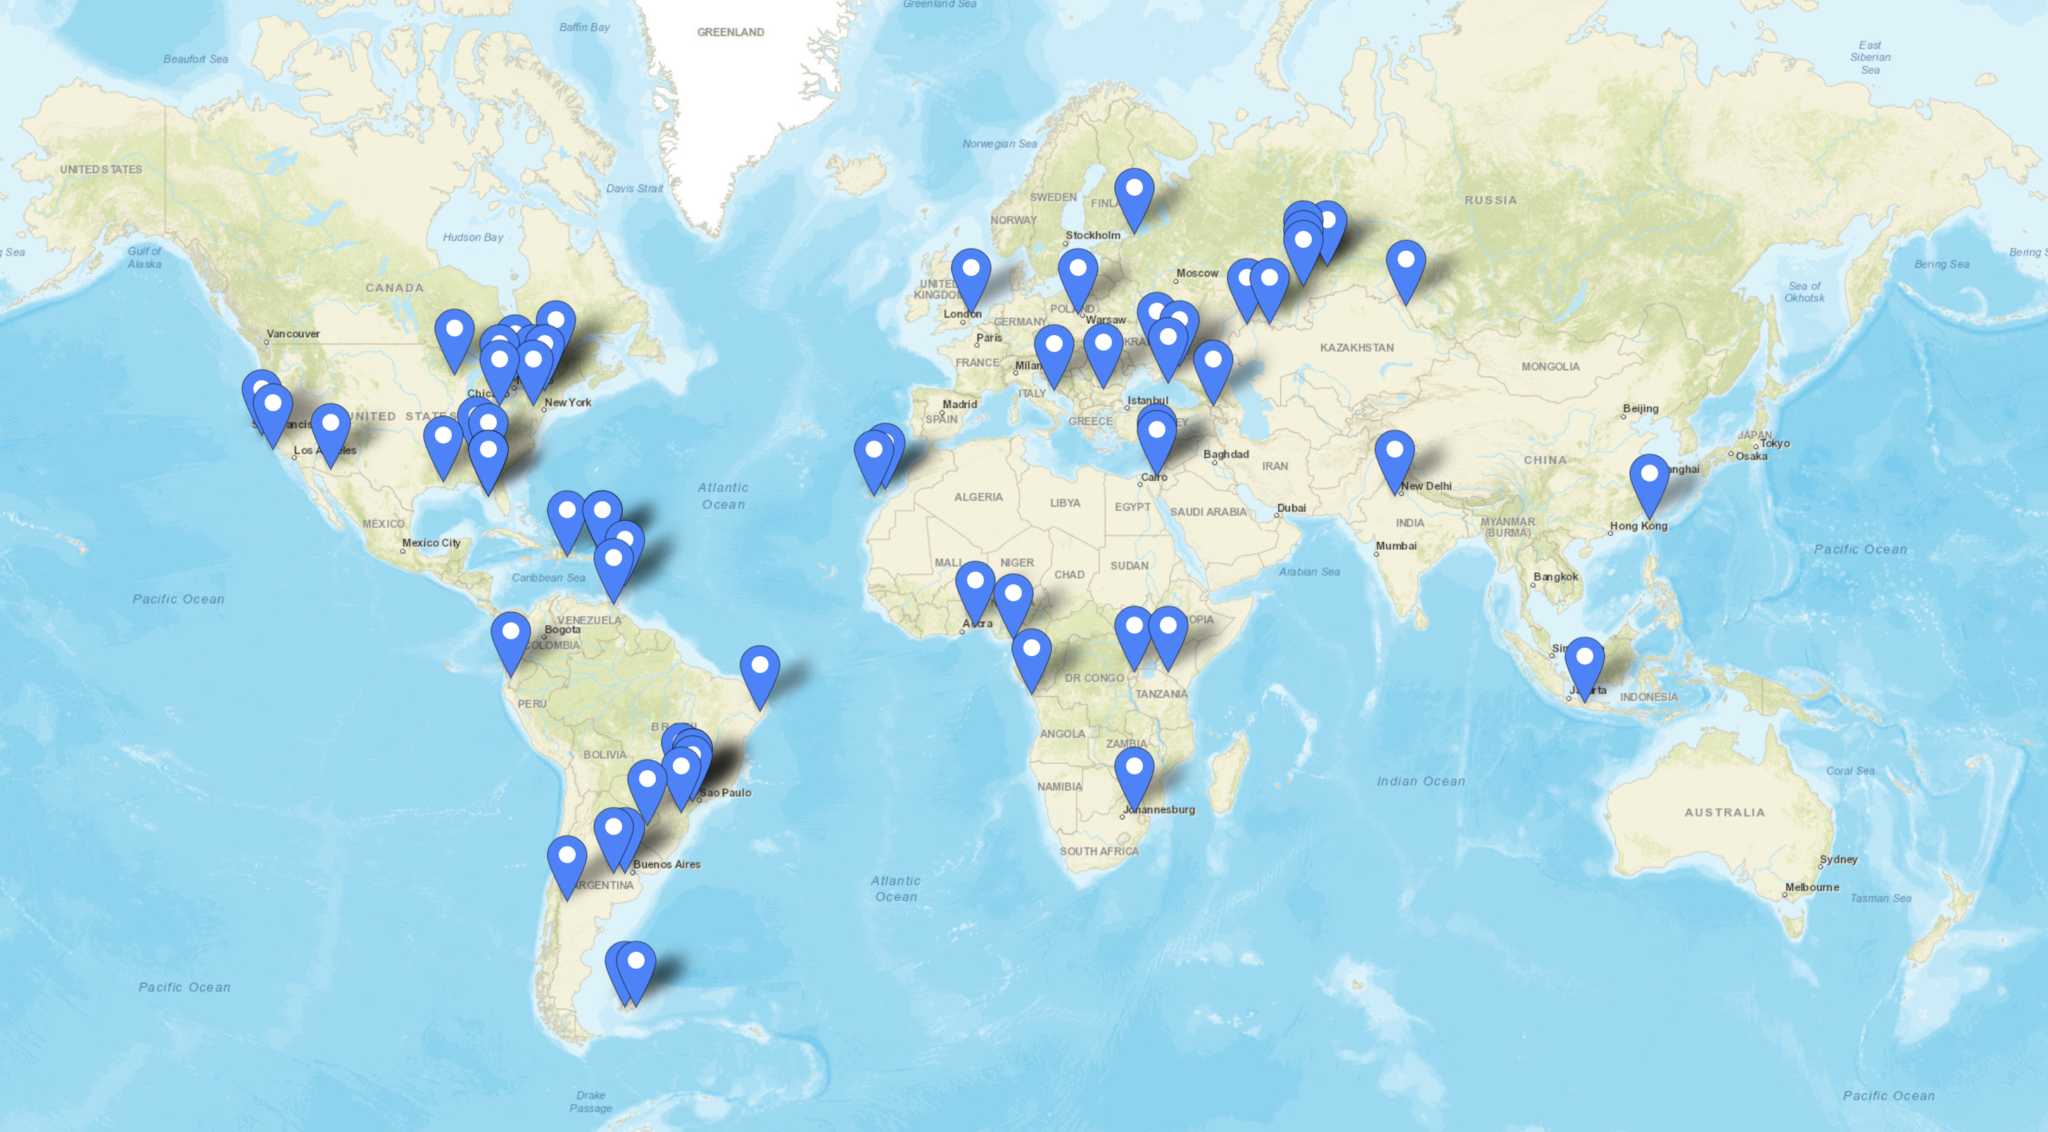
Always wanting to put things into perspective here’s some details of the contacts I’ve made on each band showing how well this antenna has performed over the last year or so.
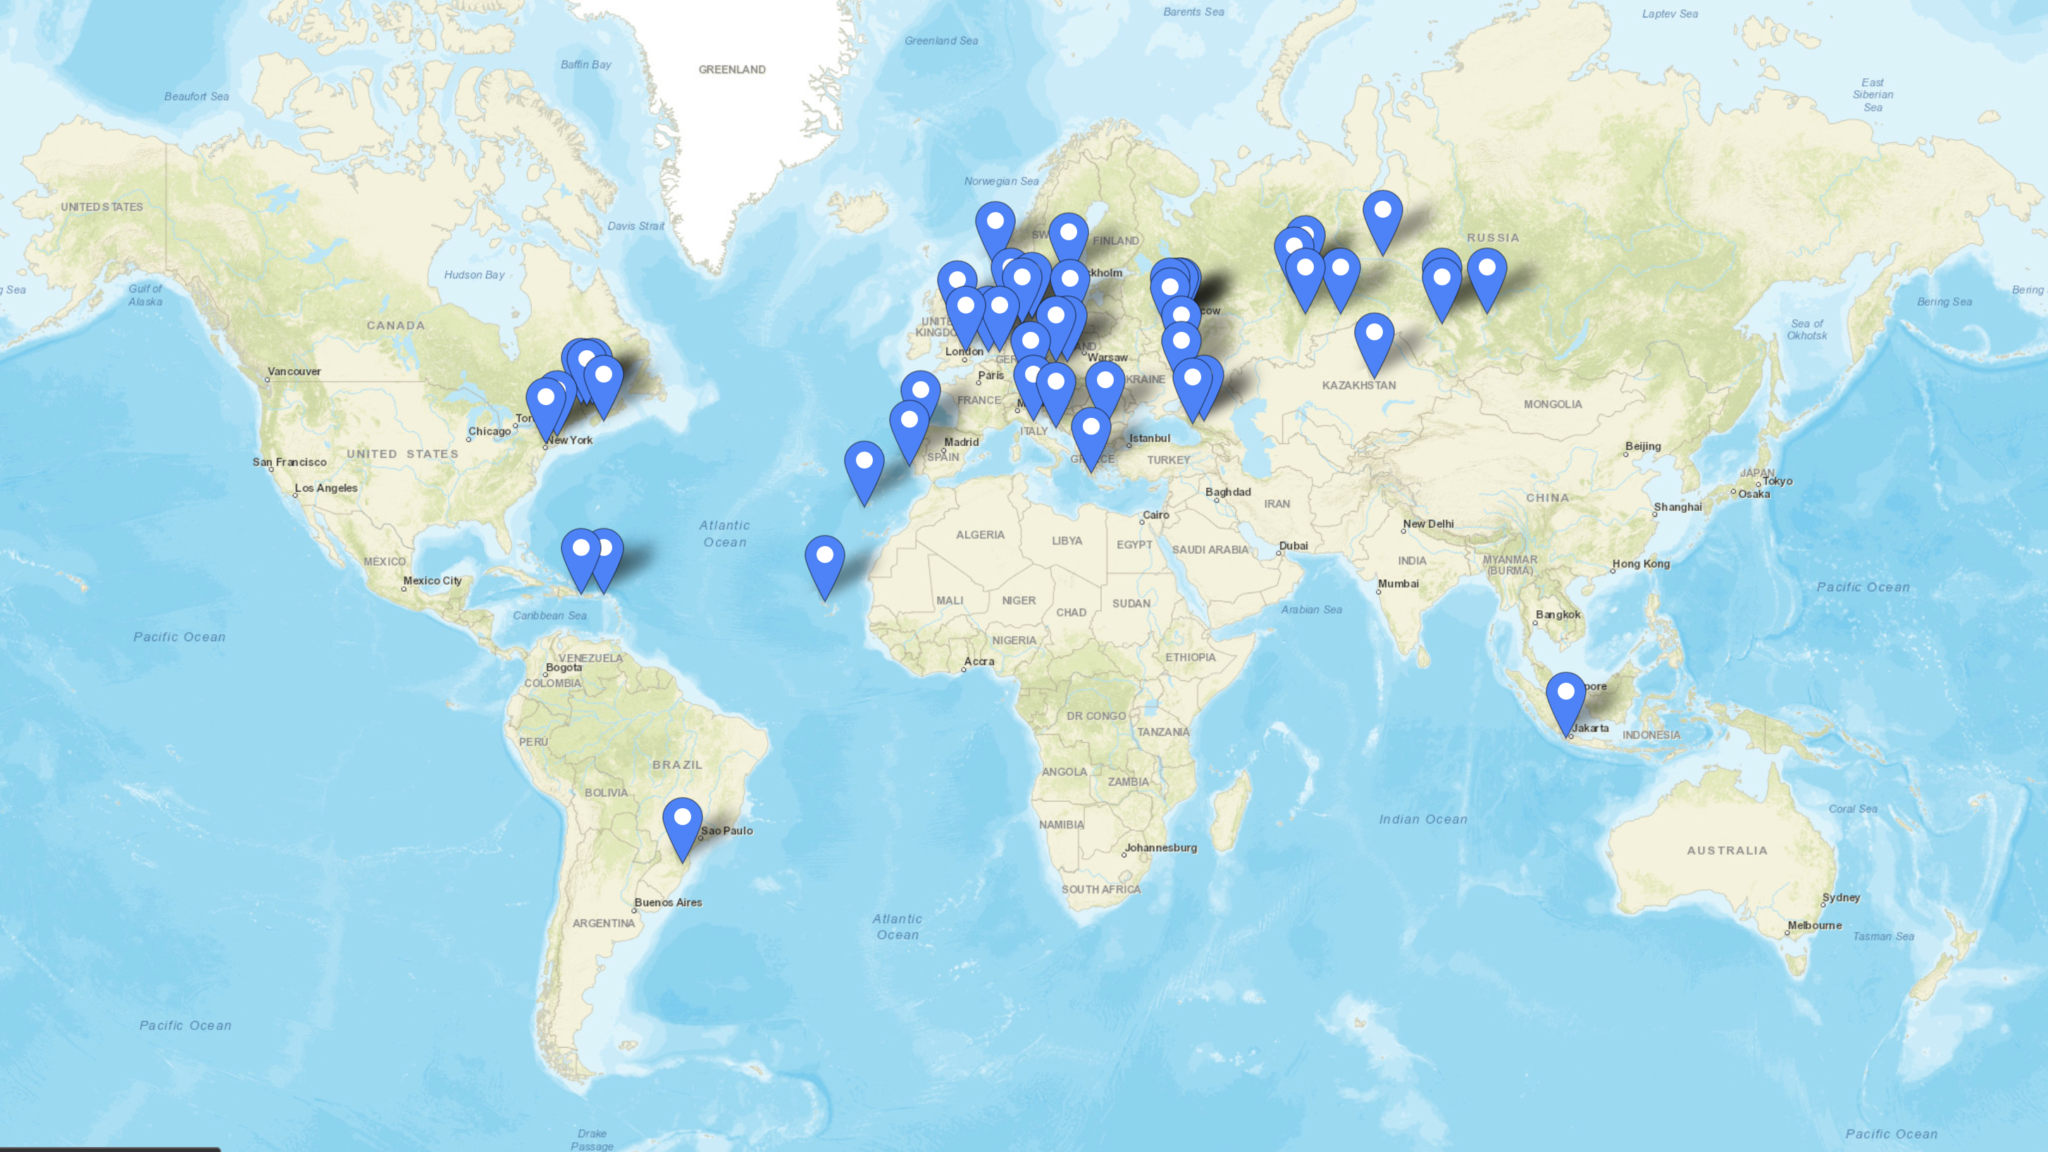
Firstly the 80m band, I’ve not used this band much over the winter months as I’ve got into the higher bands however, the map below shows all the stations worked on 80m using this antenna.
Stations worked on the 80m band from the M0AWS QTH
There are 51 contacts in total, not a big number by any means however, there are some good distances made with contacts into North America, South America and Indonesia. I’m sure I could had done better if I’d spent more time on this band, something to aim for next winter perhaps.
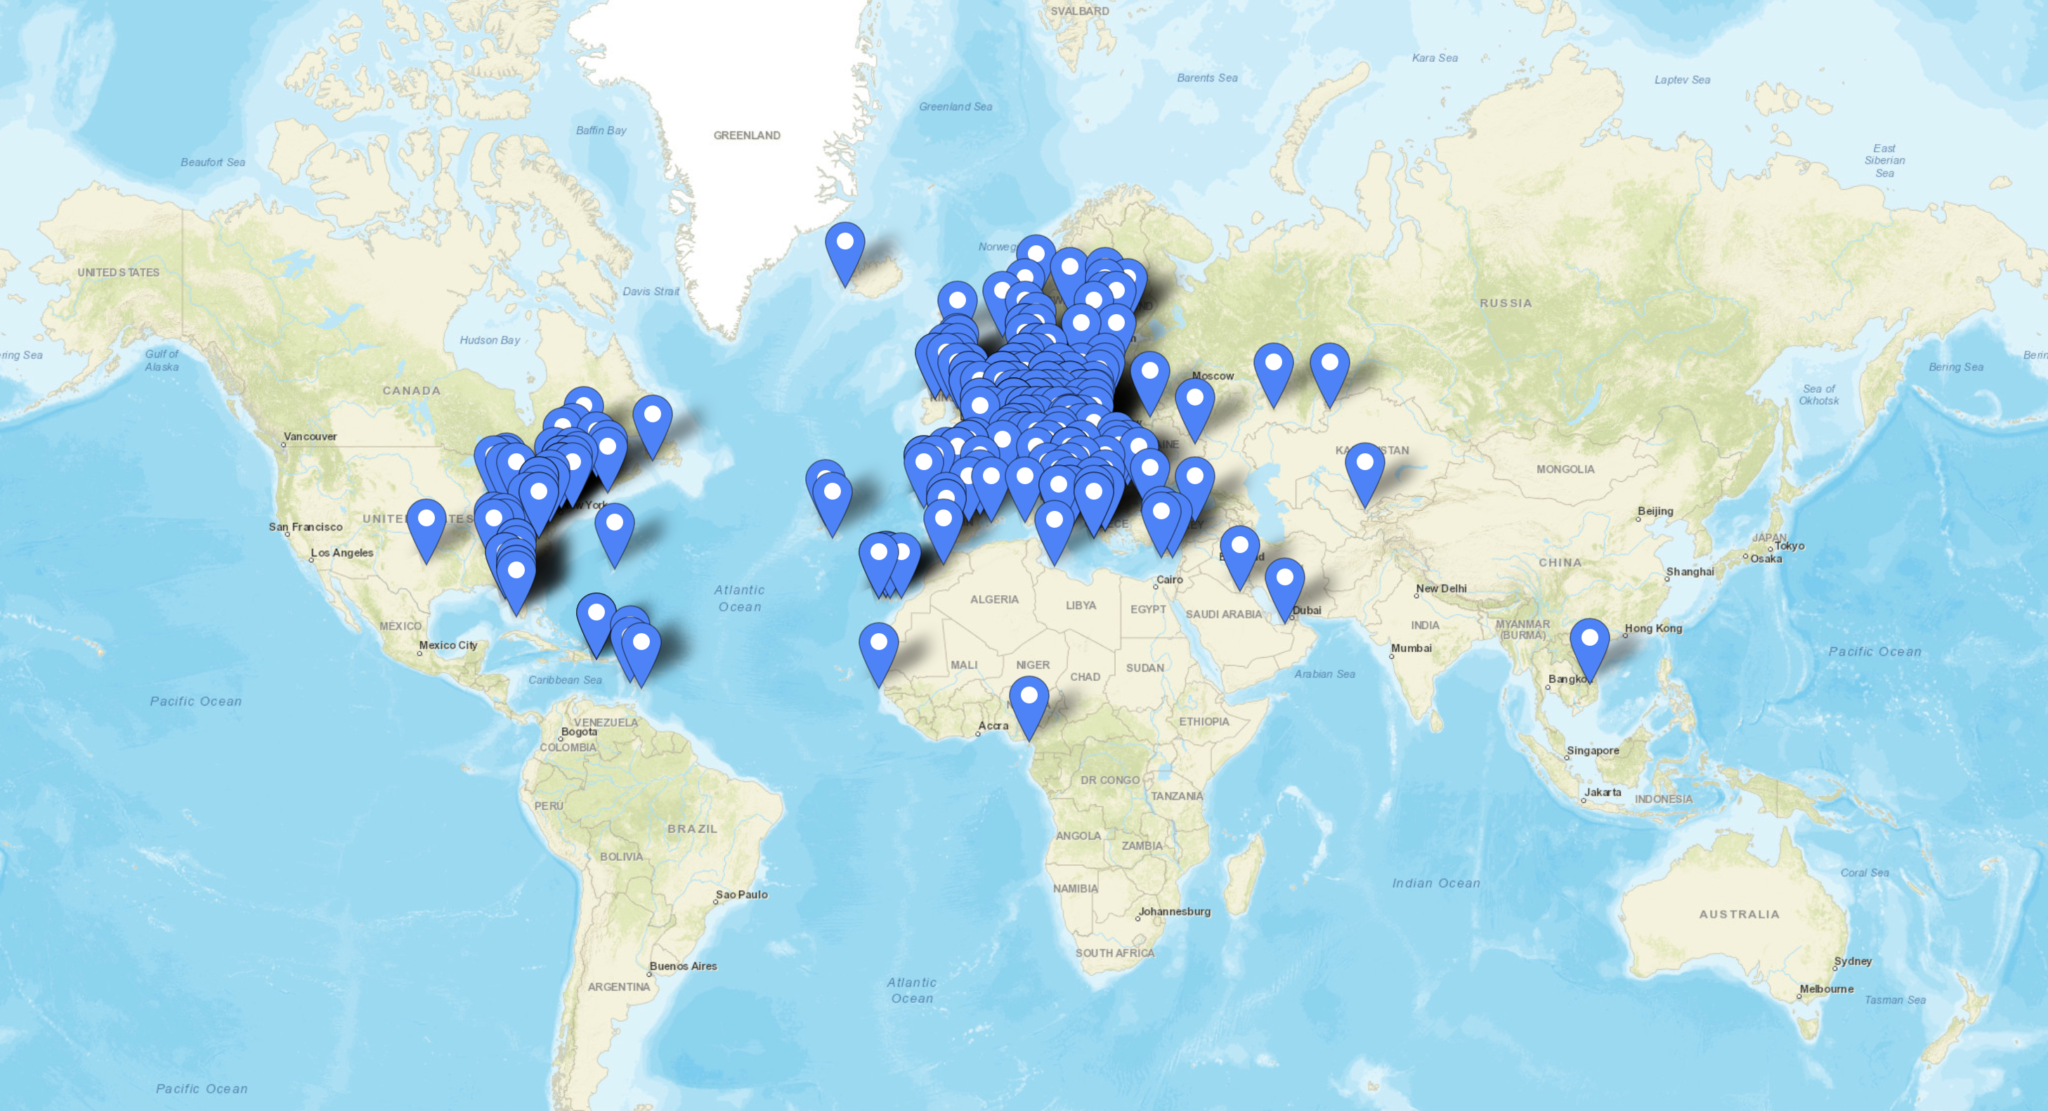
Next is the 60m band, a band I really like and have enjoyed over the winter months. The antenna performs incredibly well on this band even though we have very limited access to 60m here in the UK. With 288 contacts in the log with a good spread of distances I’m really pleased with how this antenna performs on this band.
Stations worked on the 60m band from the M0AWS QTH
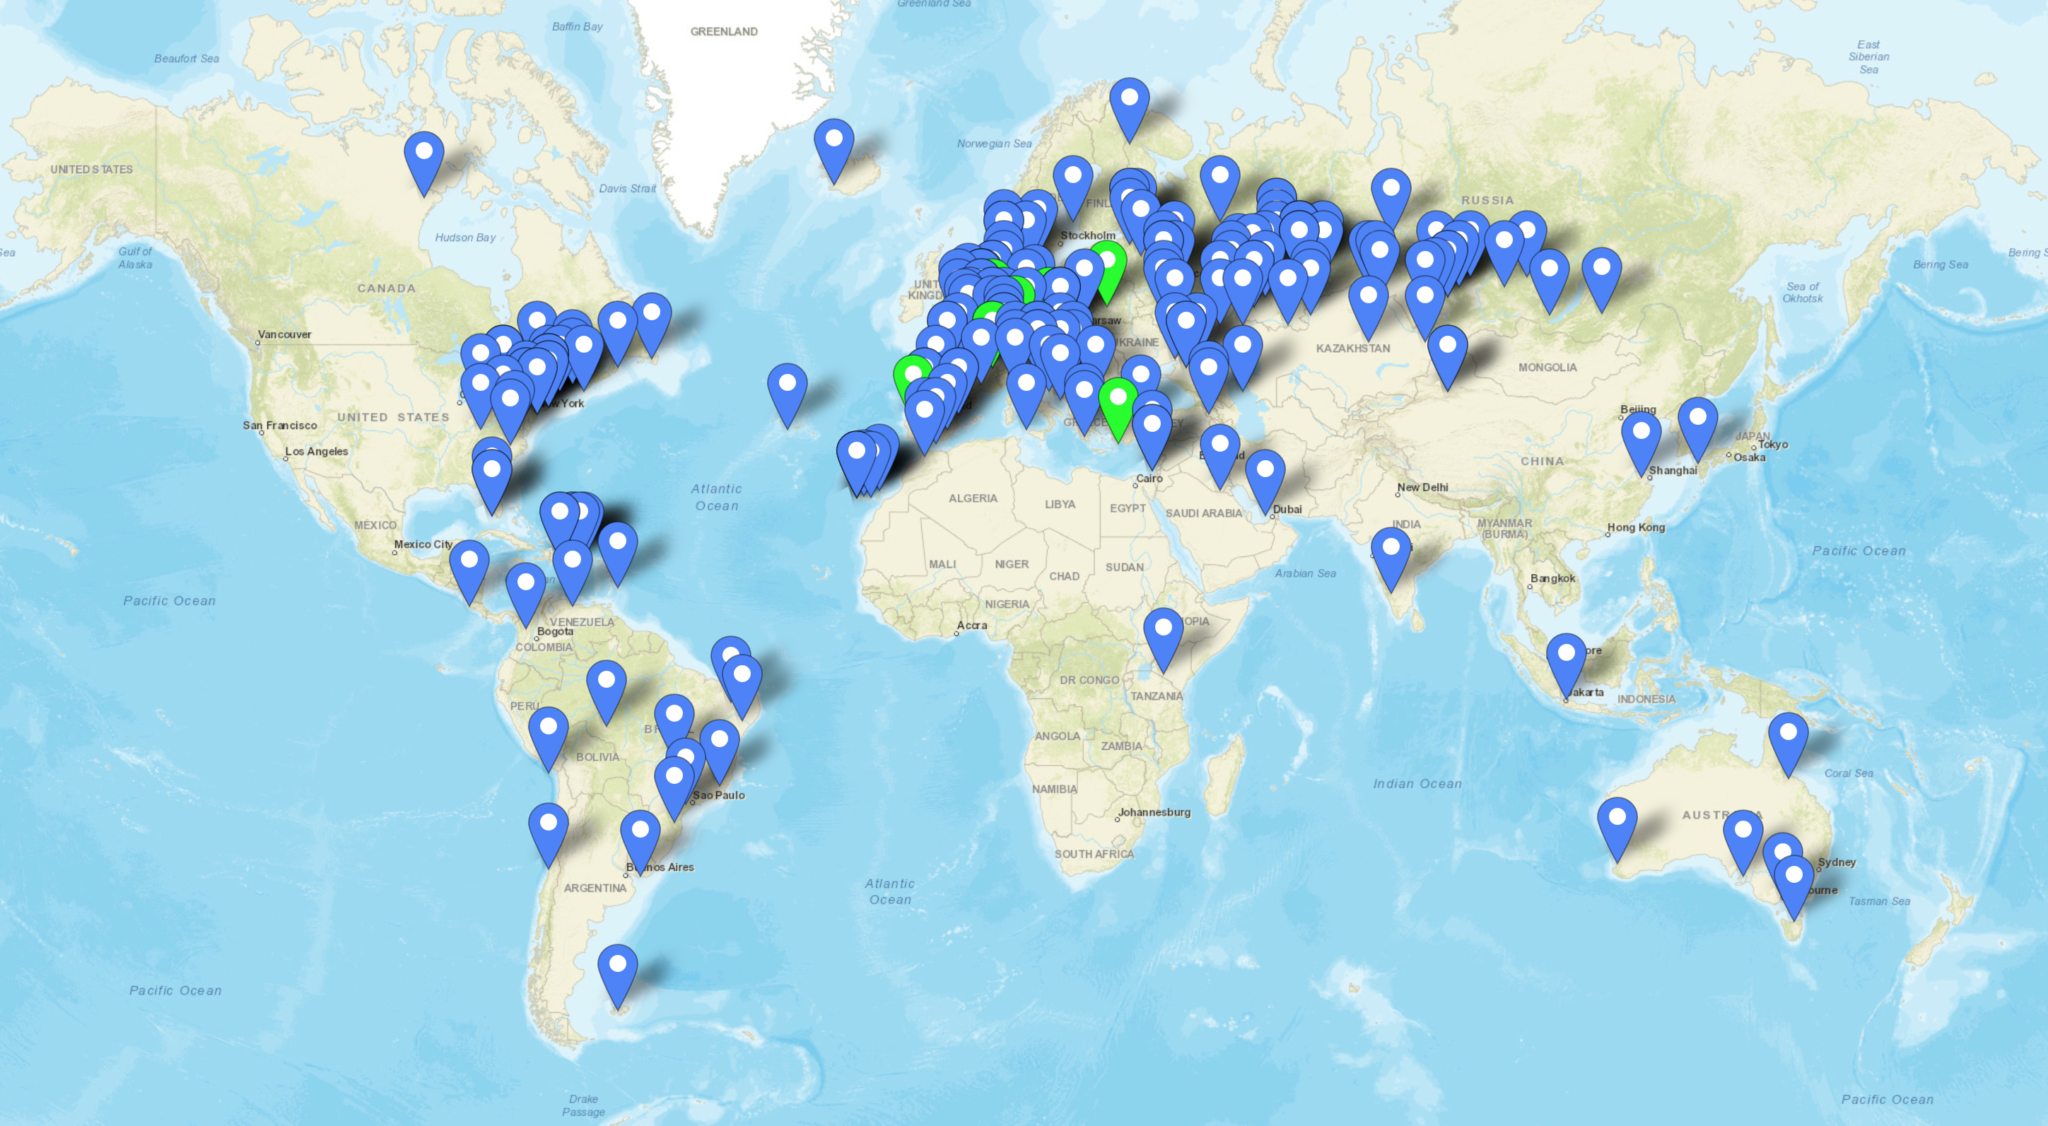
Moving up in frequency the 40m band is the next one on the list, this is a great band and one that I’ve loved for many years. I’ve spent countless hours on CW on this band in the past and worked some great DX. The performance of this antenna on the 40m band is excellent, if I can hear the DX normally I can work them regardless of where in the world they are located. With 226 contacts in the log spread globally over the winter here in the northern hemisphere I have no complaints about performance of this antenna on the 40m band.
Stations worked on the 40m band from the M0AWS QTH
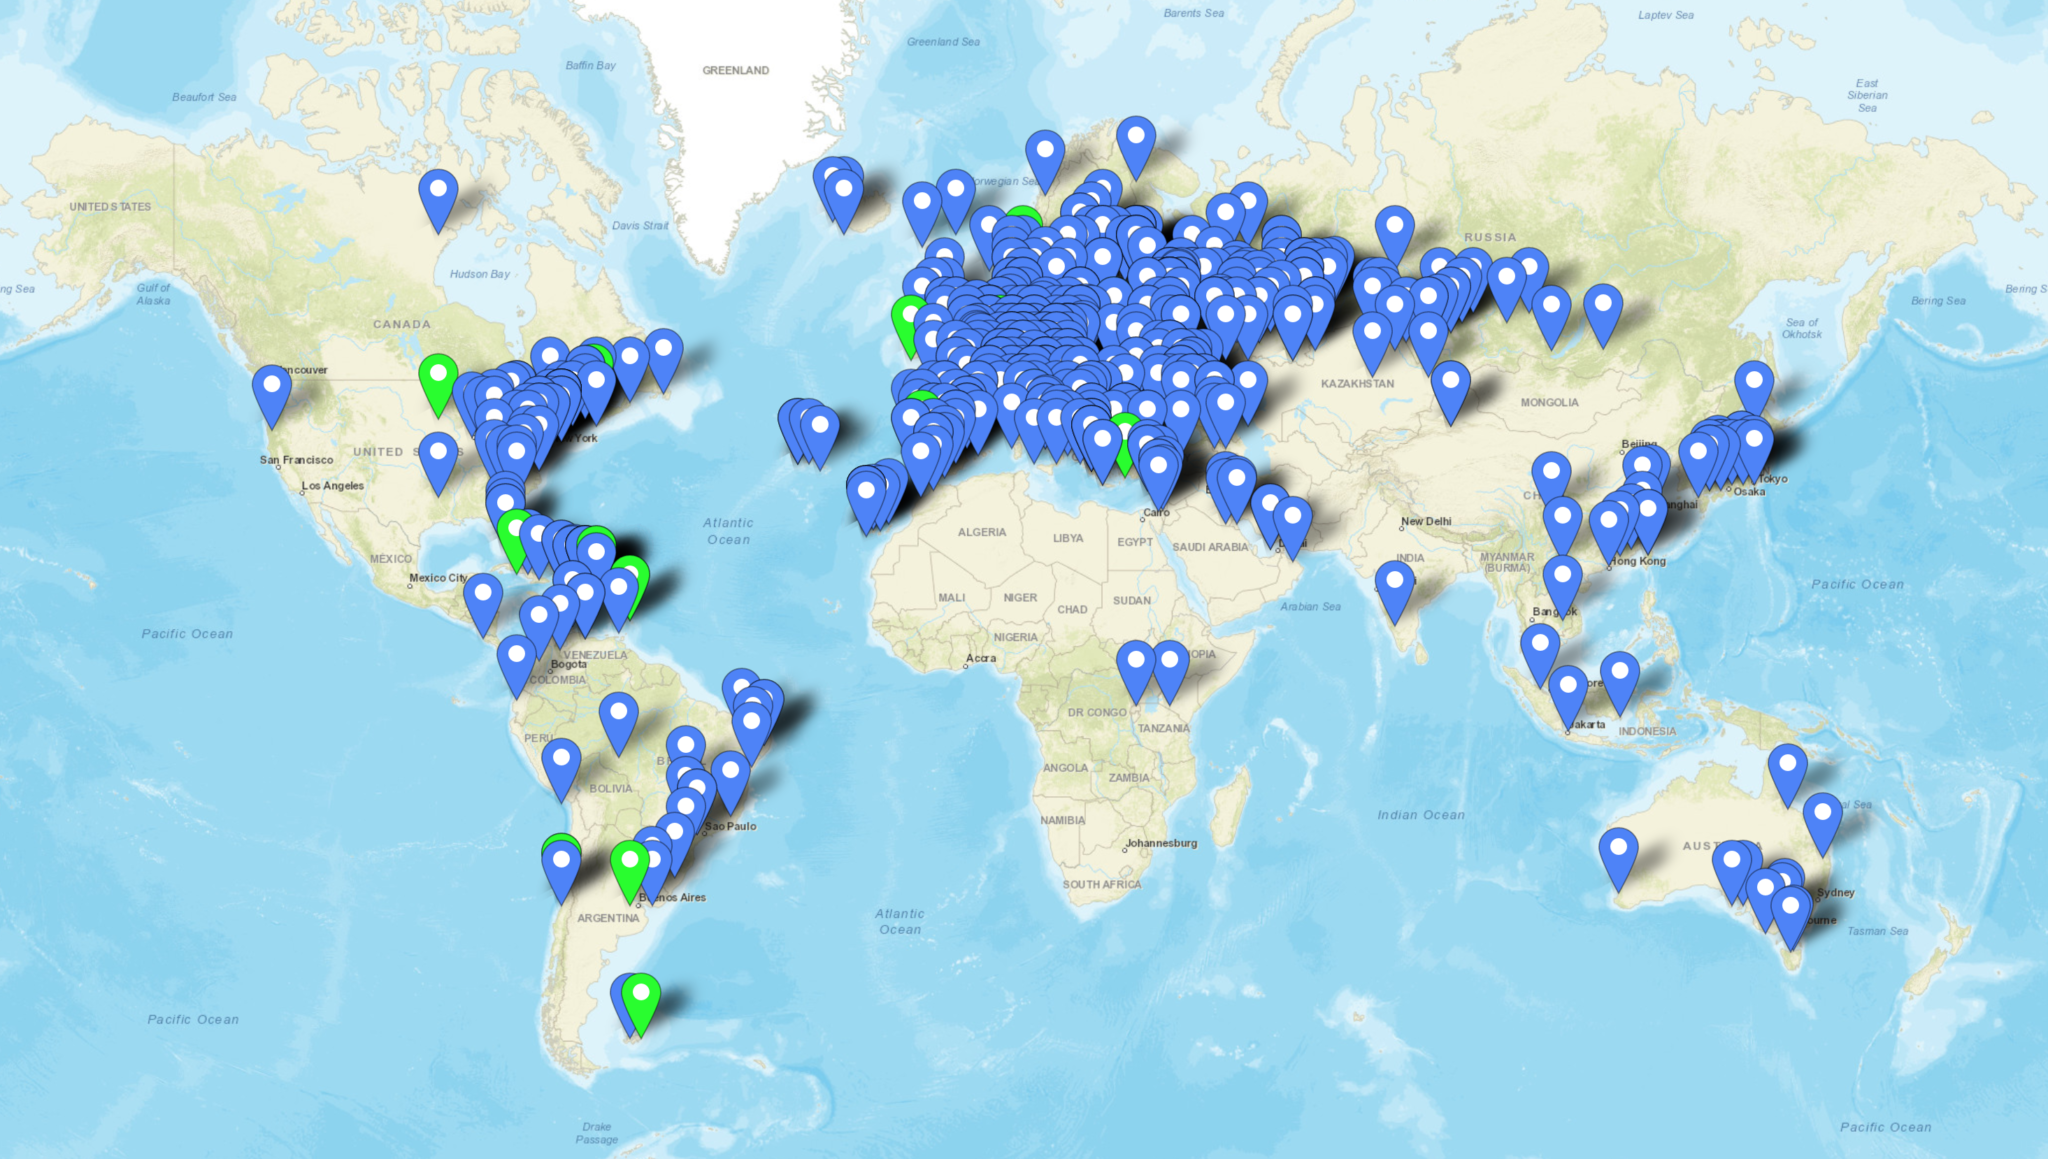
Moving up onto the 30m band I have to admit this is probably my favourite band of all. I’ve spent so many hours on CW working some of the best fists I have ever heard on the air I’ve grown to love this band not just for the DX available but, for the quality of operator found on this narrow piece of the RF spectrum. Needless to say since the antenna is a half wave on the 30m band performance is stunning, out performing any other 30m band antenna I have ever made. It’s even better than the 30m Delta Loop antenna that I built and used when I lived in France.
With 467 contacts in the log on the 30m band you can tell this is my goto band and one that offers access to some of the best DX in the world.
Stations worked on the 30m band from the M0AWS QTH
The 20m band is a band that I never really used until I moved back to the UK from France. Living in France I had acres of land and so I was very much into the low bands, 160m to 30m and never ventured above this part of the spectrum. Now living back in the U.K. with a typical U.K. sized garden the low bands are much more difficult to get onto and so my interests have moved up in frequency somewhat.
Getting onto the 20m band I was amazed at how easy it is to work DX stations compared to the low bands, it’s simply a case of if you can hear them you can work them, there’s no real challenge to be honest. Because of this the band is always super busy with people shouting over the top of each other to get the DX. Not to be put off, I’ve made a surprising 412 contacts on 20m covering the globe. This antenna works incredibly well on this band and you really don’t need anything else to work DX on 20m.
Stations worked on the 20m band from the M0AWS QTH
Next is the 17m band, one of the WARC bands that I’ve never really ventured onto until now. I have to admit I really like this band, when it’s open it’s normally open to the world all at the same time. With an almost undetectable background noise level you can hear the faintest of signal on this band. This is one of the bands that according to the EzNEC modelling software this antenna shouldn’t be any good on but, I have to say that it’s performance is beyond anything I ever imagined. I’ve worked my longest distance yet on this band and with this antenna, ZL4AS at 11776 miles, a distance I haven’t achieved yet on any other band. The 17m band really is a great band, I’d actually say it’s better than the 20m band even though there is considerably less spectrum available. With 220 contacts in the log it’s been a fun band to use.
Stations worked on the 17m band from the M0AWS QTH
Continuing the theme of the WARC bands, the 15m band is another one that I’ve only discovered in the last 12 months. It’s only now that I realise what I’ve missed out on due to my addiction to the low bands for so many years.
I’ve only made 76 contacts on the 15m band, not a lot at all really. This is mainly due to the fact that I get easily side tracked by the 17m and 30m bands most of the time and the radio VFO never gets as far as 21Mhz. Performance of the antenna is good on 15m, I would say not as good as on the 17m band but, it’s no slouch by any means.
As you can see on the map below, I may of only made 76 contacts on the 15m band but, they are spread right across the world proving that this antenna’s DX-ability on 21Mhz really is rather good.
Stations worked on the 15m band from the M0AWS QTH
Finally we arrive at the top of the WARC bands, the little 12m band. Once again this band is very much like the 17m band, super low background noise level, when it’s open you can work huge distances with very little power but, often there is quite deep QSB that can make getting that elusive DX a bit more challenging.
With only 66 contacts in the log once again I’ve not spent a huge amount of time on this band but, it hasn’t disappointed. With global coverage from this antenna on 12m once again I am astounded at how well it works. With software modelling saying it should be terrible on 24.9Mhz with nothing but super high angle radiation, it really shouldn’t be a good antenna for DXing on this upper WARC band but, it is and I have no idea as to why!
Stations worked on the 12m band from the M0AWS QTH
Finally we arrive at the 10m band, another band that I have never got into even though many refer to it as the magic band. This is the band that I’ve made the fewest contacts on, not because the antenna doesn’t work at the dizzy heights of 28Mhz but, because I hardly ever get the VFO dial past the lower bands due to the level of DX available. I really should make more effort to get the best out of the 10m band, especially now the summer is coming.
With a measly 19 contacts in the log I should be ashamed of myself for not doing more on this band as it is very often open and busy with traffic. Since I’ve not really used the antenna that much on the 10m band it’s hard to say how well it performs however, I have had contacts into North and South America and so it shows potential.
Stations worked on the 10m band from the M0AWS QTH
As you can see, the performance of this antenna is self evident from the log entries, it works superbly even though the modelling software says it shouldn’t above 14Mhz. This is now my main antenna here in the U.K. and I’ve only made one change to the initial setup and that is to add a CG3000 remote auto ATU to replace the home-brew LC tuning circuit.
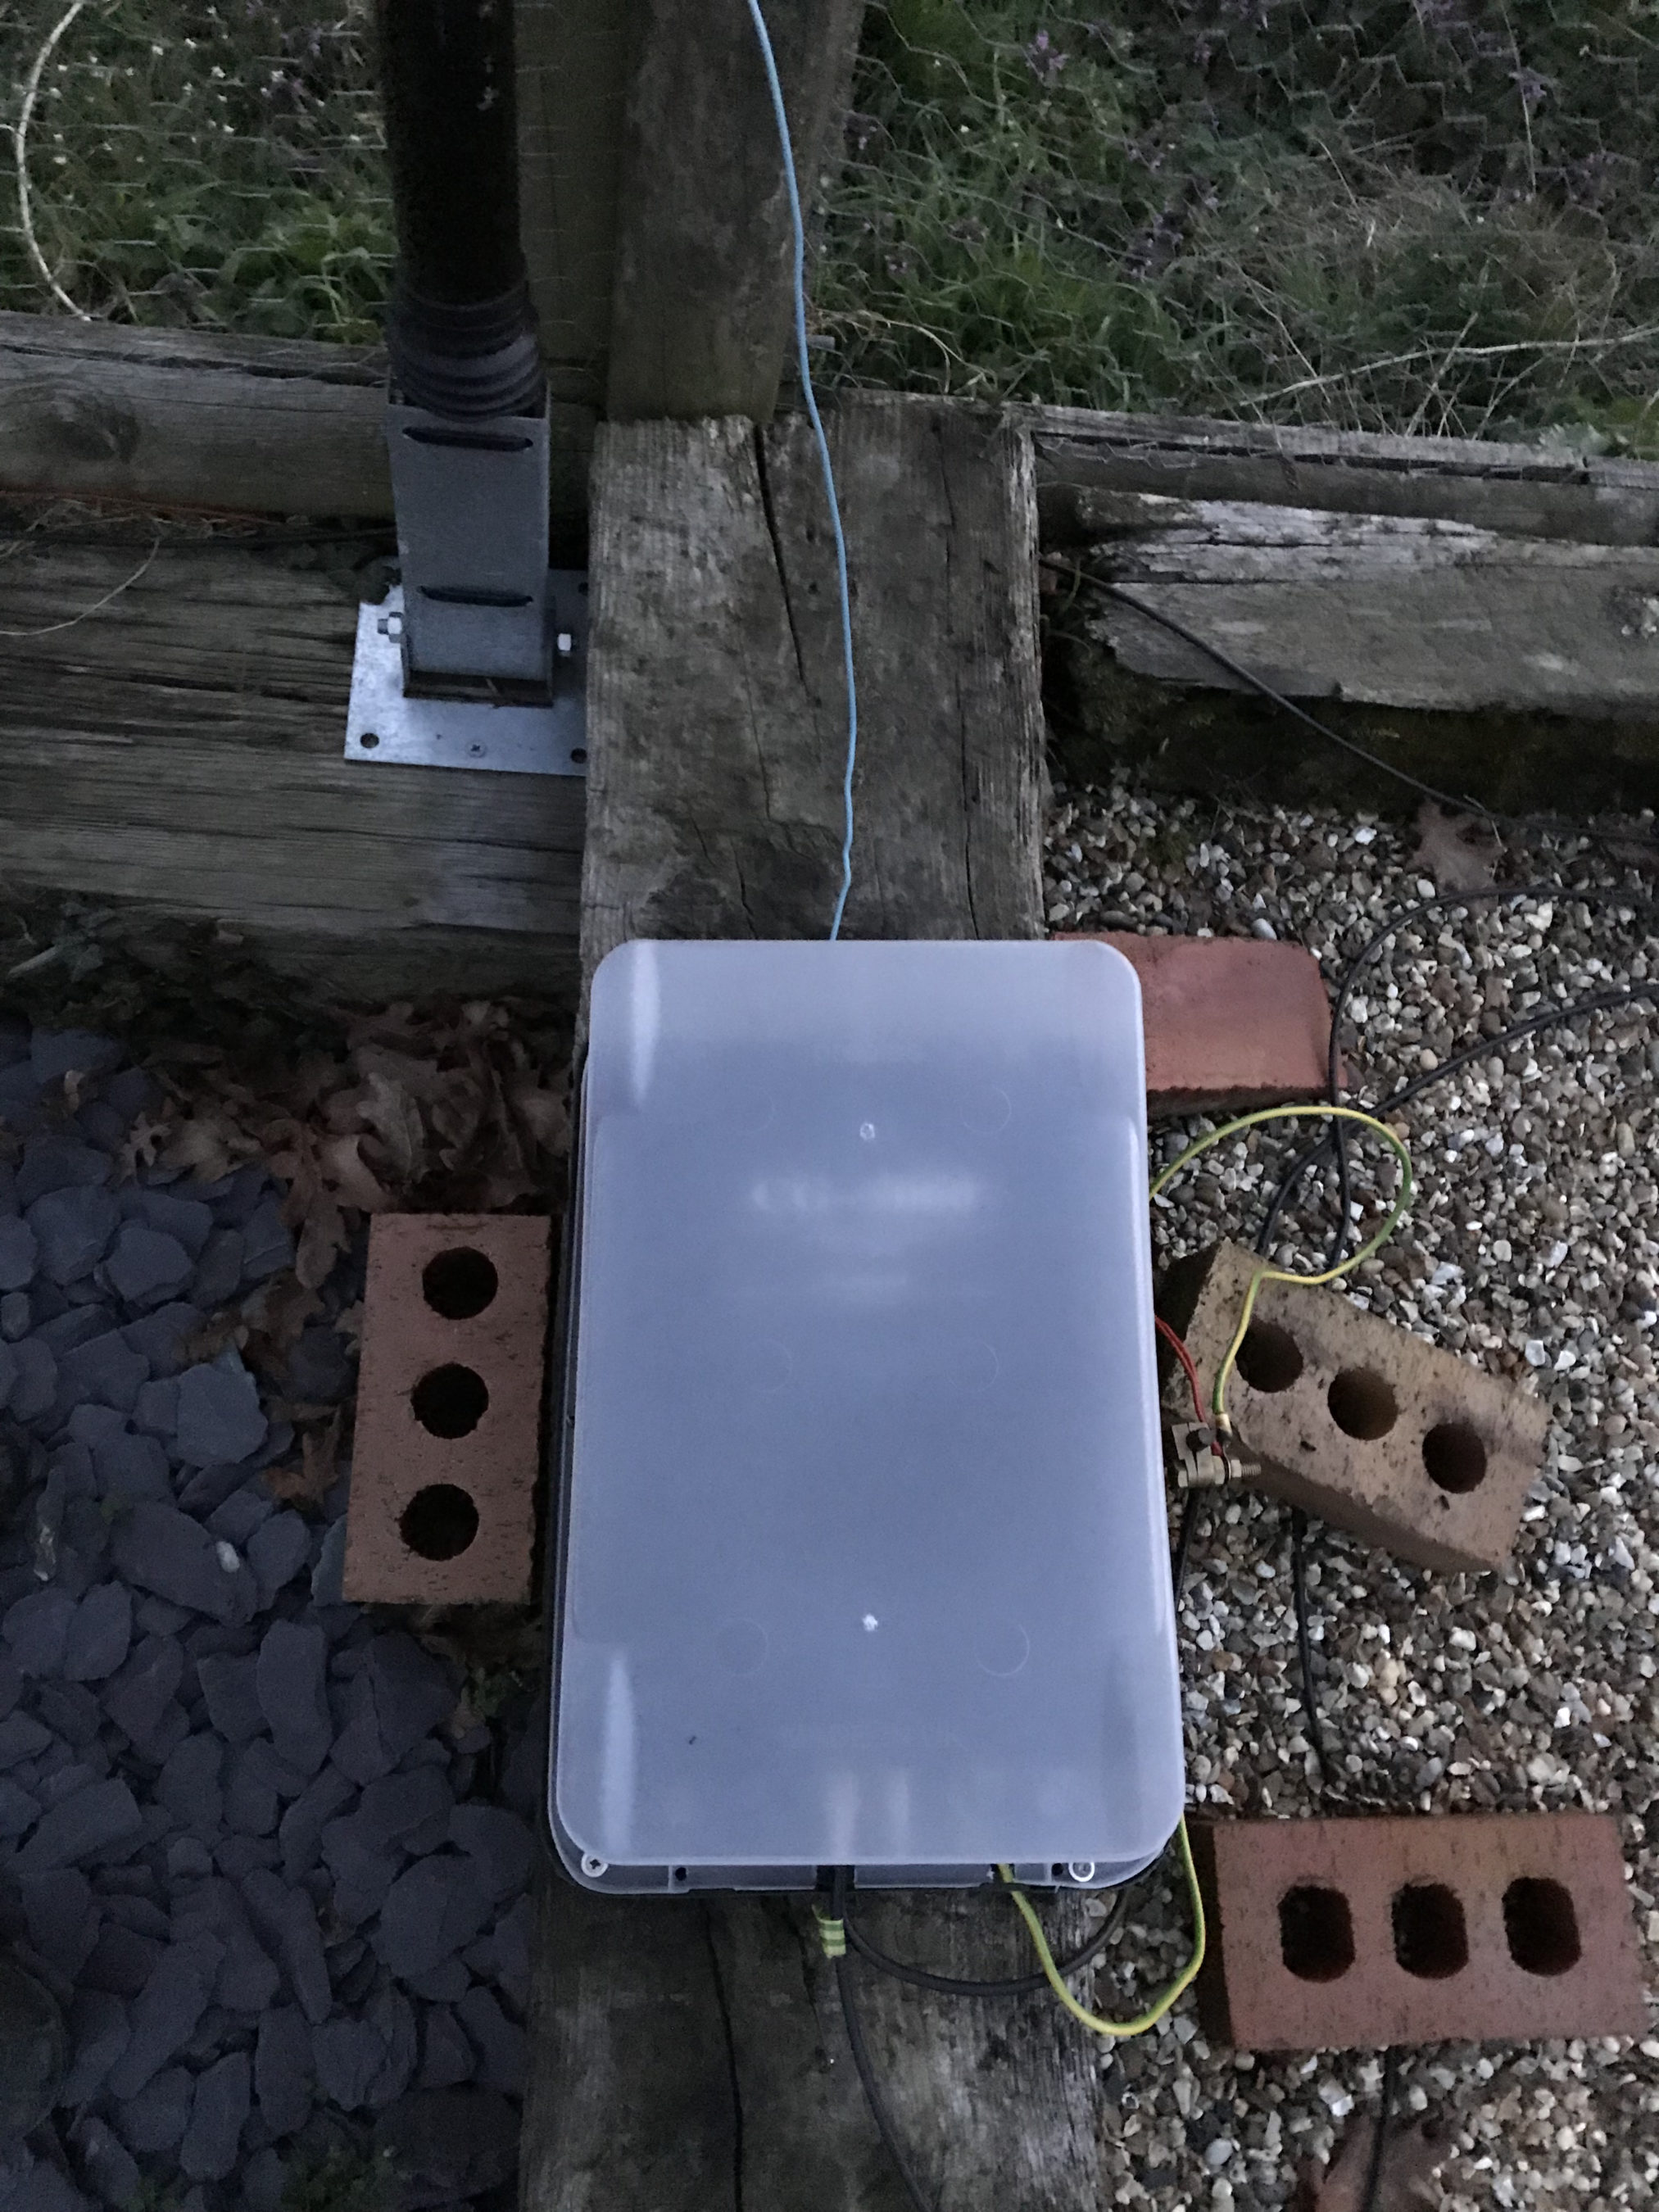
CG3000 Remote Auto ATU housed in a plastic box
With the CG3000 auto ATU in place I no longer have to venture out into the cold, wet garden in the winter months to change band, it’s just a case of sending a continuous 10w signal into it and leaving it to tune in less than 2 seconds. The CG3000 is a Pi Network ATU so it handles both high and low impedance loads with ease. A Pi Network ATU is one of the best you can have, I’ve made my own in the past and had excellent results.
So in summary, 13.4m of wire vertically up a 12.4m pole with 4 x 12m radials, a ground rod and a CG3000 Auto ATU will give any HAM station the ability to work DX on all bands from 80m to 10m without ever having to leave the shack to tune it.
Since I got the CG3000 off of Ebay for a bargain £170 and the 12m heavy duty Spiderpole for under £100 the total cost of the antenna is considerably less than many commercial offerings available and yet performs as well if not better.
If you want to get this antenna onto the 160m band then you just need to add a small coil into the mix at the bottom of the wire to increase the inductance in circuit. The CG3000 will then happily tune the entire 160m band. It’s best to remove this coil though for all the other bands otherwise performance is reduced.
Please be aware that the performance of this antenna will not be anywhere near as good if you use the ATU in your radio at the end of a coax run. This is because the coax becomes part of the antenna and the radiation pattern is all but destroyed. You will be extremely disappointed if you use the antenna in this fashion. The ATU must be at the end of the wire and connected directly to ground and the radials to get the performance that I have experienced.
Finally, if you have an Icom IC-705 and AH-705 remote auto ATU you can use the AH-705 ATU in place of the CG3000, you will get the same results as I have with the CG3000.
I have used my AH-705/IC-705 combo quite a few times with this antenna with excellent results although, the big antenna can sometimes result in the receiver of the IC-705 getting overloaded especially on the lower bands. This is easily resolved by reducing the RF Gain on the radio.
Following on from my previous article on Enhancing Digital modes with Node Red I’ve now got to a point where I have realtime decode information from the WSJT-X digital application being plotted on a Node Redworld map not just for CQ calls but, for stations in conversation too.
The flow has become somewhat more complex than it was originally as more and more functionality has been added. I have deliberately split out the flow process into more nodes than are really necessary so that the flow is easier to understand. Anyone from a programming background like myself will soon realise that a lot of the nodes could actually be combined into one big node however, the overall flow process wouldn’t be so easy to understand for the Node Red newcomer and would possibly put people off from trying it out.
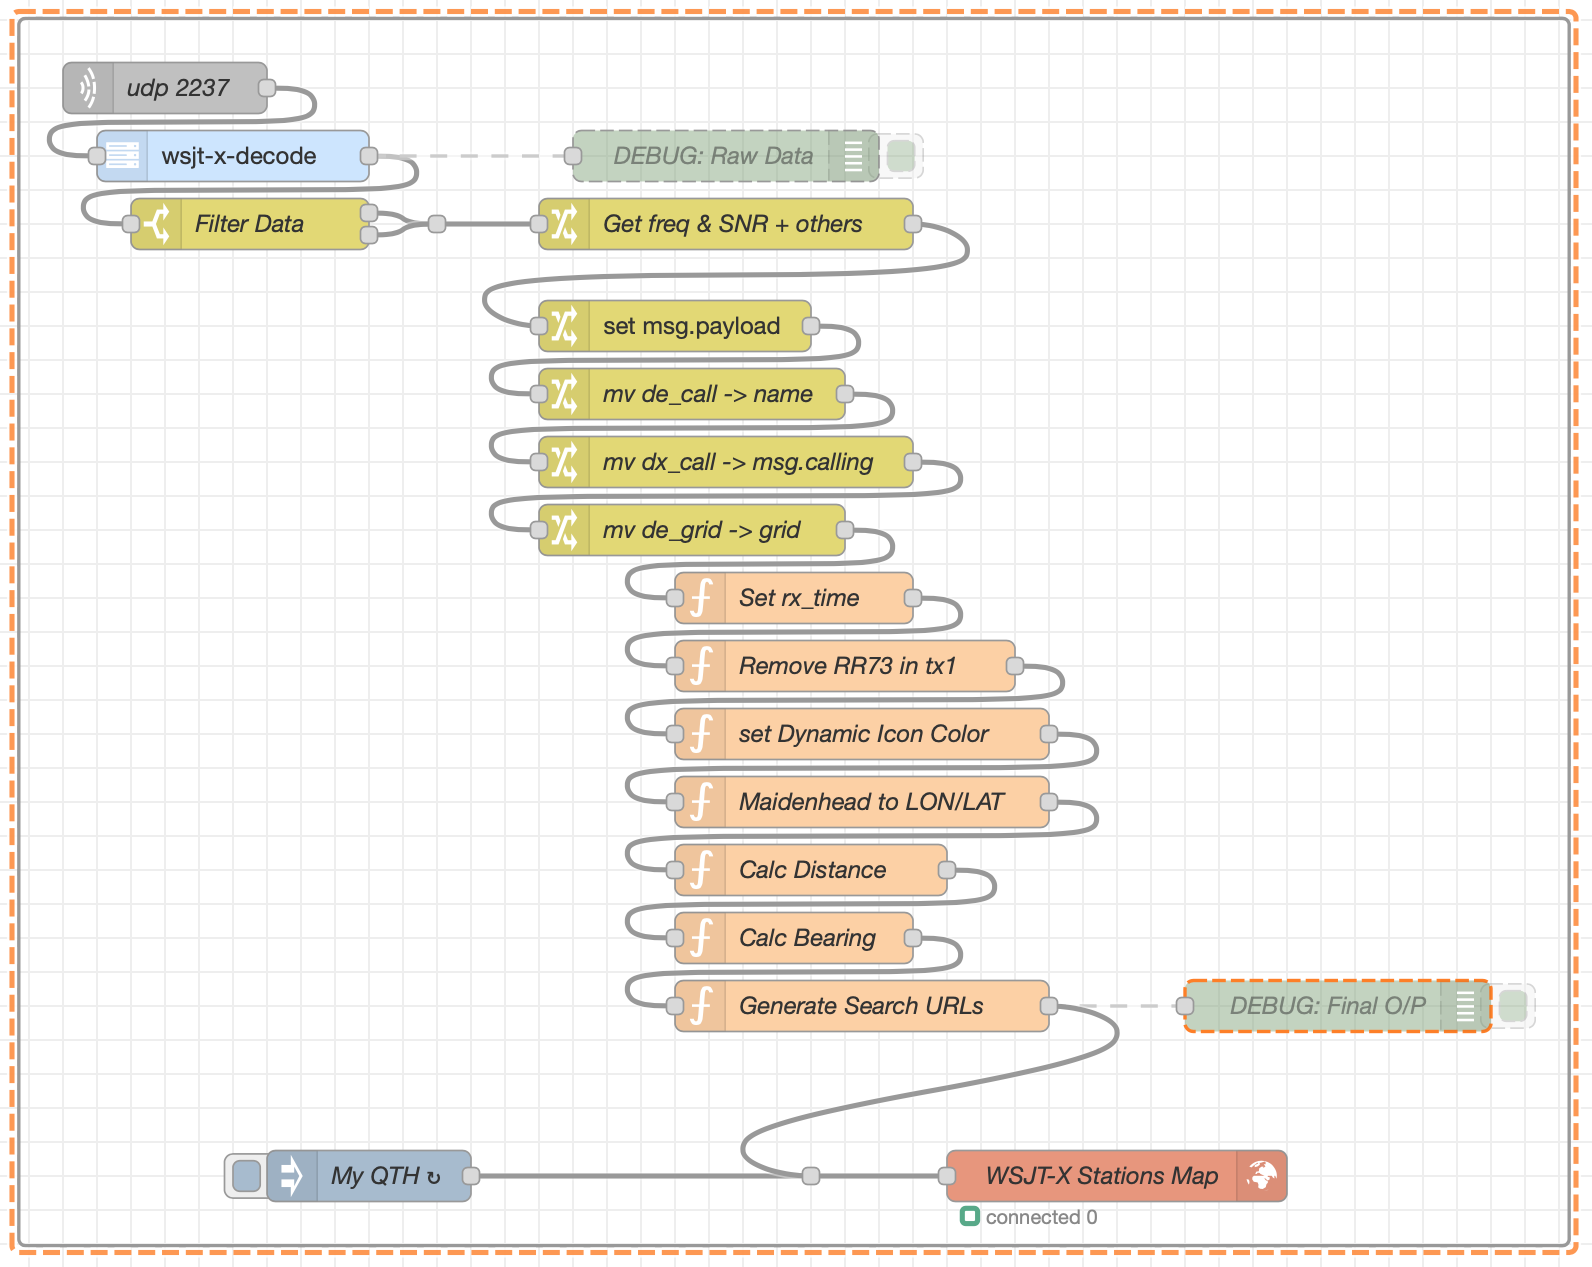
Current WSJT-X Node Red flow
Above is a screenshot of the flow as it currently stands. It’s pretty easy to understand what is happening in the flow due to the fact that the processes are broken out into small, easy to digest blocks.
From the top down we connect to WSJT-X via UDP port 2237 and listen for the data stream. As the data is received it’s passed directly into the WSJT-X-Decode node that converts the information into a Node Red compatible format. The data is then filtered with only the information required being passed onto the next node. There are two outputs from the filter node as we require two different streams of information, namely “CQ” and “TX1” data. All the rest of the data from WSJT-X is ignored as it’s not required at this time.
The “Get freq & SNR + Others” node builds a decode message payload with all the correct data, in the right format ready to be passed on along the flow. This node also sets a number of parameters required by the map node to be able to control the display of the data.
The next node along is “Set msg.payload”, this brings together all the necessary data into a single message payload that is then worked on by all the nodes further along the flow.
The next 3 nodes perform the simple task of moving some of the data into the objects defined by the world map node, if the data isn’t moved into these specific objects the map will not plot anything.
Now we get onto the slightly more difficult bit that might put off those who aren’t from a programming background. The next 7 nodes are all javascript functions which I have created to perform tasks that cannot be done via the standard Node Red pallet.
At this point it’s worth noting that I’m not a javascript programmer, I’ve used Python, Rust, Go, C and many other languages during my 40 plus year career but, javascript has never been one of them. I’m sure any seasoned javascript programmer will most likely raise an eyebrow at my attempt at javascript programming but, you need to remember that I’m doing this in my retirement and my enthusiasm for learning yet another programming language has wained somewhat!
So, getting back to the flow, each javascript function does just one task each of which is as follows:
Set rx_time – Sets the time the data was received/processed
Remove RR73 in tx1 – Remove decodes where RR73 is in TX1 instead of a valid callsign
Set Dynamic Icon Colour – Sets the icon colour depending on what type of call is decoded
Maidenhead to LON/LAT – Converts Maidenhead locator codes into LAT/LON Coordinates
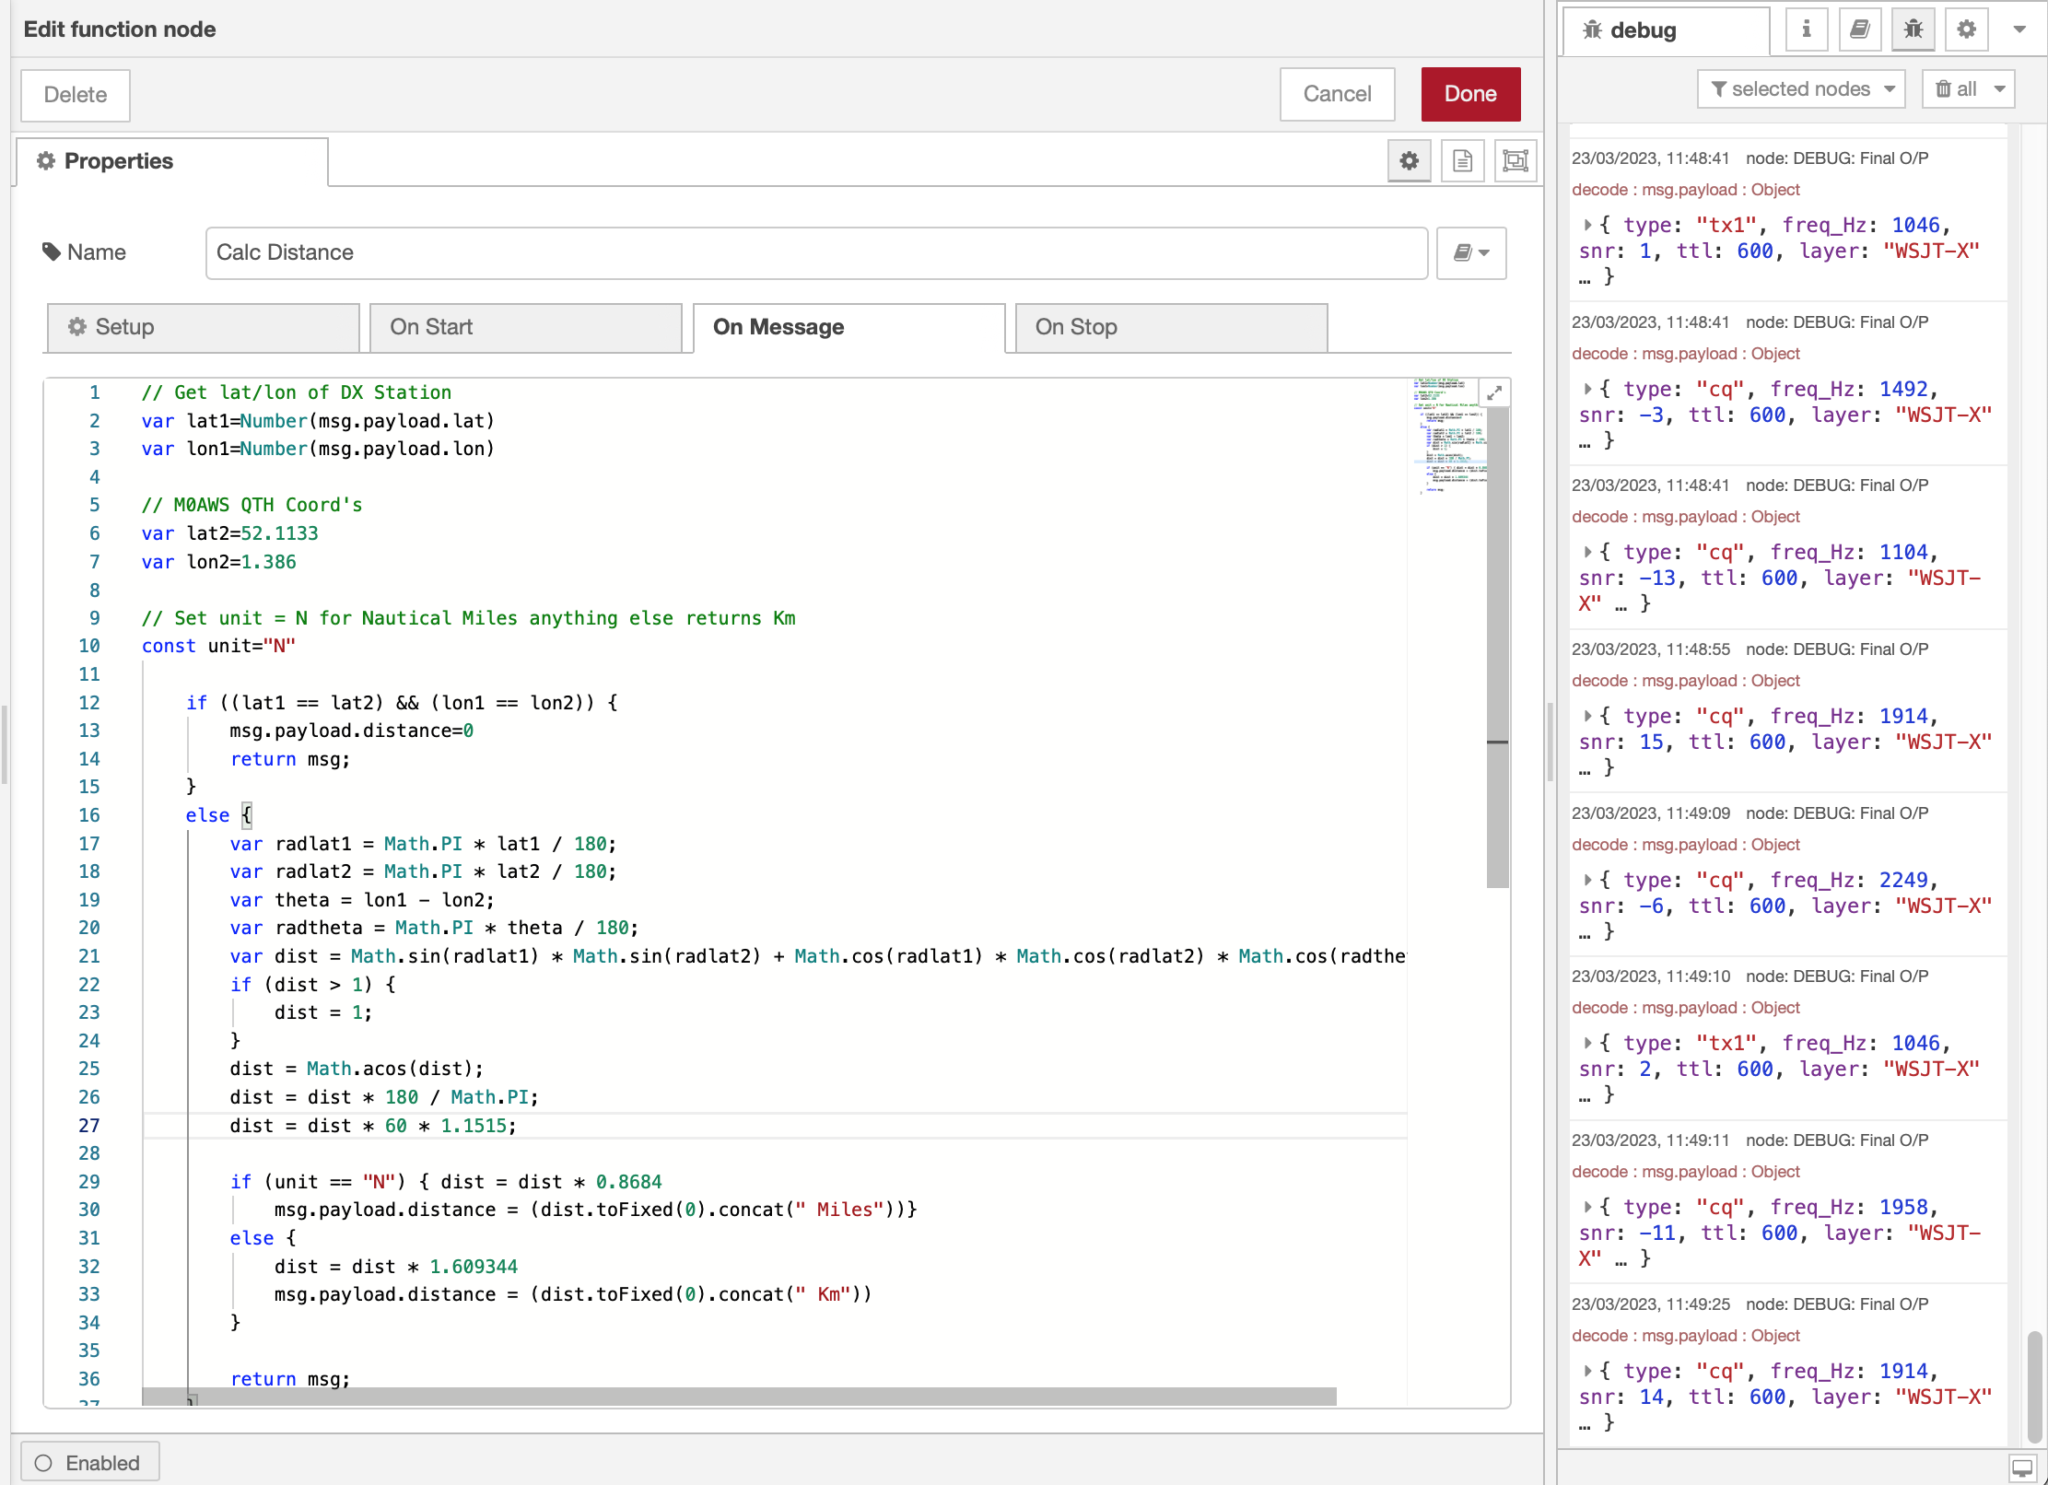
Calc Distance – Calculates the distance between “My QTH” and the DX station
Calc Bearing – Calculates the bearing/beam heading to the DX Station from “My QTH”
Generate Search URLs – Generates the URLs for QRZ and my own online log lookups
Editing the Calc Distance function with debug info in the far right panel
Once all the functions have run the resultant data set is forwarded on to the WSJT-X Stations Map node where it is plotted real time on a world map.
To view the map point your web browser at your PC running Node Red as follows:
http://radiopc.your.domain:1880/worldmap/
Or if you haven’t got a DNS setup at home then just use the IP Address of the PC instead:
http://192.168.100.10:1880/worldmap/
Don’t forget that for all of this to work you must configure WSJT-X to send data via UDP on port 2237 otherwise the flow won’t be able to connect and listen for the decode data.
You may have noticed that there are 3 other nodes that I haven’t mentioned yet. The two green greyed out nodes are Debug nodes that can be enabled when required to help see what is going on in the flow. These debug nodes will display data in the debug panel on the right of the flow editor screen when they are enabled, they are extremely useful for debugging!
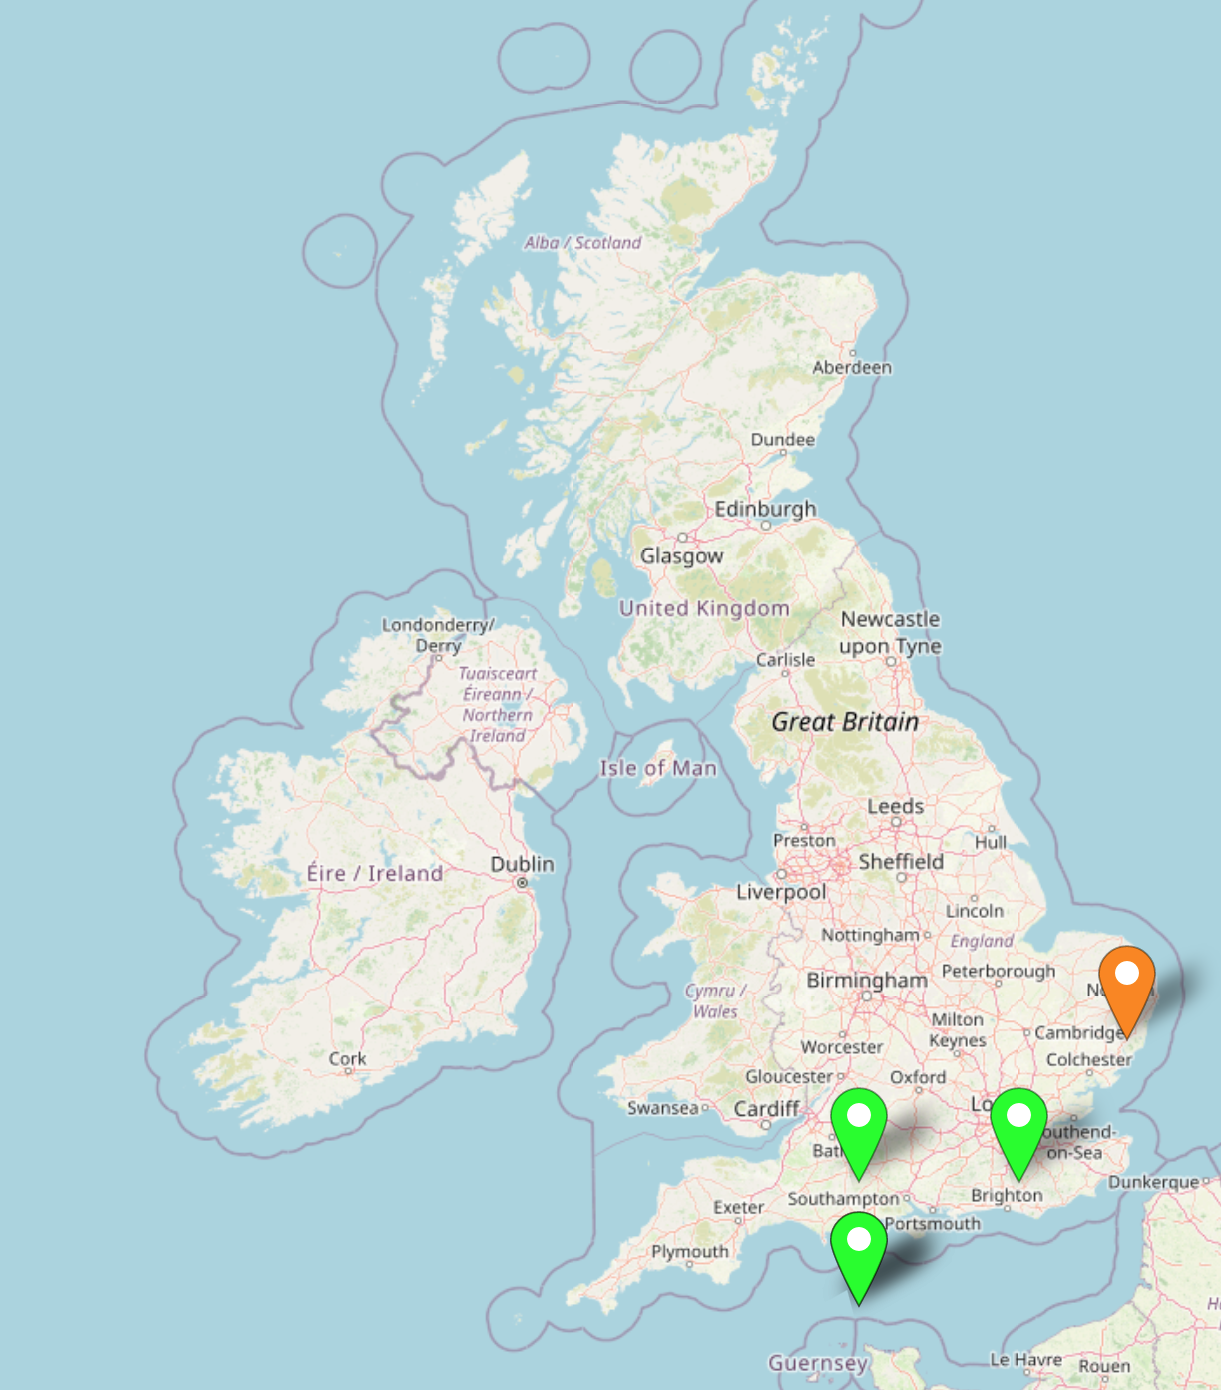
The third is the blue My QTH node, this contains data pertaining to my QTH that is plotted on the map using an orange icon. You can easily edit this node to point to your QTH instead.
WSJT-X Node Red map showing orange icon denoting my QTH
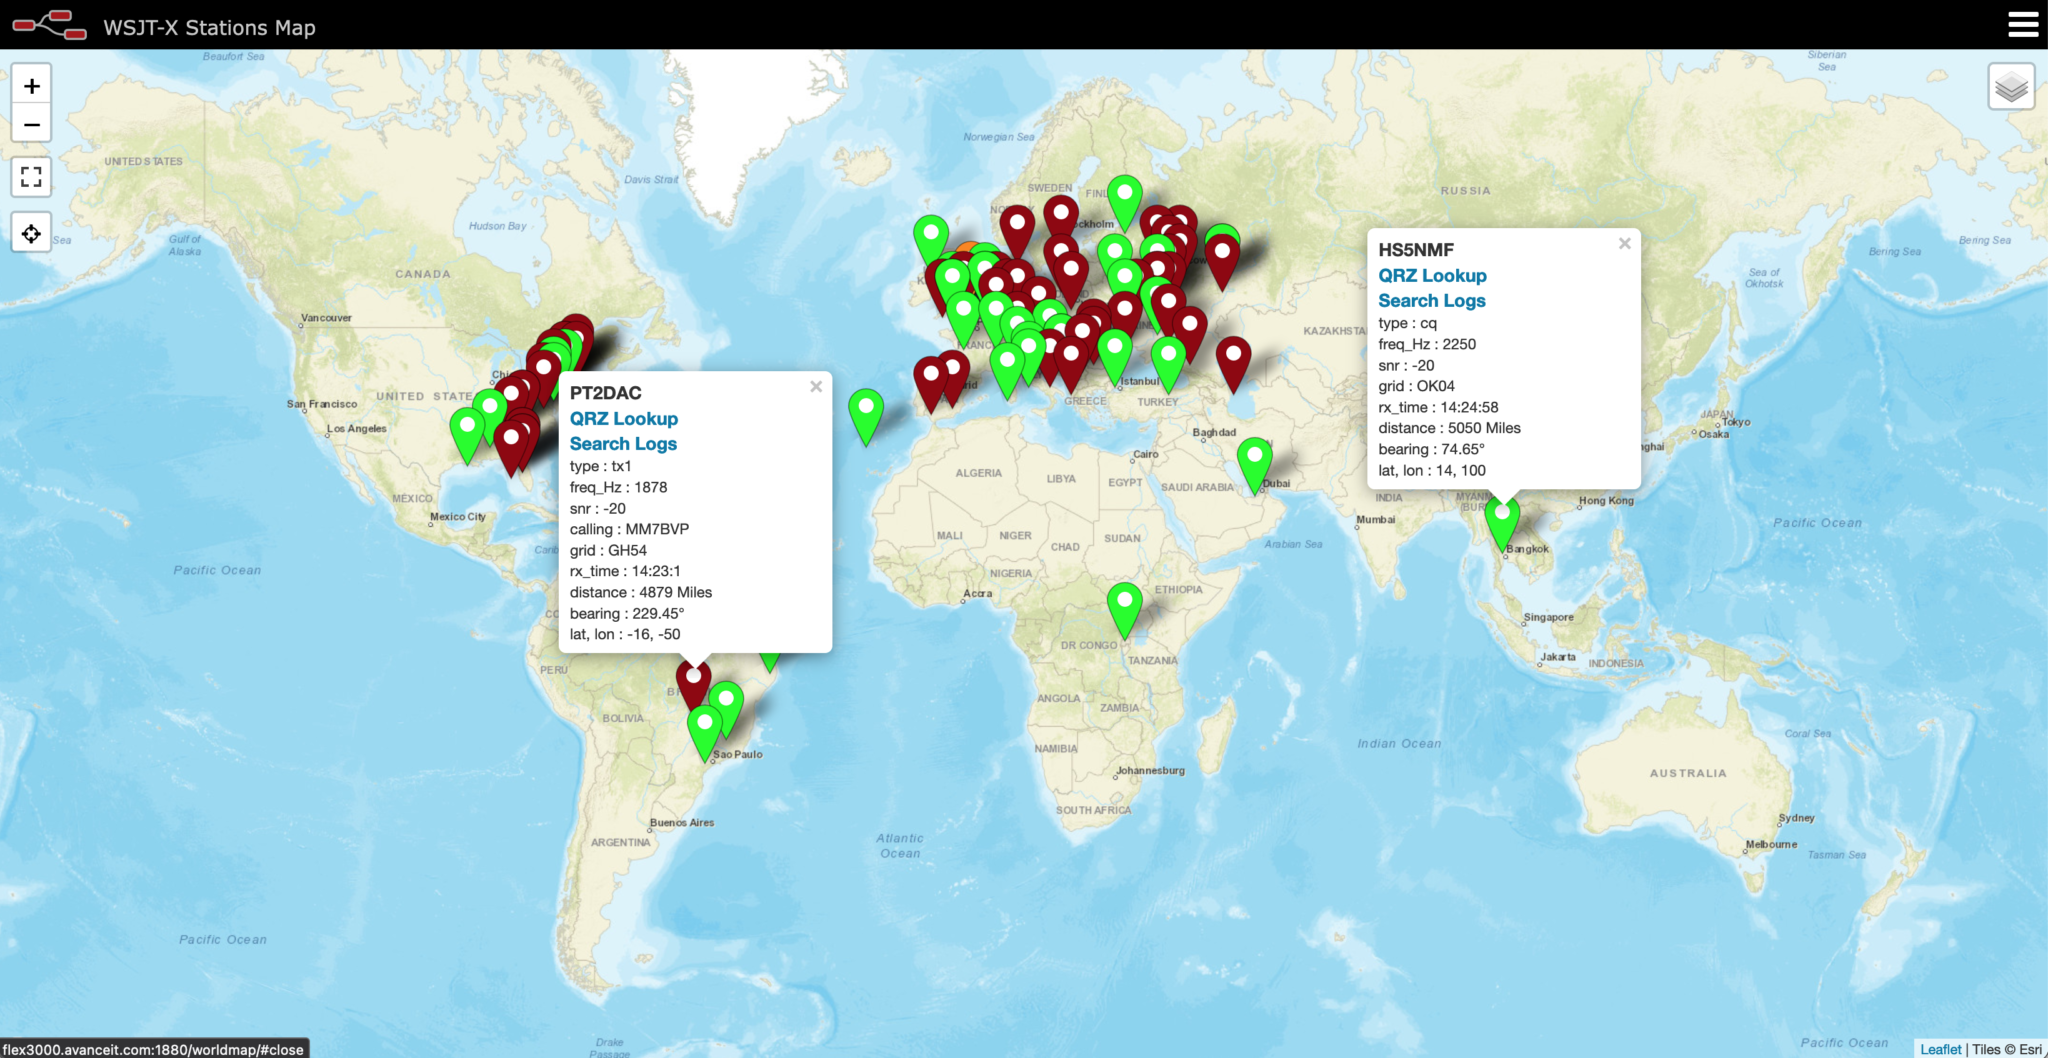
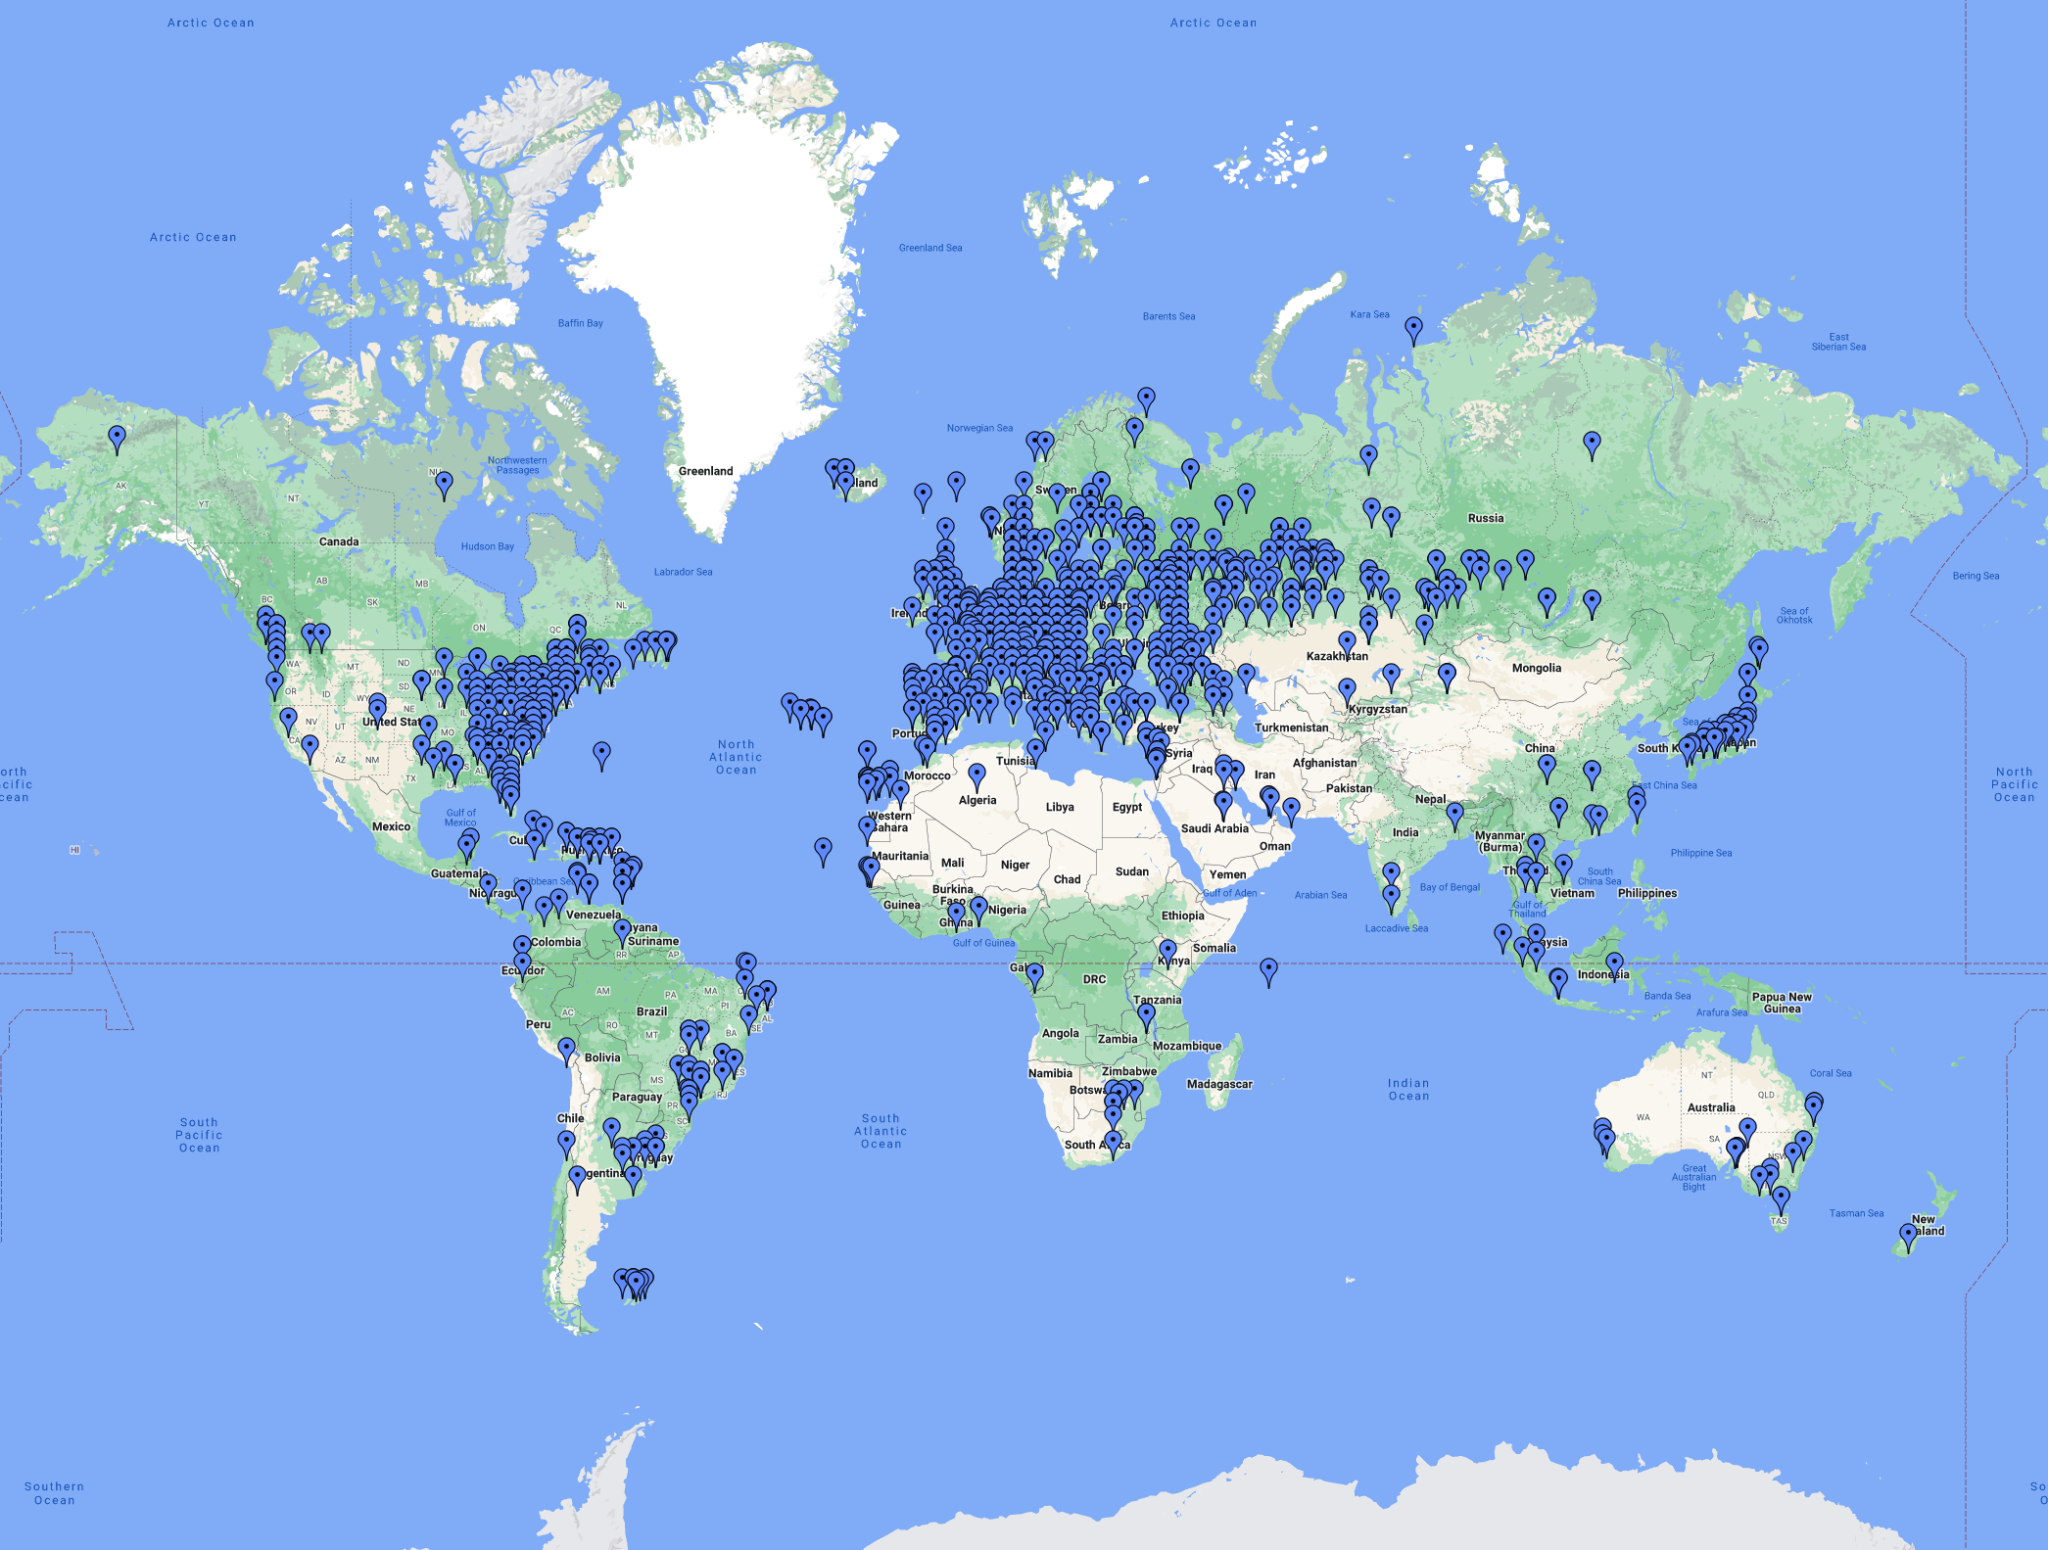
Once the flow is deployed you’ll be surprised how quickly the data starts to be plotted on the map. Stations calling “CQ” are shown by Green icons and stations that are in a QSO with another station are denoted by the Red icons.
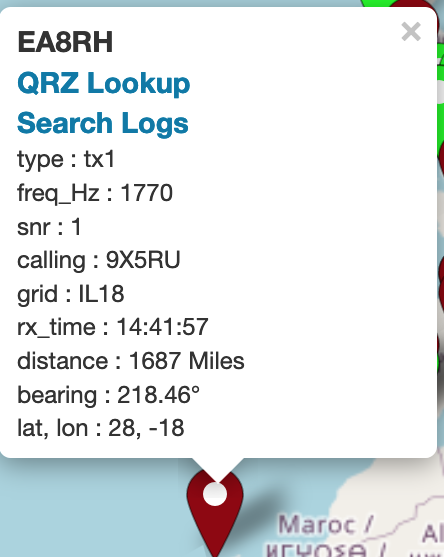
Each icon is clickable and will present all the information collected by WSJT-X for each station viewed.
WSJT-X Node Red World Map showing FT8 stations realtime on the 12m Band
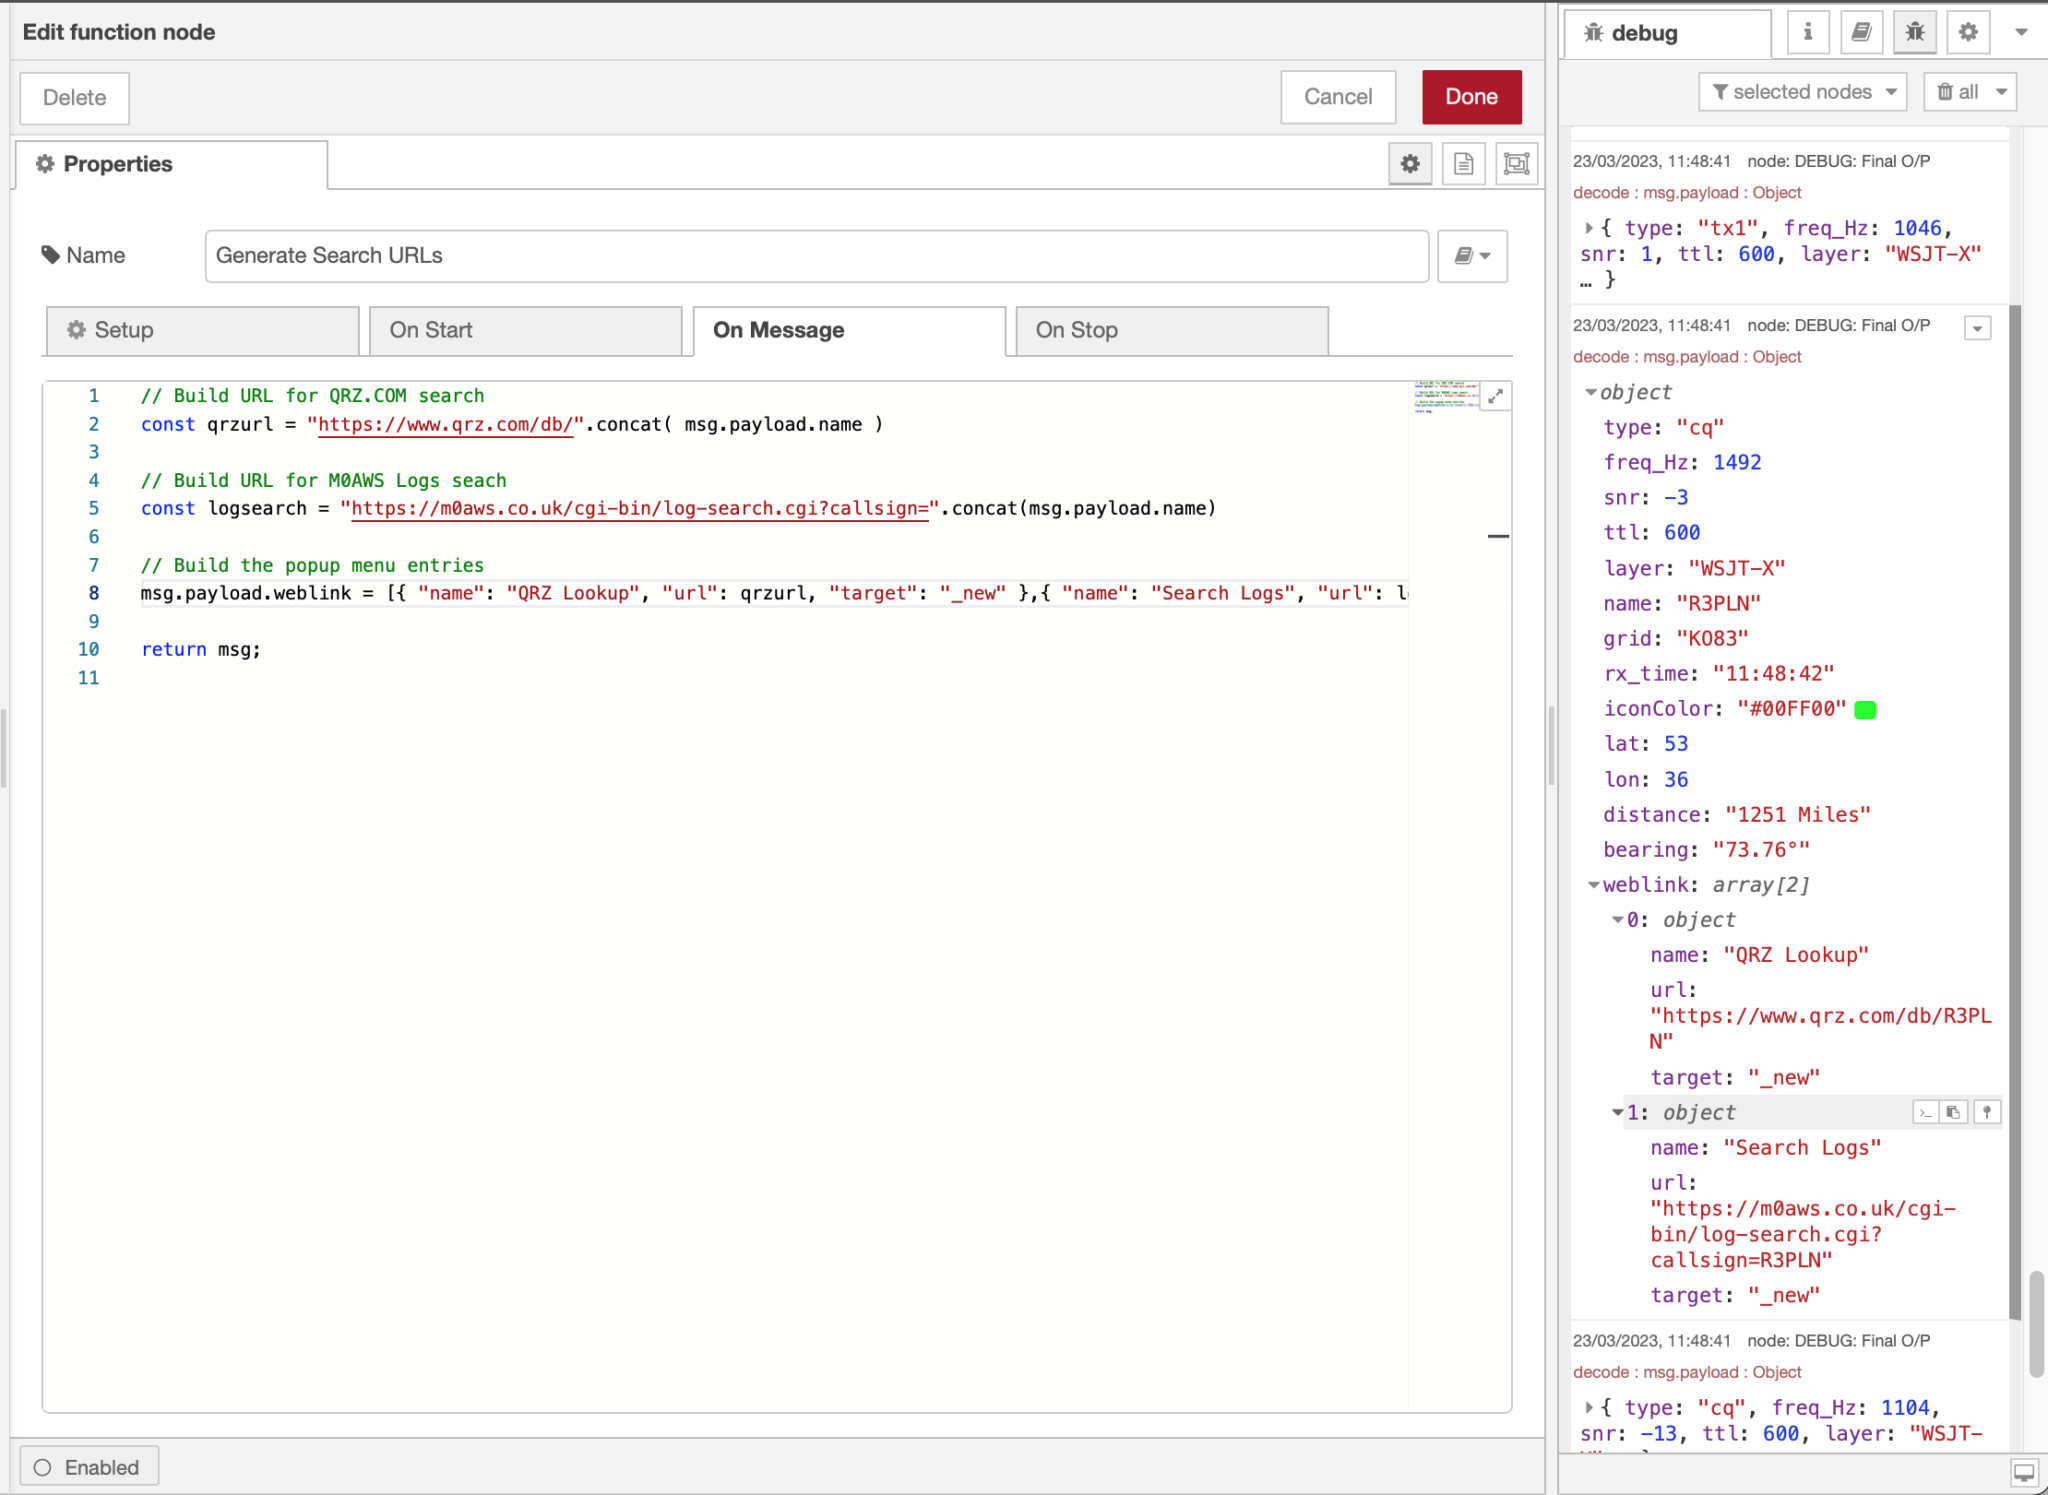
The popup also has two clickable entries, one will take you to the qrz.com page for the station being viewed and the other will search my logs to see if I have worked that station already and if so it will open a new tab showing the information.
Node Red Function Editor showing the Generate Search URLs function
You can edit the “Generate Search URLs” node so that it points to your online logs search engine so that you can view your own log data instead of mine.
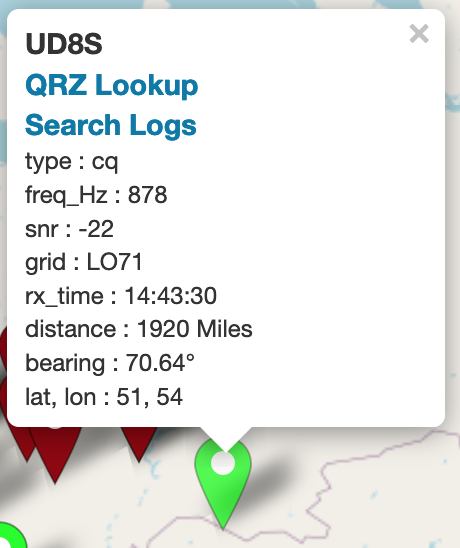
Below is a close up of the popups that are displayed when each icon on the map is clicked. The popups show the information collected from WSJT-X for each station plotted on the map.
Left – Green “CQ” Popup and Right – Red “TX1” in QSO popup
If you fancy trying this out for yourself but, don’t fancy creating all the nodes in the flow manually then I have made an export of the flow available for download. All you have to do is download the file, unzip it and then import it to Node Red and you’ll have everything built ready to play with.
The 2023 new year has got off to a great start here at the M0AWS radio shack with my first QSO with New Zealand since setting up the new radio room.
It’s been almost a year now since I started putting the radio room together and throughout all this time I’d not been able to secure a complete QSO with New Zealand.
Well today was the day that I finally achieved what seemed like the impossible.
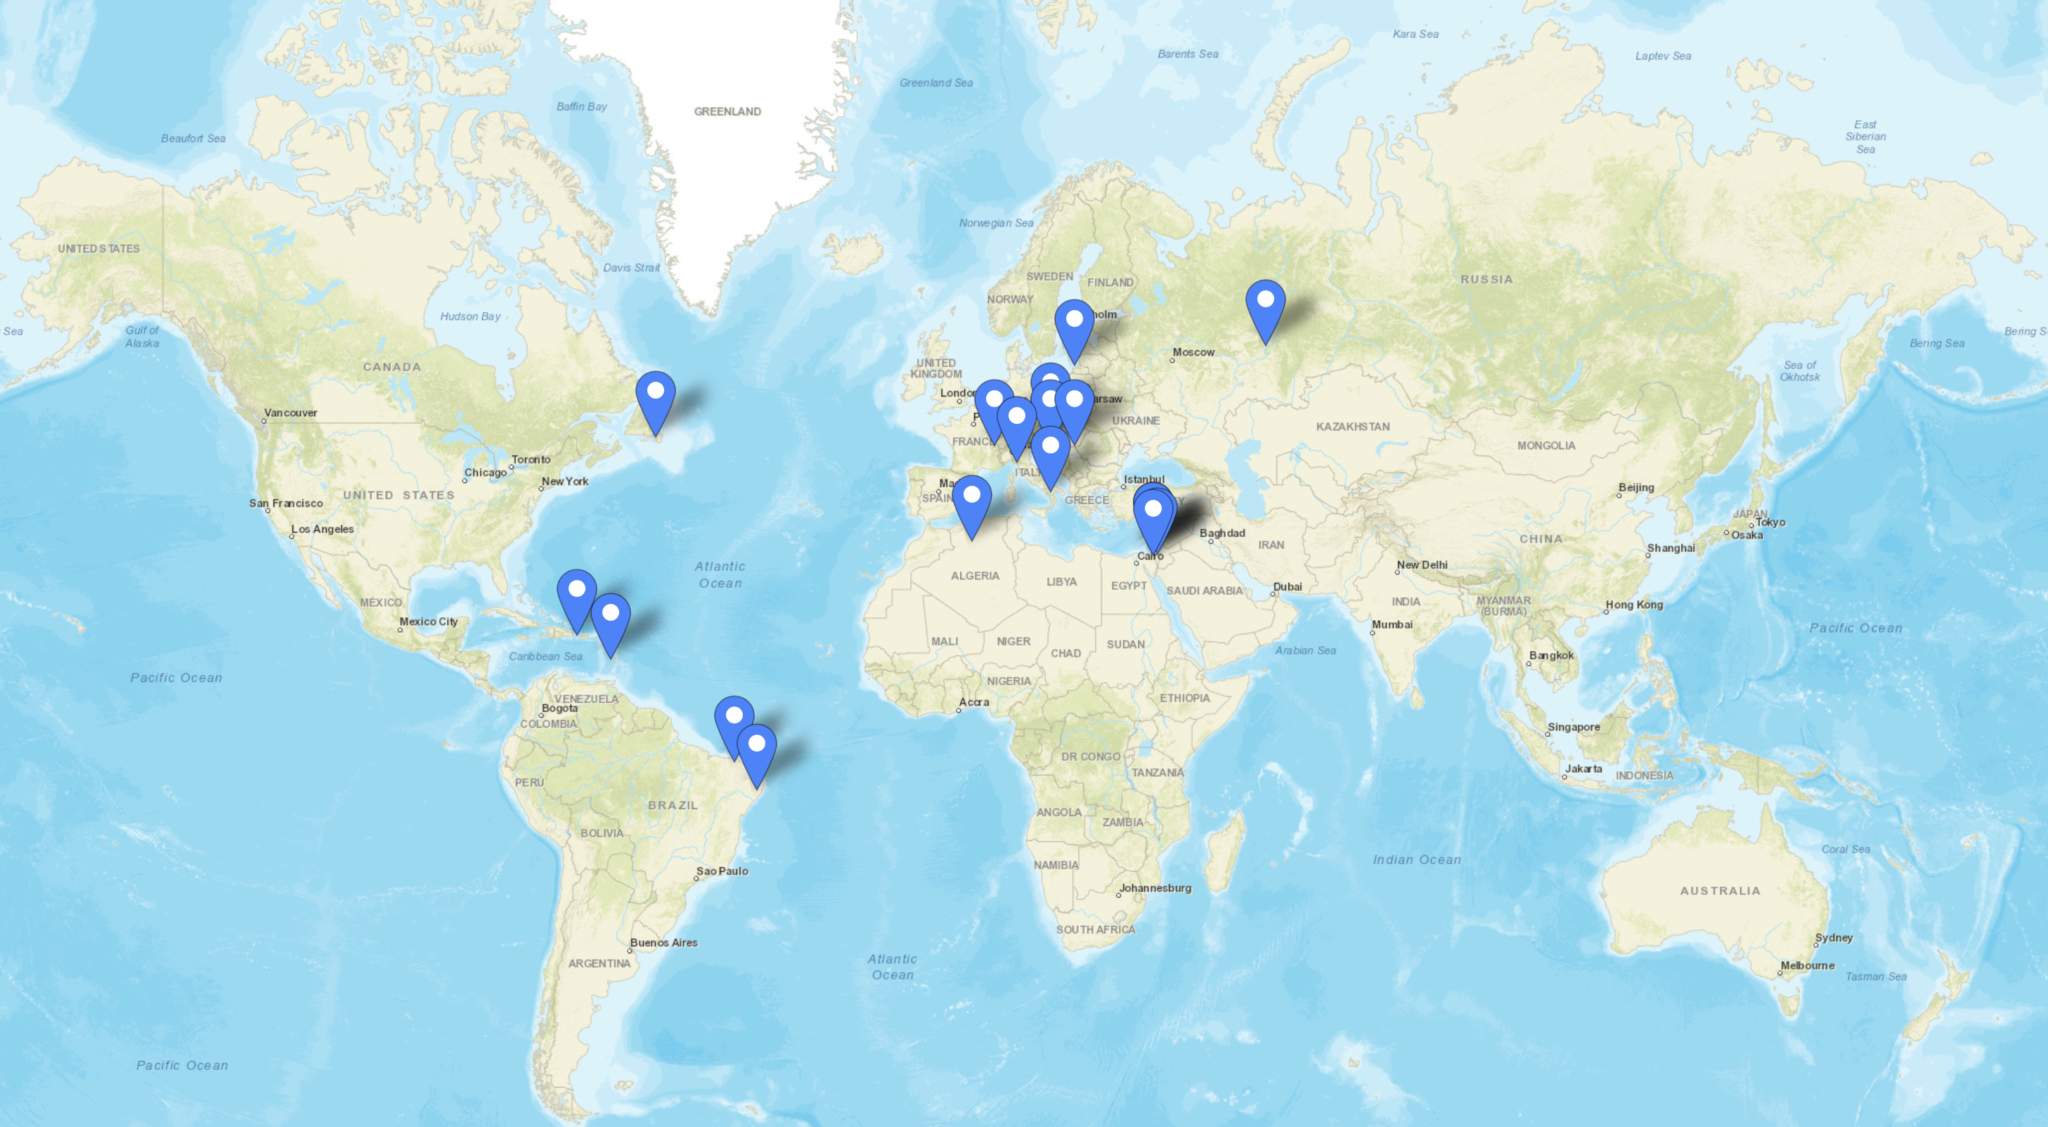
M0AWS WSJT-X QSO Map as of 3rd January 2023
ZL4AS was the first New Zealand station that I’d managed to complete a full QSO with, up until now I’d made a few ZL contacts but, never managed to complete the QSO due to conditions on various bands.
The band of choice today was 17m, a great WARC band that has provided me with much of the DX over the last year. This band really does give full global comms when it’s open.
With a new longest distance of 11776 Miles to ZL4AS in Balclutha New Zealand, I’m looking forward to see what new countries 2023 brings to the M0AWs radio room.
For the last 24hrs I’ve had the RaspberryPi2 transmitting WSPR on 20m and 10m connected to my EFHW Vertical antenna. So far not a single spot on the 10m band, I’m assuming the band hasn’t opened in the UK over the test period.
WSPR 20m band reports over the last 24hrs
Results on 20m continue to impress with reports from the USA, West Africa coast and as far east as Georgia.
I’ll check the signal on 10m later today using my IC705 to ensure it is transmitting ok and then will leave it running for another 24hrs to see what happens.
UPDATE:
It appears there’s been a reliable opening on both 10m and 20m to the Canary Islands just off the west coast of Africa so far today.
Having just completed building my new radio shack I thought what better way to break it in than to do an all night radio session chasing the DX.
All nighters aren’t anything new for me, I did many an all night session low band DXing when we lived in France (F5VKM). Back then I had a massive cellar, part of which was a very well fitted out radio shack. With some very large antennas in our field out back I was truly spoilt with some great times on the 160m band in the dark winter months.
Now back in the UK and only just getting back into the hobby after a long break things are somewhat different. I now only have a typical small UK garden and only vertical antennas. Better than no antennas though!
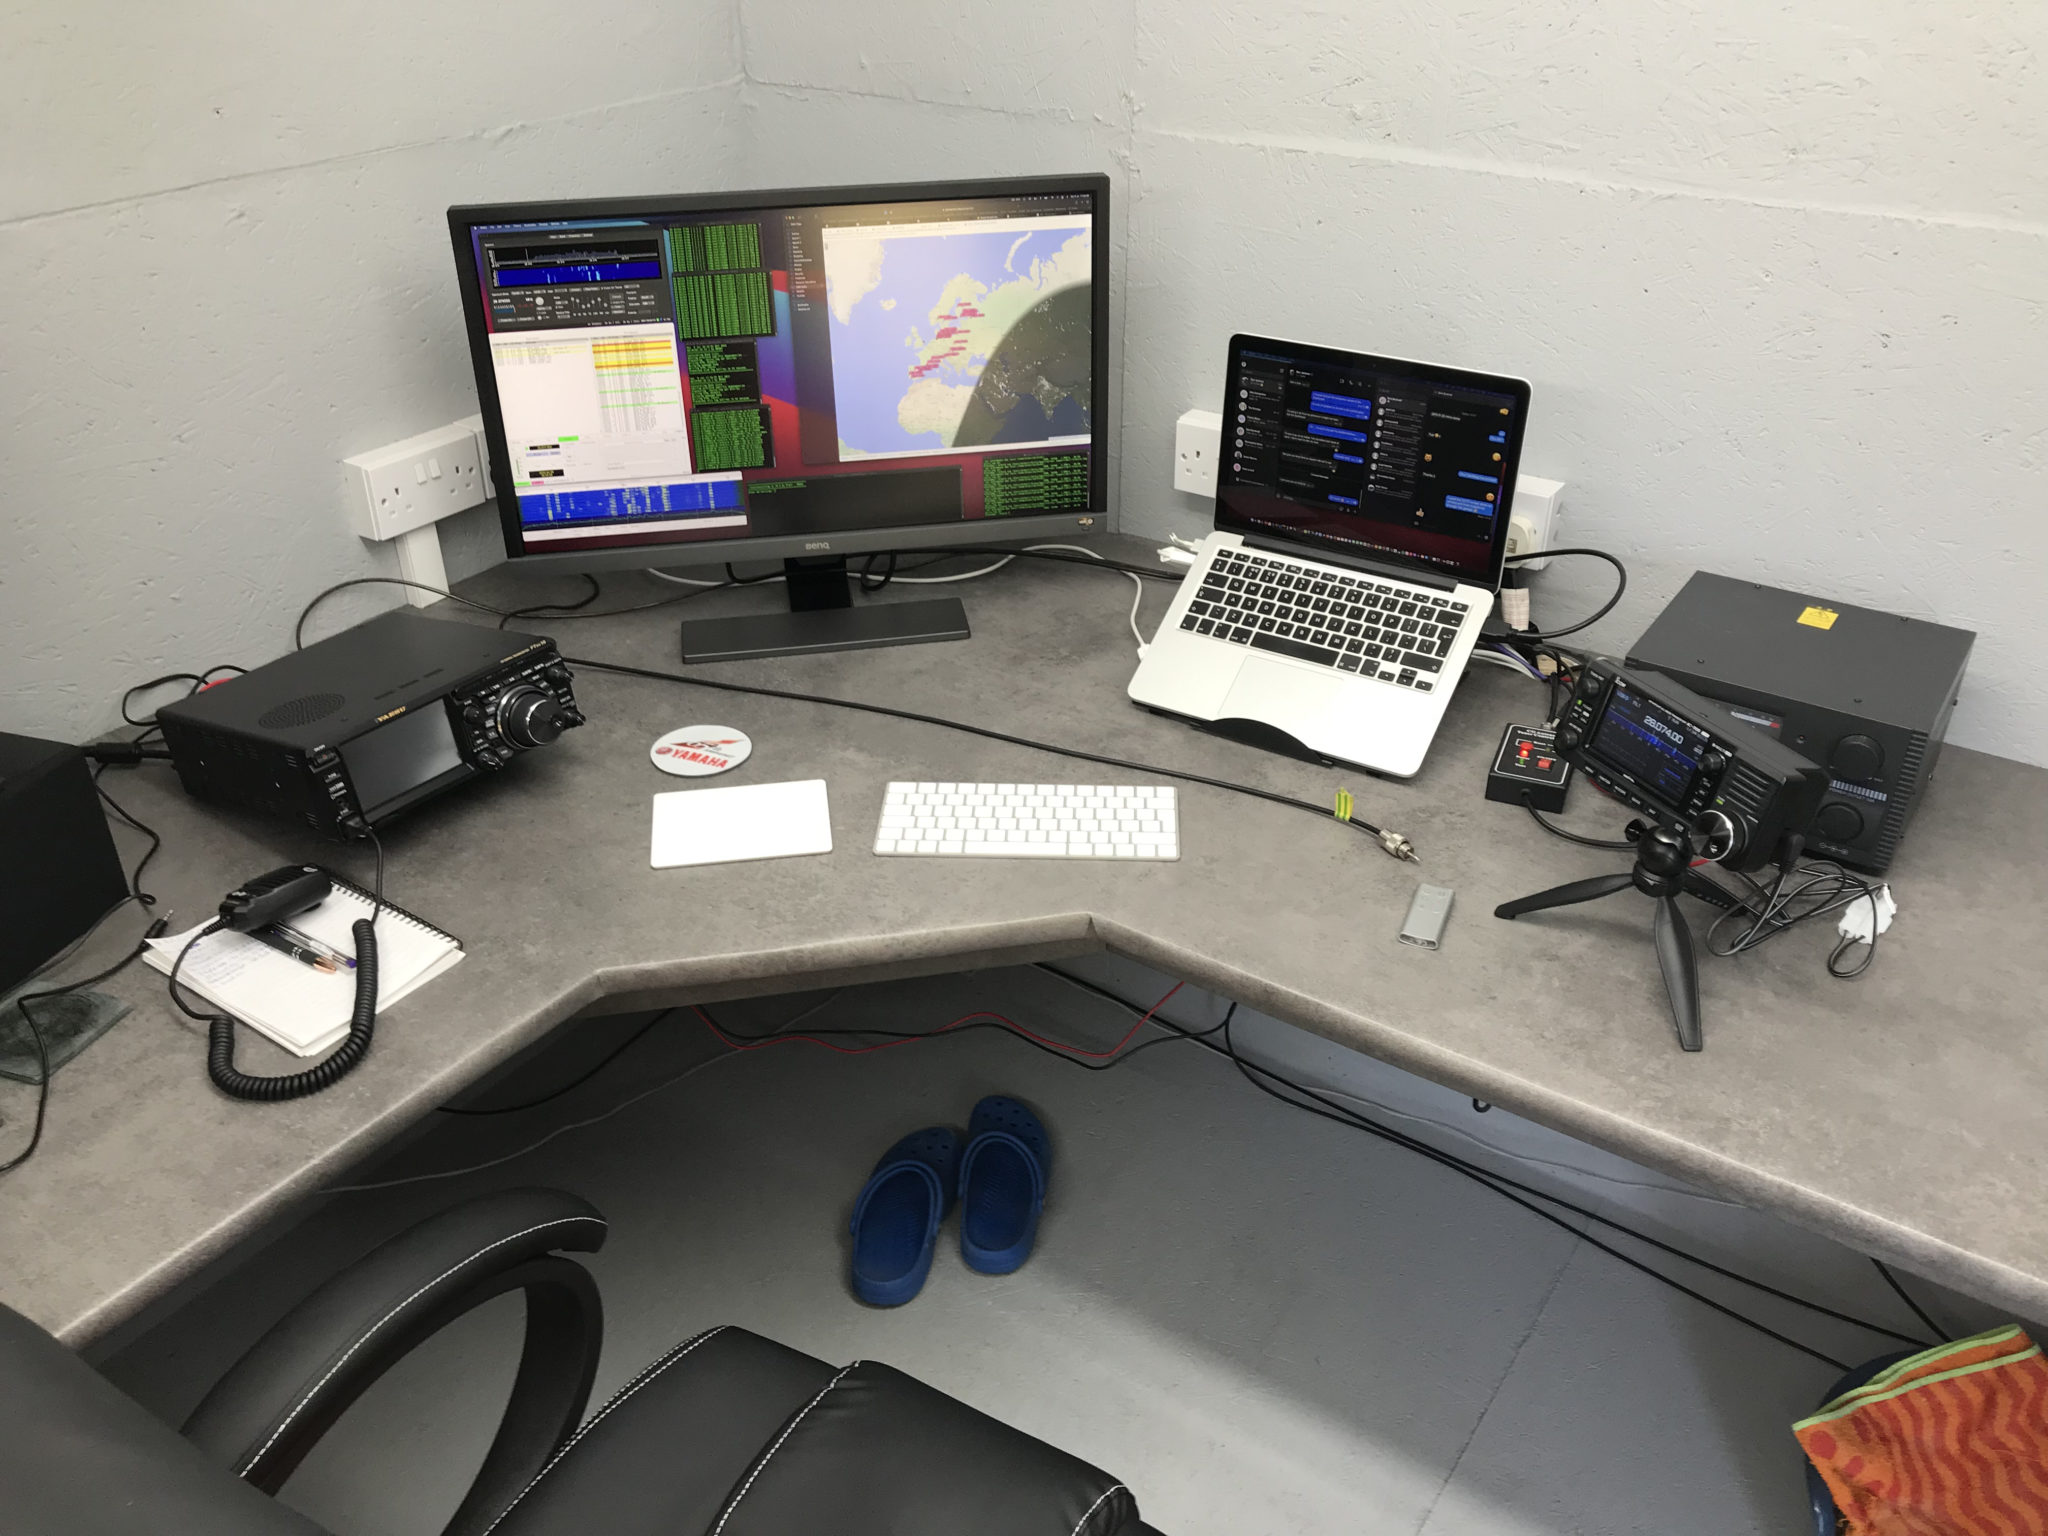
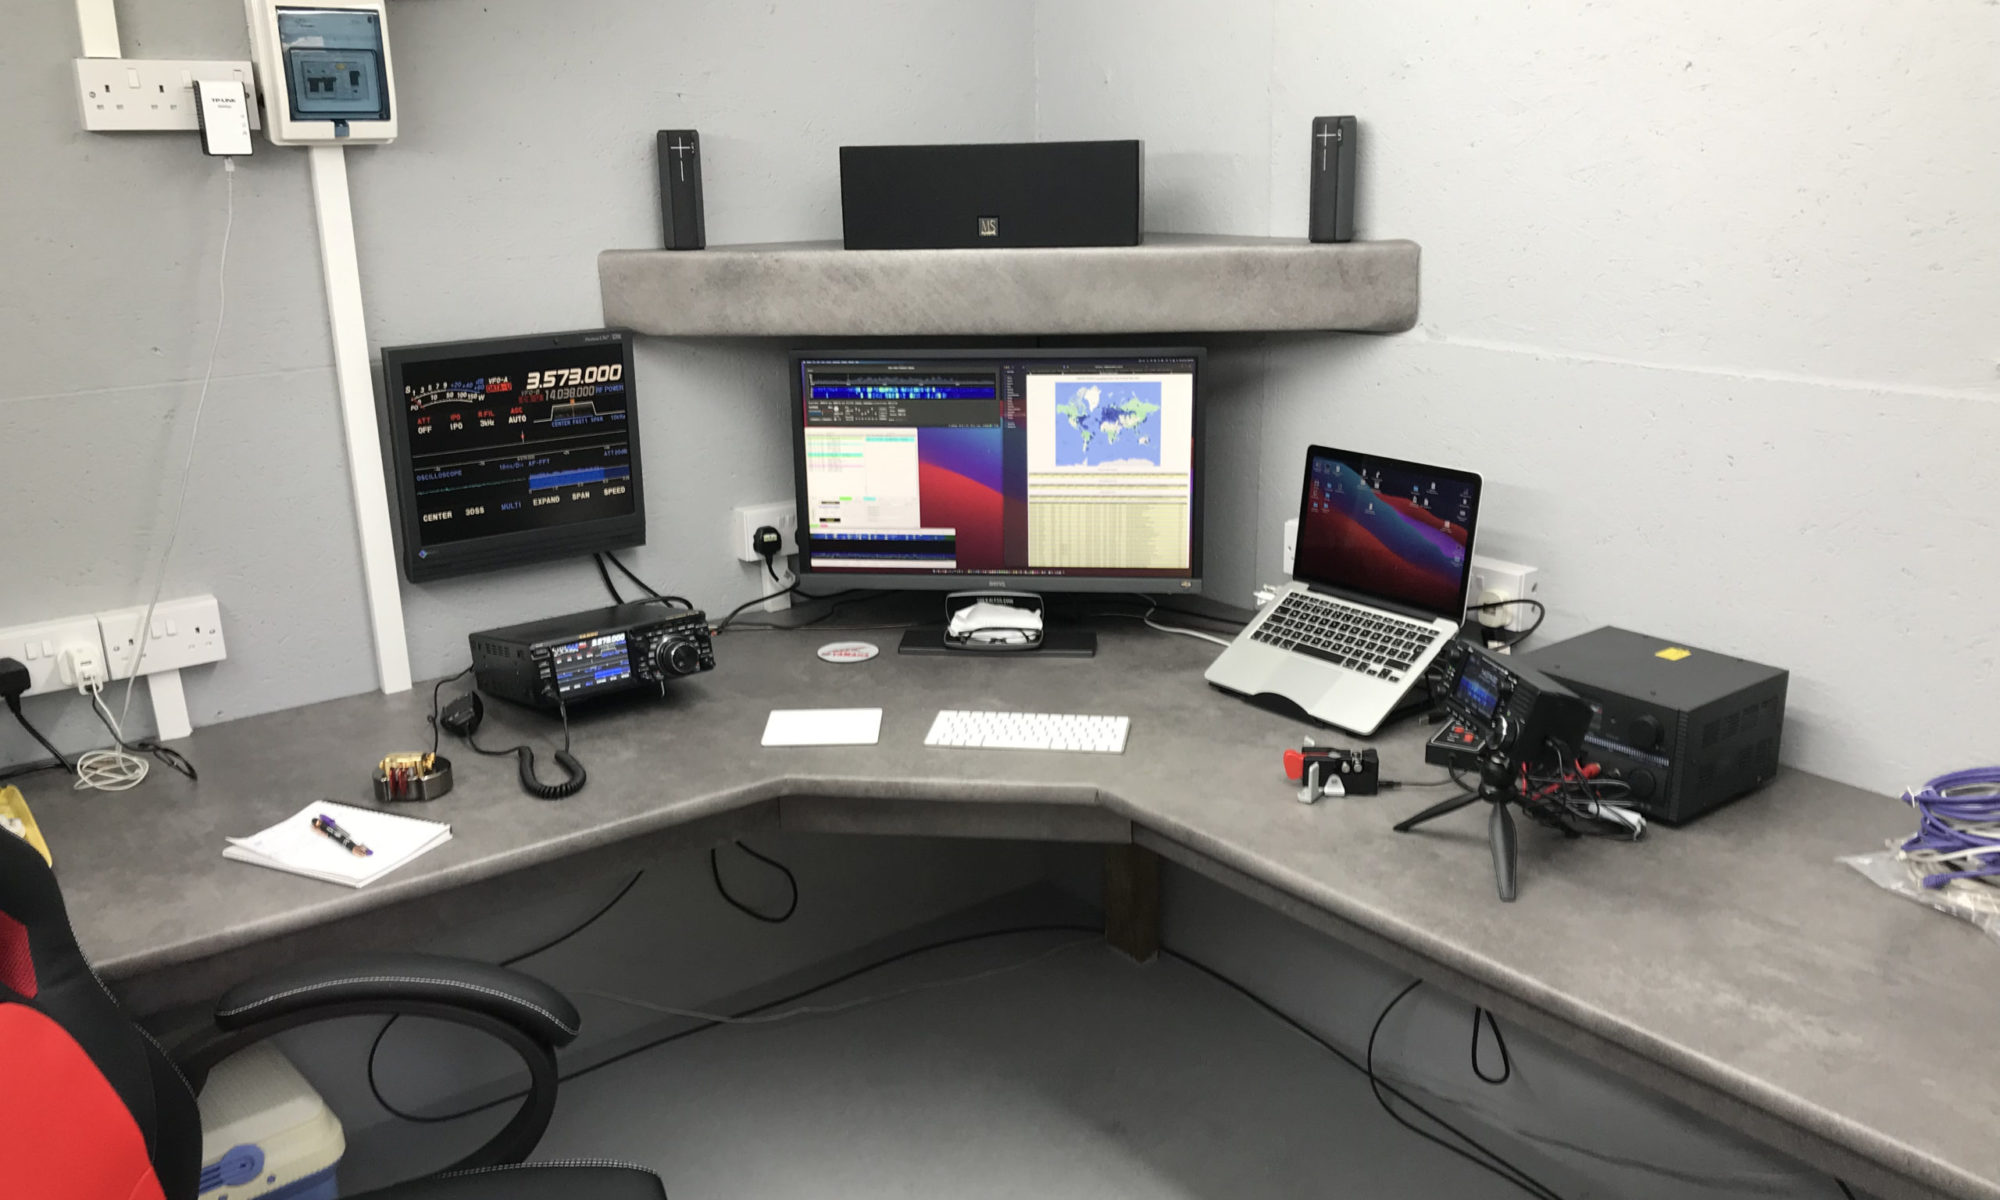
The new radio shack is small compared to my super spacious setup in France but, it’s perfectly formed with all facilities.
For my over night radio session I decided to use my trusty Yaesu FTDX10, it has the best receiver I’ve ever used and is built to withstand the long haul operation.
Antenna wise I decided to use my 30m band EFHW vertical that can be tuned on most bands from 80m and upwards. I use a CG3000 remote auto tuner to match this antenna to the 50 ohm coax feed and it does a great job.
Being comfortably setup in the shack I tuned up on the 30m band and had a listen to see what shape the band was in.
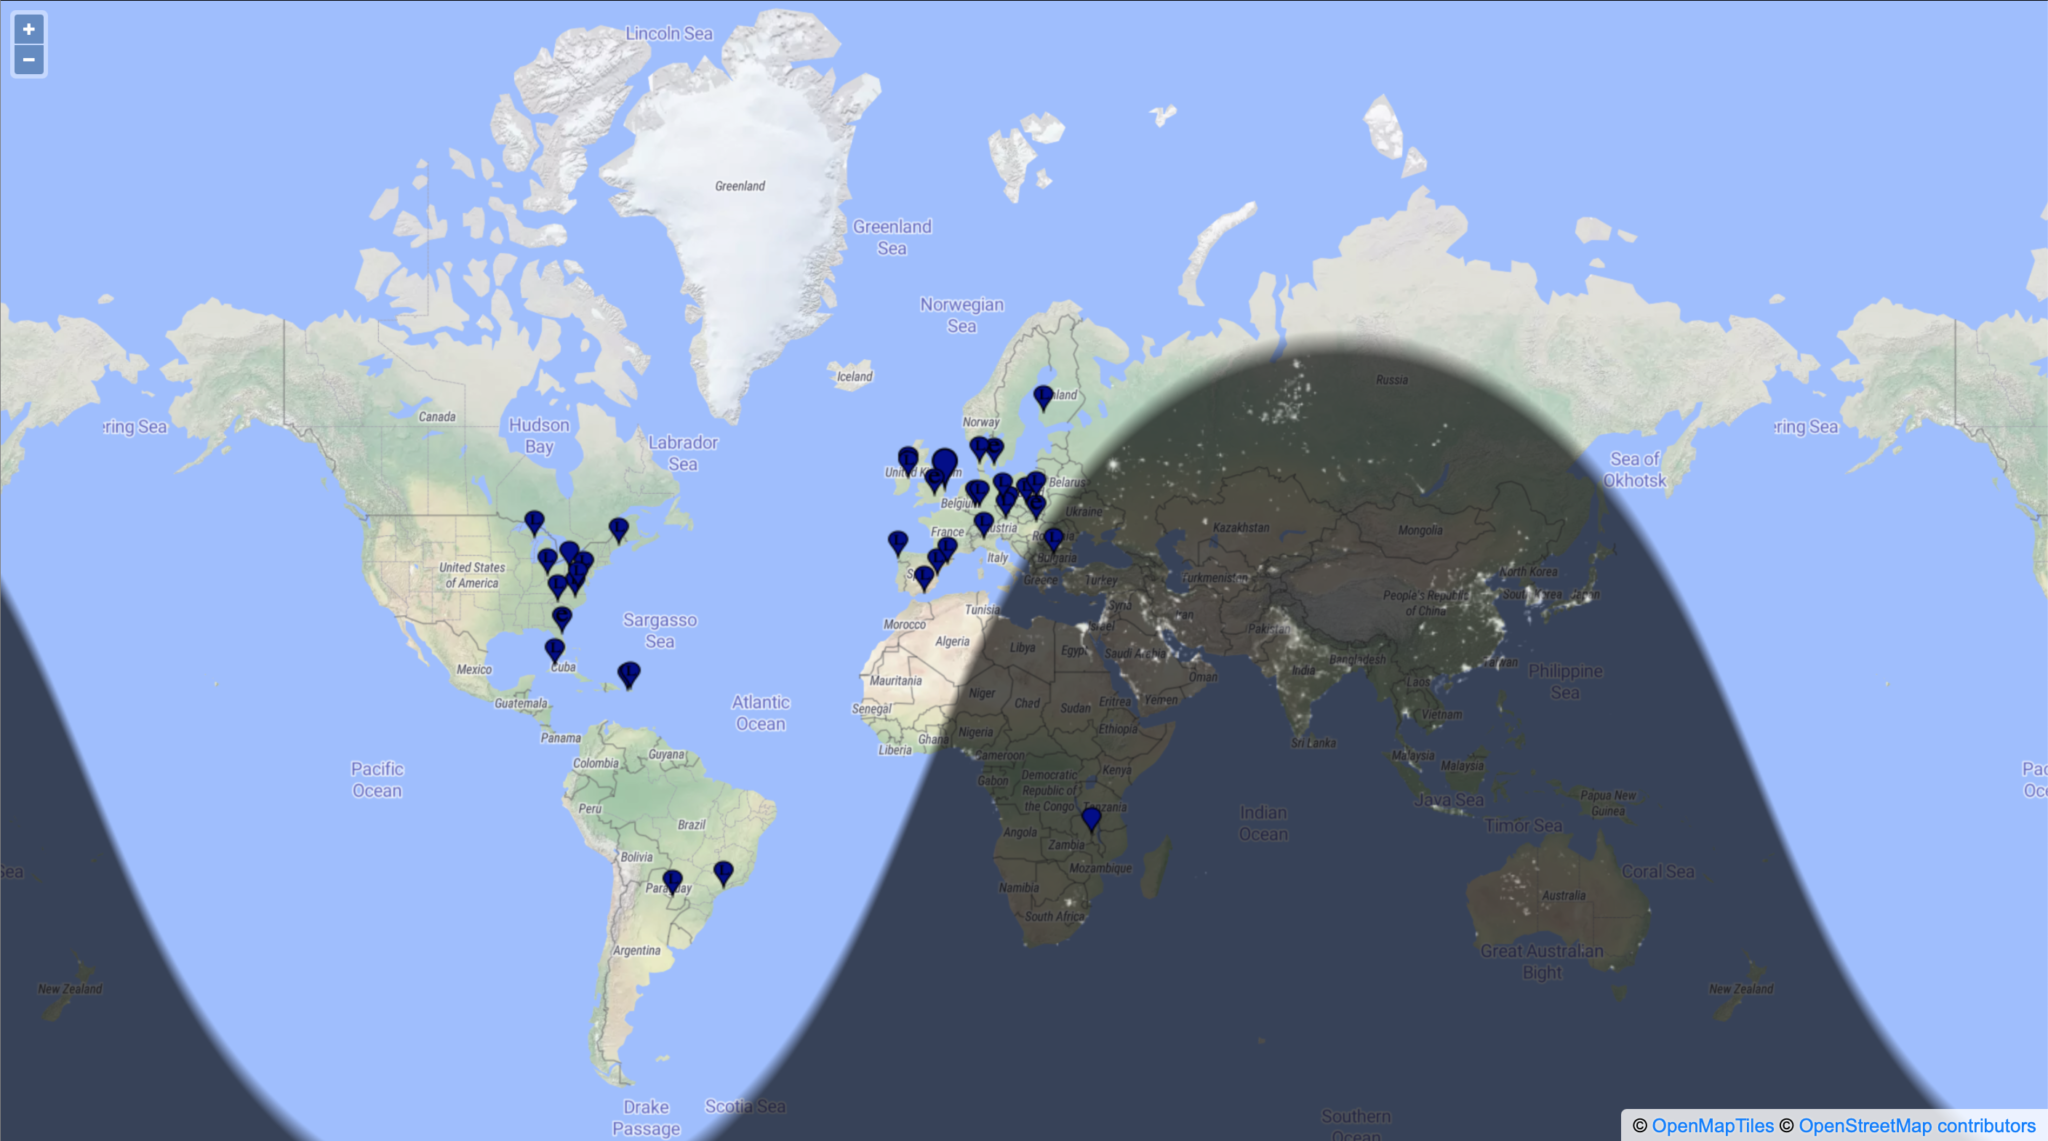
Stations heard on 30m 10/11-07-22
Using FT8 I worked a bunch of European, Russian/Asiatic Russian stations with ease, the band was in fairly good shape albeit localised around Europe and Russia. Wanting to work stations a little further afield I decided to move up on to the higher bands. 12m is a band I really like but, always seem to miss when it’s open.
Tuning up on the 12m band using the same vertical that I was just using on the 30m band the FT8 section was packed with signals. At last, I’ve tuned up on the band when it’s open!
I suddenly noticed Bobby, VP8ADR down in the Falkland Islands in the WSJTX waterfall and gave him a call. He had a fair few people calling him and so I joined the list. In no time at all Bobby answered my call and we exchange SNR reports of -8dB both ways. This was surprising as later on one of the FT8 Facebook groups Bobby stated he was using 200w into a Hexbeam during our QSO, I was only using a measly 18w into my Vertical, I would had expected a much lower SNR report. Clearly Bobby’s setup was doing all the work!
Right after the QSO with Bobby I immediately went on to work PY7ZC, LU8YD, PY2ATI, LW6EQC, PY2EBD and PY2THO all in quick succession. With the Falklands, Brazil and Argentina in the log so soon it was looking like it was going to be a fun packed night.
Next up on the waterfall was 9Y4DG in Trinidad and Tobago and 8P6ET in Barbados, two really nice locations to get into the log and new ones on 12m for me.
Having worked all the DX I could hear on 12m and not wanting to just spend hours working endless European stations I tuned down onto the 17m band using the same vertical antenna. This antenna really does work well on bands it’s not designed for.
First 3 stations in the log on 17m were all from Japan, JR3NZC, JQ6RUP and JA5BDZ. With all 3 stations being well on the way to 6000 miles away this was a good start. The propagation strangely swung to the west and I got YV5DRN from Venezuela in the log.
Not seeing any other stations that I wanted to work I retuned back onto 30m again and found it was open to South America and the Caribbean.
In no time at all I had YV4CLF in Venezuela, HK2AQ in Colombia, NP4TX and NP3XF in Puerto Rico and PY7ZC in Brazil all in the log.
Being in complete darkness I decided to tune down on to the 60m band, one of my favourites, to see if there was much going on. Sure enough there were a few stations active on the limited space available.
First station worked was a new one for me FP/KV1J on St. Pierre and Miquelon Island just off the coast of New Foundland. I have to admit I had no idea where this little island was and confess to having to look it up on google maps.
I then went on to work a few East Coast USA stations all with good SNR reports for this time of year.
Stations heard on the 60m band 11-07-22
Having worked all the notable DX on 60m I tuned back onto the 17m which was now wide open to the world.
I stayed on this band for the rest of the night well into the morning grey line and beyond working some great DX including some new ones for me.
I worked many East Coast USA stations but, stations of note were 6Y5HN in Jamaica and AK6R, K6EU and K6EI in California on the West Coast USA. It’s rare for me to get into the West Coast USA for some reason.
UA0SDX in Irkutsk Siberia was also a nice one to get in the log. This is a town I was going to be riding my motorcycle through on my Mongolian trip before COVID19 and the war in Ukraine broke out and stopped the trip from happening.
It was good to get an Ozzy call in the log too, VK6EI on the West Coast of Australia came in at a strong -15dB SNR giving me a surprising -14dB SNR report, incredible considering I was using just 22w into my vertical antenna.
Well after sunrise the DX was still pouring in and I worked KL7TC in Fairbanks Alaska, a new one for me that made me very happy as I’d been trying to get into Alaska for some time but, never seemed to time it right. Today was my day!
Another station I was really pleased to get into the log was V31MA. I’ve tried to get a QSO with this station many times but, have never succeeded until today. I called for about 20mins and eventually got a reply putting a huge smile on my face. -16dB SNR sent and -19dB SNR received, I was happy that I finally have Belize in the log.
The last station worked was RA0FF way over on the far East Coast of Russia, the complete opposite direction to Belize. Located in Yu-Sakhalinsk right on the Russian coast opposite Japan and at 5270 miles, this is my longest distance Russian station worked so far and one I was very happy to have in the log. I always get good take off towards Russia whether it be directly east or over the North Pole to the far eastern parts of the Siberian wilderness.
I had a great night chasing the DX on the HF bands and being retired didn’t have to worry about going to work after such a long night. I highly recommend that you try an all nighter at least once in your HAM radio career, you get the opportunity to work stations that you’d normally not hear during the day time hours.
You can see the full list of stations worked on the over nighter on my WSJTX Log page.
Now that I’ve got my new radio shack up and running I decided to give my Icom IC-705 QRP rig an outing and see if I could work a distance of 2000 miles with 1w output.
This is something I’ve been wanting to do for a while but, only being able to sit at the picnic table in the garden or in the summer wasn’t particularly conducive to a long stint on the radio.
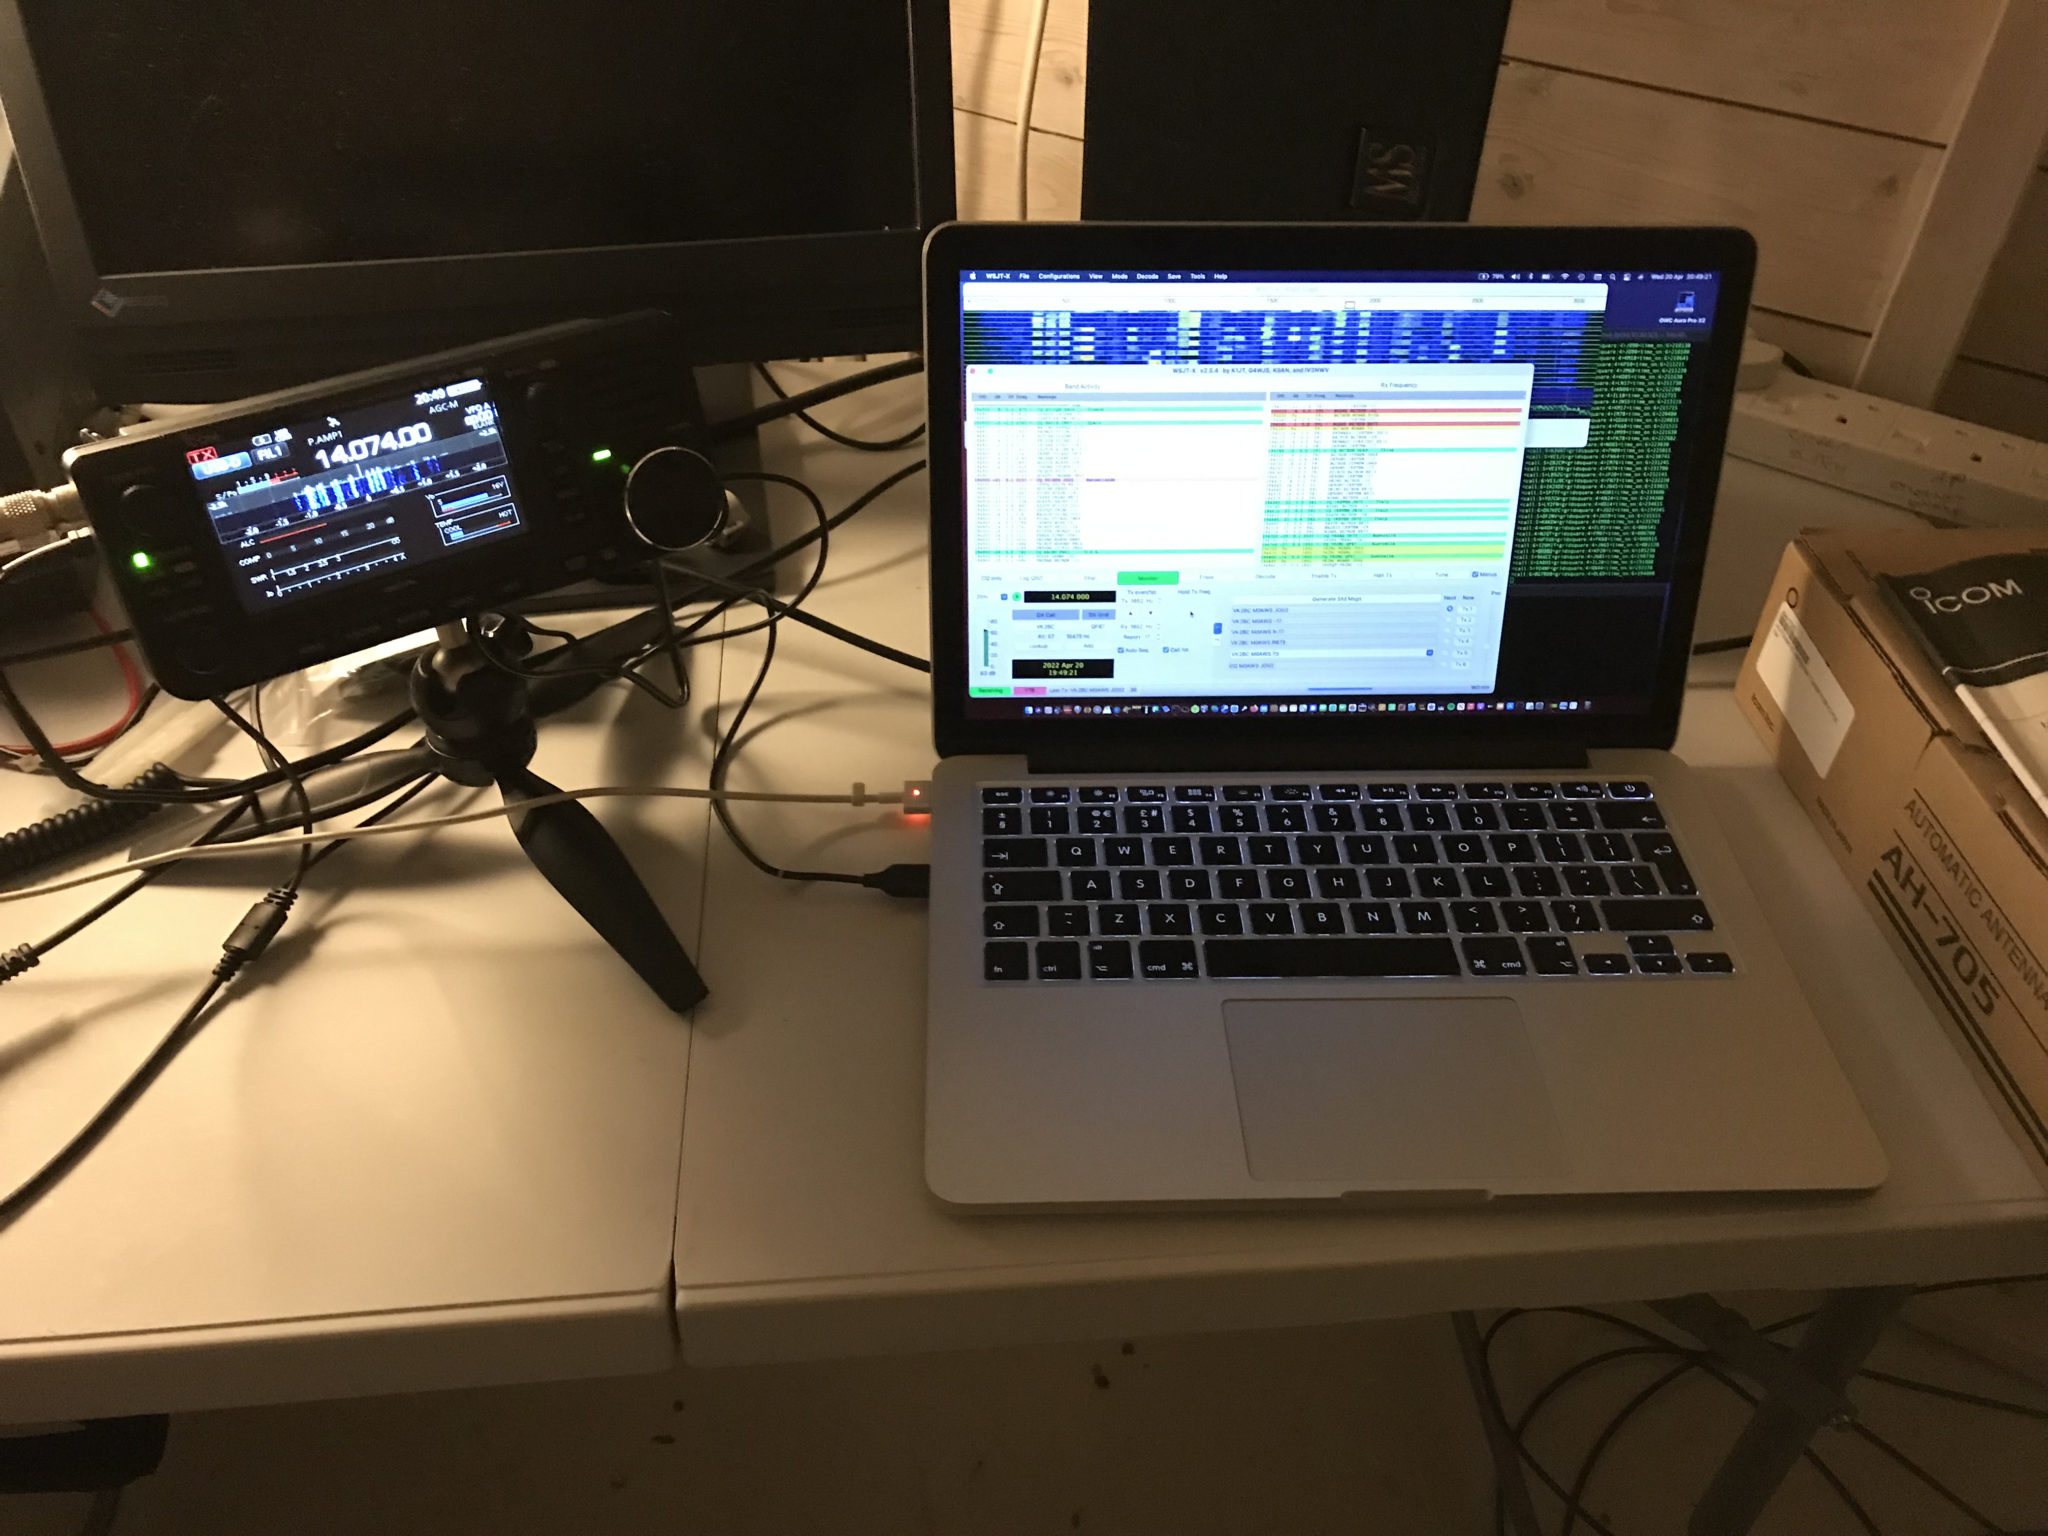
Icom IC-705 wirelessly connected to my MacBook Pro
For this challenge I decided to use FT4 or FT8, whichever was active on the bands. This is a great mode for QRP operations and can get a tiny signal through when other more traditional modes fail.
I used both my EFHW vertical for 20m/10m and my EFHW vertical for 30m that can also be tuned on most of the other HF bands too. This gave me most of the HF bands for the challenge.
Initially I worked a lot of stations in the 600-700 mile range, conditions weren’t brilliant and there was a lot of deep QSB.
My first notable distance QSO was with YO4DG near Mangalia Romania at 1383 miles, this equates to 0.72mW/Mile, my lowest mW/Mile achievement up until this point.
Not long afterwards I saw SV8DCY on the WSJTX waterfall, I wasn’t sure if he’d hear me or not but, I gave a call. To my surprise he came back and became the longest distance QSO for a short time. At 1485 Miles to Kalloni Lesvos Island, Greece this equates to a new low of 0.67mW/Mile.
I then went on to work a bunch of stations in the 1000 miles or less range for a while as conditions on the bands were up and down. It’s amazing how many times I got an answer from a station only for them to disappear completely before the QSO was completed.
The next contact of note was with CU3HN in the Azores, 1713 Miles at 0.58mW/Mile, a new lowest mW/Mile record set. it’s amazing how far you can get a signal with such a tiny amount of power.
RV6F in the Stavropol region of Russia was the next big mile marker, 1932 miles at 0.51mW/Mile. It took a number of attempts to get the QSO to complete as we kept losing each other due to the deep QSB that was between us on the 20m band but, with a little patience and persaverance we eventually got the QSO to complete and it was in the log.
At this point I decided to switch over to the 10m band to see if it had opened up to more than just Europe. When I checked earlier there were only European stations being heard, most being well under 1000 miles. Sure enough the band had indeed opened up and I was hearing stations out to the east that were in excess of 2000 miles.
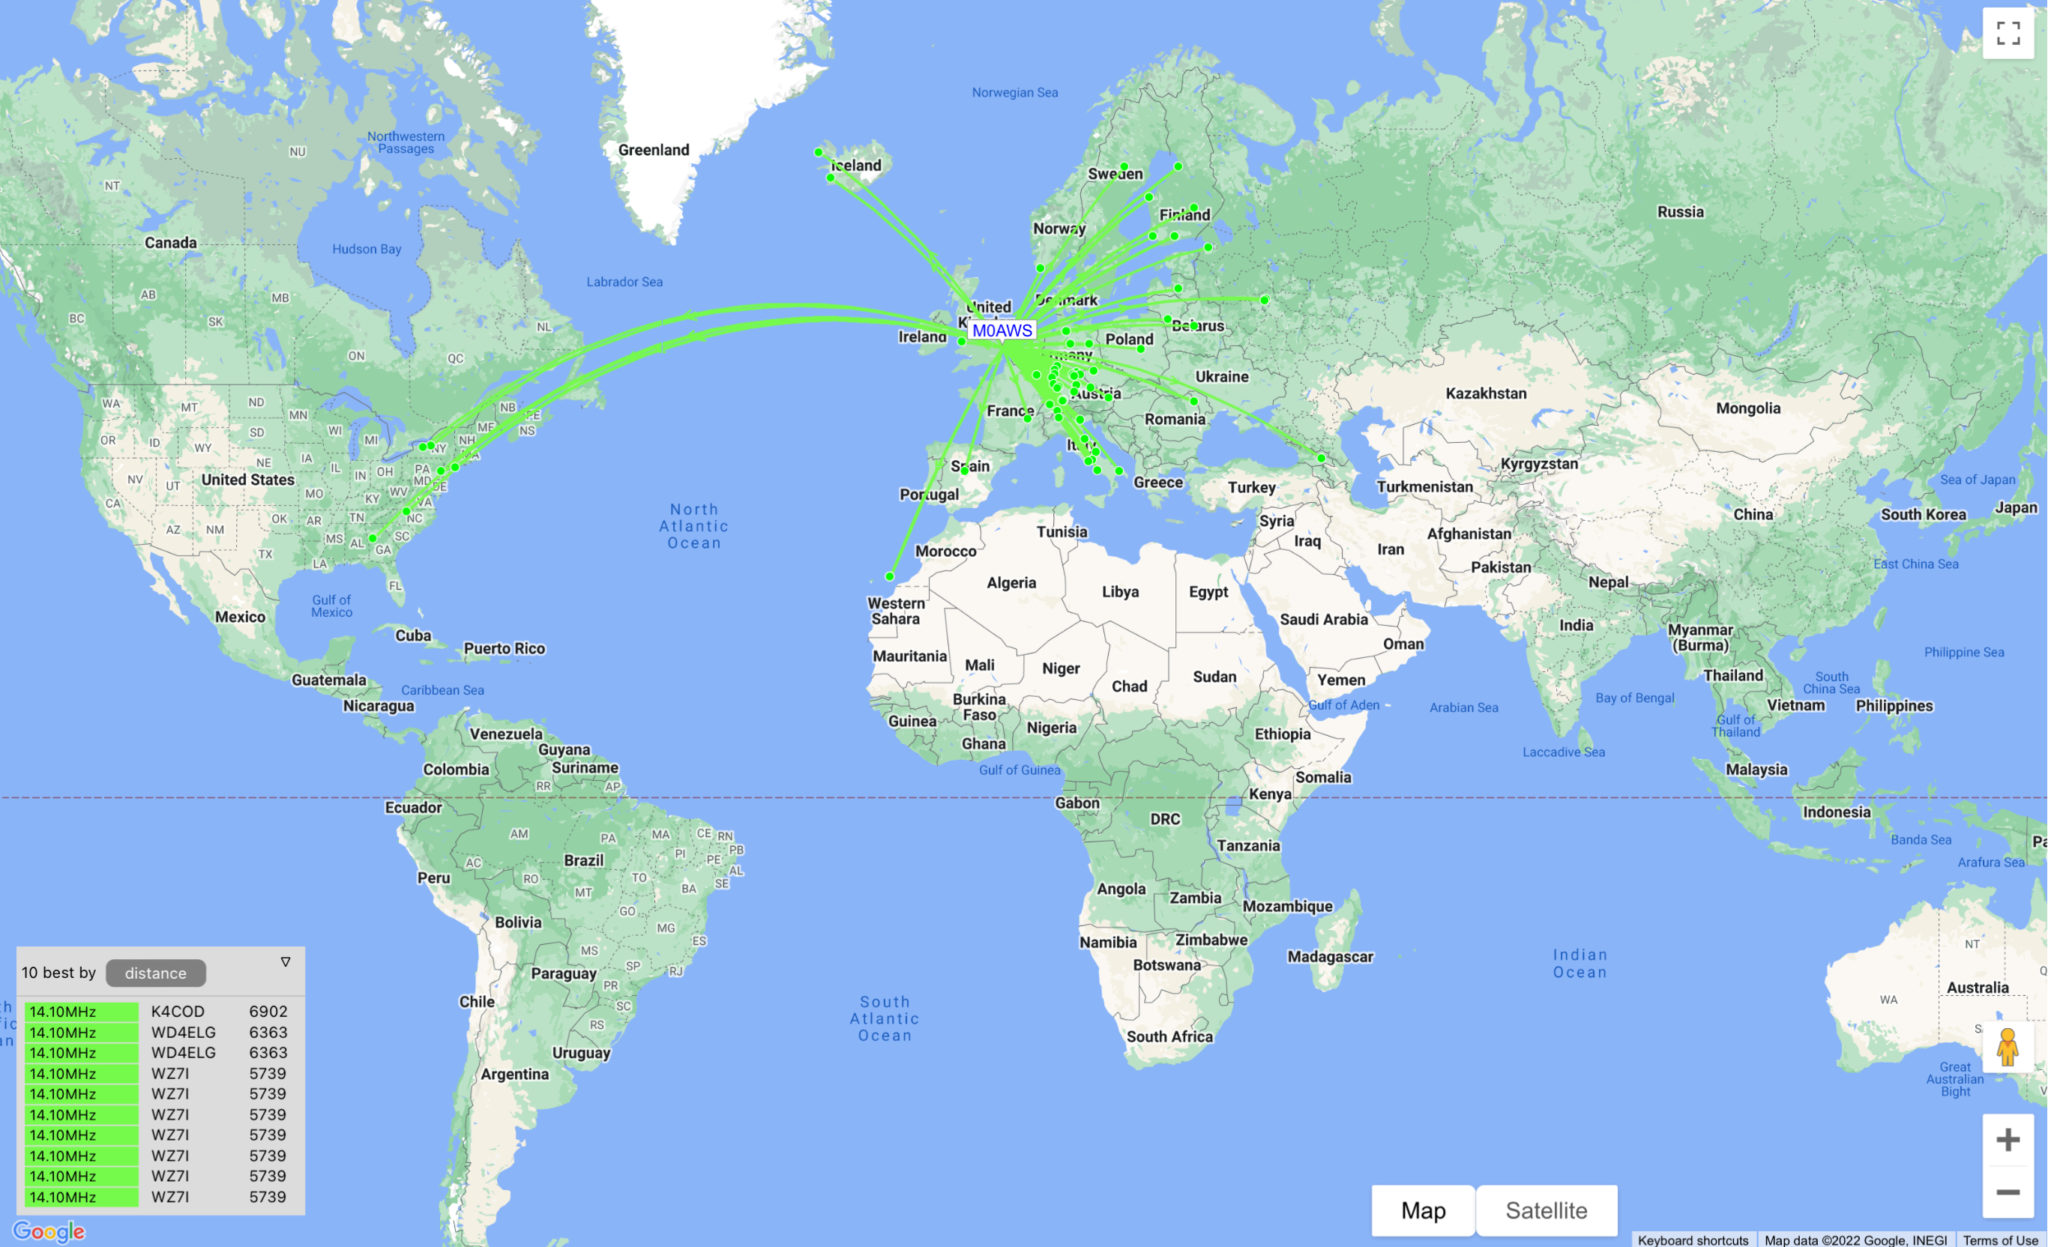
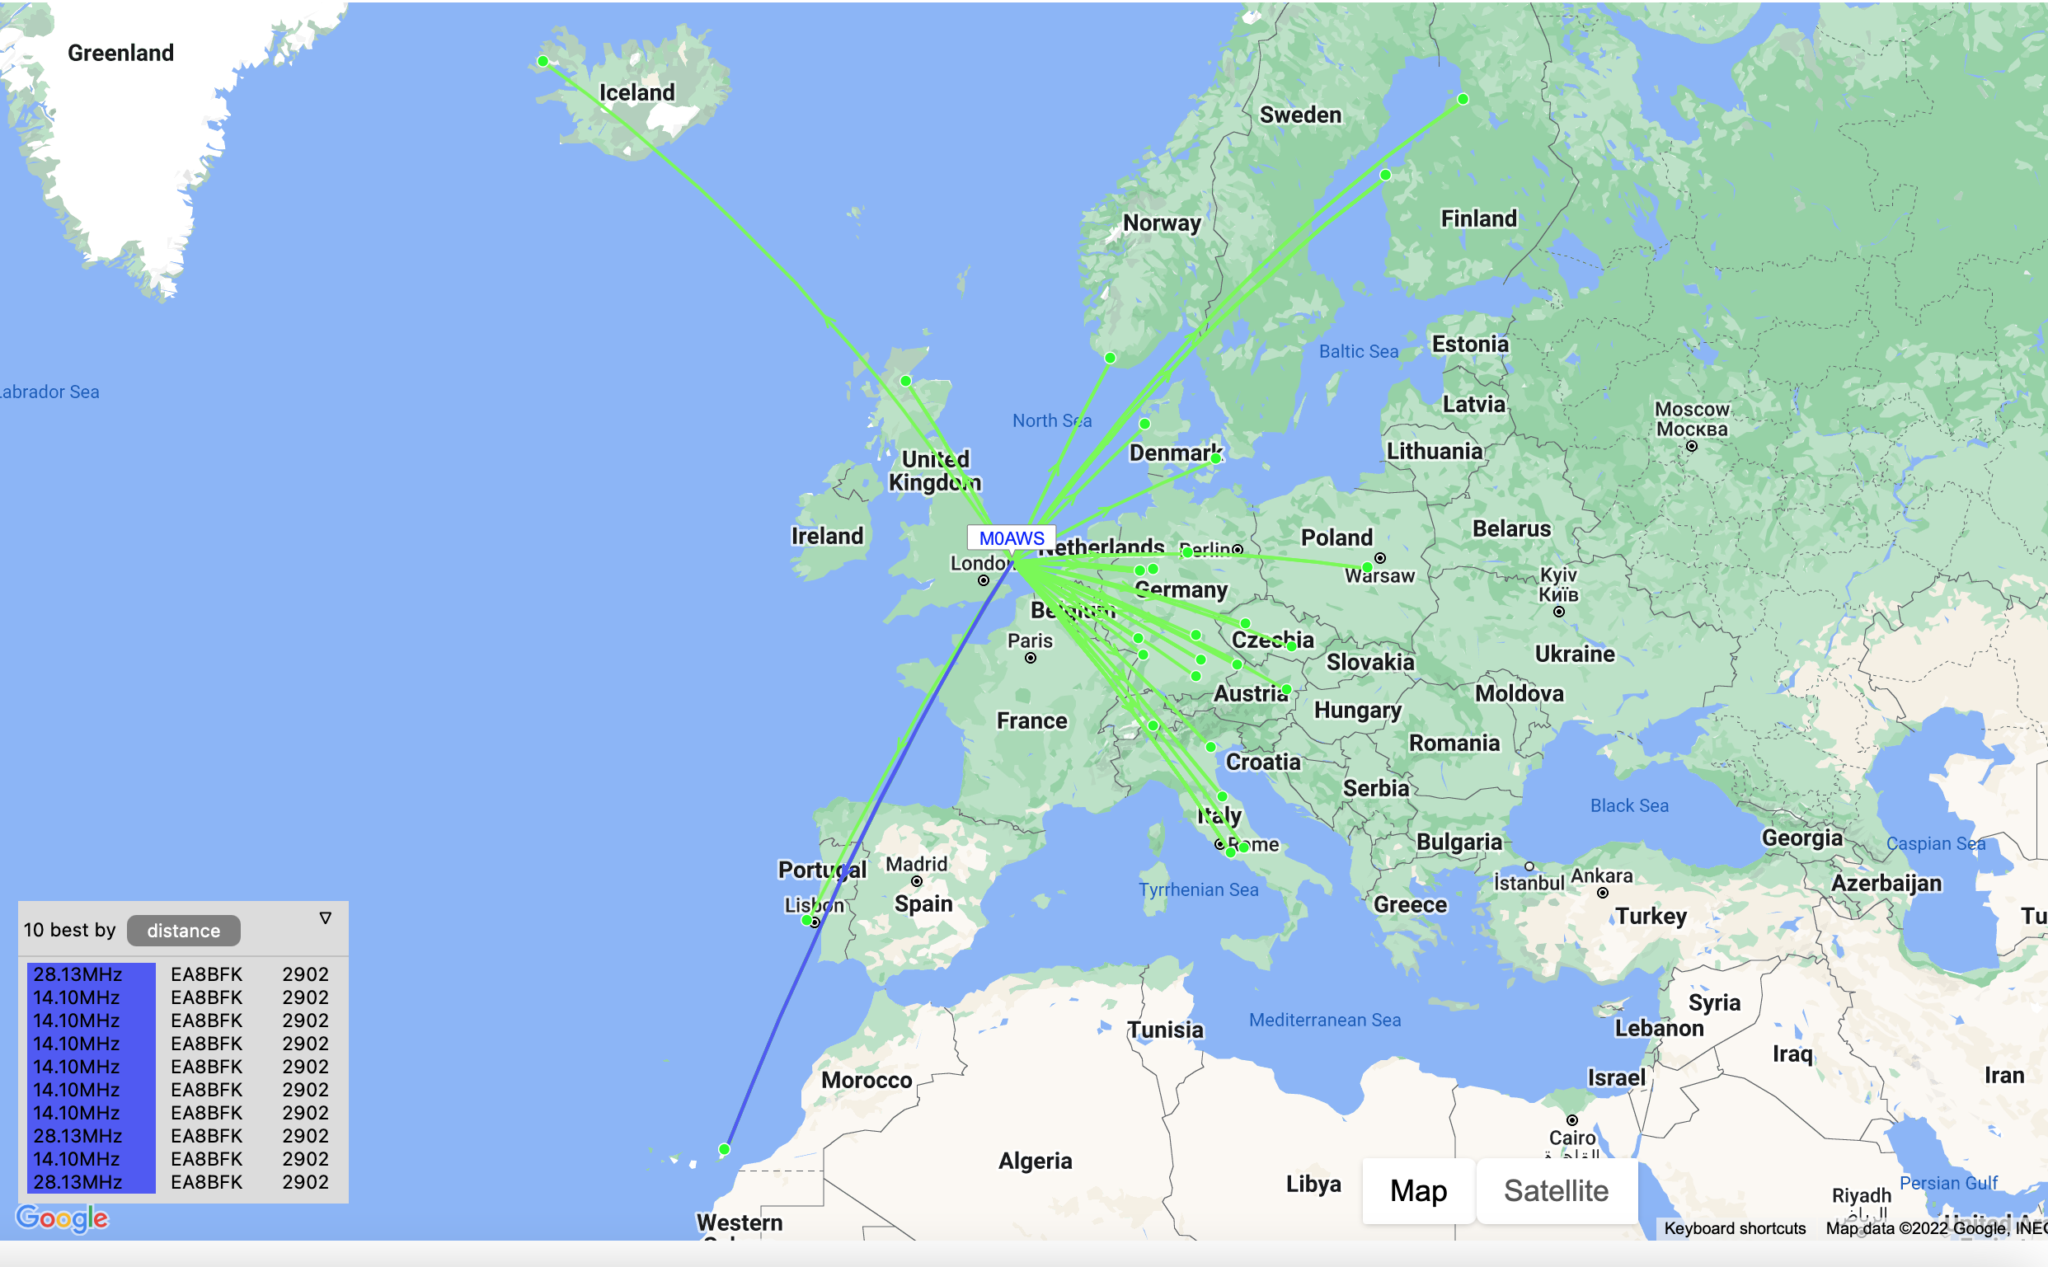
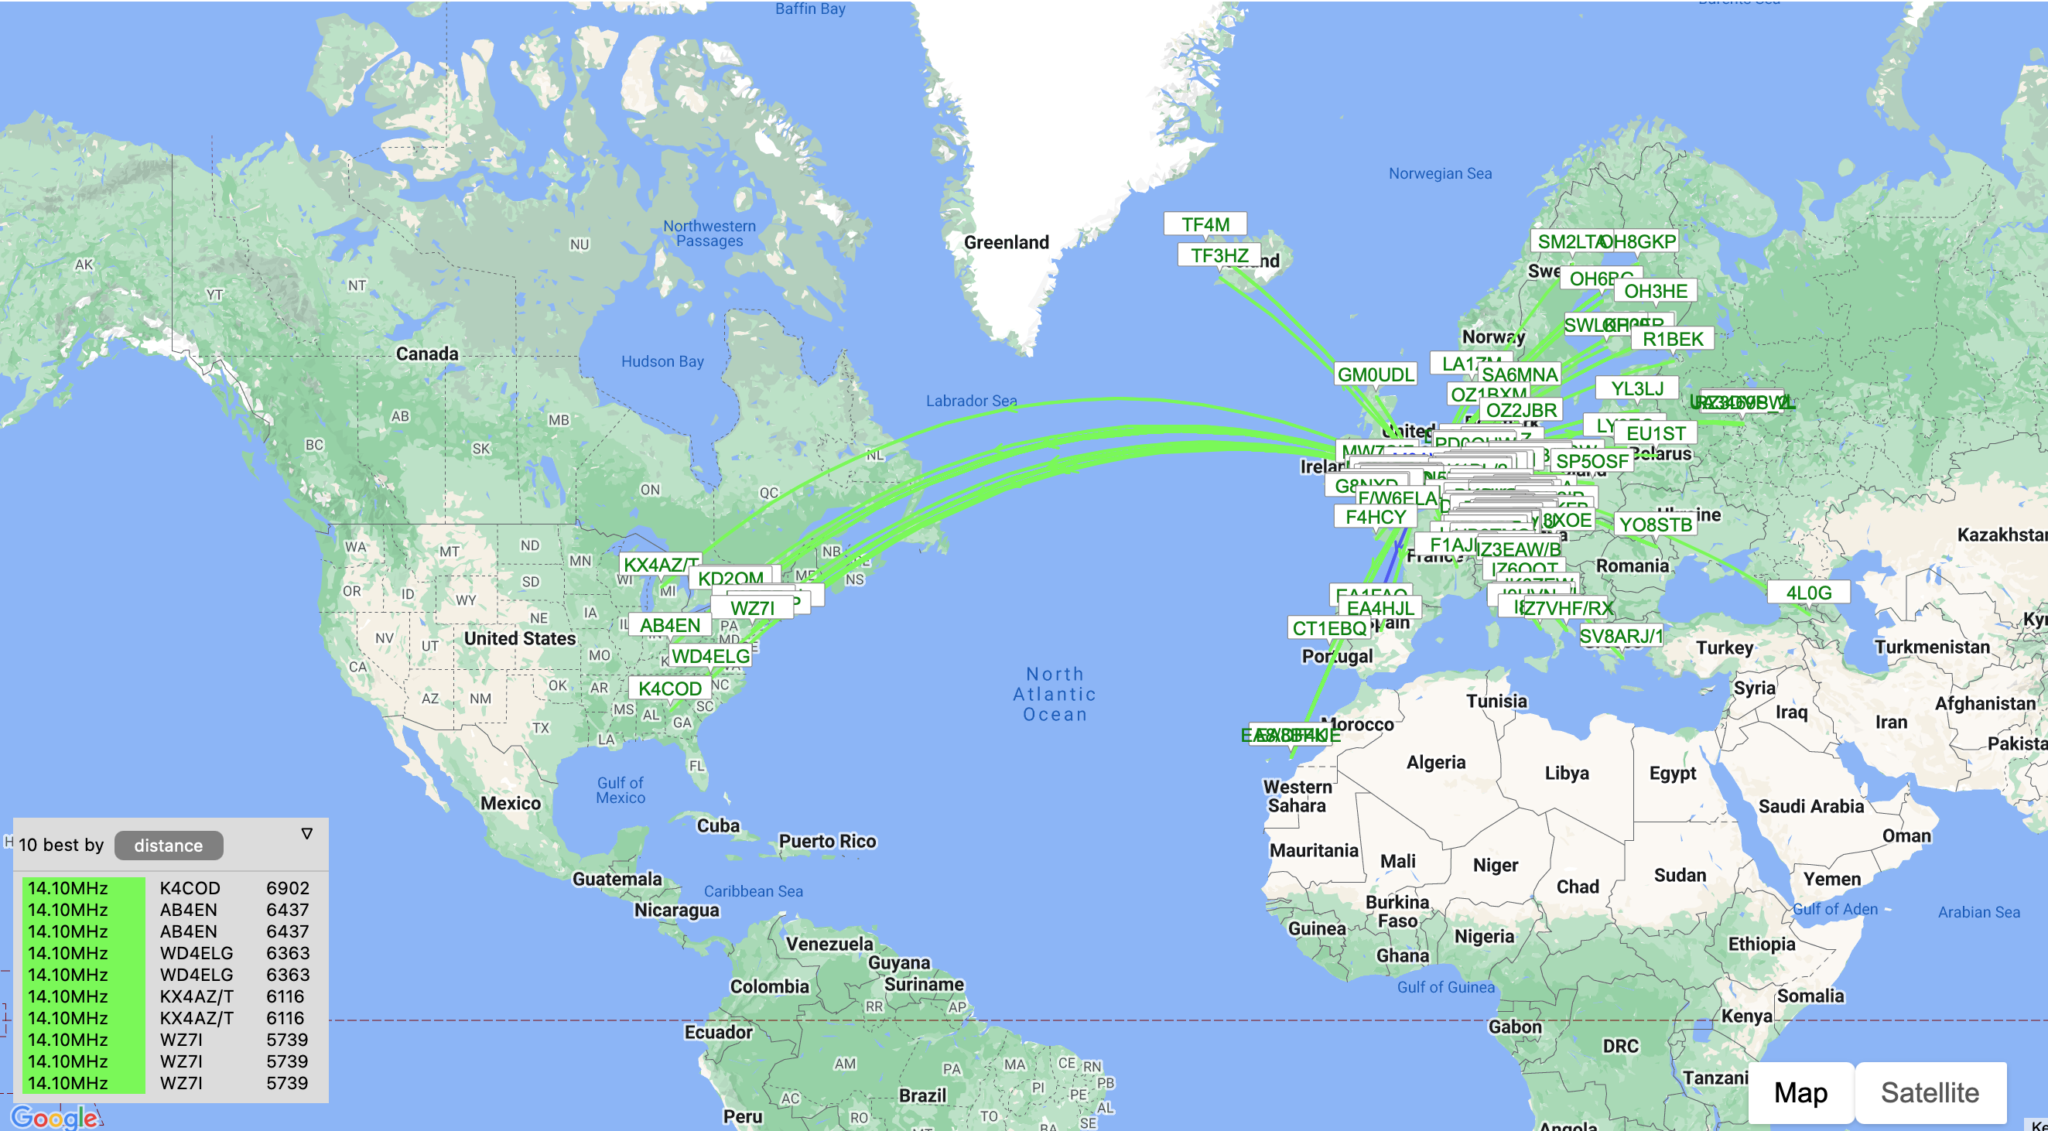
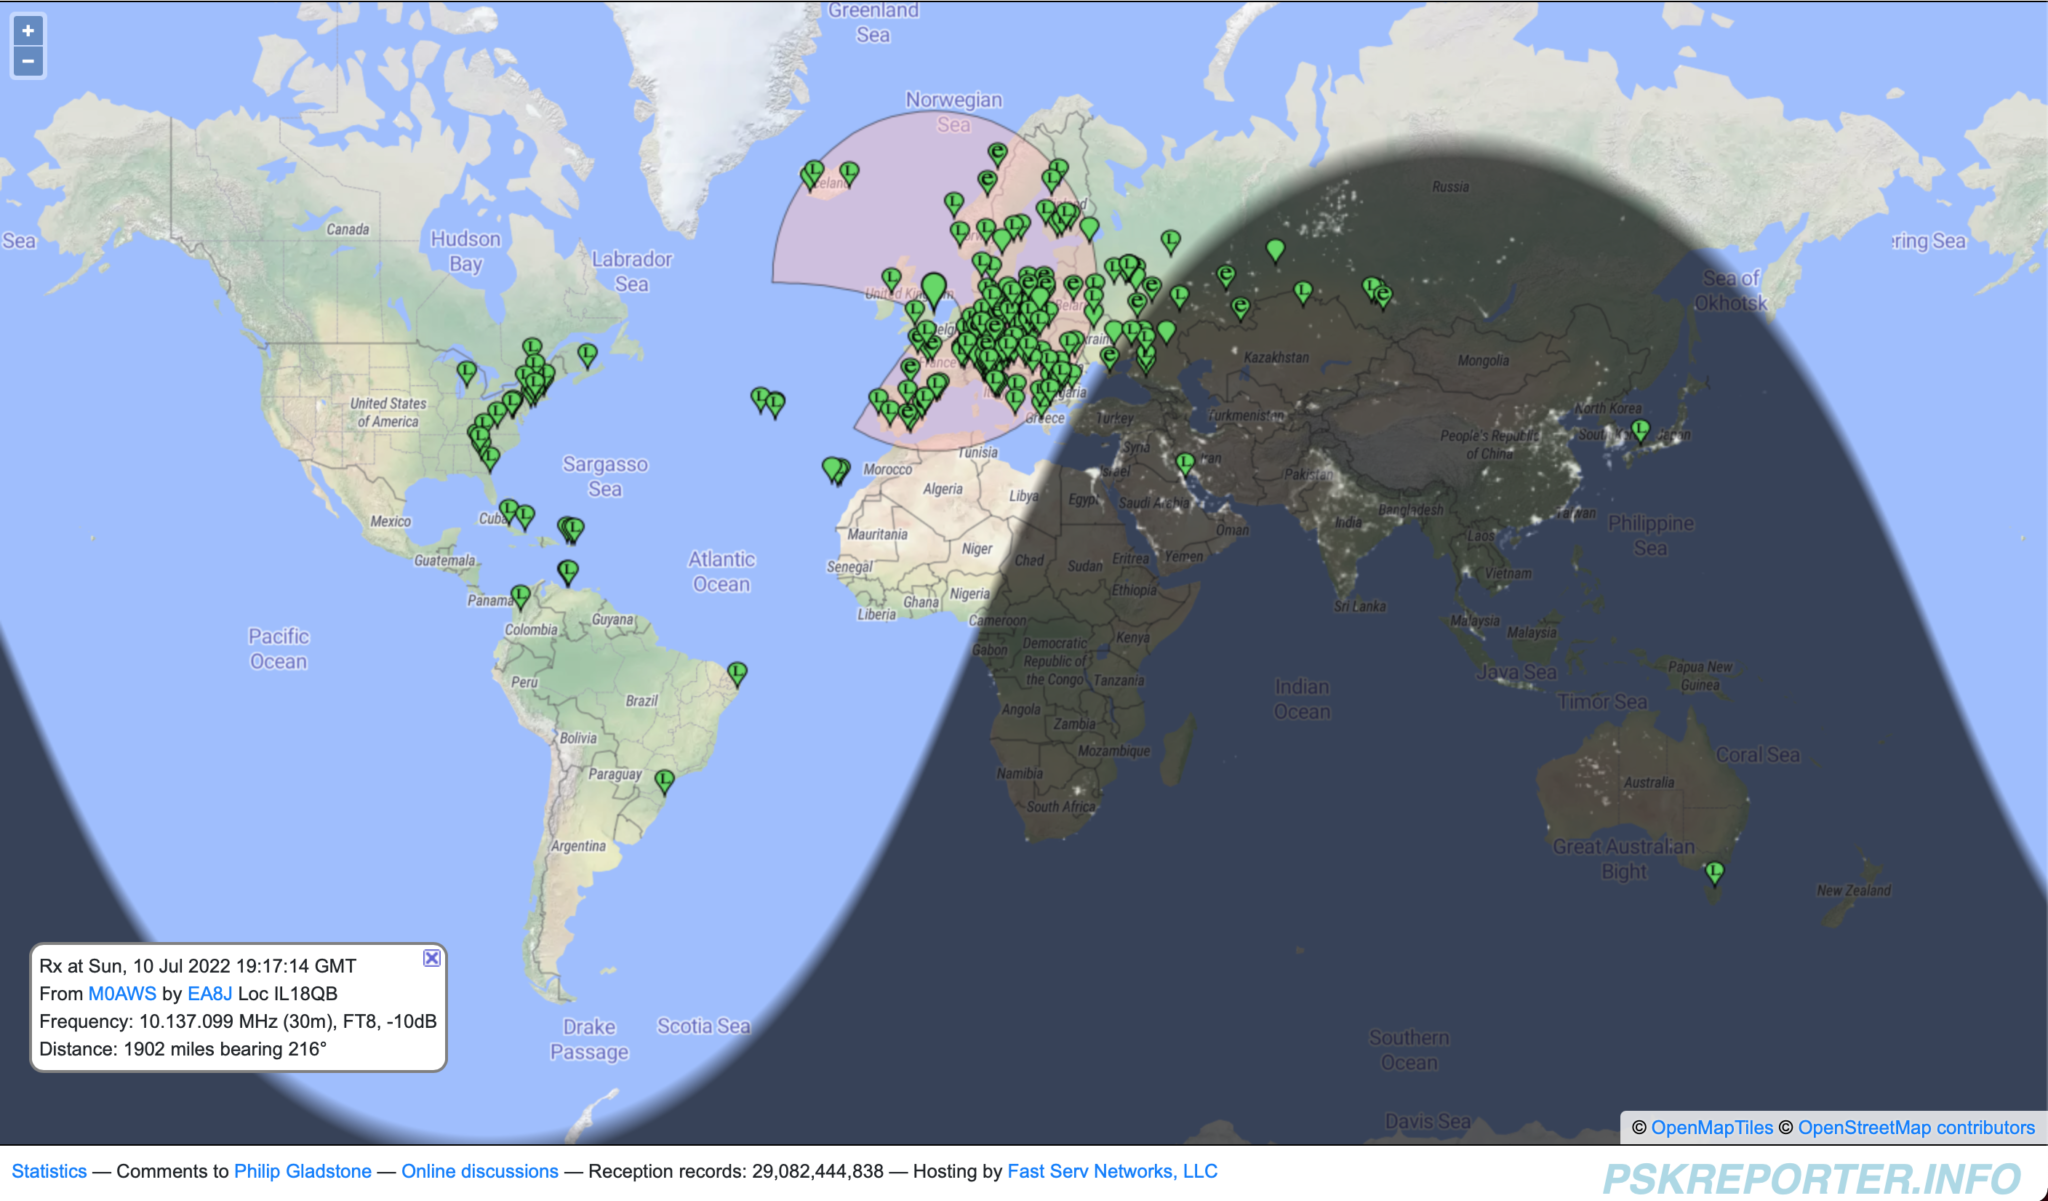
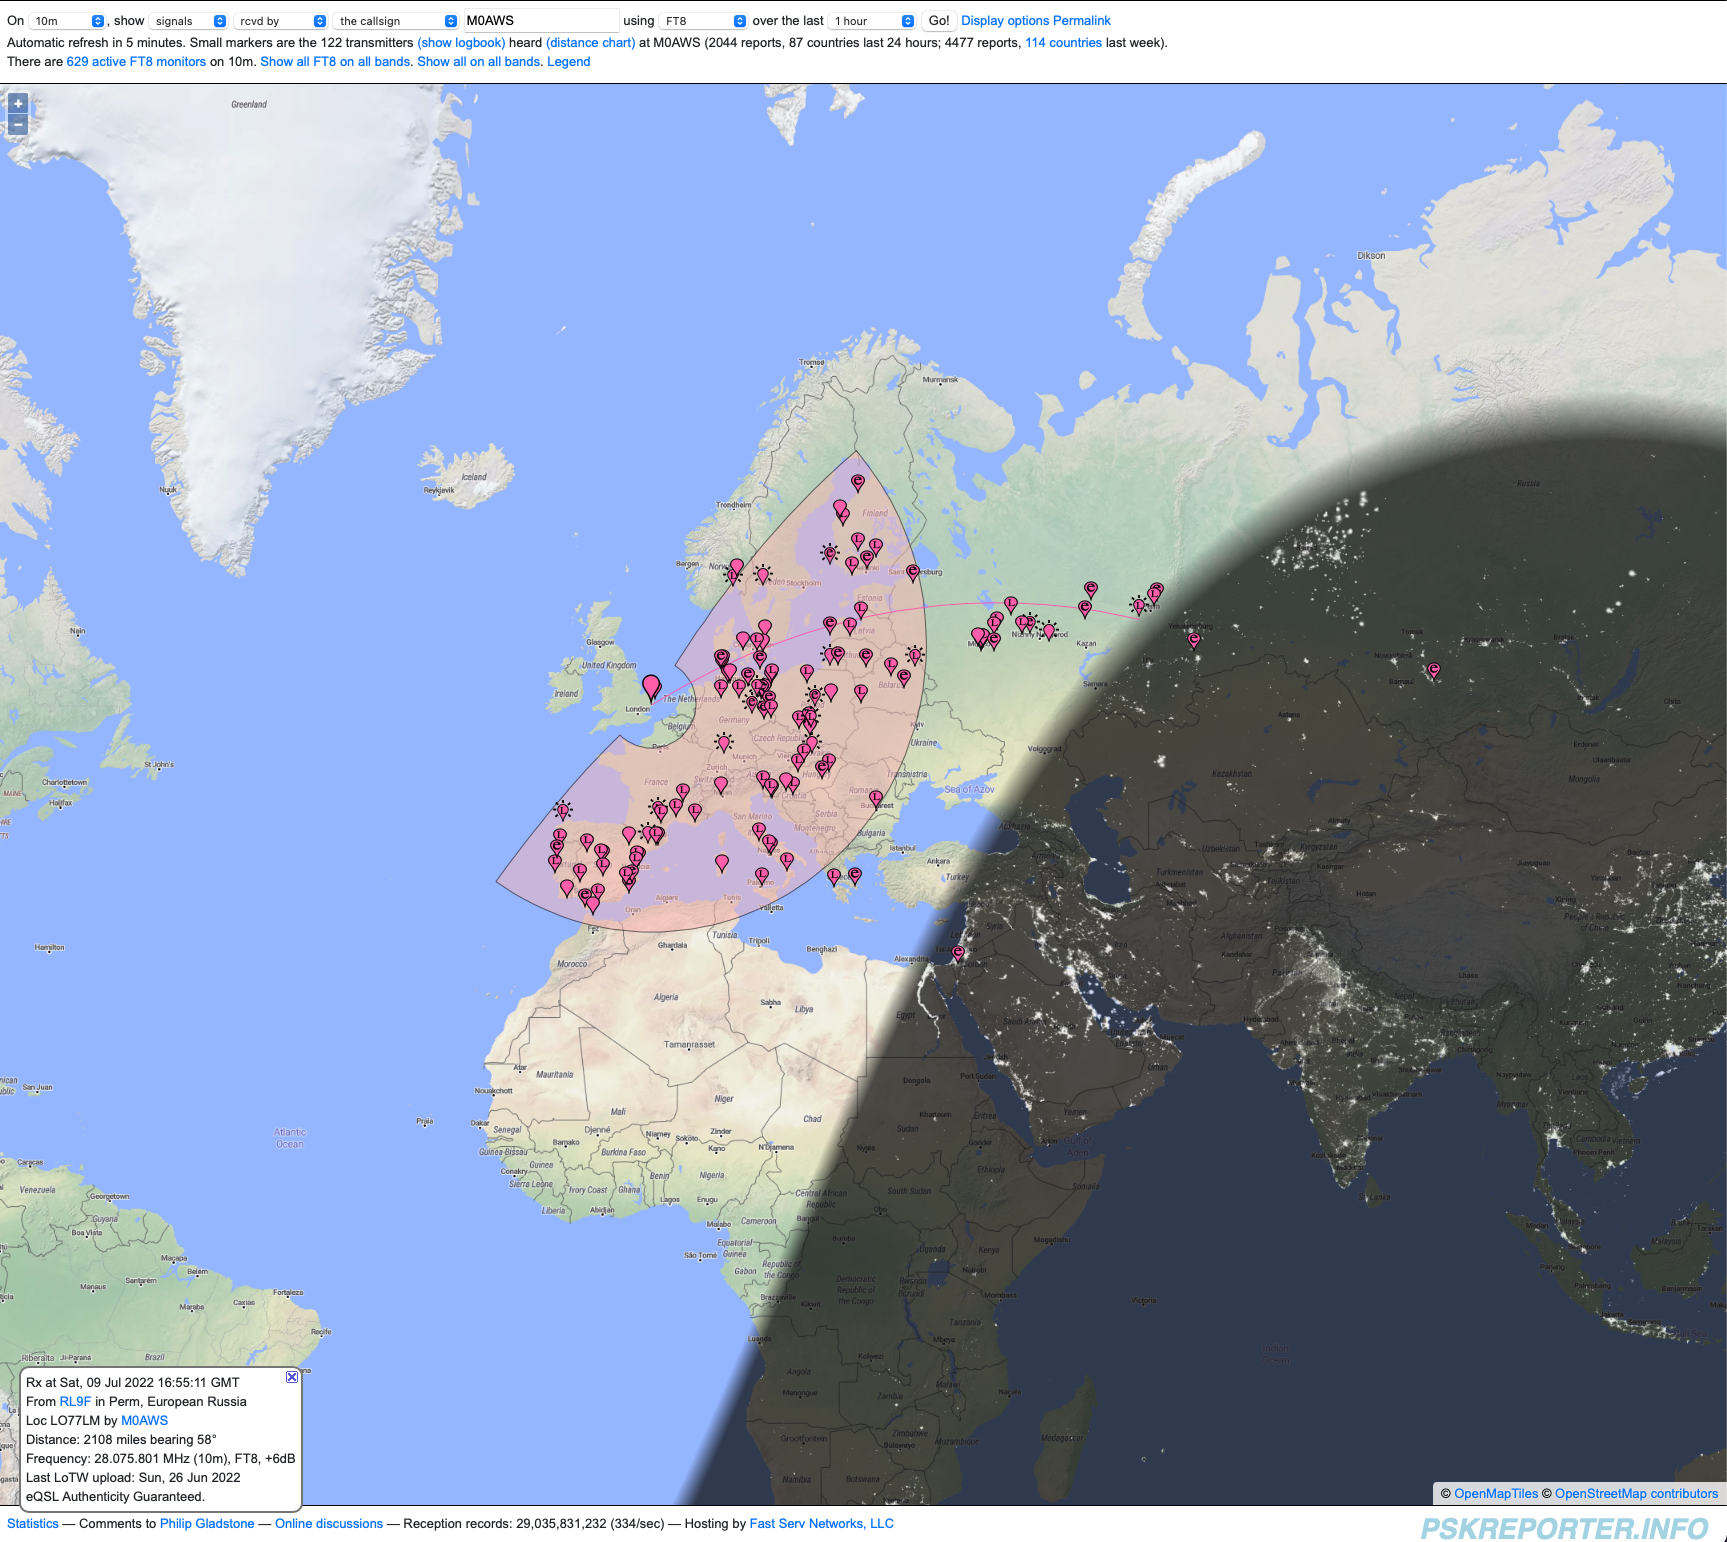
PSKReporter map showing signals heard on the 10m band
After tuning up and listening for a bit my first call was to RL9F in Perm Russia. This was the one that I’d been looking for, 2084 miles at 0.47mW/Mile this was the one that could complete the challenge.
After a few failed attempts due to deep QSB we eventually got a complete QSO in the log finishing the challenge.
2000 miles using 1w is a lot of fun, frustrating at times when you’re being heard by stations on the east coast USA but, none are answering your reply to their CQ calls.
PSKReporter has proven invaluable, being able to see who can hear you makes a big difference when trying to eek out the last mile when using next to no power.
In total 31 stations were worked over a 9 hour period, not huge numbers but, for many an M0AWS call sign isn’t exotic enough to answer and so many of my calls to stations were ignored. Sad really.
You can view all the log entries for the 2000 Mile 1 Watt challenge on my WSJTX Log.
So, what next? Well I guess it has to be 3000 miles or more using just 1w from my trusty Icom IC-705.
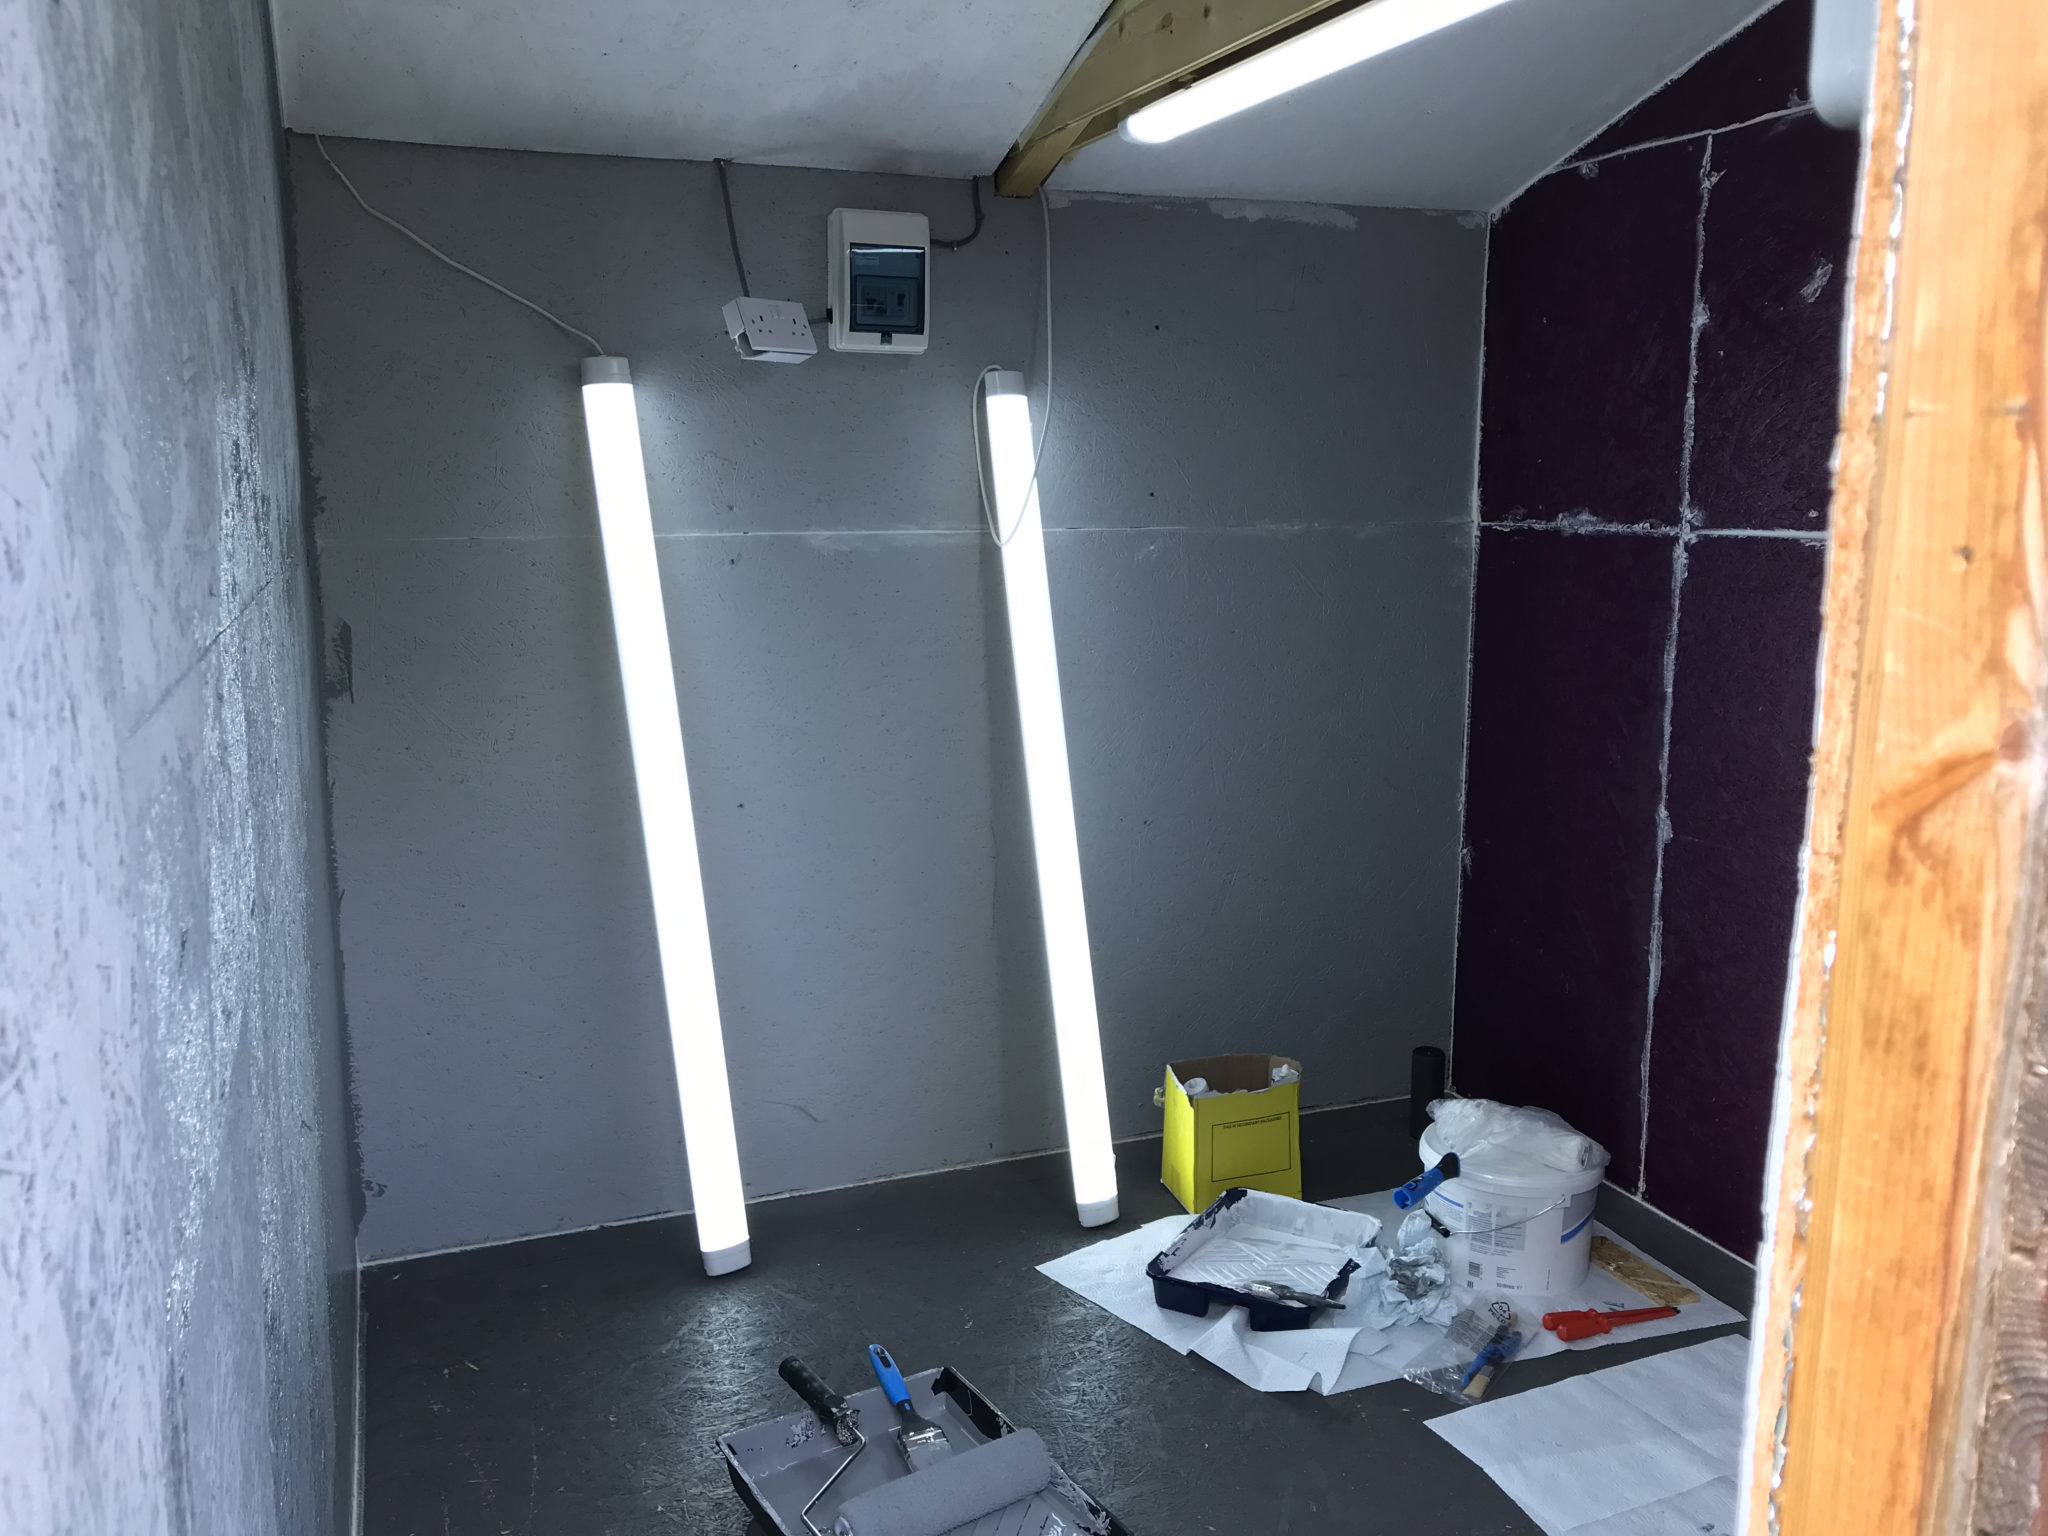
Over the last couple of weeks my wife and I have been busy converting part of my old motorcycle workshop into my new radio shack.
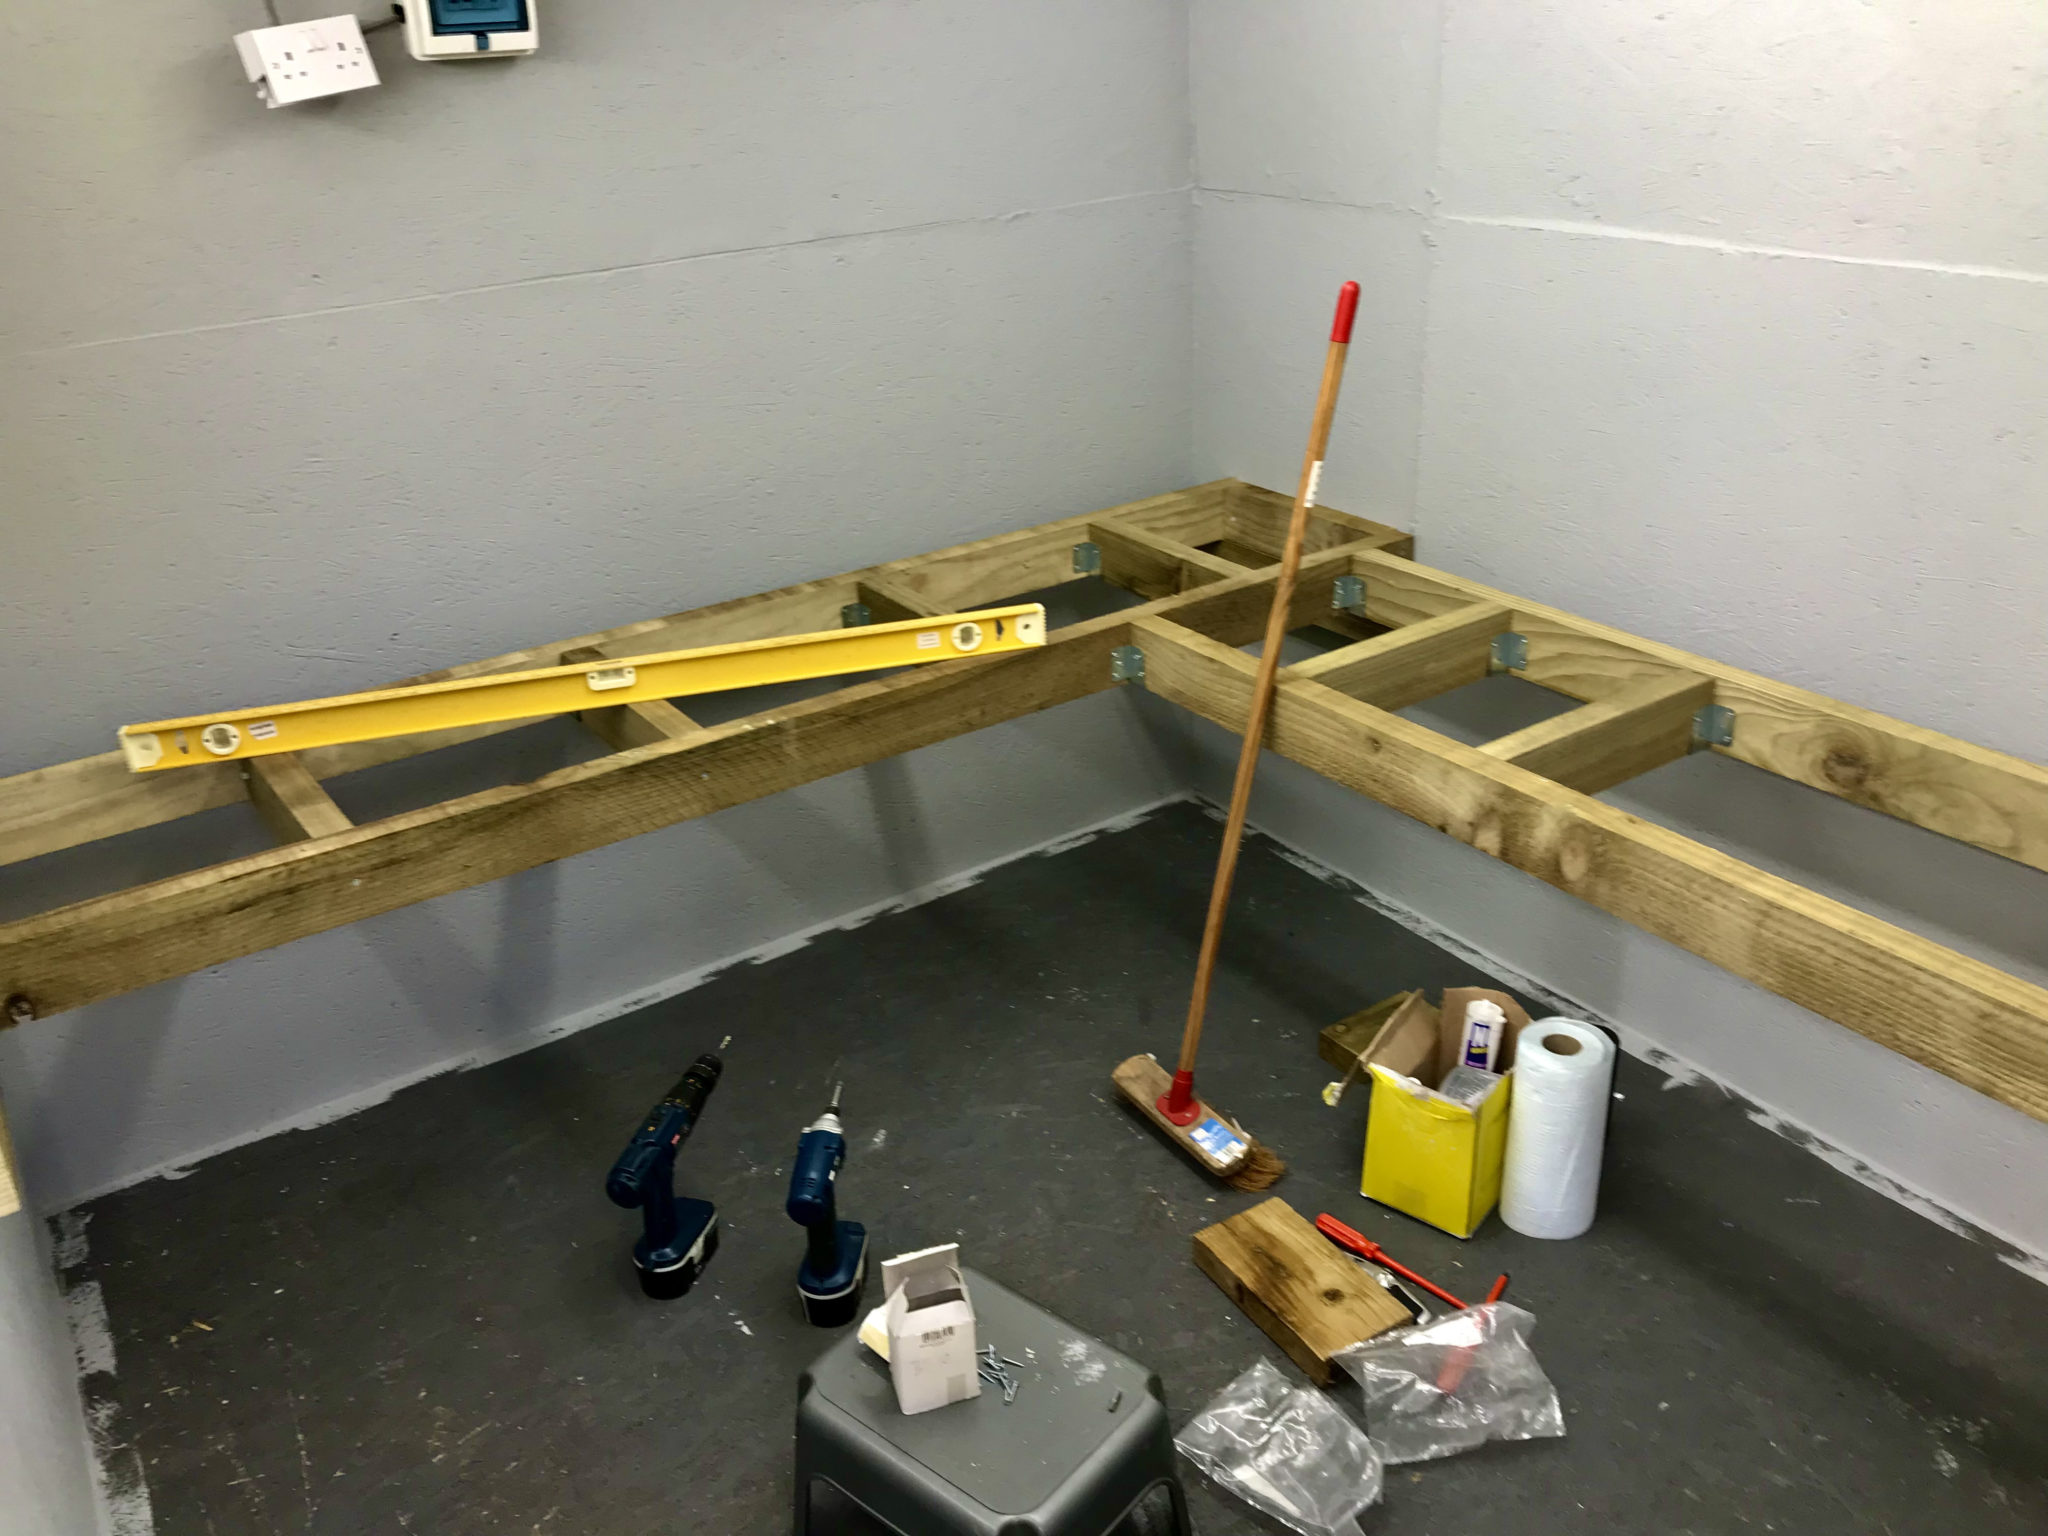
To save money we’ve custom built the desk ourselves using timber from a local supplier. I’ve done all the 240v power and lighting installation with a dedicated feed from the main distribution panel in the house.
Converting my old motorcycle workshop into my new radio shack
Custom building the desk gives us a huge advantage in that it allows us to maximise usage of the available space. Using 10mm sterling board covered with 10mm plywood makes the desk solid enough to sit on whilst fitting all the power sockets.
Bennie overseeing the project
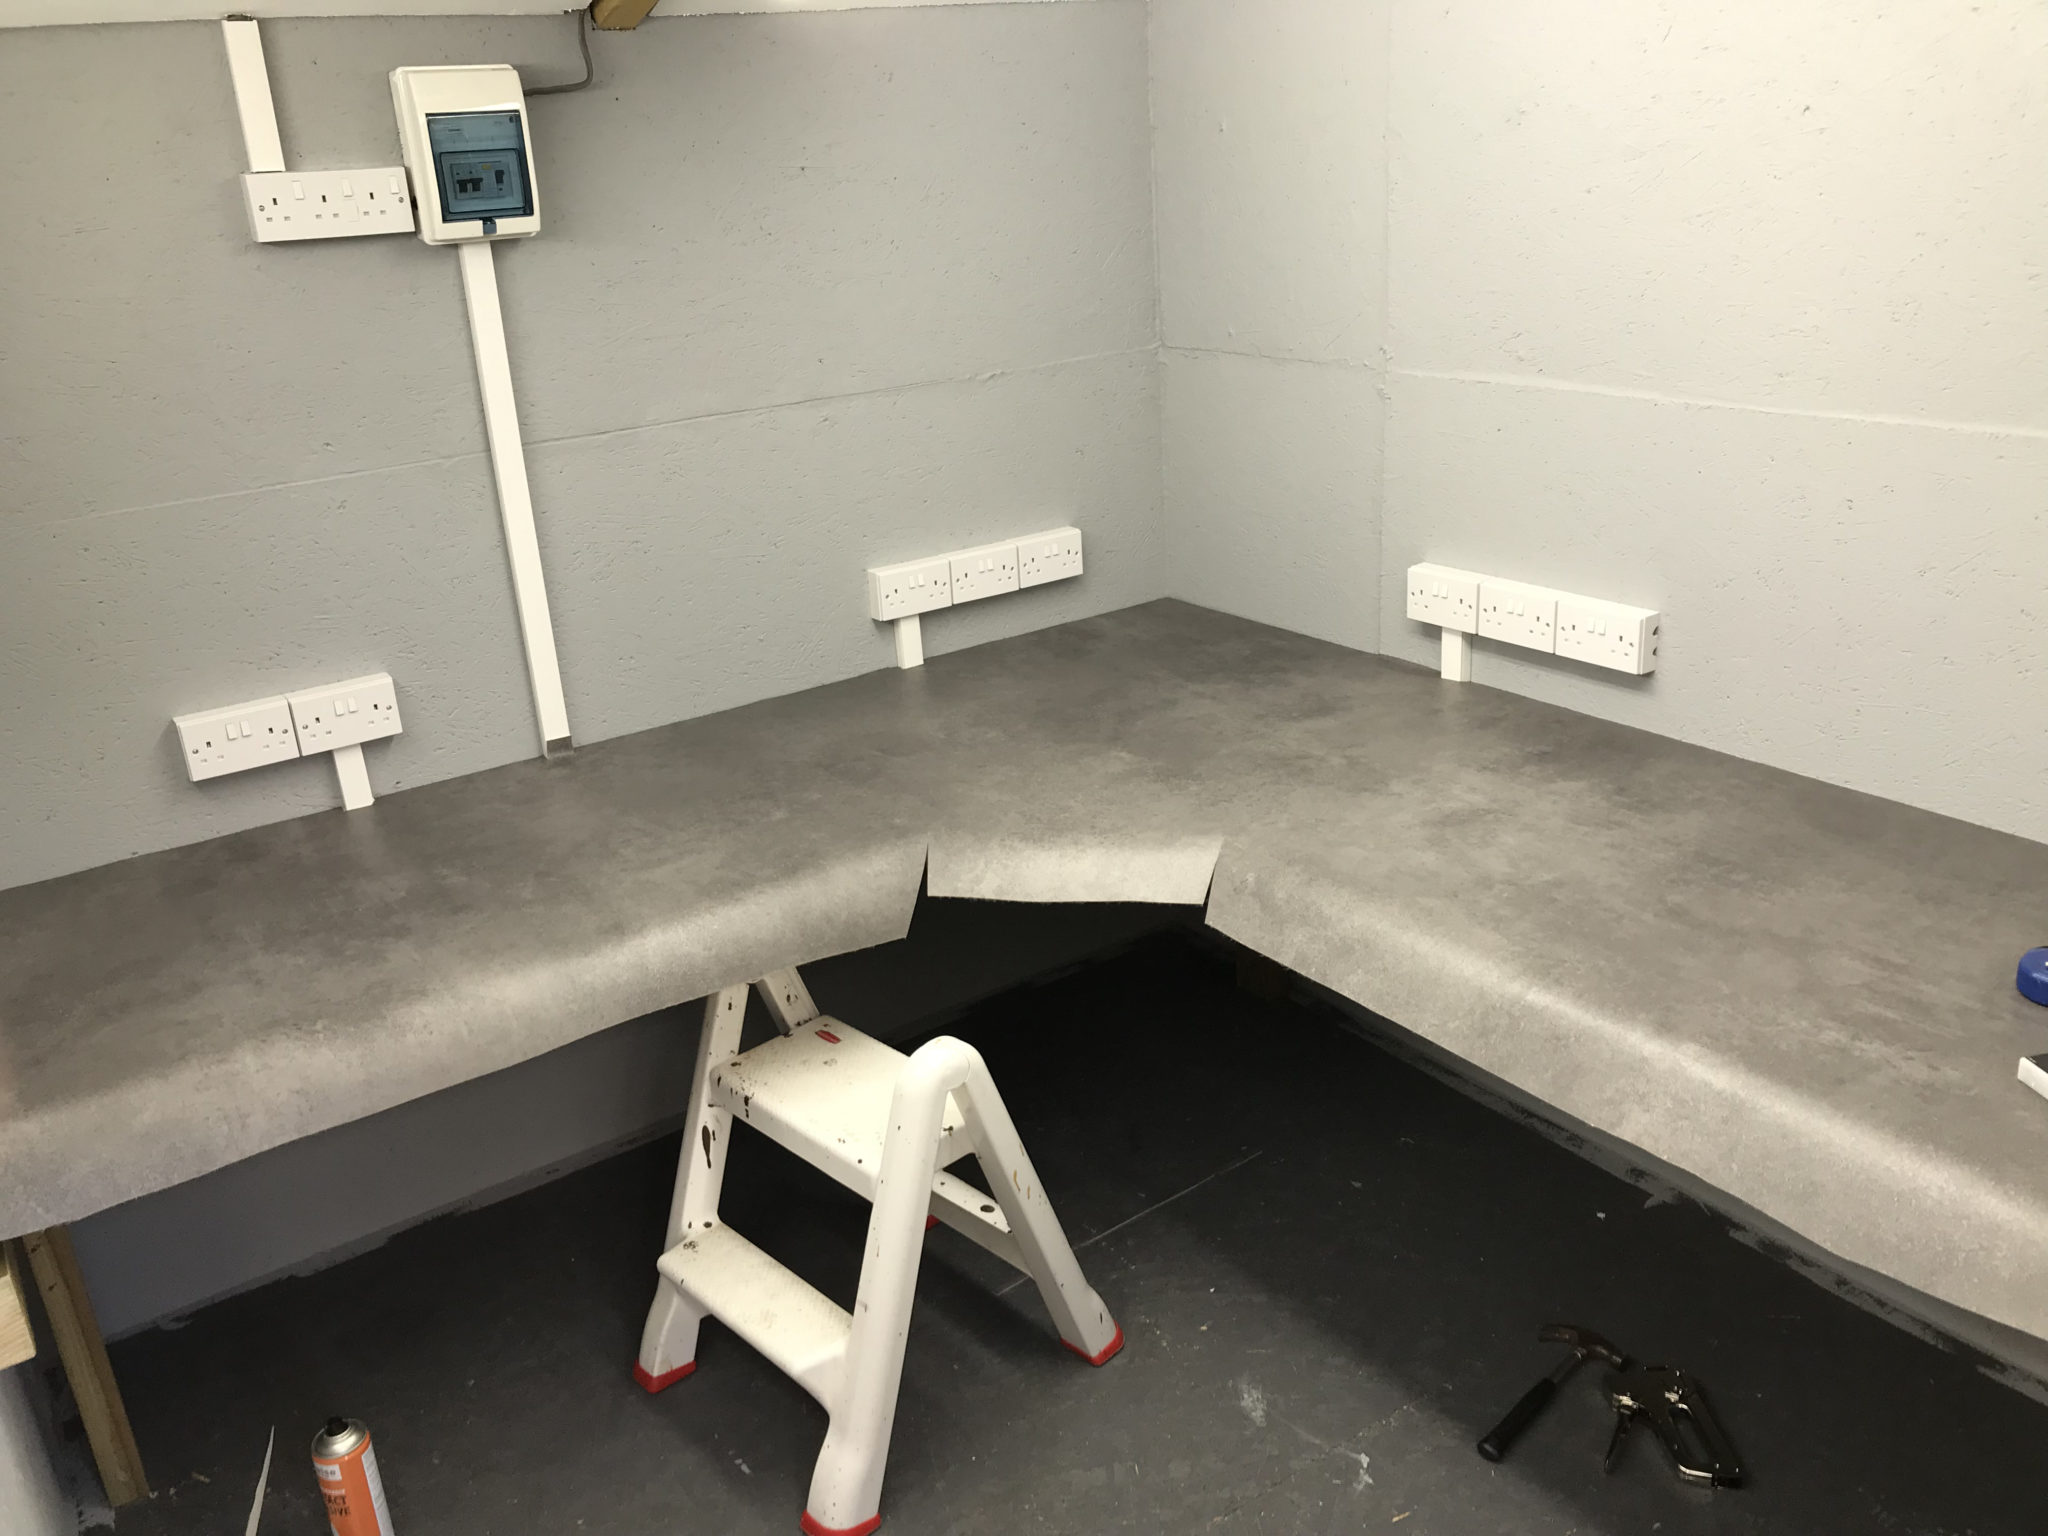
We used a good quality padded vinyl flooring for the desk covering as it allowed us to cover the desk area in one continuous piece. It was challenging to get all the cuts in the right place and get it glued down without it moving but, with a little care and patience we got it done. We’re both really pleased with the results!
Covering the desk with good quality vinyl flooring
I’ve just got to install some cable management and shelving to complete the project but, overall I’m really pleased with the new radio shack. I’m looking forward to the winter low band DXing season!
My IC-705 and AH-705 arrived today from ML&S, I wasted no time getting it hooked up to an antenna and started working my way through the manual getting to know the menu system.
After a few hours tinkering I piped up on 20m SSB and worked a couple of stations with ease using 10w. No problems getting through and to my surprise got a 5/9 report from both stations.
Later in the evening I decided to give it a go on 20m FT8 using just 5w O/P using the battery on the back of the radio that was now fully charged. It’s interesting to note that I didn’t need any drivers on my MacBook Pro to use the CAT and Audio via USB on the IC-705. It was simply plug and go. Much easier than it was with the FTDX10.
There was a fair amount of DX about on 20m including a few stations from Australia and Japan. I never managed to get a response back from either but, PSKReporter was showing that I was heard!
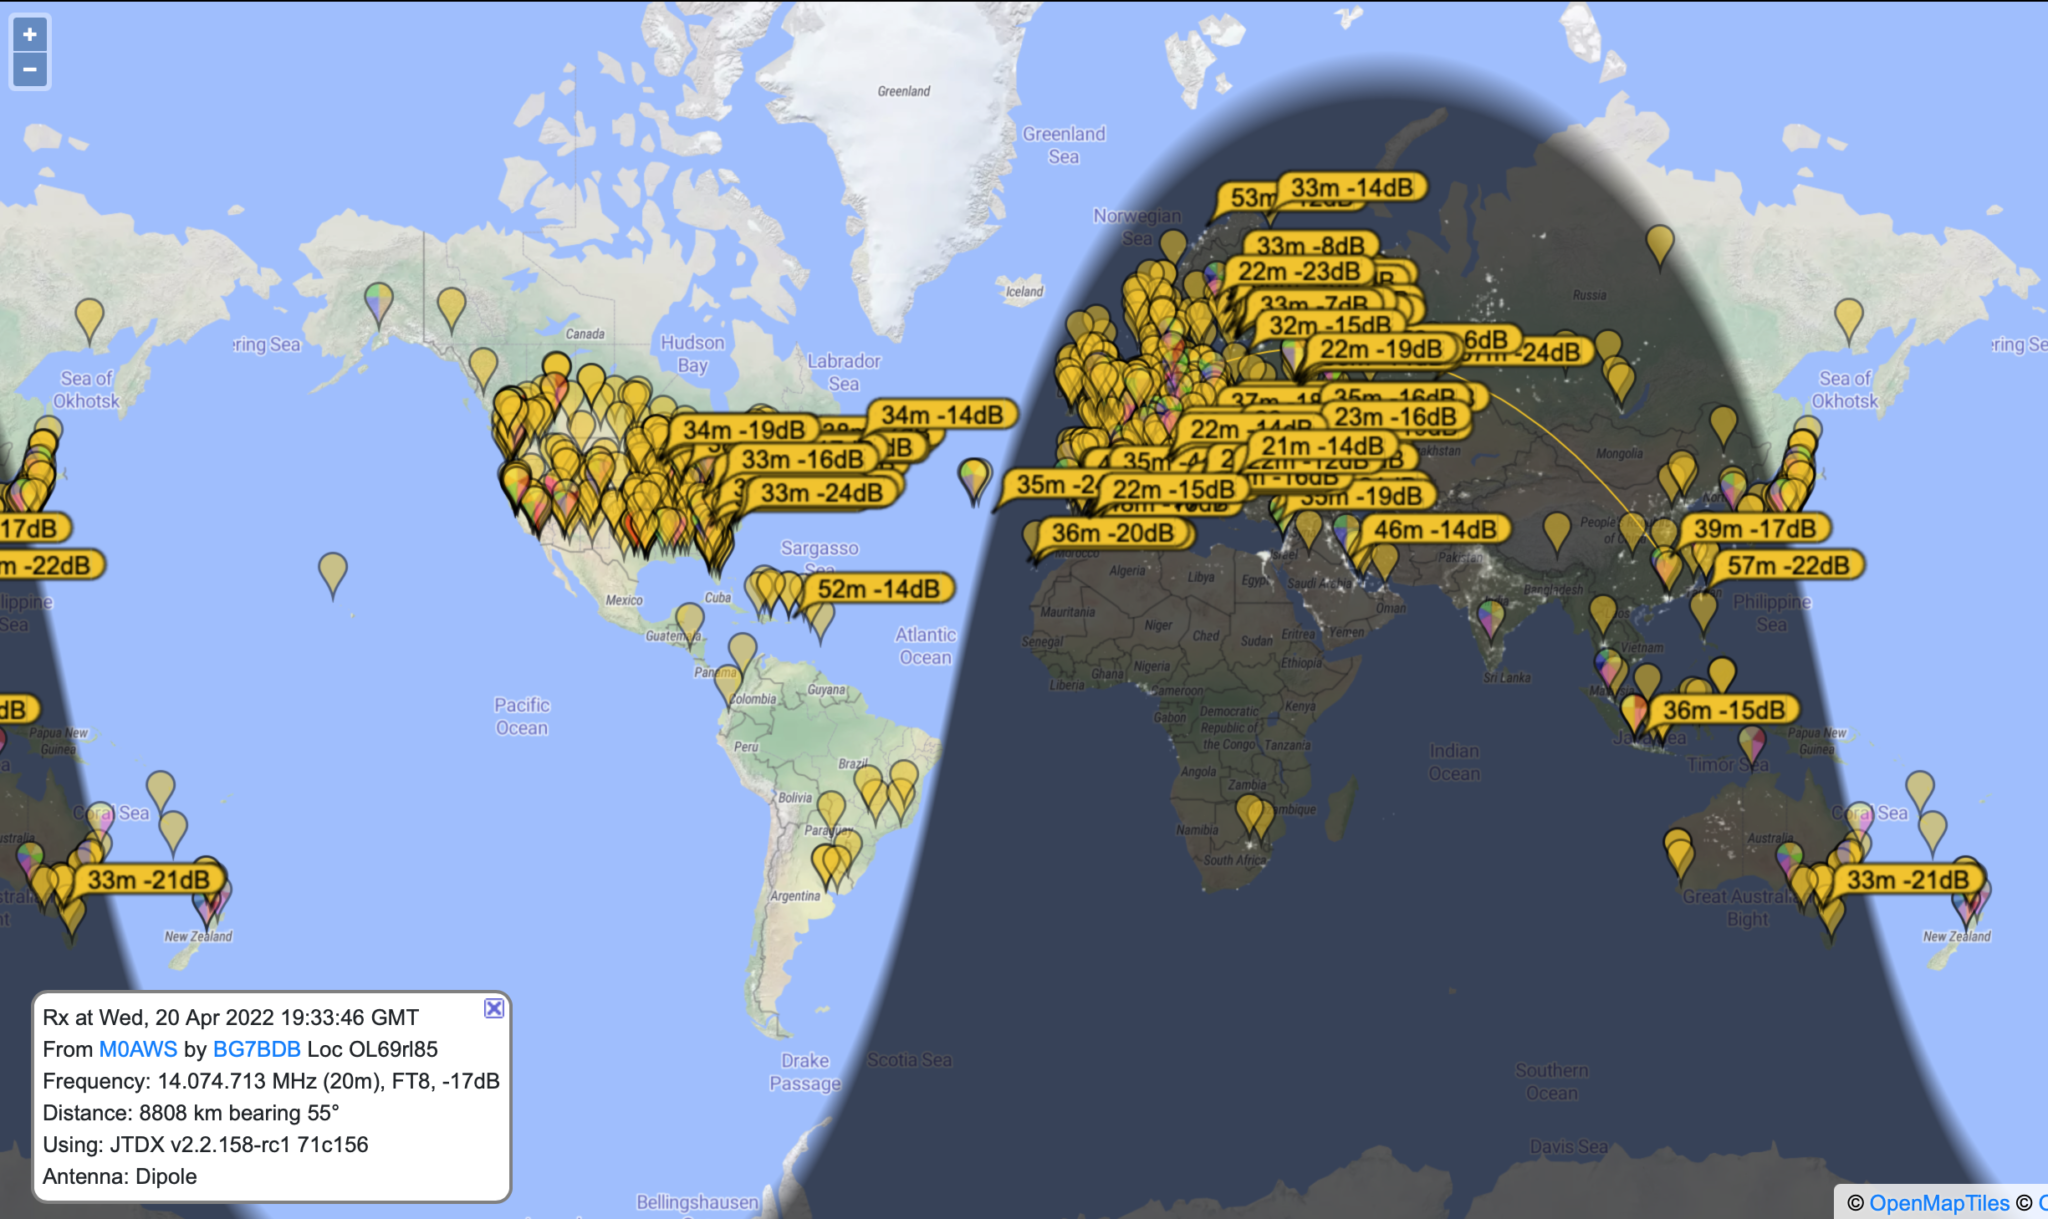
PSKReporter showing M0AWS being heard by BG7BDB
I also noticed that a station in China was hearing me too. BG7BDB in LinXiang City reported hearing me at -17dB. I quickly hunted around the waterfall and found him and gave a call.
To my amazement he came straight back to me and we exchanged SNR reports, 73 and he was in the log.
WSJT-X FT8 contact with BG7BDB
Looking at my WSJT-X log the distance to BG7BDB is 5467 Miles, at 5w O/P that equates to 0.91mW/Mile!
FT8 really is an impressive mode, it allows QRP stations to work the DX that just wouldn’t be possible on SSB. I have to say I’m really impressed with the Icom IC-705. The receiver and filtering isn’t as good as my Yaesu FTDX10 but, it’s an impressive little package. Portable operations with this radio is going to be a lot of fun!
Since purchasing the Yaesu FTDX10 and getting some wire into the air I’ve been working DX all over the world with ease. So far I’ve not exceeded 25w total output and yet I’ve worked as far as Australia, South America and West Coast USA and Canada. I’m often found to be using far less than 25w, even 5w on the 60m band is a huge amount of fun!
The FTDX10 has an incredible receiver, the best I have ever owned, for the money it really is an amazing bit of kit. The only thing about it that doesn’t work for me is the size when trying to go portable. It’s just a tad too big and requires a huge battery to power it. I love everything else about the FTDX10 apart from this one thing.
So, with the FTDX10 now being the prime shack radio I decided to look into a solution for portable operations. There are many options available today from the cheap Chinese made radios to the old reliable FT817/818 (which I used to own and had a lot of fun with) through to a multitude of newer, more modern full functionality radios. We are truly spoilt for choice these days!
One radio I have read a lot about is the Icom IC-705, it’s an incredibly feature packed little radio with a max output of 10w that covers 160m all the way up to 70cms. With its large super clear colour touch screen and easy swap battery solution it ticks all the boxes.
Icom IC-705 Portable HF/VHF/UHF Transceiver
One thing many people complain about is the fact that the IC-705 doesn’t have a built in ATU. This has never bothered me as I am a firm believer that the ATU should be at the antenna and not in the radio at the end of a long coax run. Running various antenna models on my EzNEC software has shown that keeping the ATU at the antenna is by far the best solution.
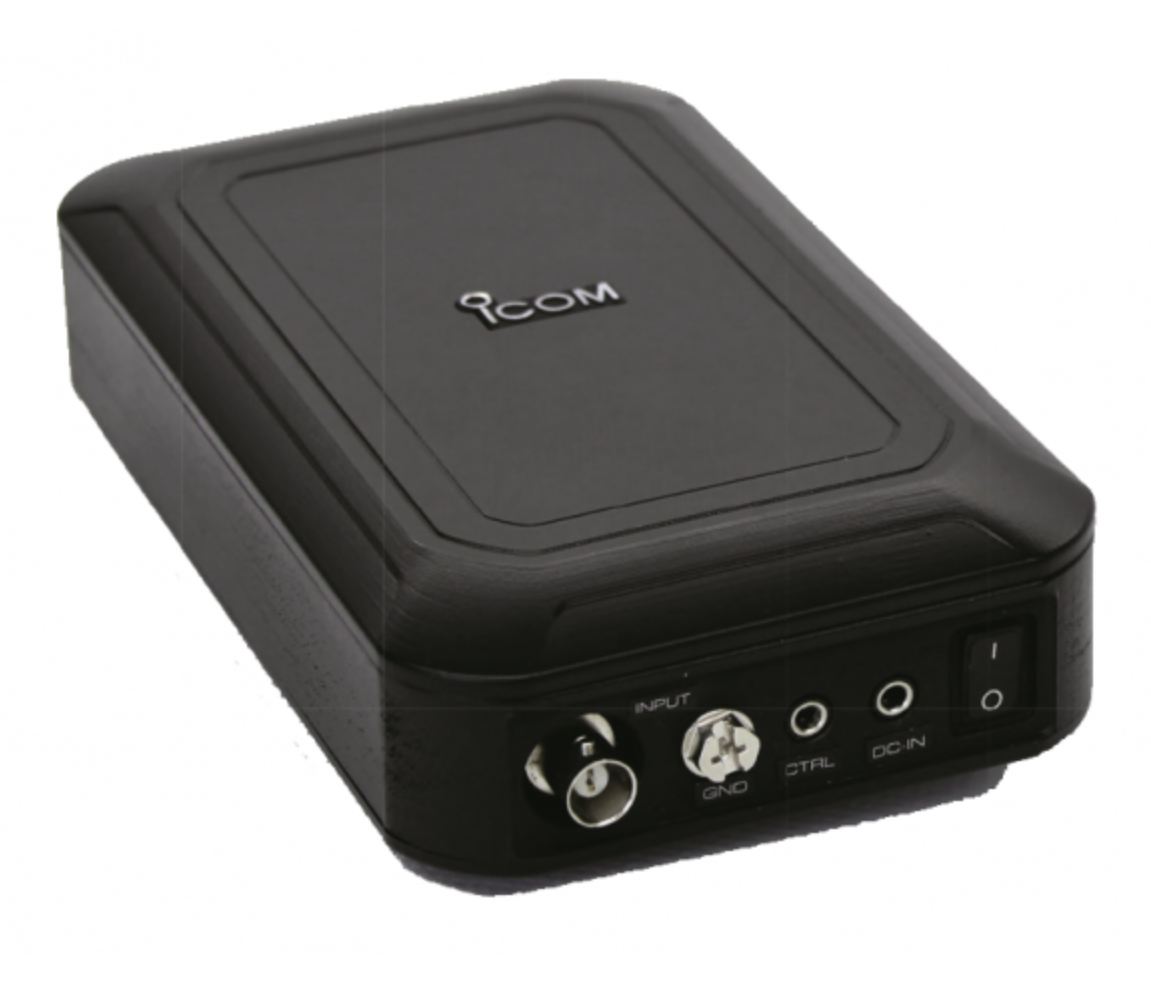
Of course Icom have this covered with their AH-705 remote auto ATU that’s specifically designed to compliment the IC-705. Powered by just two AA batteries and utilising latching relays the unit is both very quick to tune and uses next to no power at all, ideal for those Parks on the Air (POTA) or in my case, Beaches on the Air (BOTA) activations.
Being a quality Icom product the AH-705 isn’t cheap, at £299.99 it’s actually one of the most expensive auto ATUs available for the IC-705.
Icom AH-705 Remote Auto ATU
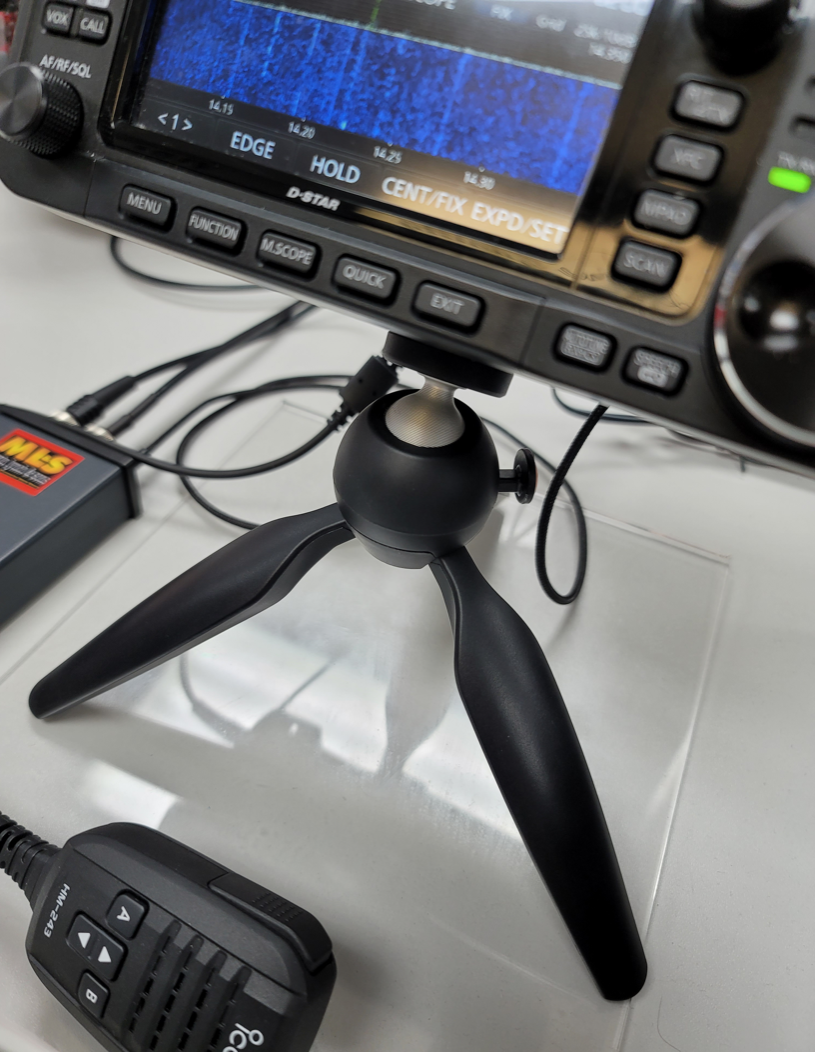
The other thing I wanted was some kind of stand for the IC-705 that would allow me to angle the radio such that the display and controls are always easily useable. On the ML&S site I found a nifty little tripod that will do the job nicely and so, that had to be included in the bundle.
Icom IC-705 Tripod stand
Fortunately for me the AH-705 was on special offer over the Easter Bank Holiday with 40% off making it the same price as the cheaper MAT tuner from china.
So I have now ordered an IC-705, matching AH-705 and the tripod all for the bundle price of £1504.87 including VAT, I even got free shipping thrown in too!
So that leaves just one more thing that I need to complete my radio solution, a morse key!
Having sold my Schurr Profi II Twin Paddle key (Been kicking myself ever since!!) a few years ago when I decided to take a break from radio I’m now in the position of not owning a morse key.
I did order a Vine Antenna RST-TP1 key from ML&S but, that had to go back (There’ll be an article about it coming very soon!) and so, I decided to spend a bit more and get a much better quality key.
Talking to many people online and Tony at ML&S it’s apparent that the Begali Morse keys are some of the best available these days. Looking on the Begali website they certainly have a great selection of high quality keys available, some for much more than I want to spend.
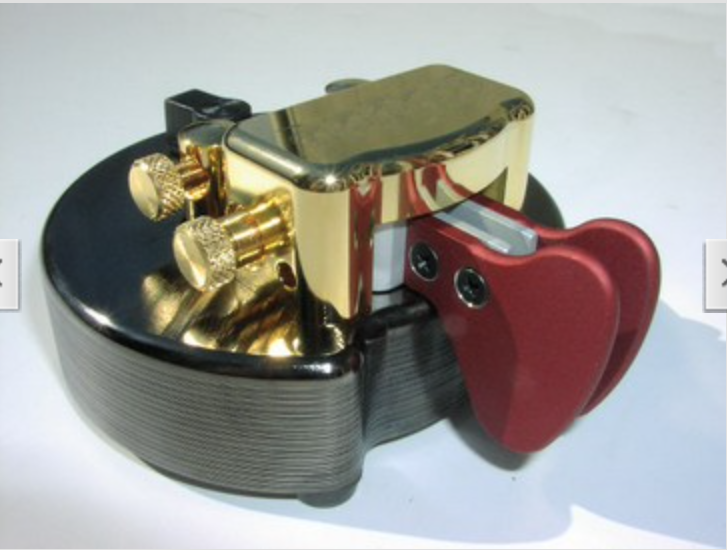
Begali Pearl Twin Paddle Morse Key
So after much consideration I decided to purchase a Begali Pearl Twin Paddle Morse key in Palladium and Gold with red paddles. It’s a super looking key and gets great write ups. It’s also their biggest seller, that says a lot.
More soon …
We use cookies to ensure that we give you the best experience on our website. If you continue to use this site we will assume that you are happy with it.