Another new radio!

Many years ago when I lived in France I had a Flex-3000 transceiver, one of the first fully SDR transceivers on the market. It was paired with a proprietary Windows XP application called PowerSDR (now Opensource and called Thetis) and connected via a firewire connection.

17 years later I am once again venturing into the world of SDR transceivers in the form of a Hermes Lite 2. (HL2)

The HL2 hardware is available via the Makerfabs website in kit form. I ordered the HL2 motherboard, the N2ADR Filter Board to ensure a clean signal from the transceiver and the enclosure. Total cost for all the parts and shipping was £288.00 including all taxes.

The kit took about 10 or so days to arrive and was very easy to put together making sure to fit the PA transistor heat sink the right way round so that it doesn’t short out the main board. (There are many videos about this on YouTube)

Once the hardware was put together I needed to install some software to control/drive the HL2. Being a heavy weight Linux user my software choice had to come from the Opensource world.
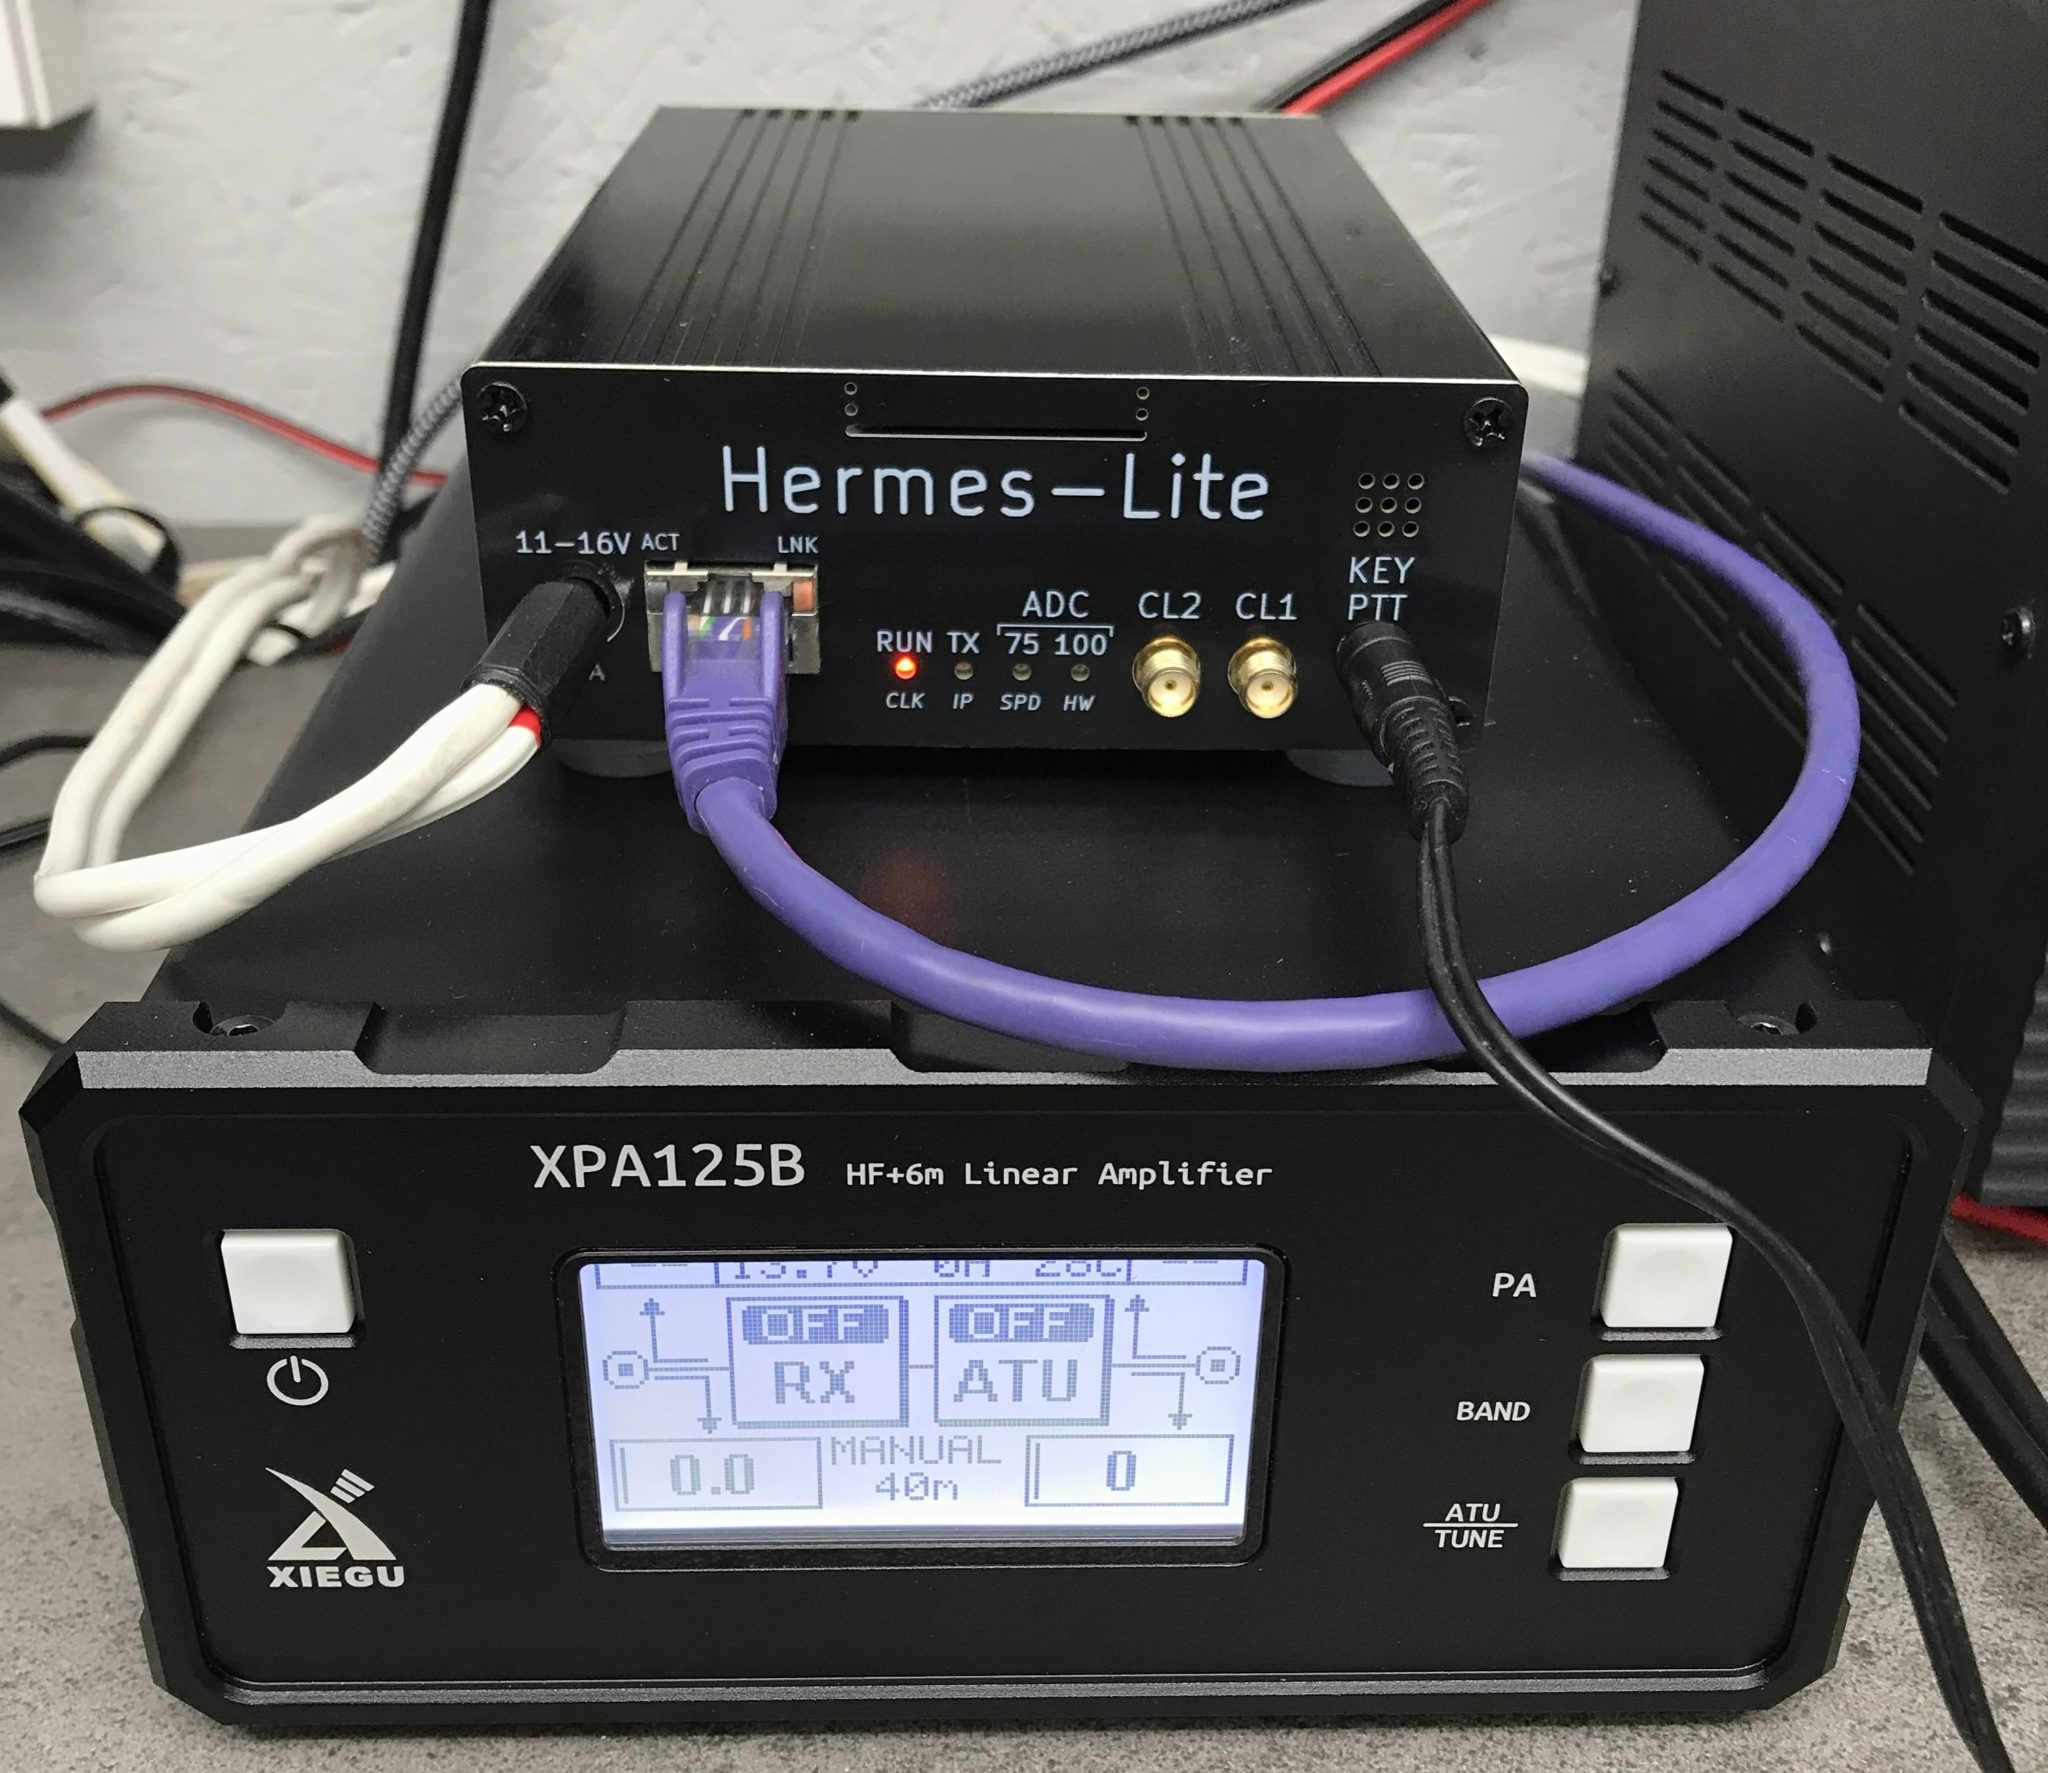
M0AWS Hermes Lite 2 SDR Trasnceiver and Xiegu XPA125B Amplifier

After much research and chatting with other HAMs on the Matrix who have the HL2 I found that most people use the closed source SDR Console software to control the transceiver. Since this software is for Windows it’s not something I can use as I don’t have any Windows PCs, they’re all Linux only.

To this end I started researching Linux SDR software for the HL2 and decided that PiHPSDR was the one I was going to try first.

PiHPSDR was originally written for the RaspberryPi 3/4/5 single board computers (SBCs) but, I wanted to have a go at compiling it on my Kubunu Linux desktop PC. I found it straight forward to follow the instructions in the pihpsdr-install.pdf file and in no time at all I had the software compiled and running.

PiHPSDT running on Kubuntu Linux 22.04LTS
PiHPSDR running on Kubuntu Linux 22.04LTS

PiHPSDR is infinitely configurable and thus it feels like it has an infinite number of menus and options. Since the HL2 has two separate receivers, it’s possible to listen to two bands at the same time. This is the one feature I really missed more than anything with my FTDX10 so, I’m glad to have dual receive capability back once more!

Going through all the settings I realised that the A and B VFOs have individual settings. Initially I setup the software using just VFO A but, when I switched over to VFO B none of my settings were there. I then had the realisation that the settings apply only to the active VFO. I quickly went through all the settings again for VFO B and all was well.

In no time at all I was on the air with just 5w as my Xiegu amp hadn’t arrived. Not being perturbed I tuned up on the 15m band and started searching for stations. Interestingly it was CQWW SSB weekend and the band was full of contest stations. Working my way along the spectrum I found I was able to work quite a few stations with ease using my vertical and inverted-L antennas.

Contacts of note were VE3KG at 3406 Miles, VE3JM at 3382 Miles, RW9DX at 2380 Miles, KC1XX at 3331 Miles and N1DE at 3600 Miles. I also worked a bunch of European stations and had a great time giving away points with my little QRP rig.

Contests are a good time to try out new radios as all the big stations with good ears are on the bands and make the effort to get us QRP guys in their logs.

I have been extremely impressed with the receivers in the HL2 radio. It handles both strong and weak stations exceptionally well. PiHPSDR really does have brick-wall filtering and I was able to work the weaker stations right next to large contest stations with ease. At no time did the front-end of the receiver get overloaded.

Below is a short video clip of a conversation on the 80m band. The band was quite noisy however, with a reduction of the AGC gain and the 2700Hz filter it’s possible to remove almost all the noise.

Hermes Lite 2 SSB reception on the 80m Band

On CW the radio is a real delight. With the filtering and AGC gain control I am able to use extremely narrow receive filters without any ringing whatsoever. I would say that on CW the HL2 is as good as my FTDX10 when it comes to receiving even the weakest of stations.

I’m sure on paper the FTDX10 receiver has better numbers however, to the ear there really is no discernible difference.

Below is a short video clip of D4DX on CW on the 80m band. The band was noisy but, with the 100Hz filter enabled and clever use of the AGC Gain I was able to remove almost all the noise completely, reducing fatigue on the ears and making reception very easy even though there was some fairly deep QSB at times.

Receiving D4DX on CW on the 80m band using 100Hz filter and reduced AGC gain

A few days later my Xiegu XPA125B amplifier arrived. Unfortunately the amp didn’t come with the normal PTT lead that comes from the factory and is detailed in the user manual. For some bizarre reason this is a chargeable option when you buy the amp from Martin Lynch and Sons even though it is included from the factory.

This meant I had to make a lead which was a problem as I didn’t have one of the mini DIN plugs required for the connection to the amplifier. Jumping onto Amazon I ordered a packet of two and sat back and waited for their arrival.

A couple of days later the DIN plugs arrived and I quickly made up the necessary phono/RCA to mini DIN lead and got the amp operational.

The Xiegu XPA125B isn’t cheap but, it’s a really nice bit of kit. The neat little LCD display keeps you informed of power O/P, I/P and O/P SWR, voltage, current draw, temperature and band selected.

With just 0.7w of input from the HL2 I’m able to get a full 100w O/P from the amp. On the lower bands I have to reduce the O/P from the Hermes Lite 2 even further so that I don’t over drive the amp.

Being an avid Short Wave Listener (SWL) I wanted to see how the HL2 performed when listening to the big AM broadcast stations. To my surprise it makes an excellent SWL receiver with better AM demodulation than many of the more expensive radios. Having the option to select receive filters up to 16Khz wide I found I was able to get the best audio possible from many of the broadcast stations including Radio Caroline on 648Khz. It’s quite an improvement over the 12Khz maximum on the FTDX10.

Listening to AM Broadcast stations

What makes this project even more exciting is that both the hardware and software are from the OpenHardware/OpenSource world. The complete circuit diagram, PCB layout and information is available for all to download, something you don’t often see these days!

PiHPSDR is one of the nicest SDR applications I’ve seen in the Linux world and even comes with a 200 page downloadable user manual. Something you don’t see in many Opensource projects. The source code for the application is downloadable and you are able to make your own changes to it without restriction.

Overall I am really pleased with the Hermes Lite 2 SDR transceiver.
It has two excellent receivers, is infinitely configurable via the PiHPSDR software and performs extremely well under all conditions. Since getting the radio I haven’t even switched on the FTDX10.

More soon …

Use a Griffin Powermate with SDR via Node Red

I’ve been gradually building my QO-100 ground station over the last few months and have had the receive path working for some time now. One of the things I really miss with the Funcube Dongle Pro+ (FCD) SDR is a real VFO knob for changing frequency.

My QO-100 Node Red dashboard is configured so that I can have the FCD track the uplink frequency from the IC-705 but, sometimes I use the FCD without the IC-705 in the shack and so a physical VFO would be handy.

Many years ago when I lived in France (F5VKM) I had a Flexradio Flex-3000 SDR, a great radio in it’s time and one that gave me many hours of enjoyment. One addition I bought for that station was a Griffin Technology Powermate VFO knob. It worked extremely well with the PowerSDR software for the Flex-3000 and I used it for many years.

Many years later I’m back in the UK and much of my equipment is packed away in the attic, including the Griffin Technology Powermate VFO.

I decided to dig it out and see if I could get it working with GQRX SDR software. Sadly I couldn’t get it working with GQRX however, I did find a way of getting it working with Node Red and thus could add it to my QO-100 Node Red Dashboard and then control GQRX with it via a simple Node Red flow.

Griffin Technology Powermate VFO

Plugging the Powermate VFO into my Kubuntu PC it wasn’t immediately recognised by the Linux O/S. After a little searching I found the driver on Github. I added the PPA to my aptitude sources and installed the driver using apt.

https://launchpad.net/~stefansundin/+archive/ubuntu/powermate

Once installed the default config for the Powermate device is to control the default audio device volume. To make the device available for use as a VFO knob you need to change the configuration so that the default setting is disabled. To do this is relatively easy, just edit the config file using your favourite command line editor (Vi/Vim in my case) and add the following entry.

vi /etc/powermate.toml

# Entry to control HDMI volume with Powermate
#sink_name = "alsa_output.pci-0000_01_00.1.hdmi-stereo"

# Set powermate not to work with volume control
sink_name = ""

As shown above, comment out the default “sink_name” entry (Yours may be different depending on audio device in your PC) and add in the Powermate “sink_name” entry that effectively assigns it to nothing.

Once this is done, save the file and exit your editor and then reboot the PC.

Next you’ll need to install a small program called evtest.

sudo apt install evtest

To check the evtest program has installed correctly, plugin your Powermate VFO to any available USB port and run the following command in a terminal.

evtest /dev/input/powermate

Turning the Powermate knob you should see output on the screen showing the input from the device. You should also see BTN events for each press of the Powermate device.

Input driver version is 1.0.1
Input device ID: bus 0x3 vendor 0x77d product 0x410 version 0x400
Input device name: "Griffin PowerMate"
Supported events:
  Event type 0 (EV_SYN)
  Event type 1 (EV_KEY)
    Event code 256 (BTN_0)
  Event type 2 (EV_REL)
    Event code 7 (REL_DIAL)
  Event type 4 (EV_MSC)
    Event code 1 (MSC_PULSELED)
Properties:
Testing ... (interrupt to exit)
Event: time 1685816662.086666, type 2 (EV_REL), code 7 (REL_DIAL), value -1
Event: time 1685816662.086666, -------------- SYN_REPORT ------------
Event: time 1685816662.318638, type 2 (EV_REL), code 7 (REL_DIAL), value -1
Event: time 1685816662.318638, -------------- SYN_REPORT ------------
Event: time 1685816662.574615, type 2 (EV_REL), code 7 (REL_DIAL), value -1
Event: time 1685816662.574615, -------------- SYN_REPORT ------------
Event: time 1685816663.670461, type 2 (EV_REL), code 7 (REL_DIAL), value 1
Event: time 1685816663.670461, -------------- SYN_REPORT ------------
Event: time 1685816664.030421, type 2 (EV_REL), code 7 (REL_DIAL), value 1
Event: time 1685816664.030421, -------------- SYN_REPORT ------------
Event: time 1685816664.334389, type 2 (EV_REL), code 7 (REL_DIAL), value 1
Event: time 1685816664.334389, -------------- SYN_REPORT ------------
Event: time 1685816665.334255, type 1 (EV_KEY), code 256 (BTN_0), value 1
Event: time 1685816665.334255, -------------- SYN_REPORT ------------
Event: time 1685816665.558230, type 1 (EV_KEY), code 256 (BTN_0), value 0
Event: time 1685816665.558230, -------------- SYN_REPORT ------------
Event: time 1685816666.030161, type 1 (EV_KEY), code 256 (BTN_0), value 1
Event: time 1685816666.030161, -------------- SYN_REPORT ------------
Event: time 1685816666.182151, type 1 (EV_KEY), code 256 (BTN_0), value 0
Event: time 1685816666.182151, -------------- SYN_REPORT ------------

At this point you’re ready to stop evtest (CTRL-C) and then create the following little BASH shell script that Node Red will run to collect the O/P from the Powermate USB device.

#!/bin/bash

###############################################
# Griffin Technology Powermate control script #
# for Node Red.                               #
#                                             #
# 04/06/23 - M0AWS - v0.1                     #
#                                             #
###############################################

VAL="1"
echo "STEP-1Hz"

/usr/bin/evtest /dev/input/powermate | while read LINE 
do
   case $LINE in

      *"(REL_DIAL), value 1") echo "$VAL"
           ;;

      *"(REL_DIAL), value -1") echo "-$VAL"
           ;;

      *"(BTN_0), value 1") case $VAL in

                              "1") VAL="10"
                                   echo "STEP-10Hz"
                                      ;;

                             "10") VAL="100"
                                   echo "STEP-100Hz"
                                      ;;

                             "100") VAL="1000"
                                    echo "STEP-1Khz"
                                       ;;

                             "1000") VAL="10000"
                                     echo "STEP-10Khz"
                                         ;;

                             "10000") VAL="1"
                                       echo "STEP-1Hz"
                                          ;;
                              esac
                                 ;;
        esac
done

Once the BASH script is copied and pasted into a file called powermate.sh you need to make it executable by using the following command.

chmod 700 ./powermate.sh

If you now run the shell script in a terminal you’ll see a similar output to that shown below from the device when used.

./powermate.sh 
STEP-1Hz
-1
-1
-1
1
1
1
STEP-10Hz
10
10
10
-10
-10
-10
STEP-100Hz
100
-100
-100
STEP-1Khz
1000
STEP-10Khz
STEP-1Hz
1
1
STEP-10Hz

As you can see above the shell script outputs a positive or negative number for VFO tuning and changes the VFO step size each time the Powermate is depressed.

Getting this output from the BASH shell script into Node Red is really simple to achieve using just 3 or 4 nodes.

In the Node Red development UI create the following nodes.

Griffin Powermate Node Red Nodes

The first node in the flow is a simple inject node, here I called it trigger. This sends a timestamp into the next node in the flow at startup to set the flow running.

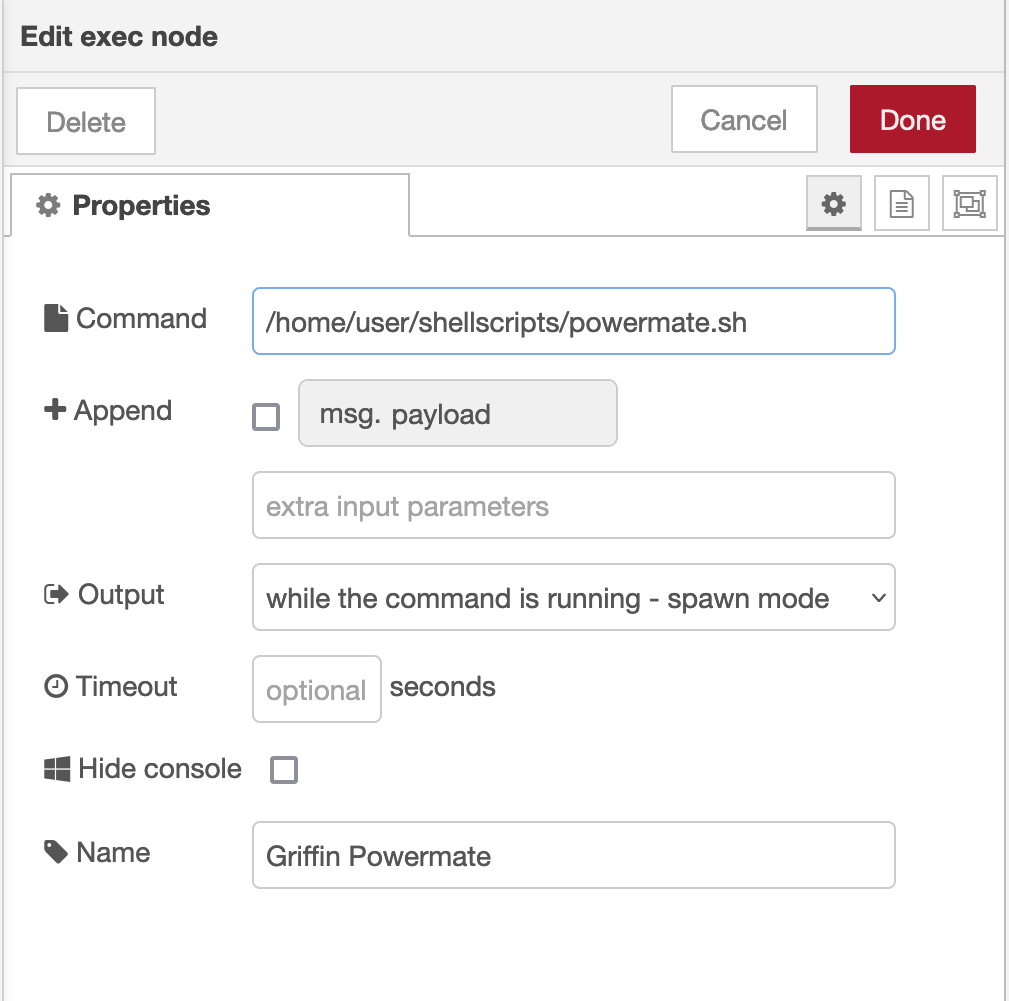
The Griffin Powermate node is a simple exec node that runs the script we created above.

M0AWS Powermate exec node

Configure the node as shown above and connect it to the inject node that’s used as a trigger. Note: Change “user” in the Command field shown above to that of your username on your Linux PC)

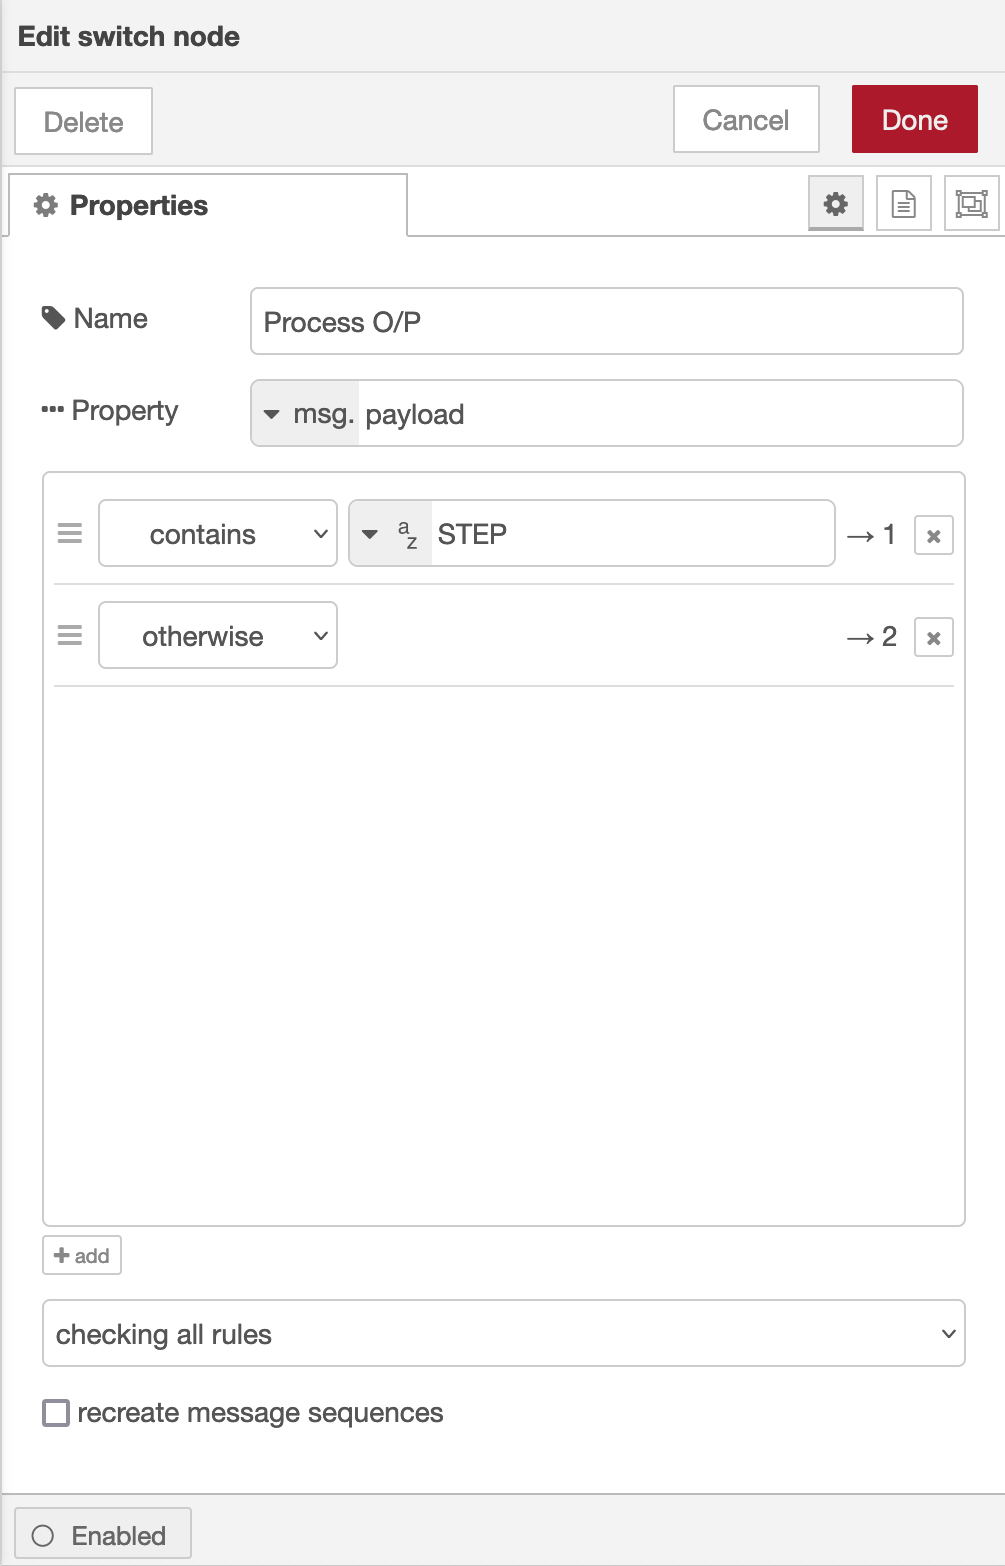
Once done create the third node in the flow, a simple switch node and configure as shown below.

Switch Node for Powermate

The switch node has two outputs, the top one is a text output that is fed into a text field to show the current step size of the Powermate device and the lower output is the numeric output that must be fed into your VFO control flow so that the VFO value is incremented/decremented by the amount output by the Powermate device.

I’ve found the Griffin Technology Powermate USB device works extremely well with Node Red and GQRX that I use for controlling the FCD SDR radio and it’s now part of my QO-100 ground station build.

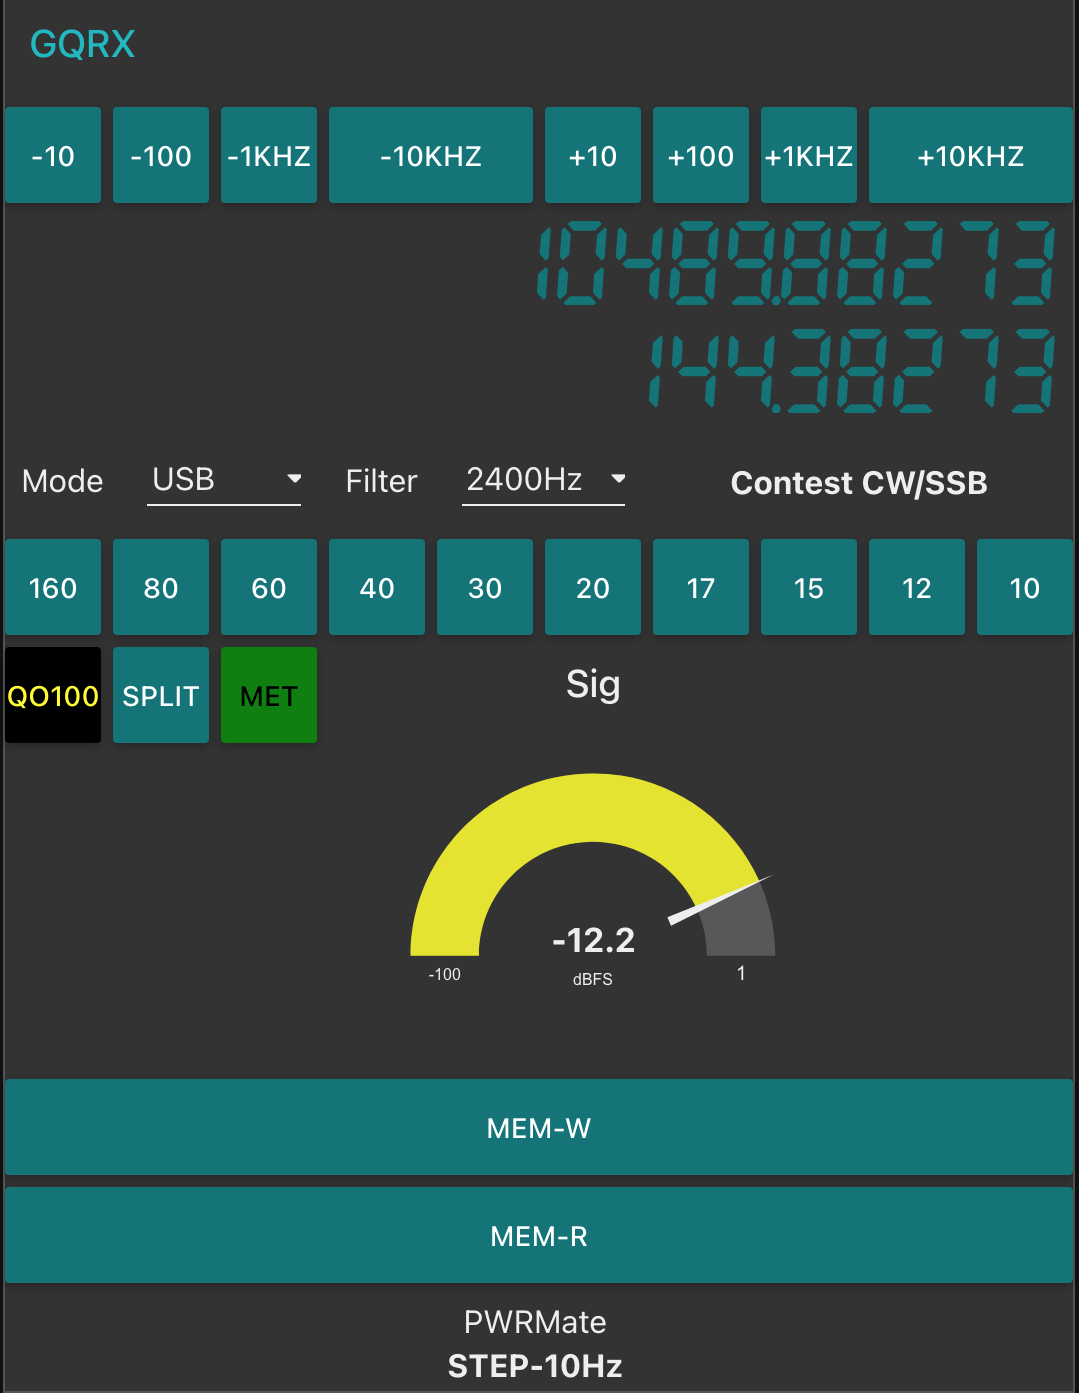
M0AWS QO-100 Dashboard with Powermate Step Display at bottom

As shown above you can see the Powermate Step size at the bottom of the dashboard, this text changes each time the Powermate device is depressed and will set a step size of 1Hz, 10Hz, 100Hz, 1Khz, 10Khz in a round-robin fashion.

The next stage of the build is the 2.4Ghz transmit path. I now have all the necessary hardware and so this part of the build can finally commence.

More soon …