The 5 things that have revolutionised my Radio Shack

The articles I write for the blog are mostly technical but, I thought it was about time that I wrote this article as it’s been buzzing around inside my head for some time now.

So, what are the 5 things that I have found revolutionary in my shack that have brought new, exciting ideas and projects to life making amateur radio more enjoyable.

1: A RaspberryPi Single Board Computer
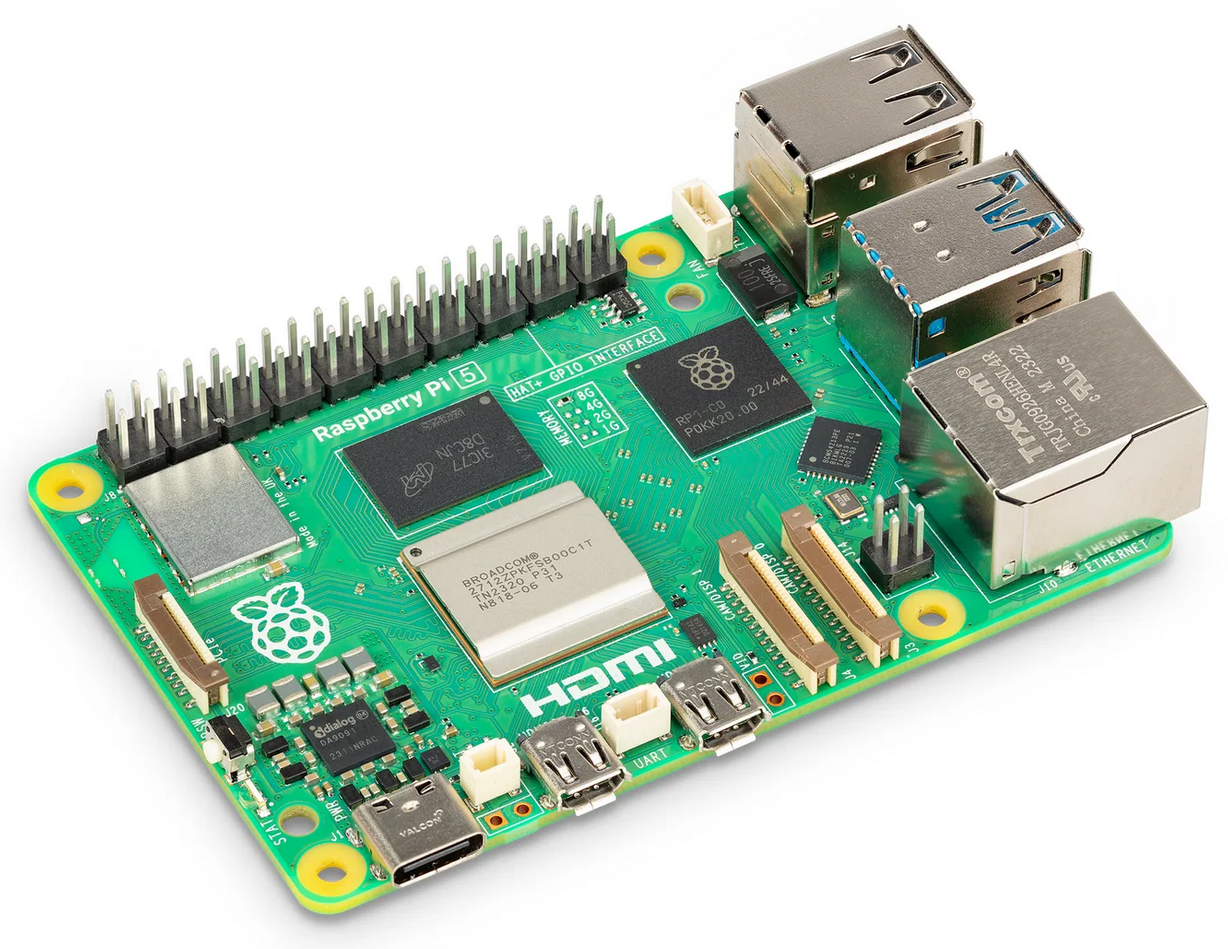
RaspberryPi 5 Single Board Computer

Ever since the first RaspberryPi Single Board Computer (SBC) was released I’ve been a huge fan. This little credit card sized number cruncher has been the base for so many projects, it has to be the first on my list.

The RaspberryPi SBC has been through a few iterations since its initial conception and is now powerful enough to take on most tasks that any radio HAM is going to throw at it.

So, what have I done with them?

Well I’ve used them to run Node-Red services for my many web app dashboards that control things like my QO-100 Satellite Ground Station, UPS power monitoring, Internet speed graphs, server and virtual machine monitoring, AllStarLink nodes, hosting websites, building an SDR shortwave receiver, running HAM Clock / Open HAM Clock, developing my own software, hosting virtual machines and a whole host of other fun and interesting things. I’m even writing this article using my RaspberryPi 500+ computer that is my daily desktop PC.

There are an endless number of things you can do with a RaspberryPi to bring new life and functionality to your radio hobby.

Want to get into Amateur TV?
Want to decode digital modes real time?
Want to track aircraft in the sky real time on a virtual radar screen?
Want to search the shortwave bands for stations of interest?
Want to host your own blog and website?

All these things and a lot more are easily within reach with a RaspberryPi.

The RaspberryPi is only limited by your imagination, the more imaginative you are the more your number crunching little friend will do.

2: A 3D Printer
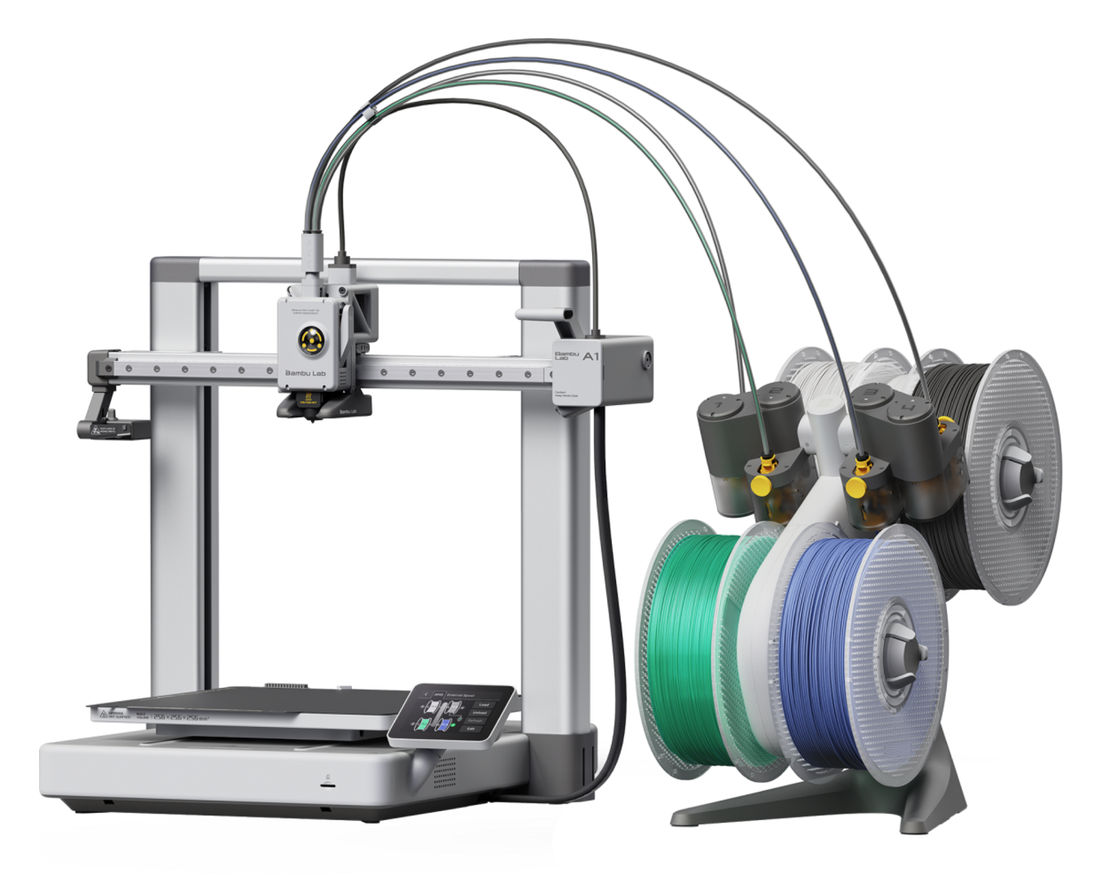
Bambu Lab A1 Combo 3D Printer

Every HAM should have a 3D printer. These manufacturing marvels bring a new level of quality, design and simplicity to your HAM radio projects. I’ve found it incredibly useful since venturing into the rabbit hole that is 3D printing. When I think back to the weeks and months of my life I’ve spent making cabinets and boxes out of sheet metal, aluminium or wood for the numerous projects I’ve built over the years, a 3D printer would had made my life so much easier. 3D printing has revolutionised the making of things for the Amateur Radio home brewer.

There’s a multitude of useful things on websites like Printables, Thingiverse , Makerworld and others where you can just download the files and print high quality designs for all those things you’ve wanted to do but, don’t have the time or inclination to craft by hand.

The real satisfaction with 3D printing comes from designing your own things and making them. My first project was to design and print a fan cooling system for my Xiegu XPA125B amplifier.

From the factory the amp is passively cooled and doesn’t take long for the heat-sink to become saturated resulting in a high operating temperature. I was never happy with this and so was determined to resolve the problem.

Getting to grips with TinkerCAD was a bit of a vertical learning curve but, after a few mistakes and design mishaps I soon had it under my belt and pressed on with designing the cooler unit.
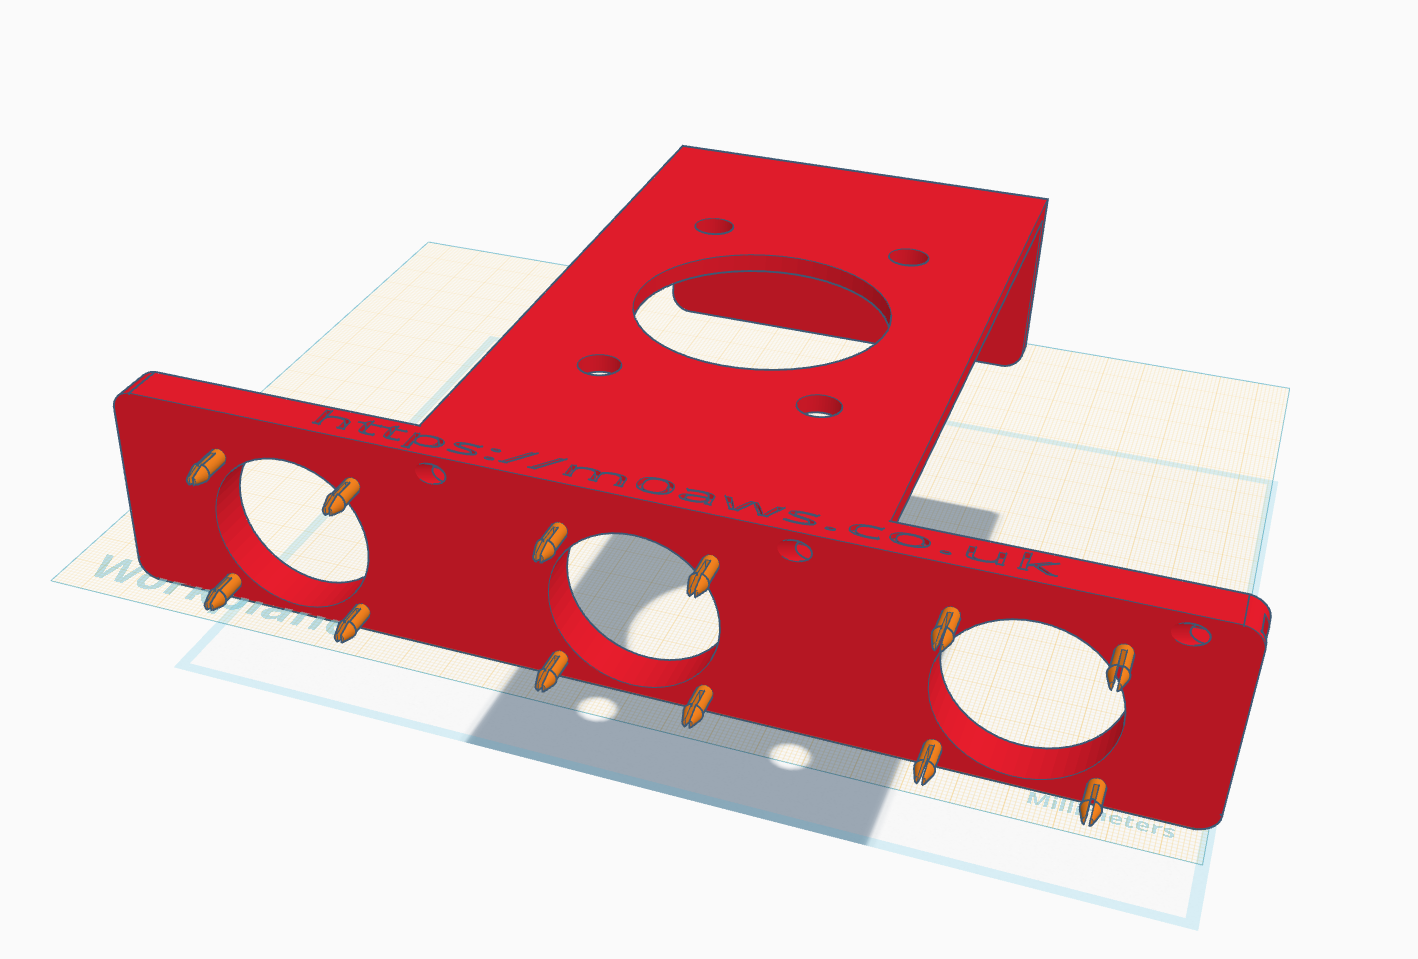
Designing the Xiegu XPA125b cooling system using tinkerCAD.

It’s not until you start designing and manufacturing things that you suddenly realise how much effort goes into them but, I persevered and over the period of about a week or so I had a perfectly fitting, operational cooling system that kept the amp super cool regardless of how long I waffled on for on the HF bands.

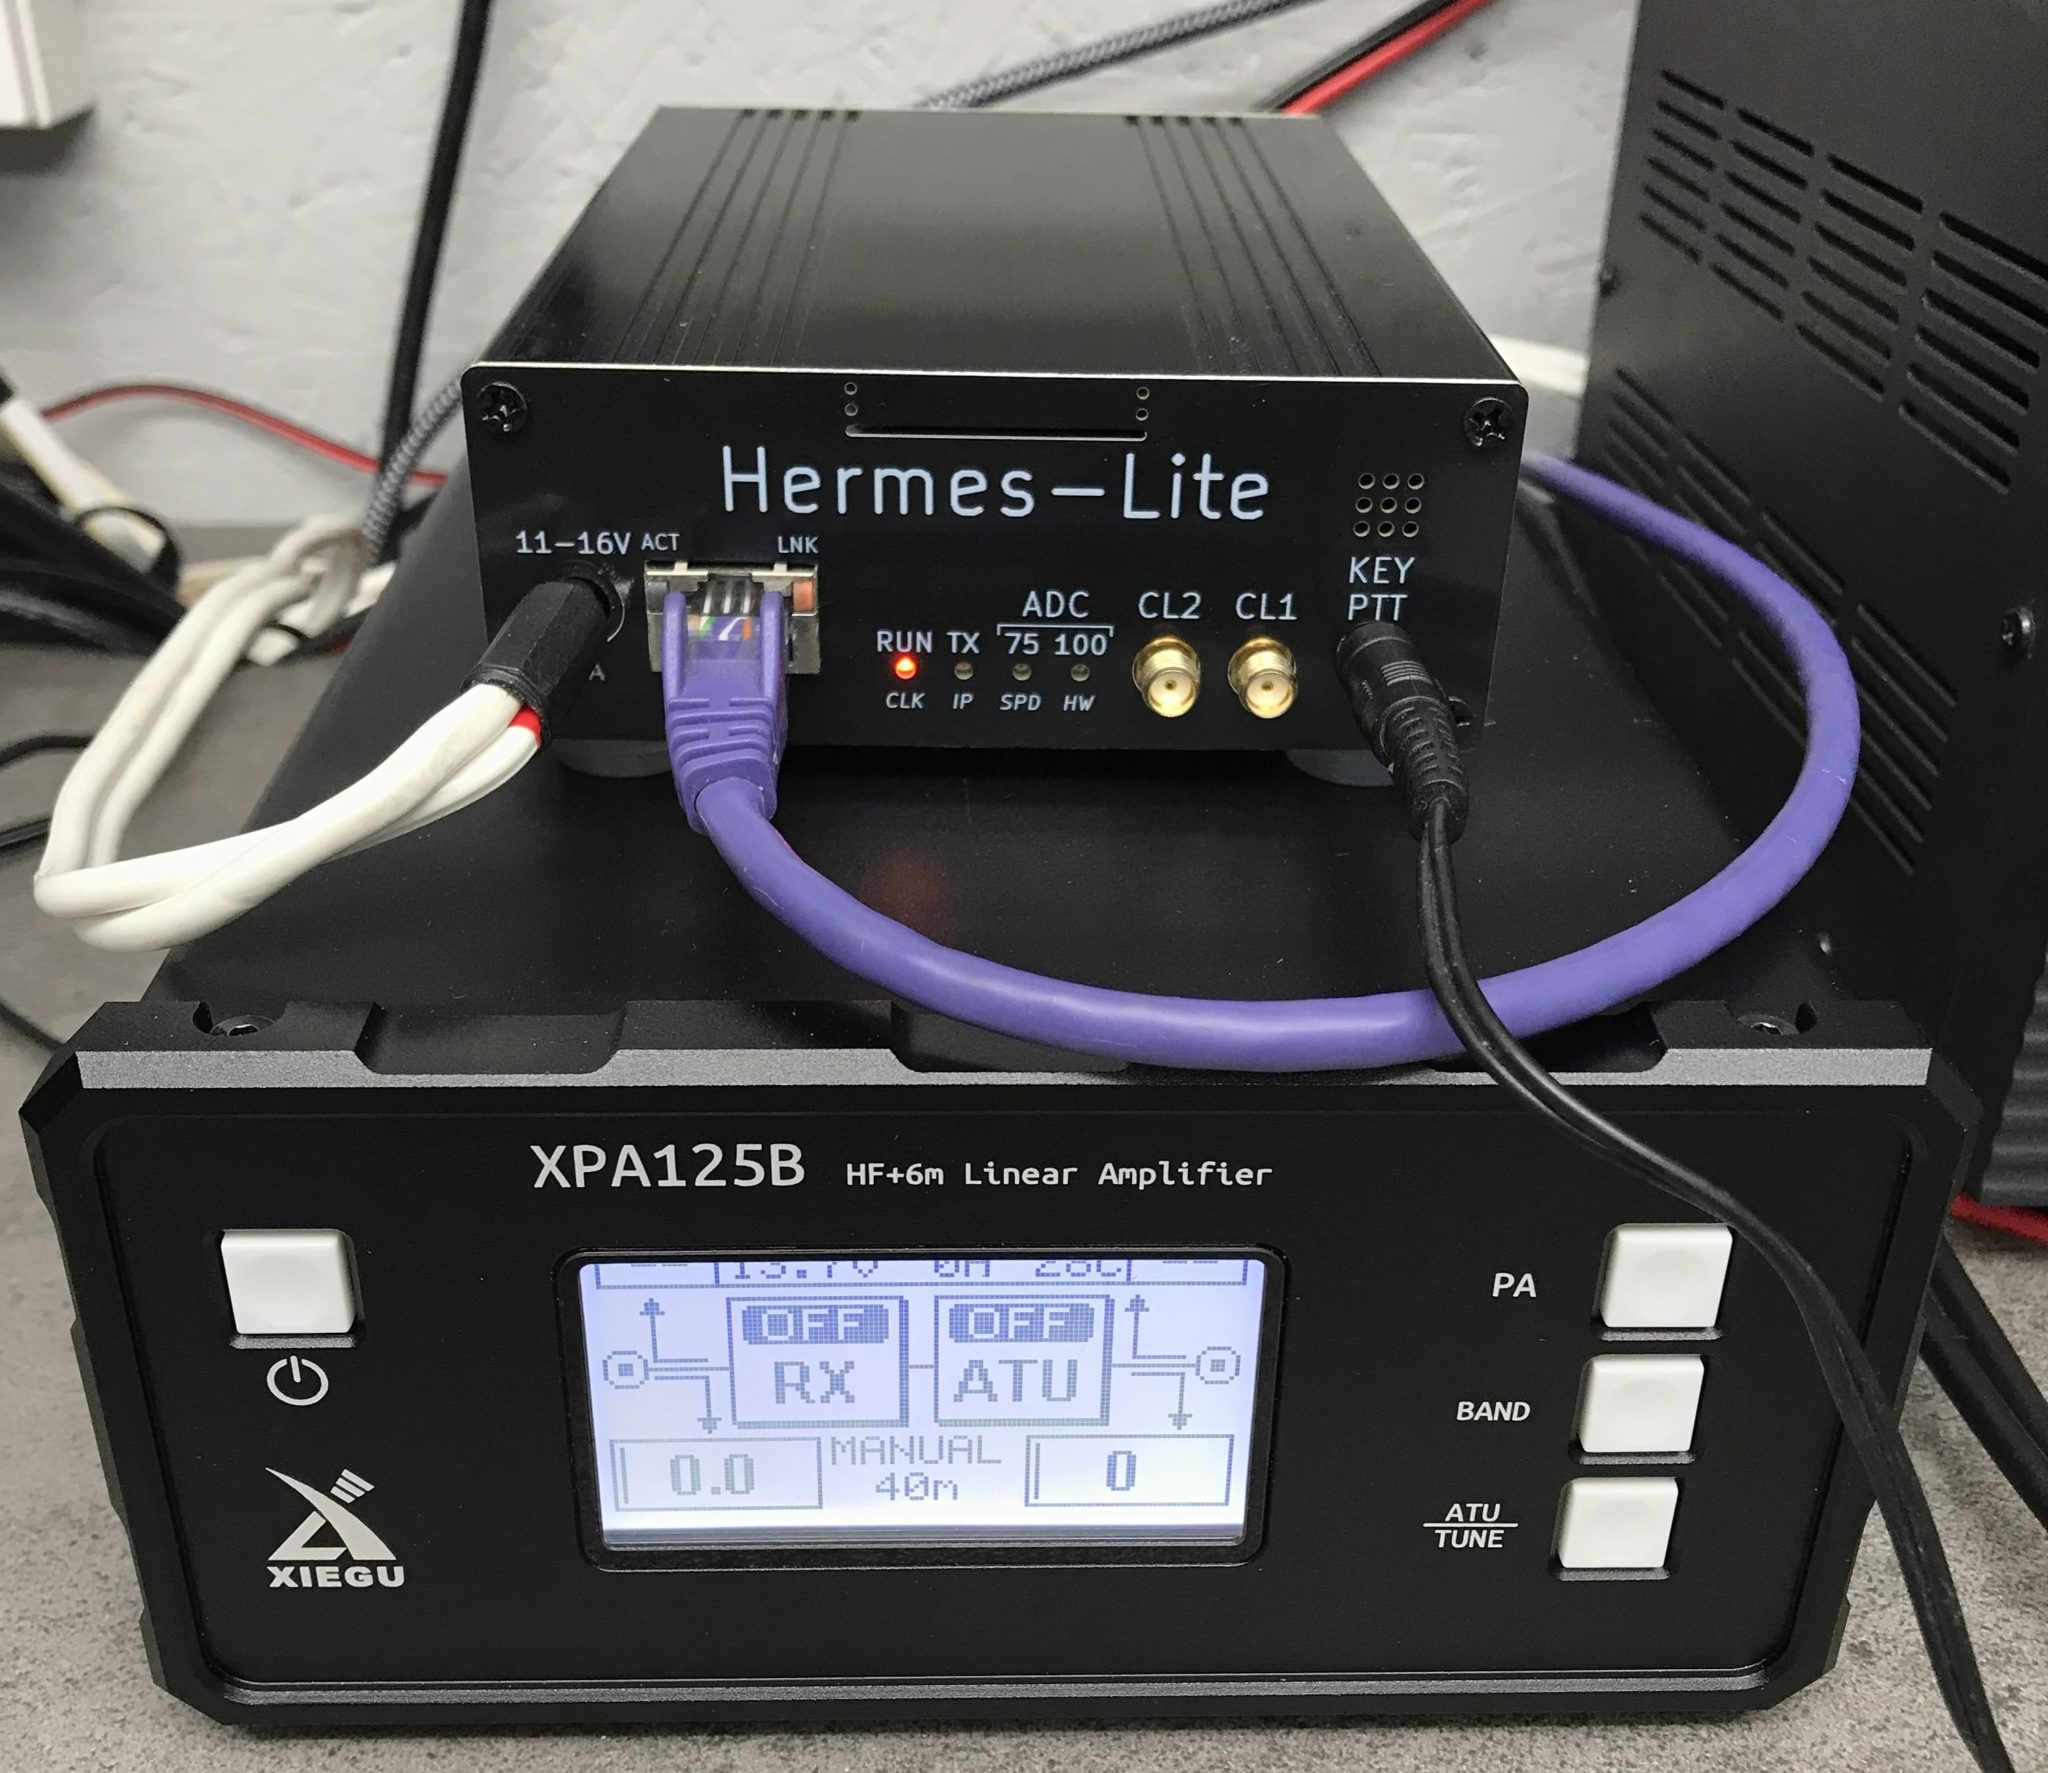
Once you’ve got your first design made you suddenly find yourself wanting to improve it and add things. In my case this was adding a Hermes Lite 2 holder to the top of the amp cooler and then a top shelf to hold my cross needle SWR and power meter.

Since then I’ve progressed massively with my designs and have even designed and printed things for other HAMs and family members, it’s totally addictive!

I can highly recommend the Bambu Lab A1 Combo (As shown above). It’s a quality piece of equipment that has operated faultlessly since purchase. Right now it’s printing a case for my RaspberryPi 4, just one of the many projects I’ve used it for since becoming a happy owner.
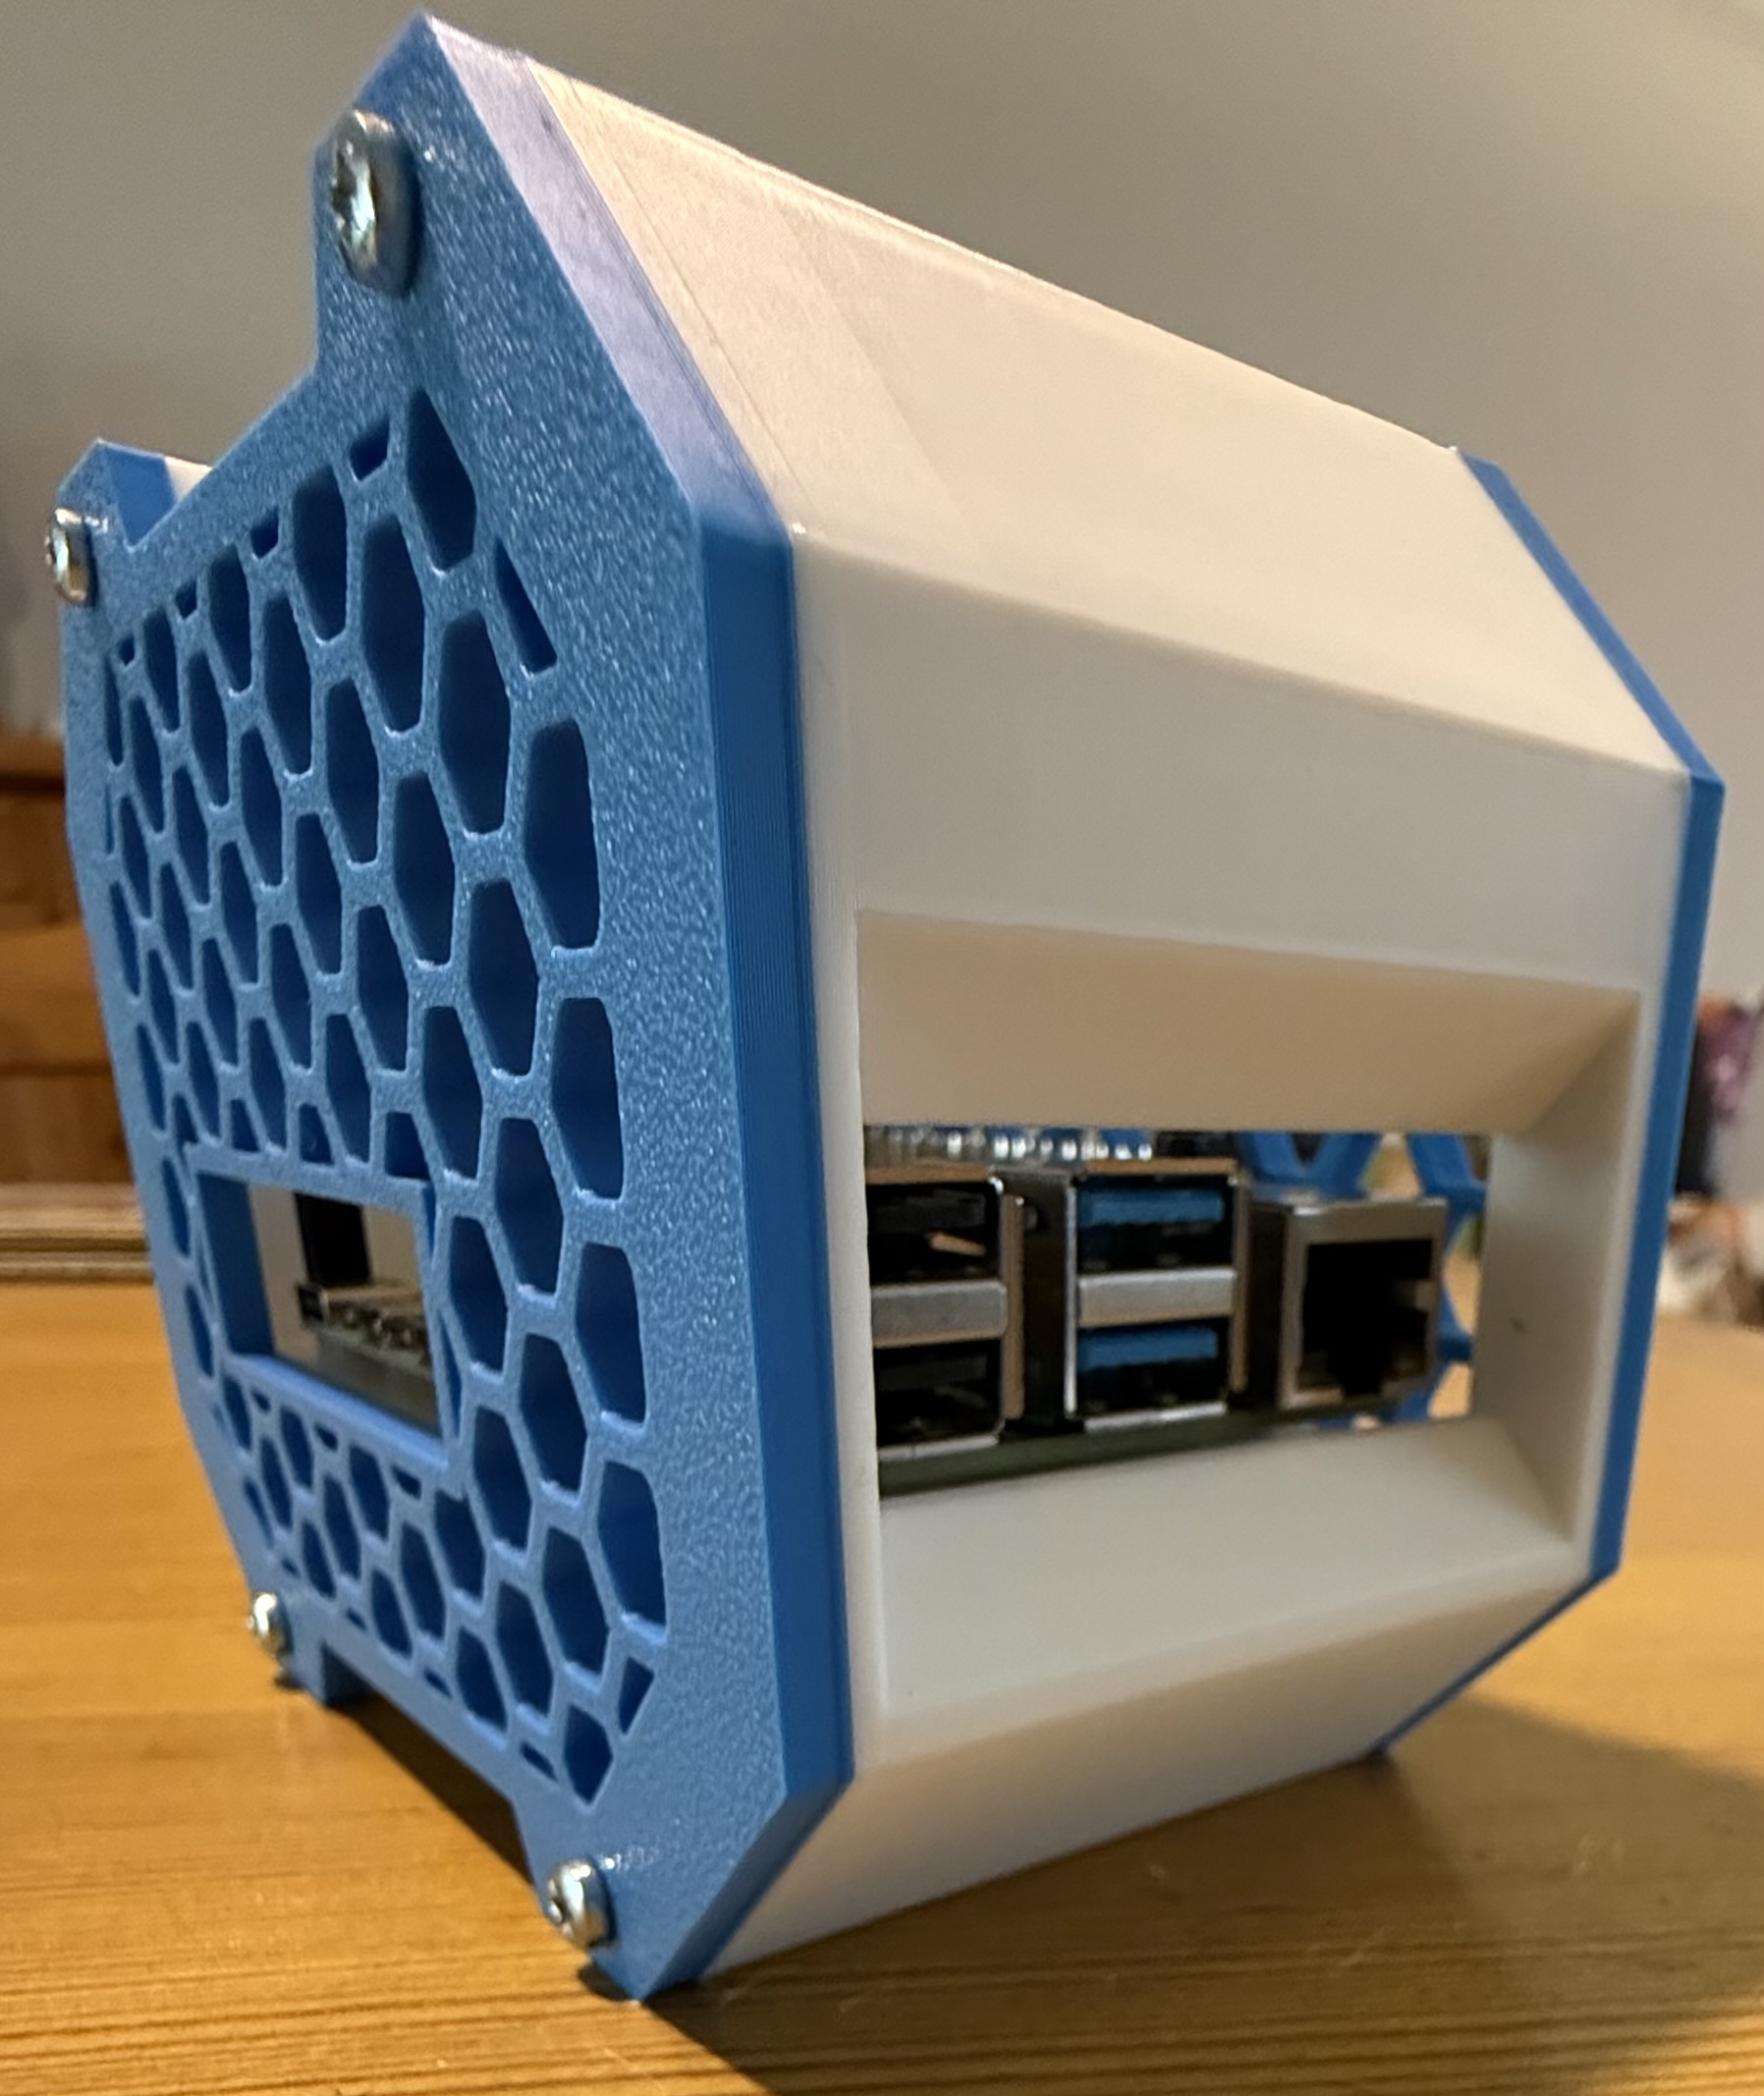
RaspberryPi 4 case from printables.com

Go on, release your inner creativity and treat yourself to a 3D printer, you won’t regret it and it’ll help you bring to life all of those radio projects you’ve dreamt of doing but, never got round to starting.

3: An AllStarLink Node
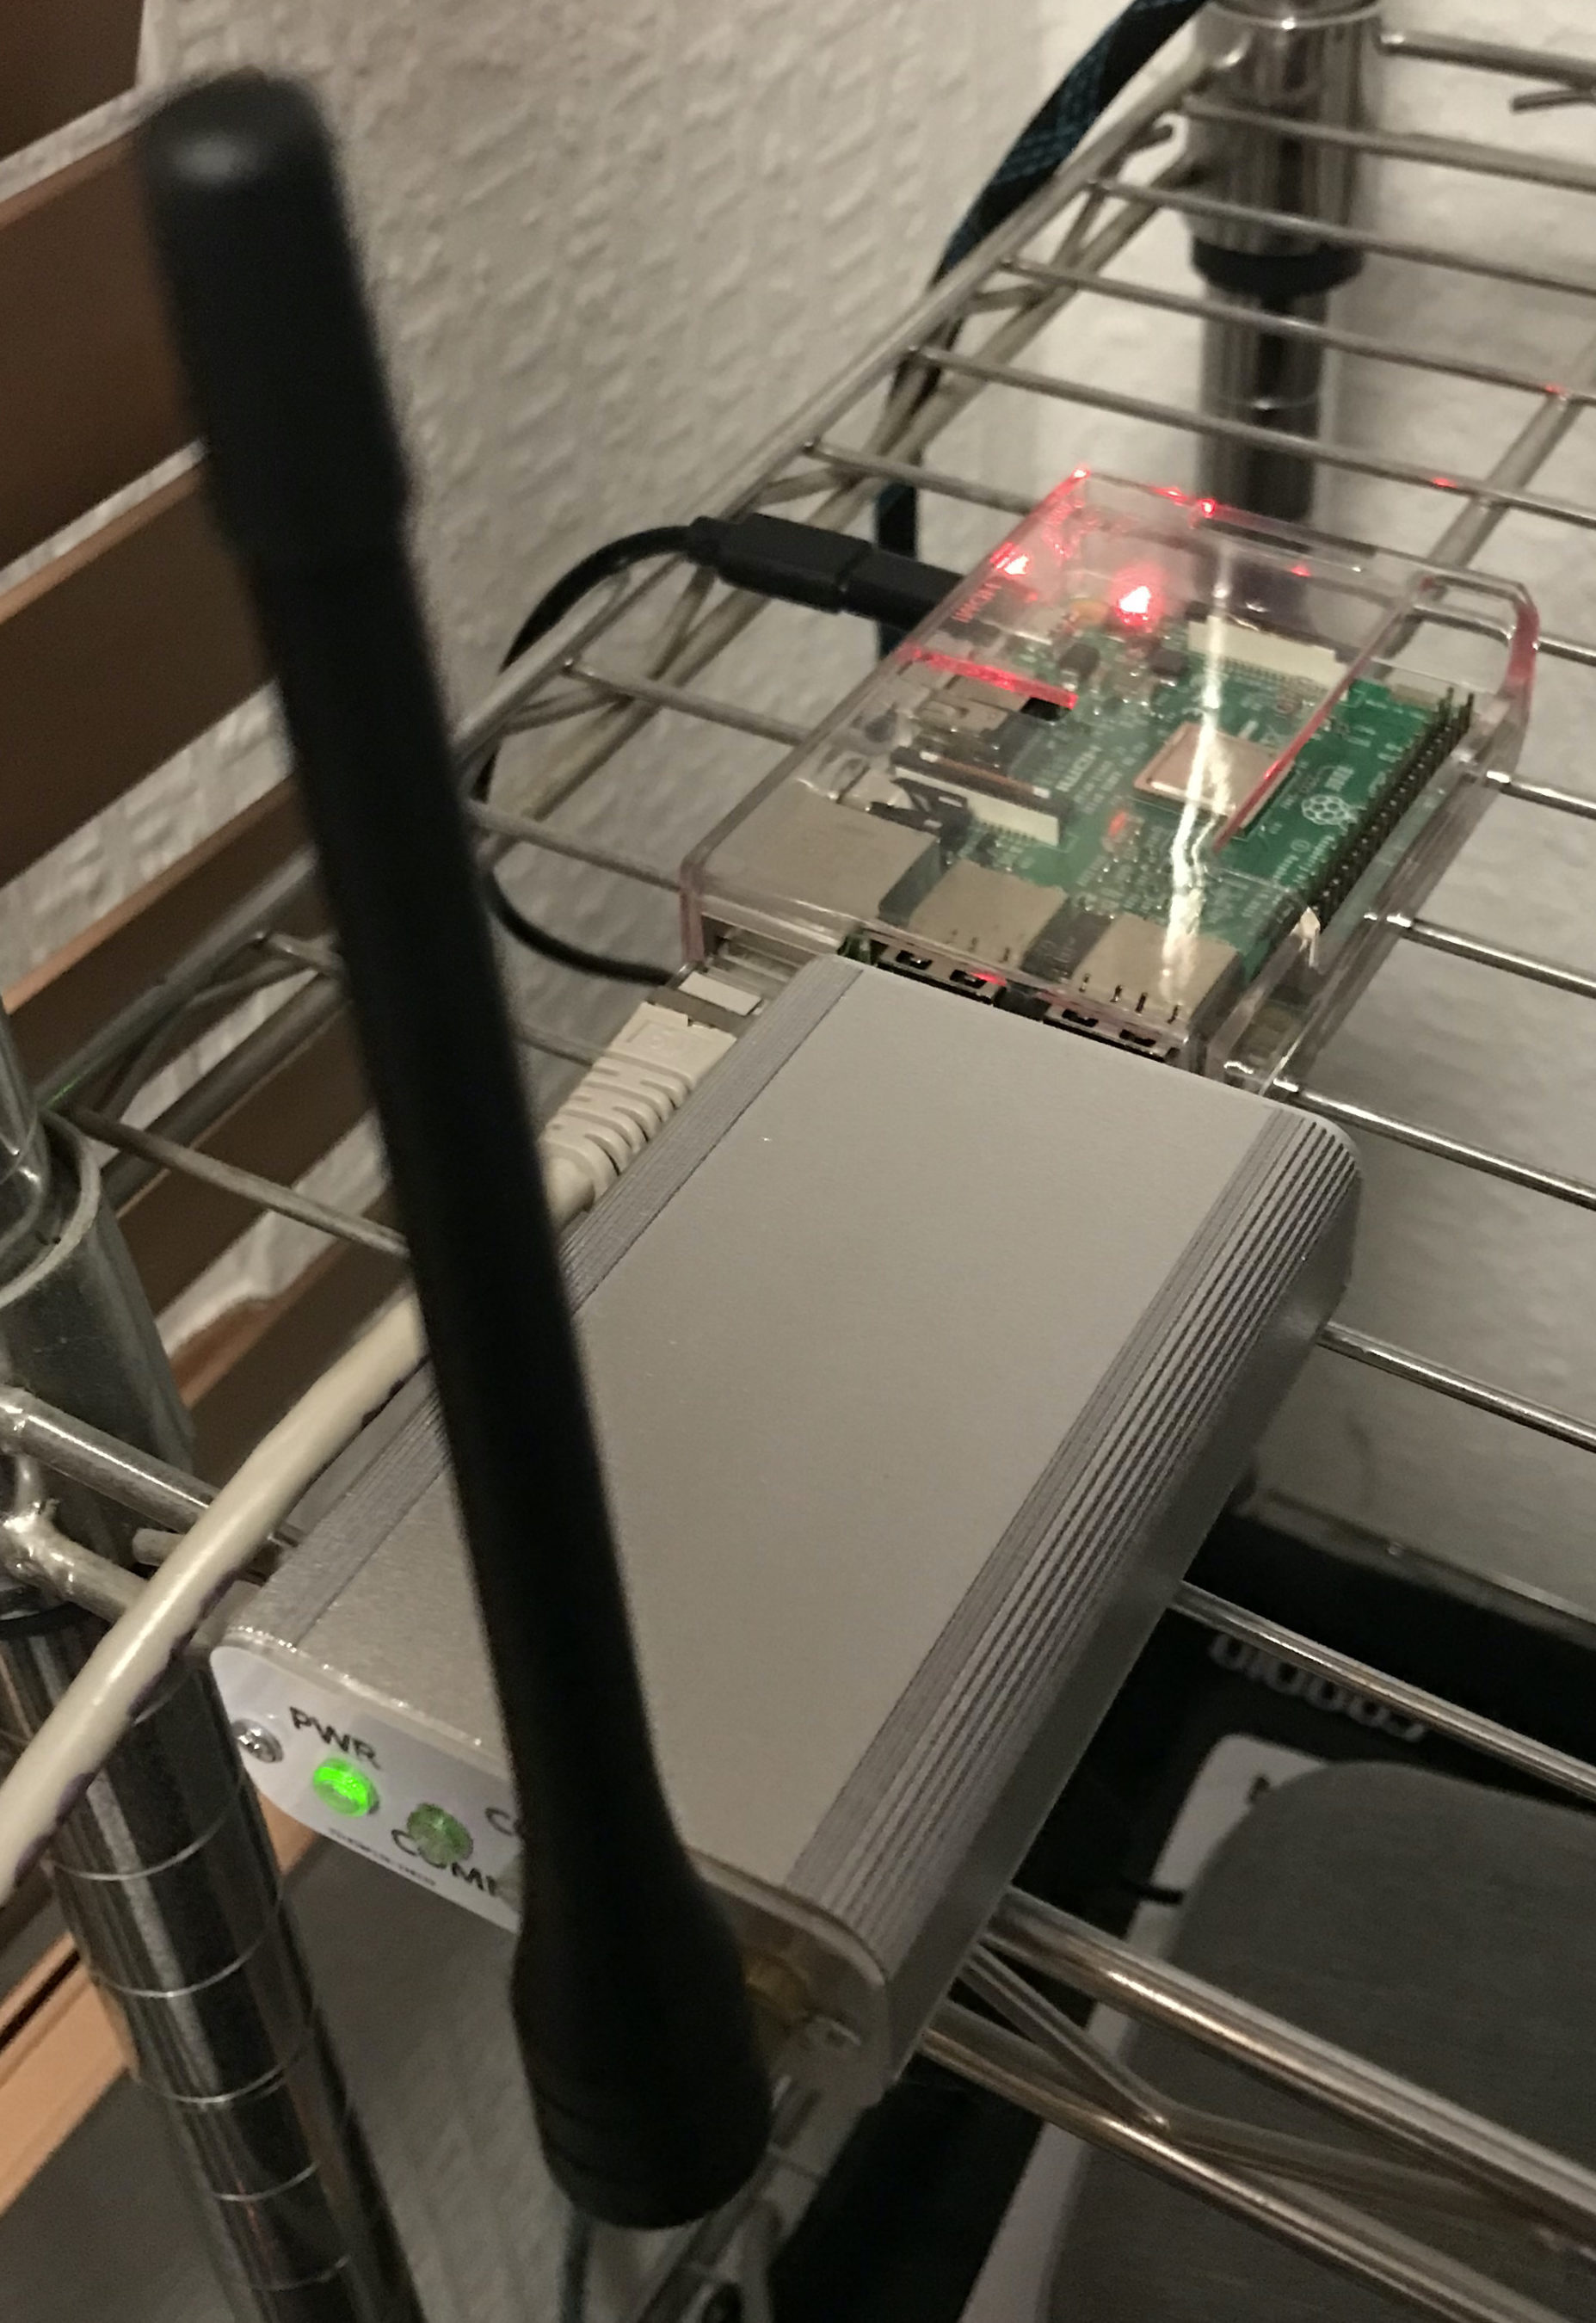
M0AW AllStarLink Node 61928 sitting on the equipment rack

Many people say that using VOIP over the internet isn’t real radio, I know because I used to be one of those people however, it has become an invaluable resource for keeping in touch with people all over the world.

Being part of an online HAM Radio Community it’s important that as a group we are able to talk to each other regardless of where we live, what bands we have access to and whether there is any propagation.

The AllStarLink (ASL) network gives global FM quality audio no matter where you are in the world. We use it daily for our breakfast net, general chatter throughout the day and even hold a weekly Matrix ASL Net on a Thursday evening.

Using our VHF/UHF handhelds (Real Radios!) and an easy to make AllStarLink Node we’re able to join in with the conversation regardless of propagation, licence type or distance, it really is great for bringing people together.

With devices like the SHARI and AIOC board now being readily available for minimal cost it really is very easy to get onto the AllStarLink network and talk to people even if you live in an antenna restricted location.

Why be alone when you can use the Matrix ASL node ( 642332 ) and join in the conversation.

4: Node-Red

M0AWS - Updated NodeRed QO-100 Dashboard with PTT button
M0AWS – Updated NodeRed QO-100 Dashboard with PTT button

Node-Red is a low-code programming tool for event-driven applications.

Node-RED’s goal is to enable anyone to build applications that collect, transform and visualise their data; building flows that can automate their world. Its low-code nature makes it accessible to users of any background, whether for home automation, industrial control systems or anything in between.

I’ve been using Node-Red for a number of years now and have developed a suite of web app’s that control and monitor just about every aspect of my Amateur Radio hobby and IT infrastructure.

Node-Red forms an integral part of my QO-100 Satellite Ground Station providing control of both the uplink and down link radios whilst synchronising the VFO’s, controlling filter selection and more, all from one simple to use interface using nothing more than a web browser.

It doesn’t stop there, my AllStarLink (ASL) nodes are also managed through a user friendly Node-Red Dashboard that removes all the need for technical know how and makes ASL node management as simple as clicking on a button to connect or disconnect to the many global networks.

Much of this functionality is achieved without writing a single line of code. If you can use a mouse, drag and drop objects on the screen you can develop Node-Red web app’s, it really is that easy.

M0AWS Interactive Log Flow

It doesn’t end there, Node-Red is great for presenting data in easy to digest formats.

Whether it be HAM Radio Log data presented on an interactive world map or monitoring of your server, RaspberryPi, virtual machine or UPS using gauges and graphs, this can all be achieved easily with nothing more than a mouse. There’s no need to spend hours writing thousands of lines of code, just drag and drop a few nodes onto the screen and join them up. You’ll be amazed how easy it is.
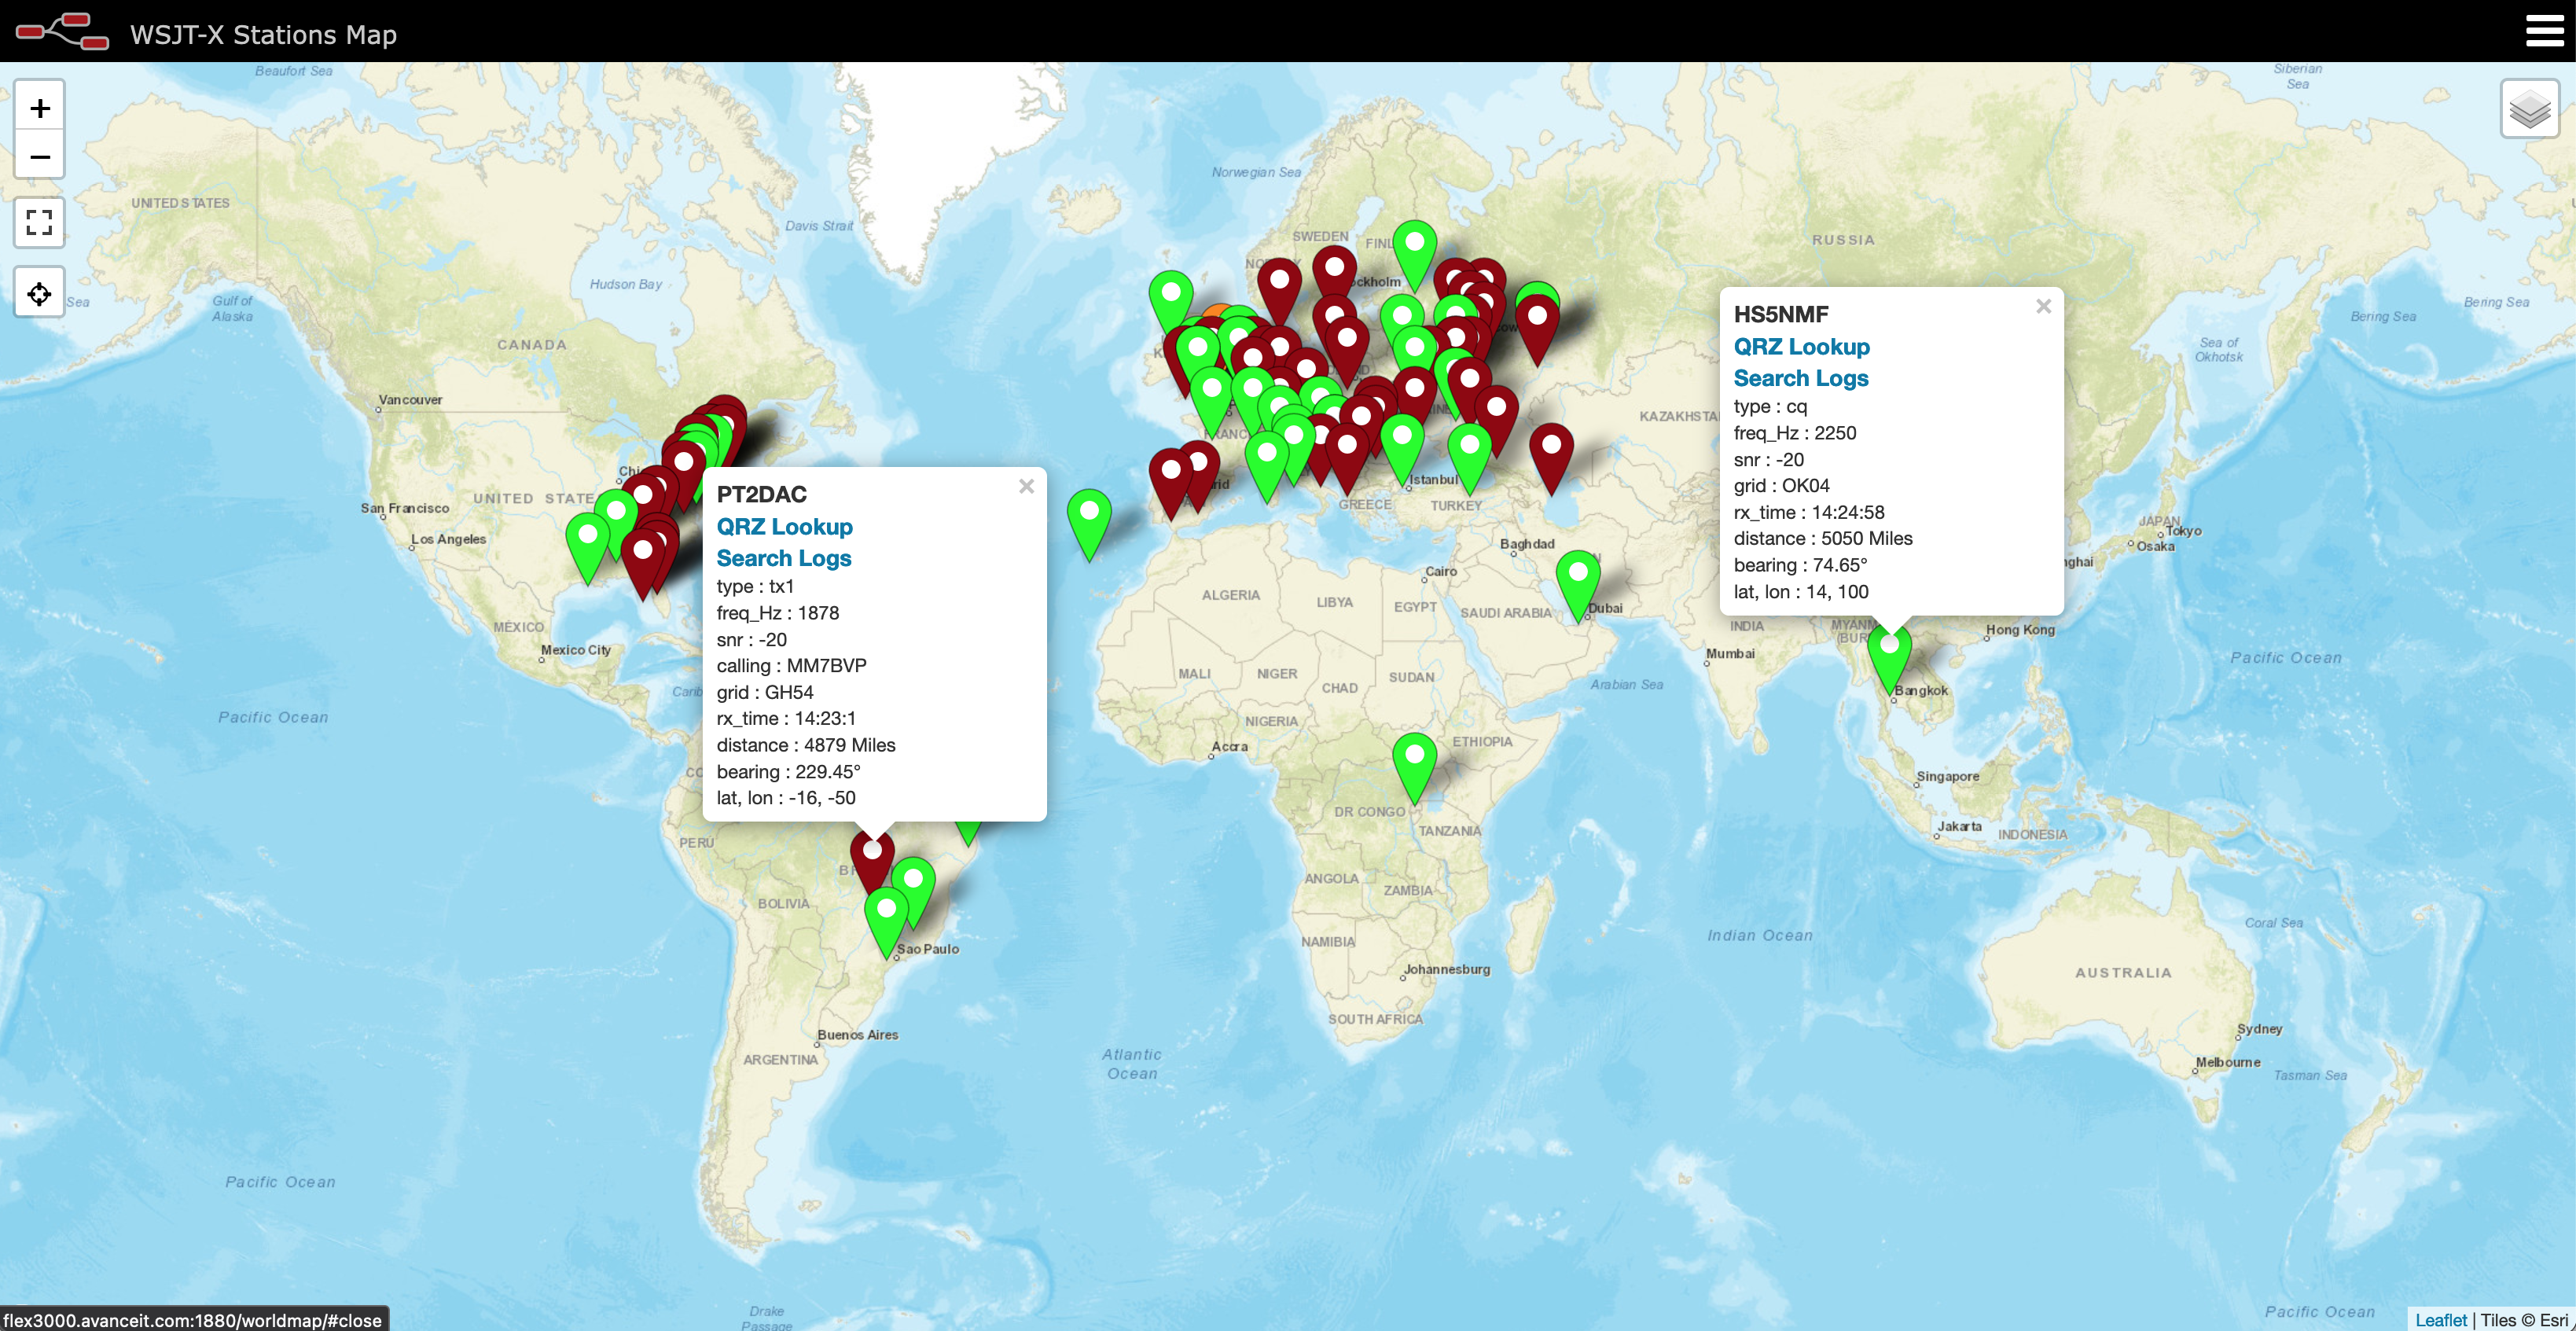
I believe every Amateur Radio enthusiast should have Node-Red available in their radio shack. It’s easy to install on your RaspberryPi 4 or 5, Linux or Windows PC and Apple Mac with the same great functionality available on all platforms.

Once you’ve developed your first web app you’ll suddenly find a million more ideas will come into your head and before you know it, you’ll be where I am today with Node-Red at the centre of your radio hobby.

5: A Hermes Lite 2 HF SDR Transceiver

For years I used black box HF radios from the big 3 manufacturers along with the odd radio from the smaller enterprises like TenTec but, they all had their foibles and there was often nothing I could do about it.

My last acquisition from the big 3 was a Yaesu FTDX10, a competent hybrid SDR radio with a good receiver however, the menu system is terrible, the button layout not much better and the user experience not as good as it could be. Of course the software is closed source so there is nothing you can do about it. The radio did its job but, it wasn’t fun to use, it wasn’t what I really wanted and it didn’t put a smile on my face.

I looked at moving to software defined radios (SDR) but, with prices in the many thousands of pounds bracket and the software being closed source I came to the conclusion that they wouldn’t give me what I really wanted either.

So what was it that I was searching for?

Thinking long and hard about it I came to the conclusion that what I really wanted was a radio that gave me the same satisfaction that OpenSource software has given me for decades, namely an HF radio that I have complete control over, from the hardware through to the software and everything in between.

I wanted something that I could tailor to my exact needs. Something that was built using open hardware and open software, something where if I wasn’t happy with it I could change it, improve it and do the things I wanted with it.

At this point my search for the ideal radio headed in a completely different direction.
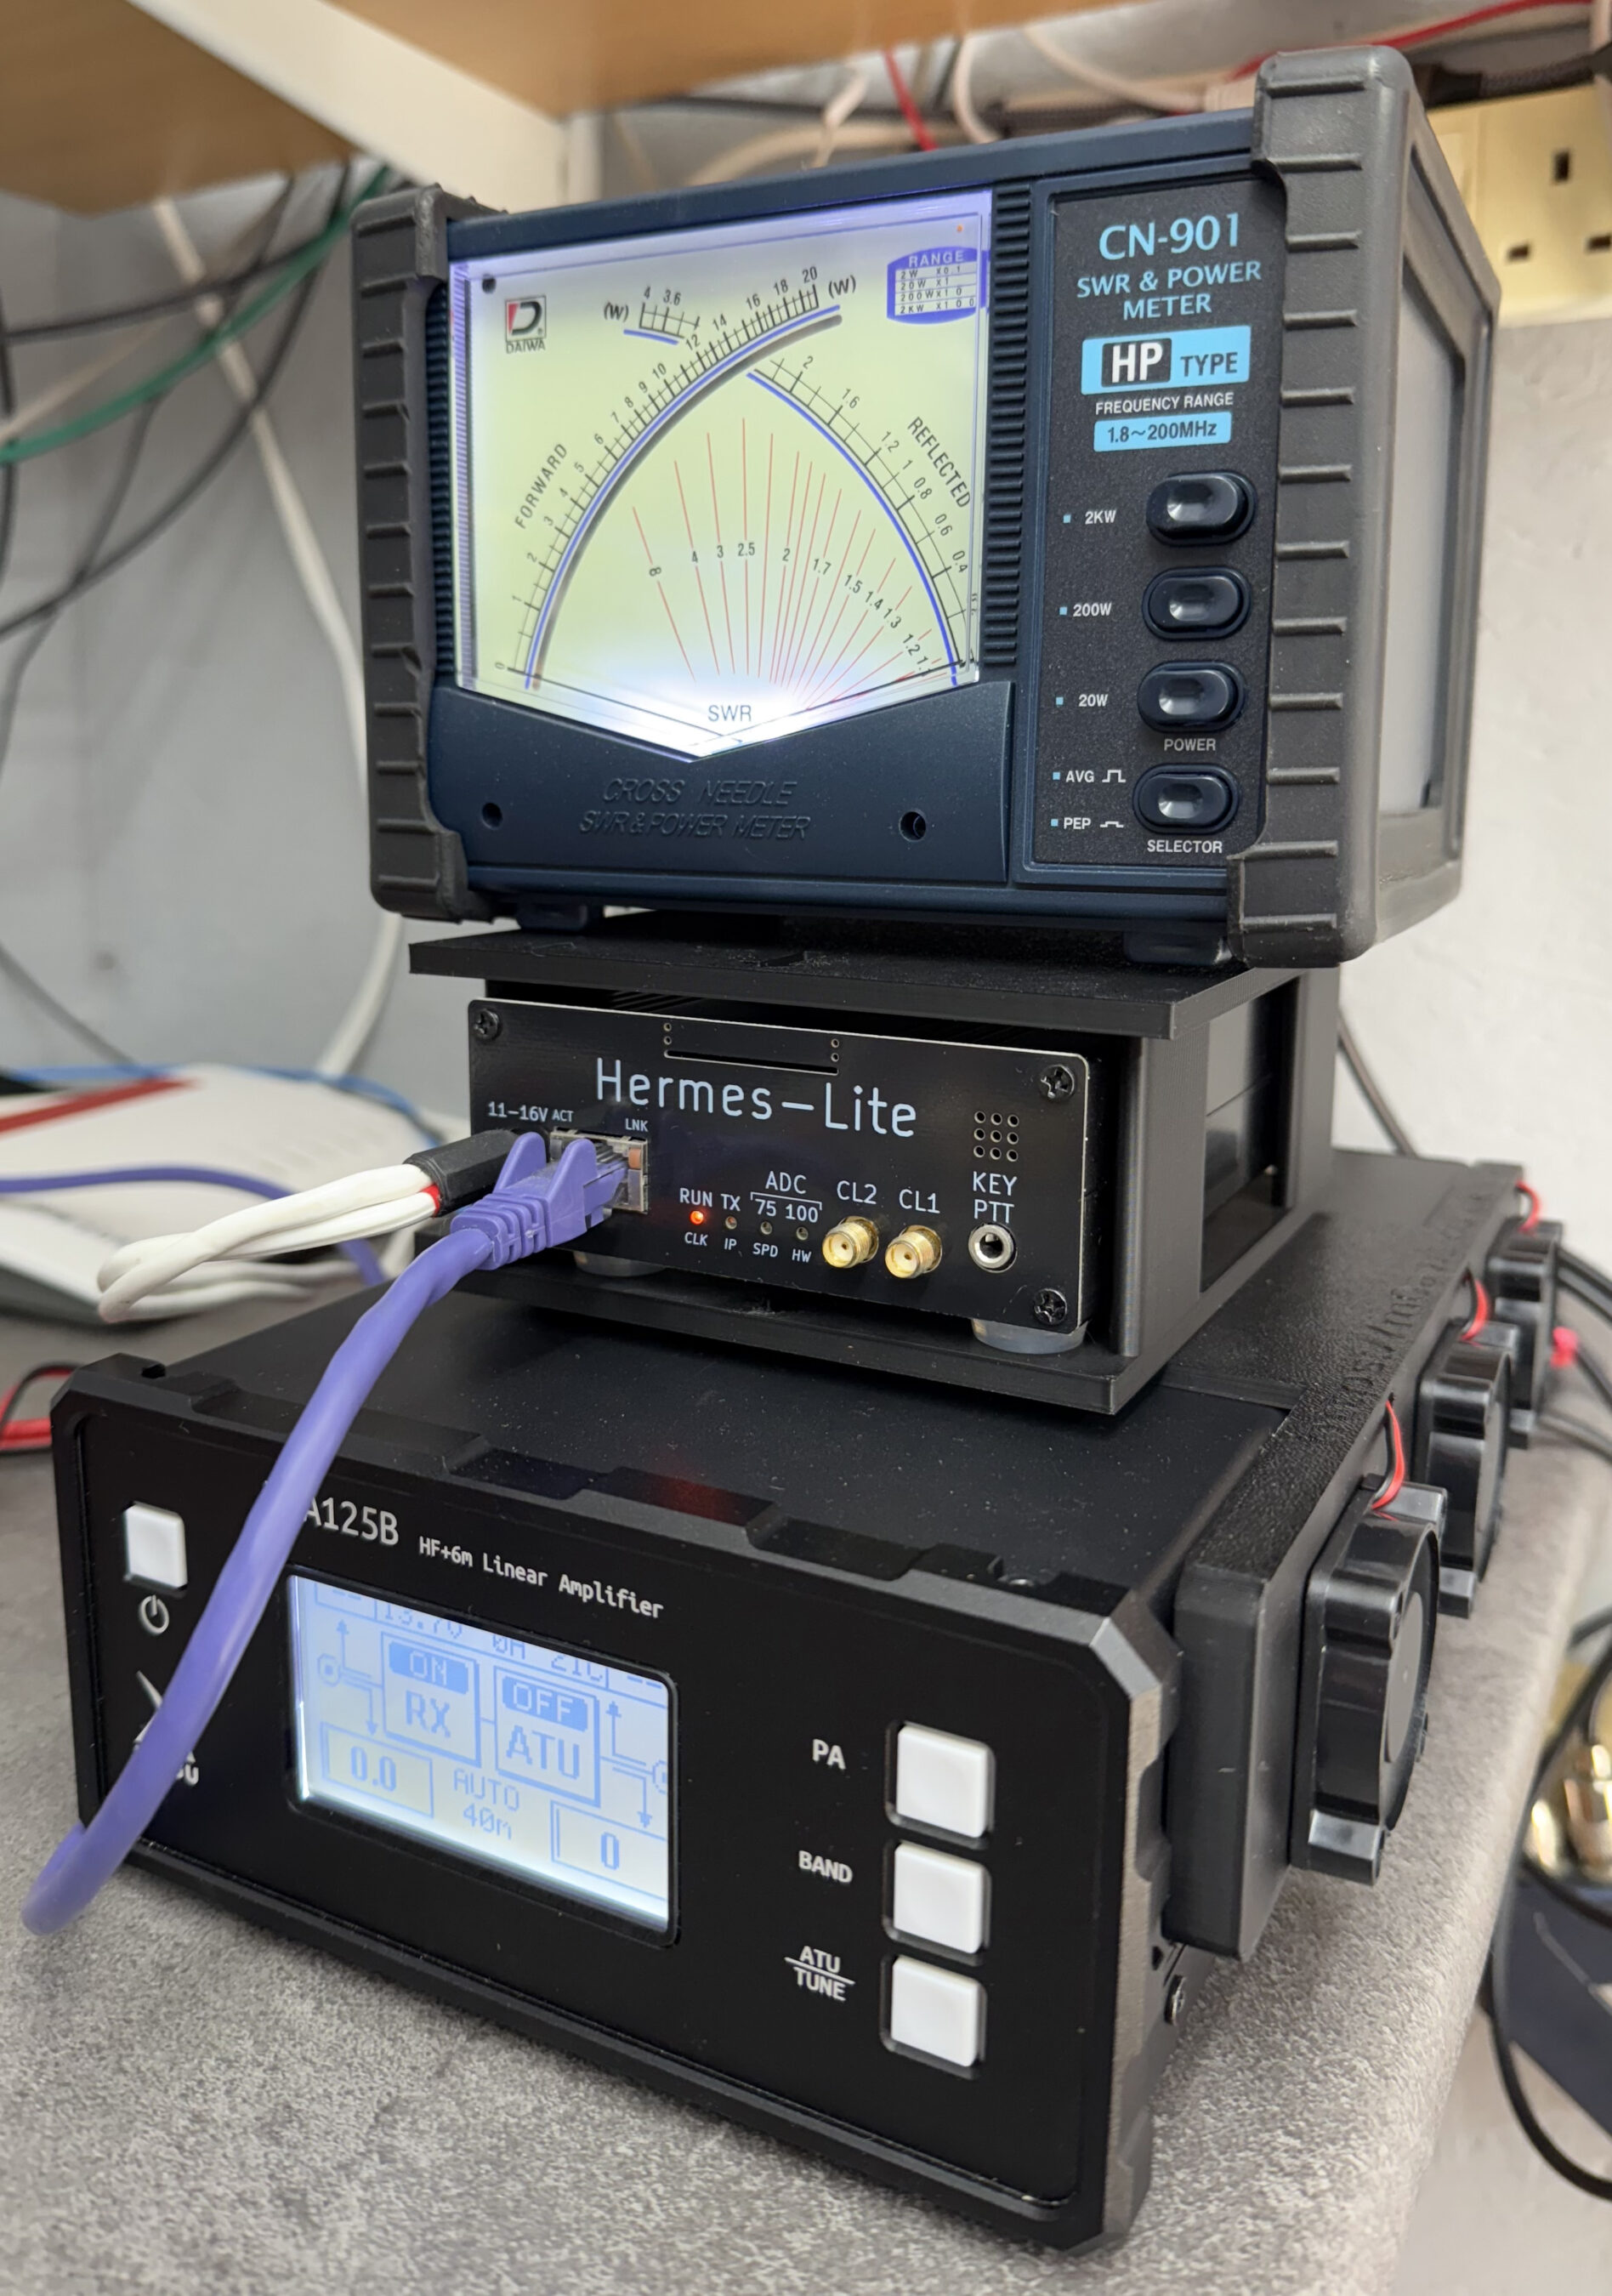
Xiegu XPA125b Cooler with Hermes Lite 2 cradle - front view
Xiegu XPA125b Cooler with Hermes Lite 2 cradle – front view

The Hermes Lite 2 SDR HF Transceiver (HL2) has been around for a number of years. I was first introduced to it by Michael, DK1MI and then Roger, G8VLR via the Matrix. Both Michael and Roger use the HL2 on a regular basis and have often waxed lyrical about how good it is.

Being designed by radio amateurs for radio amateurs it’s based on an open architecture from the ground up. Being an OpenSource junky this really appealed to me and as I looked deeper into it from both a hardware and software point of view I soon realised that it had the potential to be exactly what I was looking for.

It wasn’t long before I found myself on the Makerfabs website placing an order for the HL2 mainboard, filter board, I/O board and case. A couple of weeks later it arrived and I dived head first into the SDR rabbit hole.

2 years later and the HL2 has become my main HF radio in the shack. Partnered with a Xiegu XPA125B amplifier and PiHPSDR software running on my Kubuntu Linux PC it is everything I have been looking for in an HF radio.

I’ve made modifications to the software to suit my operating style and needs with the user interface being exactly how I want it, no unnecessary buttons or knobs, just the controls that I use on a daily basis cleanly placed in a logical, easy to use layout, the way I want it.

My understanding of software defined radio and how it works has improved a hundred fold. Having access to the software and being able to go through the code and understand the architecture has been an interesting journey and one that has enhanced my radio enjoyment considerably. I now have a smile on my face every time I go on air.

Do I miss the FTDX10?

No, not in the slightest!

So, those are the 5 things that I feel have revolutionised my radio amateur hobby and made it a more enjoyable experience. I’m sure over time I will add to this list as I venture down future rabbit holes in our wonderful radio hobby.

More soon …

Xiegu XPA125B Amplifier Cooler 3D Print File

Some time back I designed and 3D printed a 3 fan cooler for my Xiegu XPA125B HF amplifier that stops the heat-sink from becoming heat saturated.

Having printed this for Steve, M0XVT and myself we’ve thoroughly tested it and found that it greatly reduces the temperature of the amp during operation.

I’ve now decided to make the .STL file available for download so that those who have their own 3D printer can print their own cooler for the amp.

The 40x40x10mm 12v fans that fit onto the mounts on the cooler module can be obtained from Amazon. (Note: Originally they came in packs of 4)

I’m happy to print this for people who don’t have a 3D printer of their own, please contact me via email for a price.

For those who have their own 3D printer, the .STL file is available below for download.

Please note that I am releasing this STL file into the public domain for non-commercial, personal use only.


More soon …

Xiegu XPA125B Button Press

For some time now I’ve been using my Xiegu XPA125B amplifier with my Hermes Lite 2 + I/O board combo with great success. With the amp changing bands automatically it really is nice to use.

With the multitude of remote controlled smart plugs available today I’ve now got the ability to switch the station on remotely however, there’s been one issue that has plagued me until now and that’s the Xiegu amp doesn’t come on when power is applied to it, you have to press the power button on the front of the amp before it will fire up.

This of course stops me from being able to fully use the station remotely as there’s no one there to press the power button on the amp, until now.

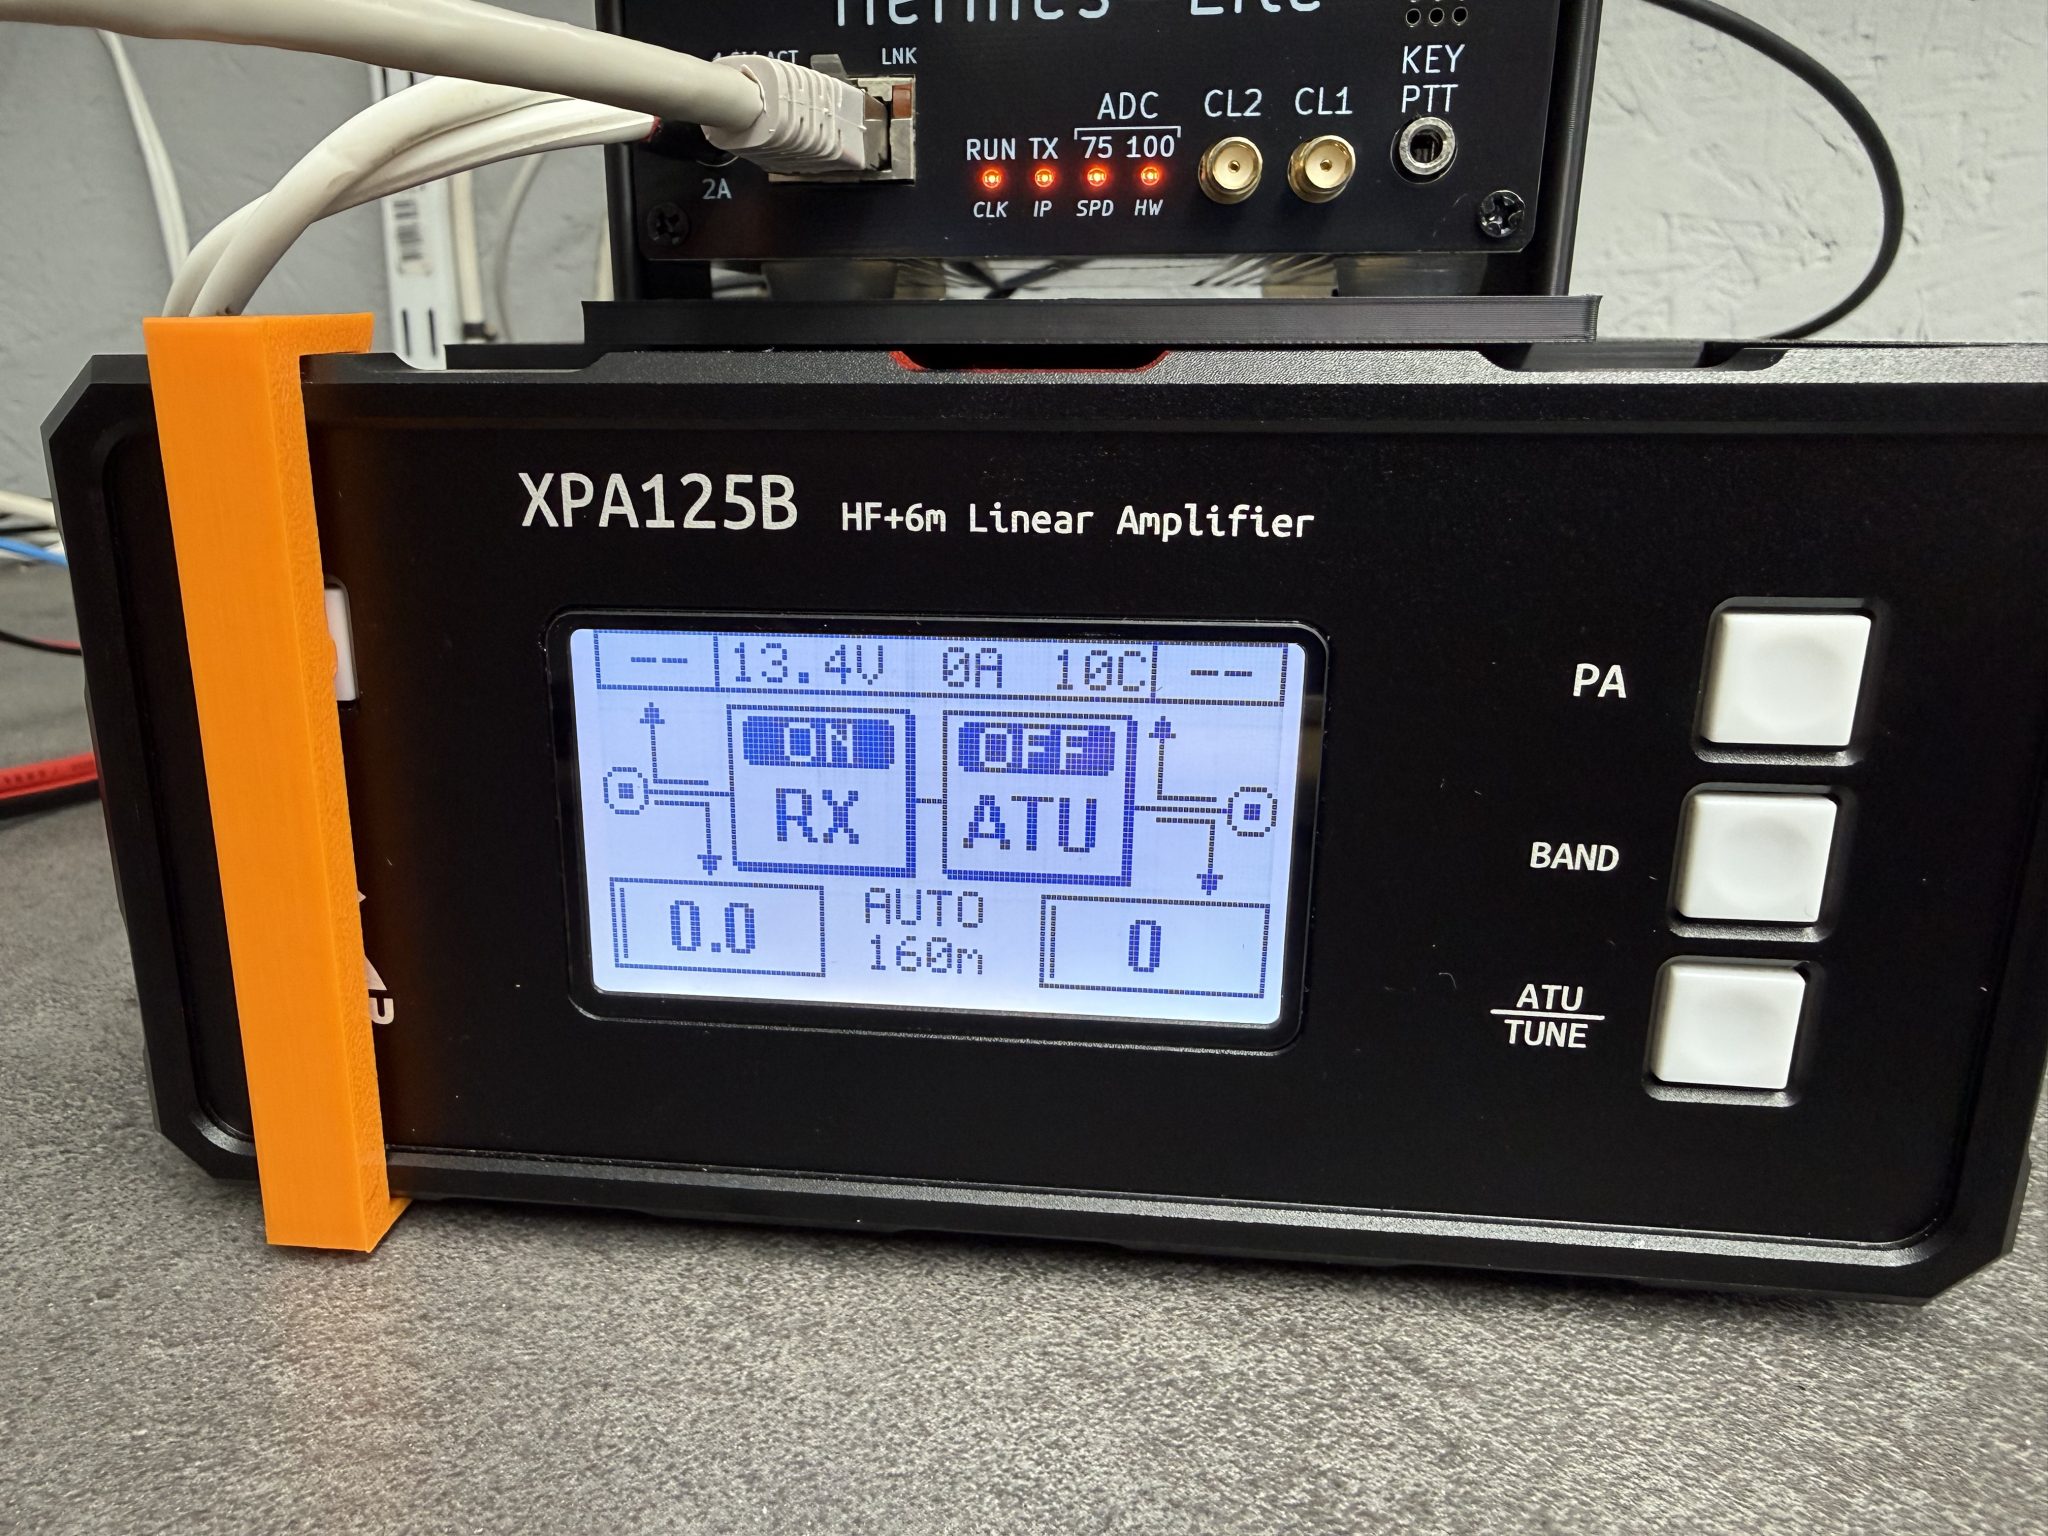
Chatting with Steve, M0XVT he discovered that if the power button is held pressed all the time the amp will come on when power is applied. This then gave me the idea of designing a button press device that I could 3D print and clip onto the front of the amp so that the button is always pressed.

M0AWS Xiegu XPA125B Clip on Power Button Press

The Xiegu amp has a very nice flange around the front edge of the amp case that lends itself nicely to clip on a simple button press device as shown above in my 3D design software.

The button press is designed so that the top is put on first and then the bottom is just snapped into place with a gentle push. This makes it easy to get on and off without marking the amplifier.

M0AWS Xiegu XPA125B Clip on Power Button Press

In just a few minutes I had the button press design uploaded to my Bambu Lab A1 Combo 3D printer and in no time at all the button press was ready for use.

As you can see in the photo above it fits snugly to the front of the amp gently holding the power button in so that the amp comes on when power is applied. Simple but, effective.

I’m sure I’m not the first person to have this problem and so, I’ve made the .STL 3D print file available for download below.


I hope this is of use to people who want to be able to use their Xiegu amp remotely without leaving the power on all the time.

More soon …

Xiegu XPA125b Cooling System

I’ve been using my Xiegu XPA125b amplifier with my Hermes Lite 2 SDR transceiver for some time now and have found it to be a great performer. The only issue I have with the amplifier is that it is passively cooled with the operating temperature often reaching in excess of 50 degrees Celsius. There is an air vent on the right-hand side of the amplifier case and then a very small vent on the rear where the end of the PA heatsink is however, air flow is really poor and so the heatsink can get saturated with heat very easily.

Having recently purchased a Bambu Lab A1 Combo 3D printer I’d already decided I was going to have a go at designing and making a fan assisted cooling system for the Xiegu amplifier.

Having no experience and very little knowledge of 3D printing I dived in head first and hit the vertical learning curve head on. In a fairly short period of time I had put together a design that would work.

Designing the Xiegu XPA125b cooling system using tinkerCAD.
Designing the Xiegu XPA125b cooling system using TinkerCAD.

After 11 design versions and 3 x 3D prints I had a solution that fitted perfectly every time. Getting the 12v fans from Amazon was fairly cheap and I soon had the amp cooler working with a temperature reduction of 20-25 degrees Celsius during long waffle overs on the 80/60m bands. The amp now runs nice and cool with great airflow through the heatsink.

Next I wanted to add a Hermes Lite 2 cradle to the cooler solution so that two devices are neatly stacked together. Like the cooler design, I already had ideas in my head and just needed to get them down in the CAD package.

After some tinkering and 3 test prints I had a solution designed that not only created a cradle for the Hermes Lite 2 but, also a top shelf for my Daiwa CN901HP to sit on.

This brought the whole HF transceiver setup together nicely with all the components now being held in place securely.

Xiegu XPA125b Cooler with Hermes Lite 2 cradle - front view
Xiegu XPA125b Cooler with Hermes Lite 2 cradle – front view
Xiegu XPA125b Cooler with Hermes Lite 2 cradle - side view
Xiegu XPA125b Cooler with Hermes Lite 2 cradle – side view

The 3 fans on the side of the amp are silent which is great, there is a little noise from the air flowing through the case and out the vent at the back of the unit however, it’s barely noticeable. Keeping the case pressurized with cool air and forcing the heat out the rear vent has made a massive difference to the overall temperature of the amp even during long hours on air.

This has been a fun project and a great introduction to 3D printing, I’ve got so many more 3D print ideas now, I think I’ll be spending a lot of time in TinkerCAD.

I’ve just printed and put together a cooler and HL2 cradle for Steve, M0XVT and will be making them to order soon so, if you have a Xiegu XPA125b and want it to run a lot cooler then keep an eye on my website for details of how to buy one.

More soon …

Hermes Lite 2 Audio

I often get unsolicited good audio reports whilst using my Hermes Lite 2 (HL2) on the HF bands with people asking what settings I am using so, I thought it was time I put together an article on the subject.

I use the DL1YCF enhanced fork of PiHPSDR to drive my HL2, a great OpenSource SDR software package that supports many SDR radios including some very high end, expensive models.

PiHPSDR is extremely configurable via it’s well laid out menu system. It’s possible to change the settings on almost everything which, when combined with really good hardware like the HL2 gives the operator the ability to create an extremely high spec transceiver at a fraction of the price of the typical black box commercial offerings.

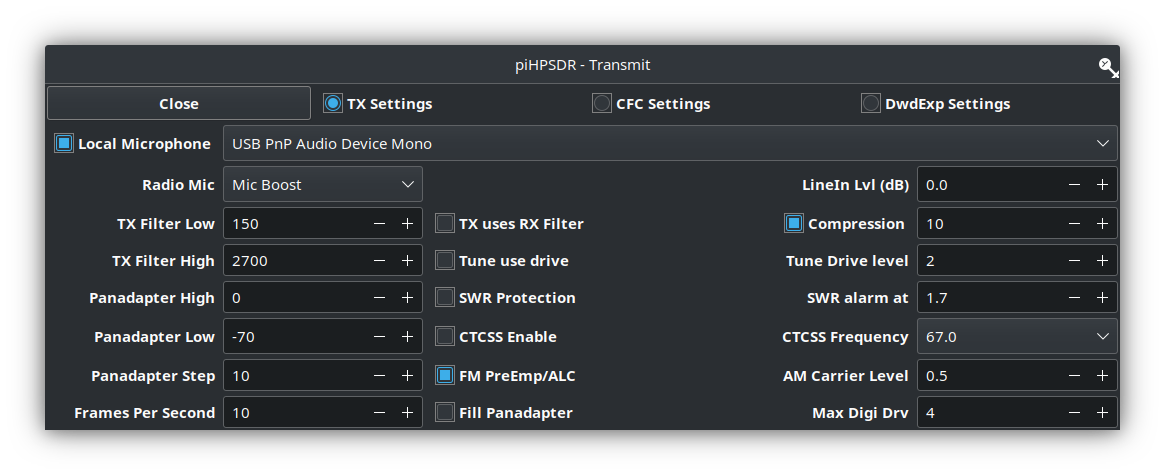
Starting at the beginning of the transmit audio chain the first settings to be changed are in the Transmit (TX) menu.

M0AWS Transmit filter settings

Using my Sennheiser headset I found I needed to set the Radio Mic setting to Mic Boost. This increases the audio level so that it drives the radio properly. It’s important to make sure that boosting the audio doesn’t cause distortion though.

Next I set the TX Filter Low to 150Hz. This ensures I don’t have that nasty bass sound that you hear often on the HF bands today.

The TX Filter High is set to 2700Hz. This gives me a transmit filter width of 2550Hz which is well within the 2700Hz standard for the HF bands.

I also set the compression level to +10dB to increase the average talk power of the audio.

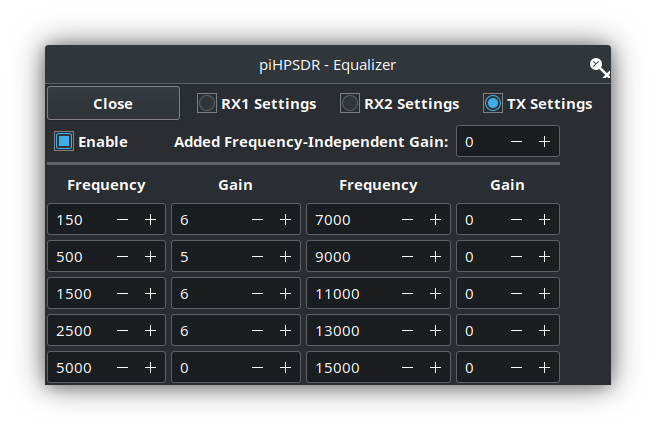
Next in the transmit audio chain is the TX Equalisation. The PiHPSDR software has a very good software defined Parametric EQ menu that provides all the audio tailoring capabilities any HAM operator will ever need.

Having watched many videos by the great Bob Heil, K9EID (SK) I understand that all the articulation in the voice is around the 2500hz range. Today on the HF bands you often hear bass heavy audio that sounds muddy and horrible. This is exactly the type of audio I don’t want to have so, to this end I have adjusted my EQ settings such that the articulation is accentuated to increase clarity and give a little pep to my rather dull sounding voice.

M0AWS PiHPSDR Transmit EQ Settings

Since the transmit filter width is set from 150Hz to 2700Hz there’s really no point in making EQ adjustments outside of this range. As show above I have made the following changes to the transmit EQ settings in PiHPSDR:

FrequencyGain
150hz+6dB
500Hz+5dB
1500Hz+6dB
2500Hz+6dB

The final part of the audio setup is the Mic Gain, I keep this set at 5. This keeps the audio nice and tidy with no IMD.

My HL2 TX Drive is set so that it puts out a maximum of 500mW, this is enough to drive my Xiegu XPA125B amplifier to 100W.

With these settings I find that the Sennheiser headset, PiHPSDR software and the Hermes Lite 2 combination gives me a great signal on all the HF bands.

I hope this helps all those who have asked how my audio is setup and have been so impressed by this great little radio.

More soon …

Hermes Lite 2 and Xiegu XPA125B Auto Band Switching

Since I’ve had my Hermes Lite 2 (HL2) and Xiegu XPA125B amplifier combo I’ve had to manually change the band setting on the amp as I never purchased the HL2 I/O board when I initially purchased the kit.

At the time I didn’t think I would need it but, changing band manually on the amp (and sometimes forgetting causing tuning issues) is a nuisance and so I put my hand in my pocket once again and ordered the I/O board for the HL2.

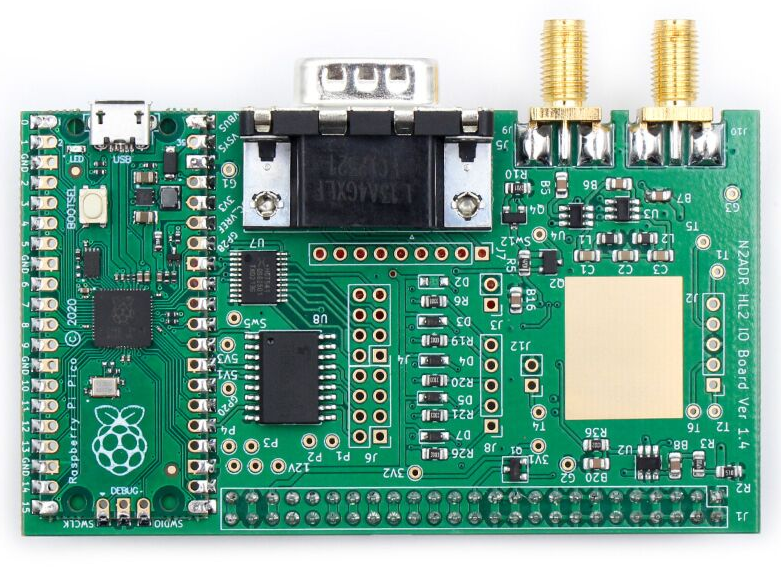
Hermes Lite 2 I/O Board

The HL2 I/O board is a small RaspberryPi Pico controlled device that can be used for a multitude of functions depending on the software loaded. Many people are writing their own software for the Pico to do things like control transverters, remote antenna switches, amplifiers and just about anything else you can think of. It’s a really versatile little add on board for the HL2.

The I/O board arrived after about 10 days from Makerfabs, all nicely packaged as always. Unfortunately due to Christmas, New year and other priorities it’s sat in the box since it arrived.

A couple of days ago I finally got round to getting it out of the box and set about configuring it to control the Xiegu amp.

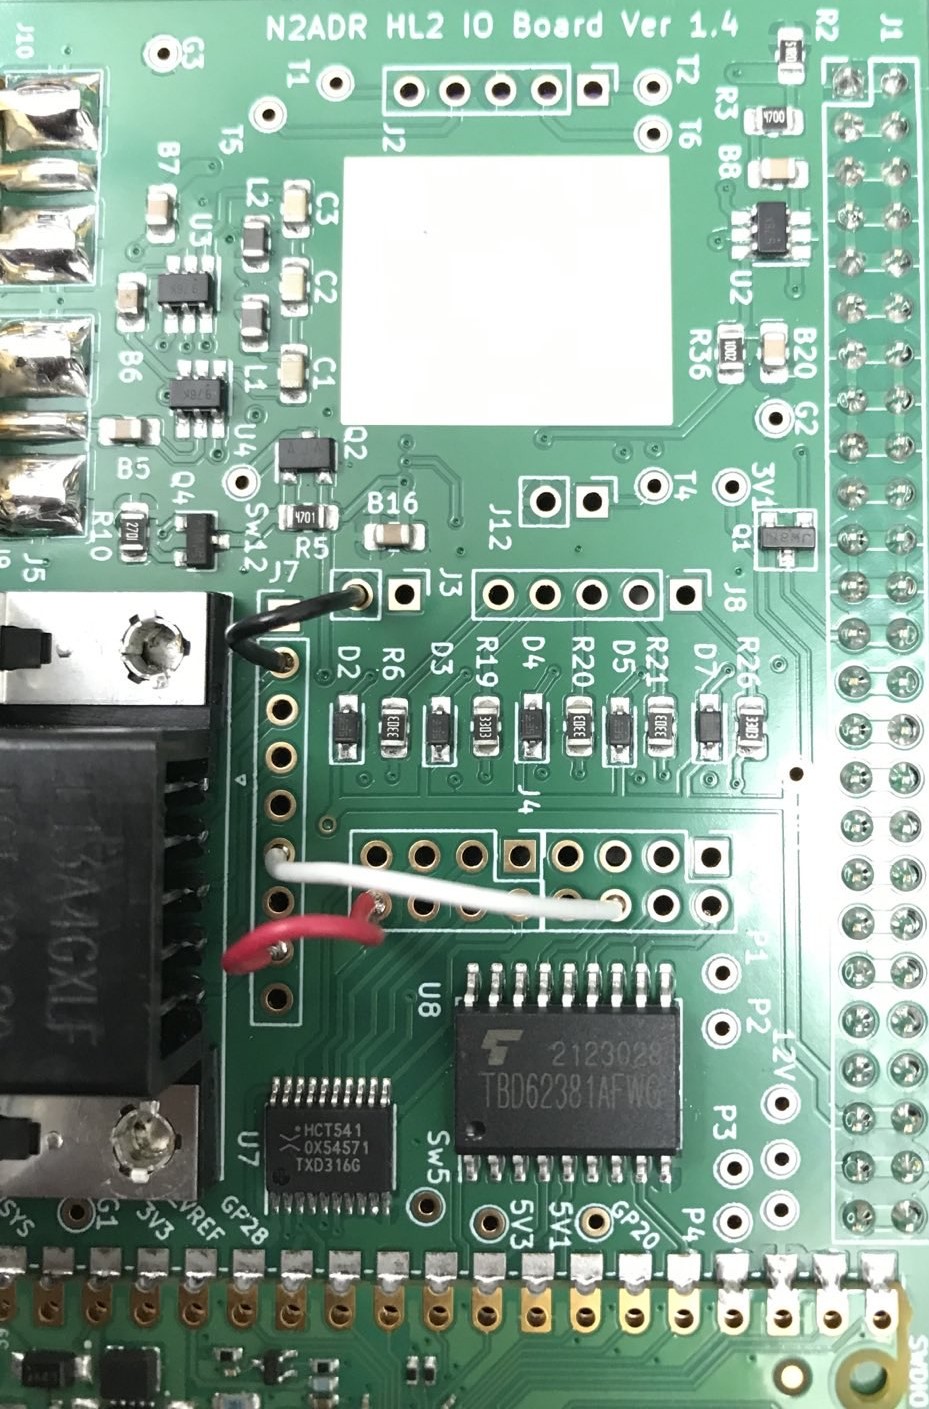
The Xiegu amp needs three connections from the I/O board. They are PTT, Band Switching Voltage and Ground. These are easily accessed from the I/O board via 3 jumper wires to connect to the DB9 connector on the rear of the board.

The other thing that is required is some software for the RaspberryPi Pico to control the whole process. Steve, M0XVT has kindly supplied me with a copy of the software.

Soldering the jumpers from the relevant points on the circuit board to the DB9 connector was pretty straight forward. You can use any of the pins on the DB9 connector that you like as from the factory the DB9 connector isn’t connected to anything. I decided to use pins 2, 6 and 8 and so will refer to those pins from this point forward.

HL2 I/O Board Jumpers

I used a different colour for each of the jumpers so that I knew which jumper was for which connection. The colours used also match the colours of the wire in the old RS232 serial lead that I cannibalized to make the connection between the I/O board and the amp thus making it easy to ensure continuity.

The colours are as follows:

Black Jumper - Ground - Pin 2 on DB9 Connector
White Jumper - PTT - Pin 6 on DB9 Connector
Red Jumper   - Band Control - Pin 8 on DB9 Connector

The I/O board gets its power feed directly from the HL2 main board however, the 3 pins it needs to connect to don’t have any headers in place and so, it’s necessary to solder a short row of 3 header pins onto the HL2 main board.

I found the easiest way to do this was to put the 3 header pins into the correct position and then use the HL2 to N2ADR filter board connector to hold them in place whilst soldering. This worked perfectly and I soon had the header pins soldered onto the main board.

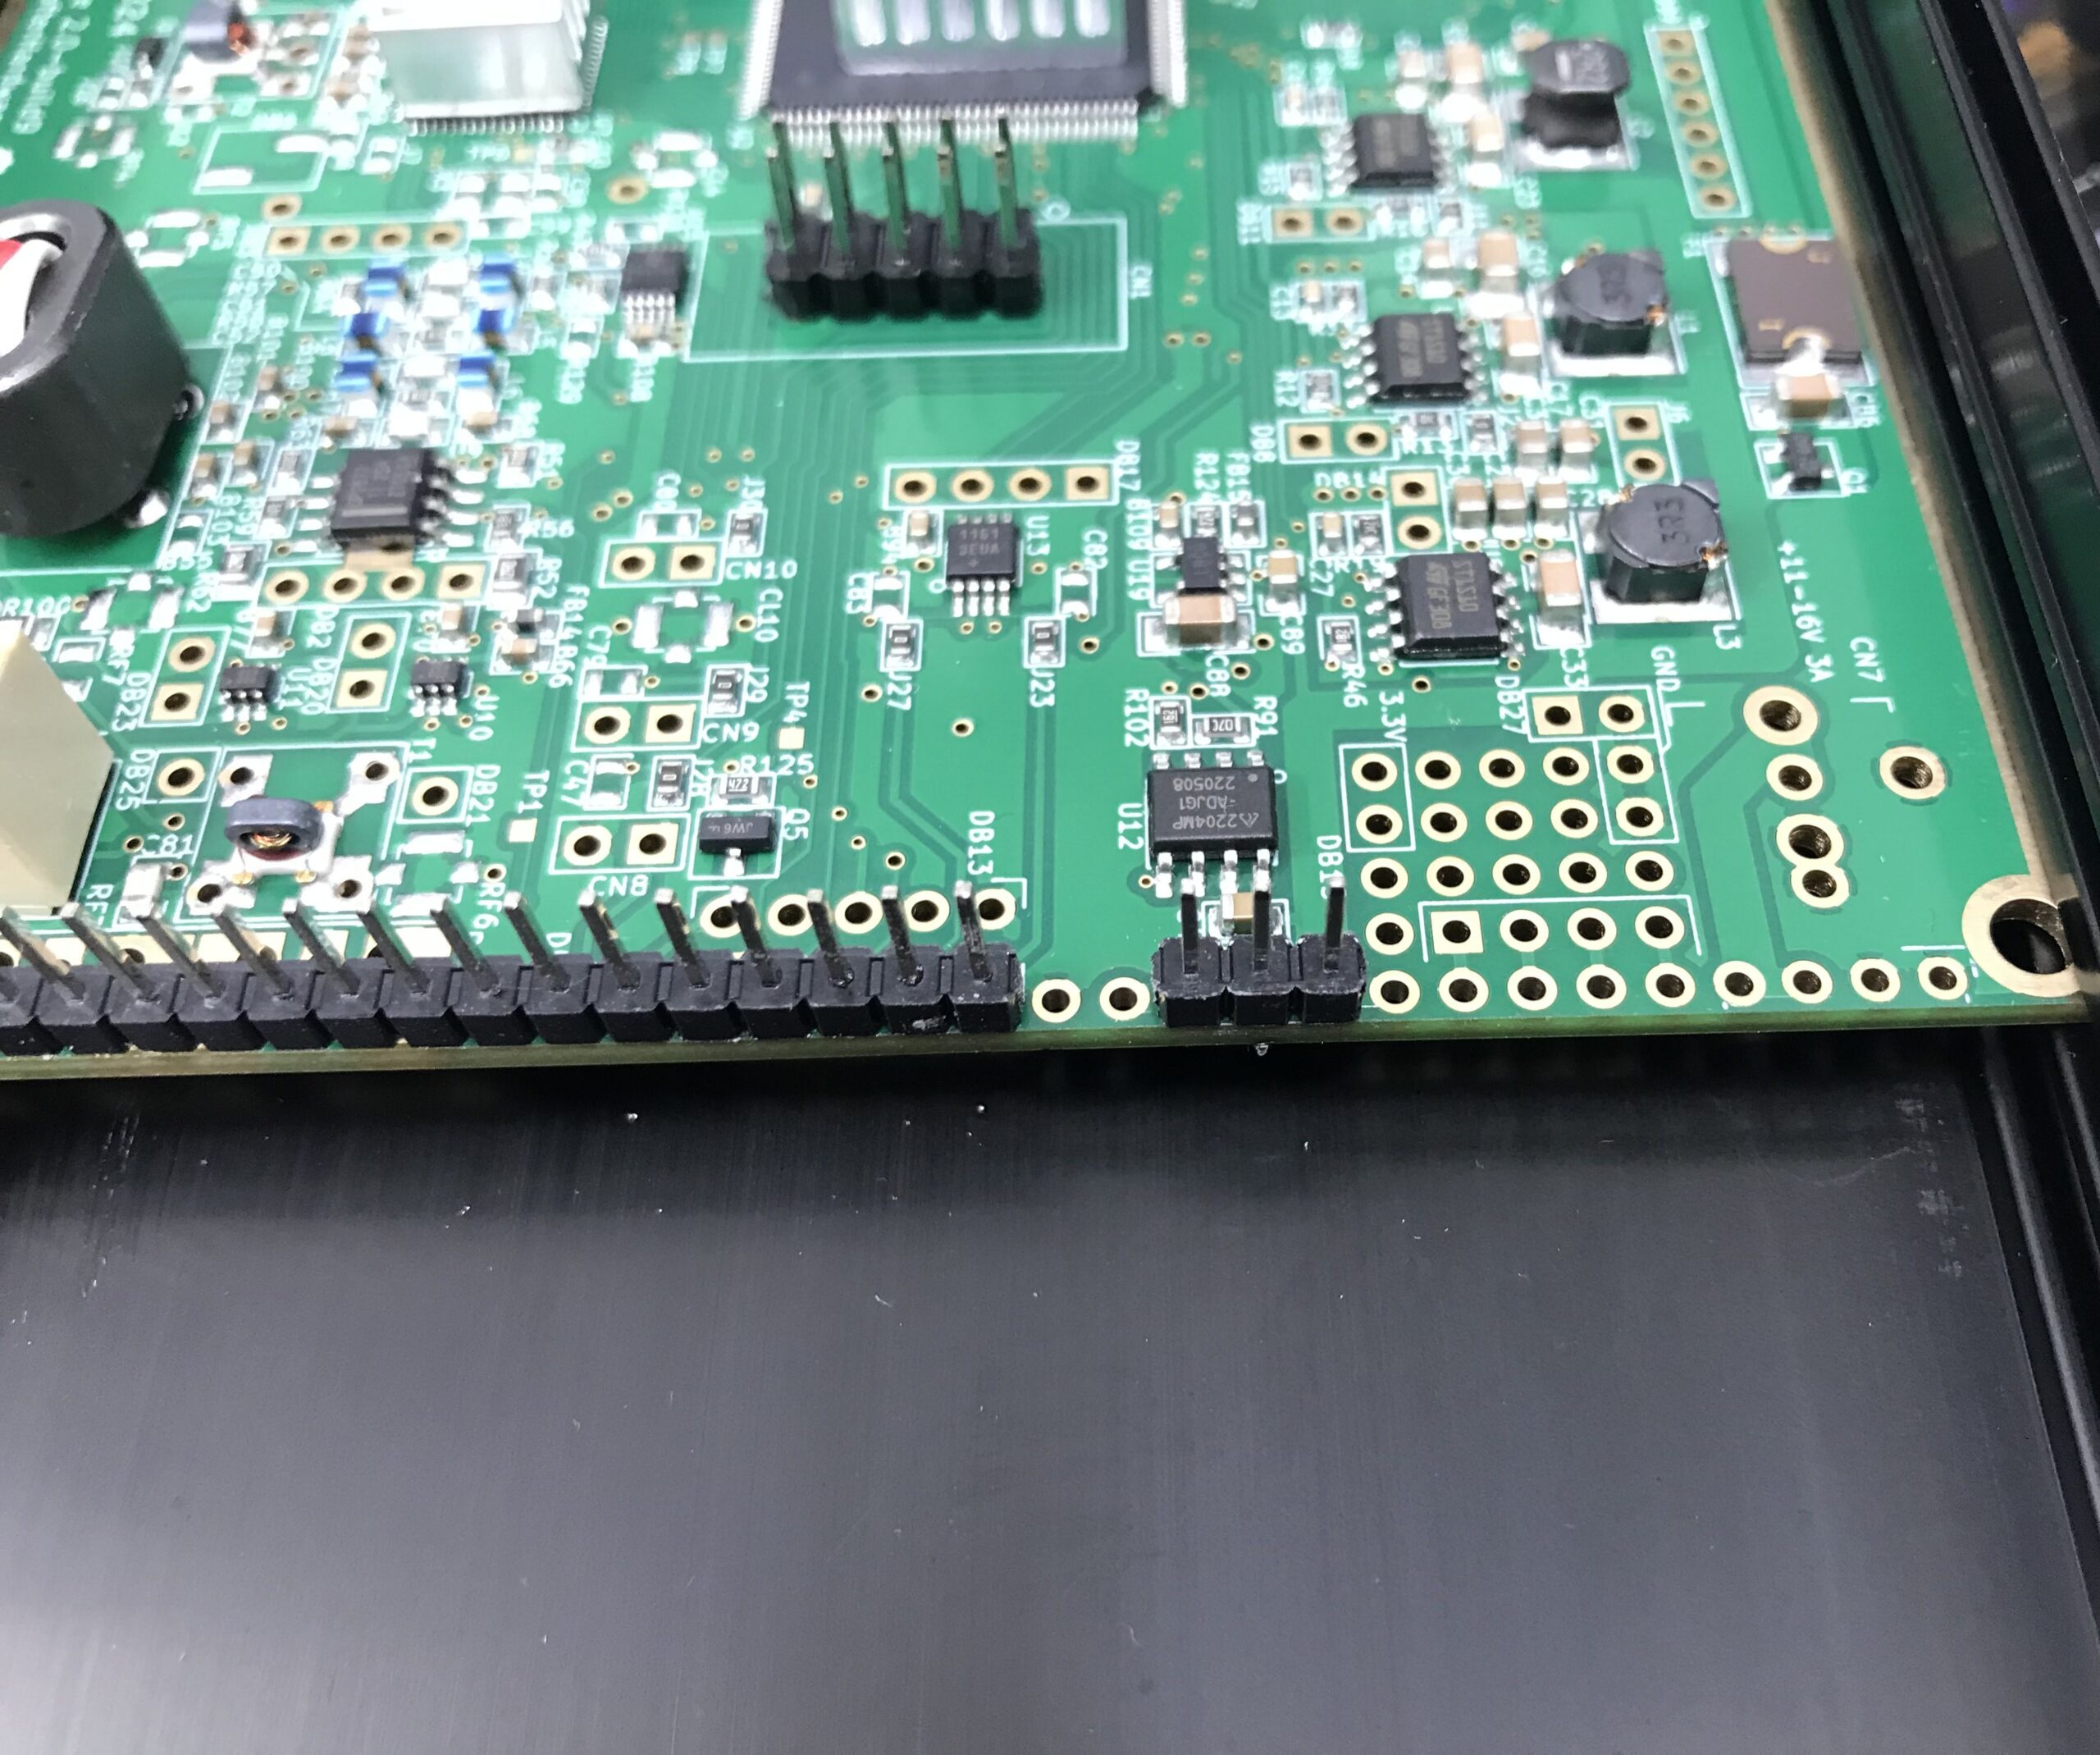
Extra 3 header pins soldered to the main HL2 board

It’s important to note that the 3 extra header pins need to be placed 2 holes away from existing header pins as shown above. Take care to get these pins in the right position so as not to cause any damage to the 3 circuit boards once all are connected and powered up.

Note: The HL2 main board must be removed from the case to solder the extra 3 header pins in place. Take care to ensure the correct fitting of the PA heatsink when when refitting the HL2 main board into the case.

At this point I refitted the N2ADR Filter board back into the HL2 case so that the two sets of header pins aligned correctly ready for the placement of the new I/O board that would connect all 3 circuit boards together.

Preparing the N2ADR Filter board for reconnection

Once the filter board was in place I fitted the new I/O board taking care to ensure all pins aligned with the socket and then gently pushed it home.

Close up of the HL2 I/O board fitted to the main HL2 board and N2ADR Filter board

The close up of the I/O board connector above shows how the extra 3 header pins connect to the last 3 sockets in the I/O board connector. It’s a snug fit with the N2ADR filter board below it.

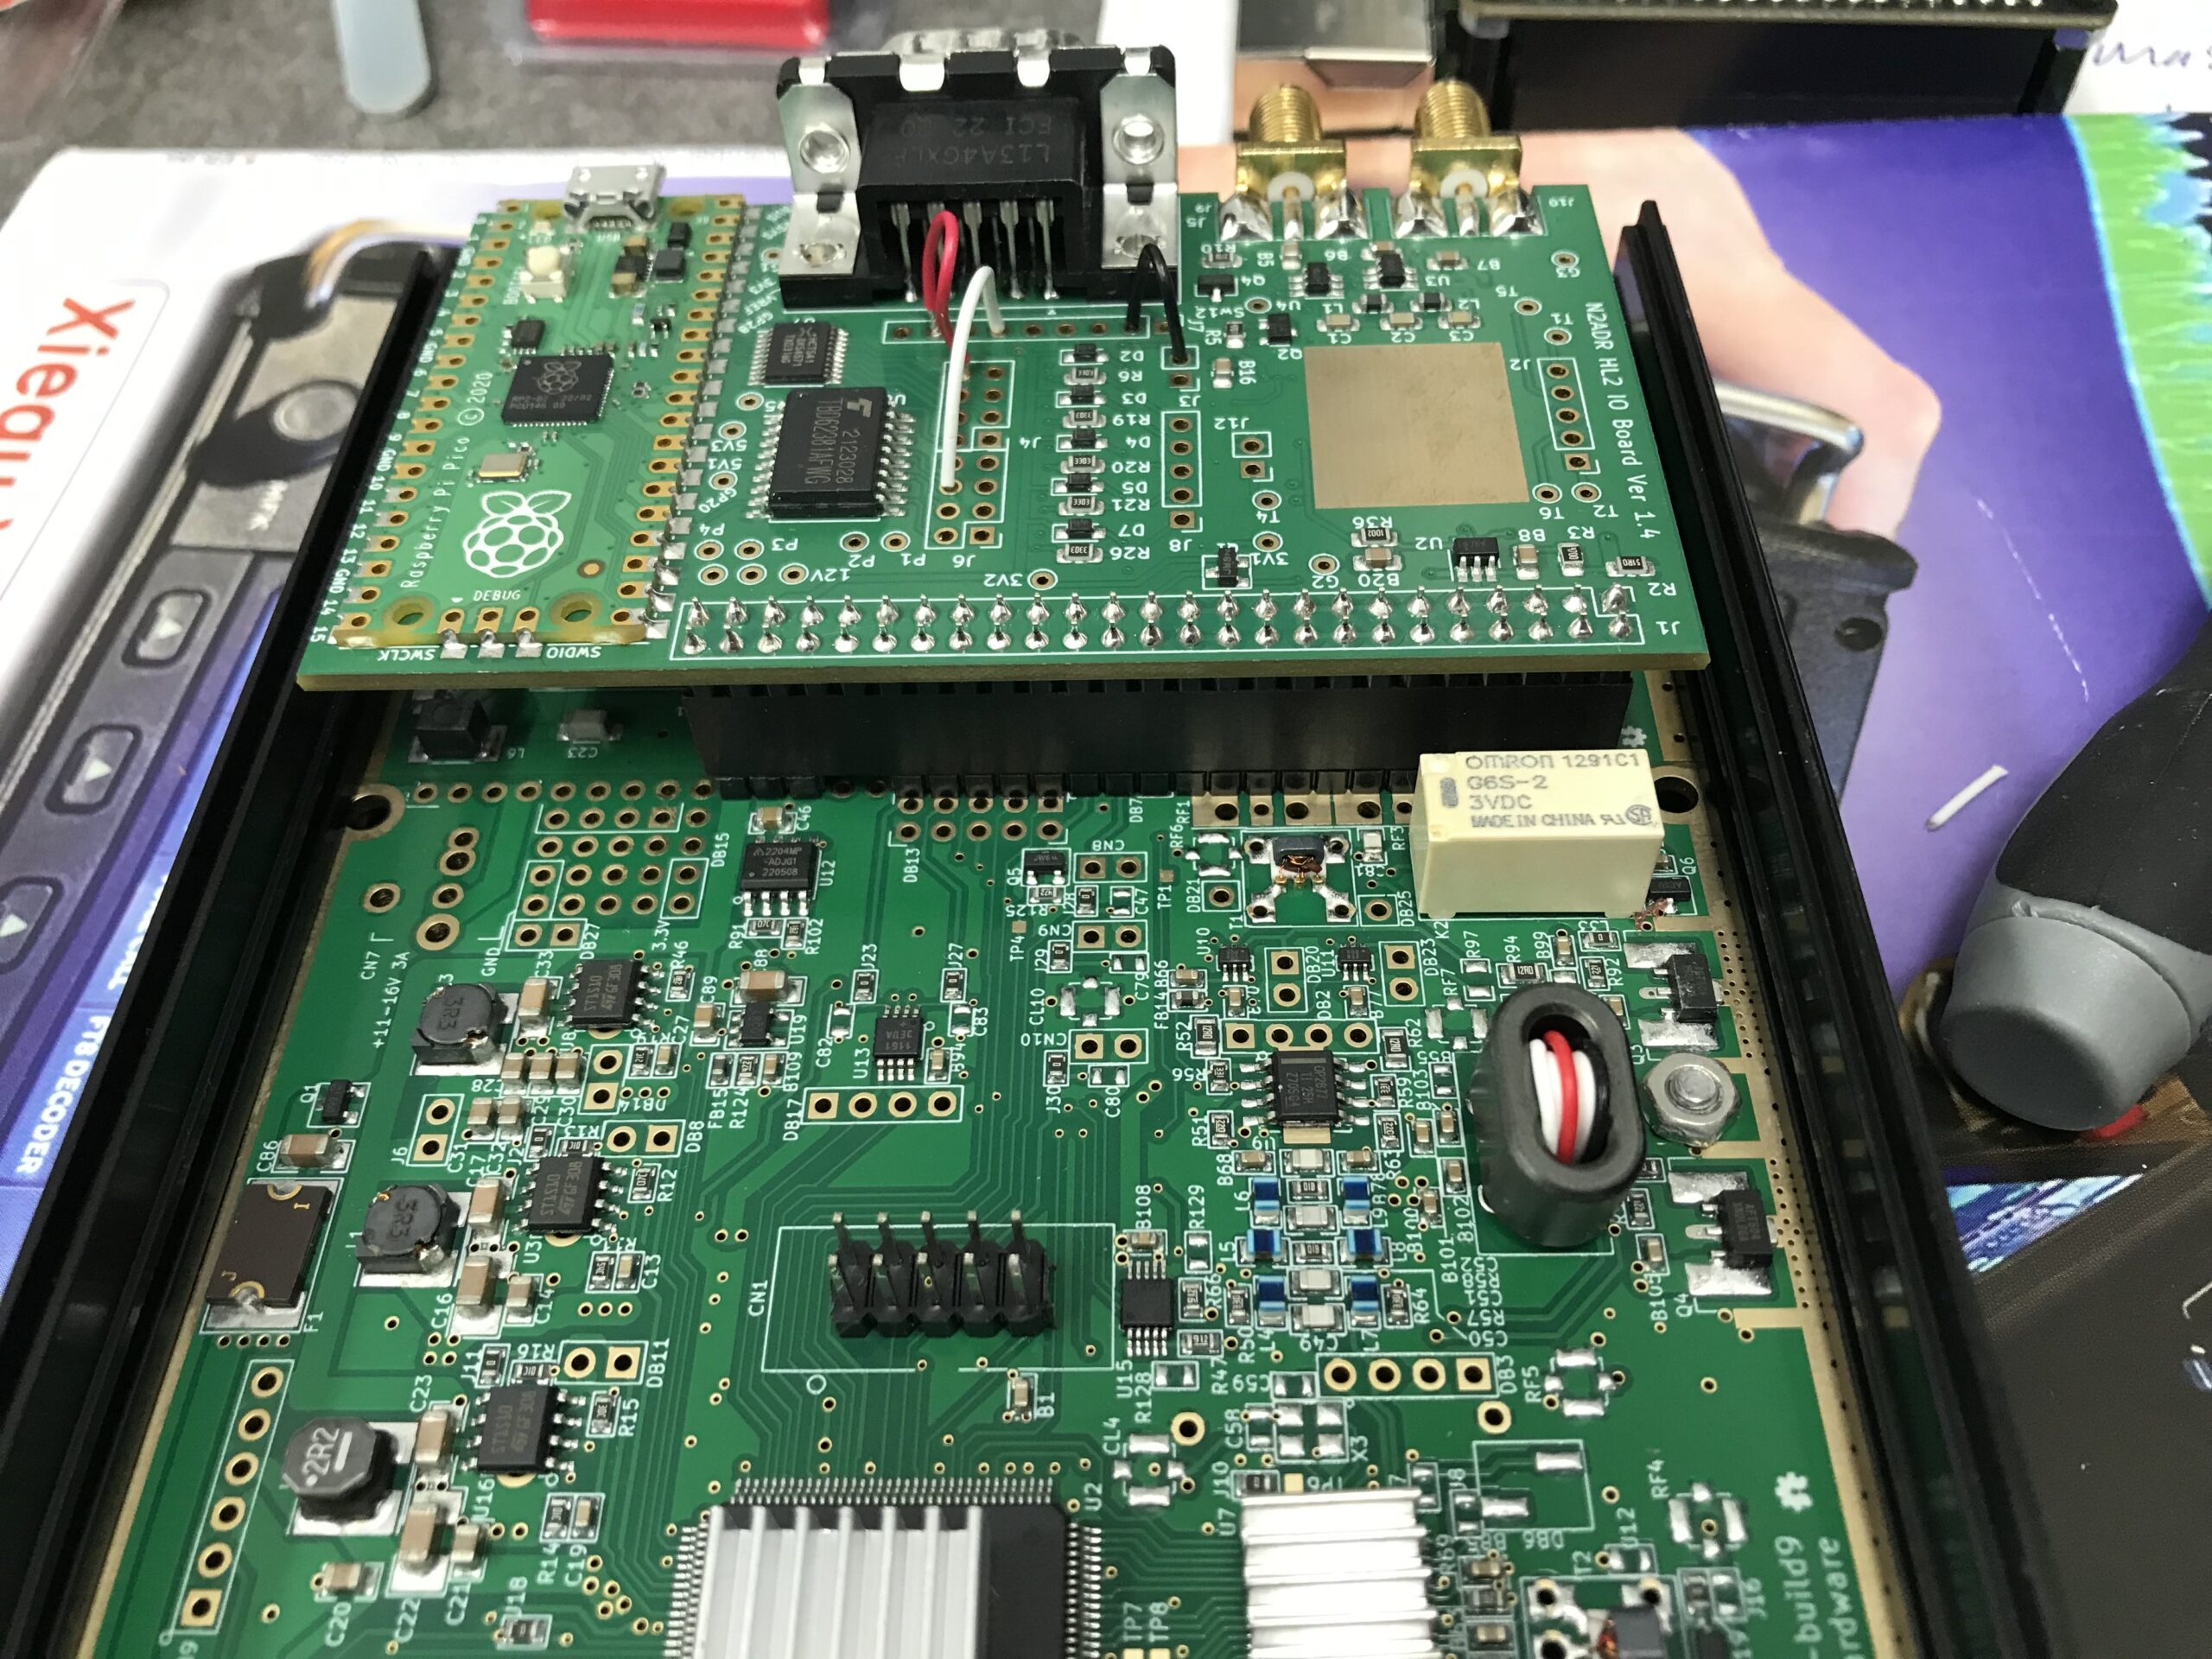
View of the fitted HL2 I/O board from above

Before the HL2 case can be put back together it’s necessary to load the software onto the RaspberryPi Pico (top left in photo above) that controls the I/O board.

This is accomplished by pressing the tiny button on the Pico whilst connecting a USB lead to the USB socket on the board that had already been plugged into my PC. Once connected the Pico appeared as a USB drive on my Kubuntu Linux desktop. All I then had to do was to copy the software file onto the drive. Once the software file is on the drive the Pico will reboot automatically and the little LED on the board will start to flash to show it has booted successfully. At this point I could safely unplug the USB cable.

The software for the RaspberryPi Pico is available for download below.


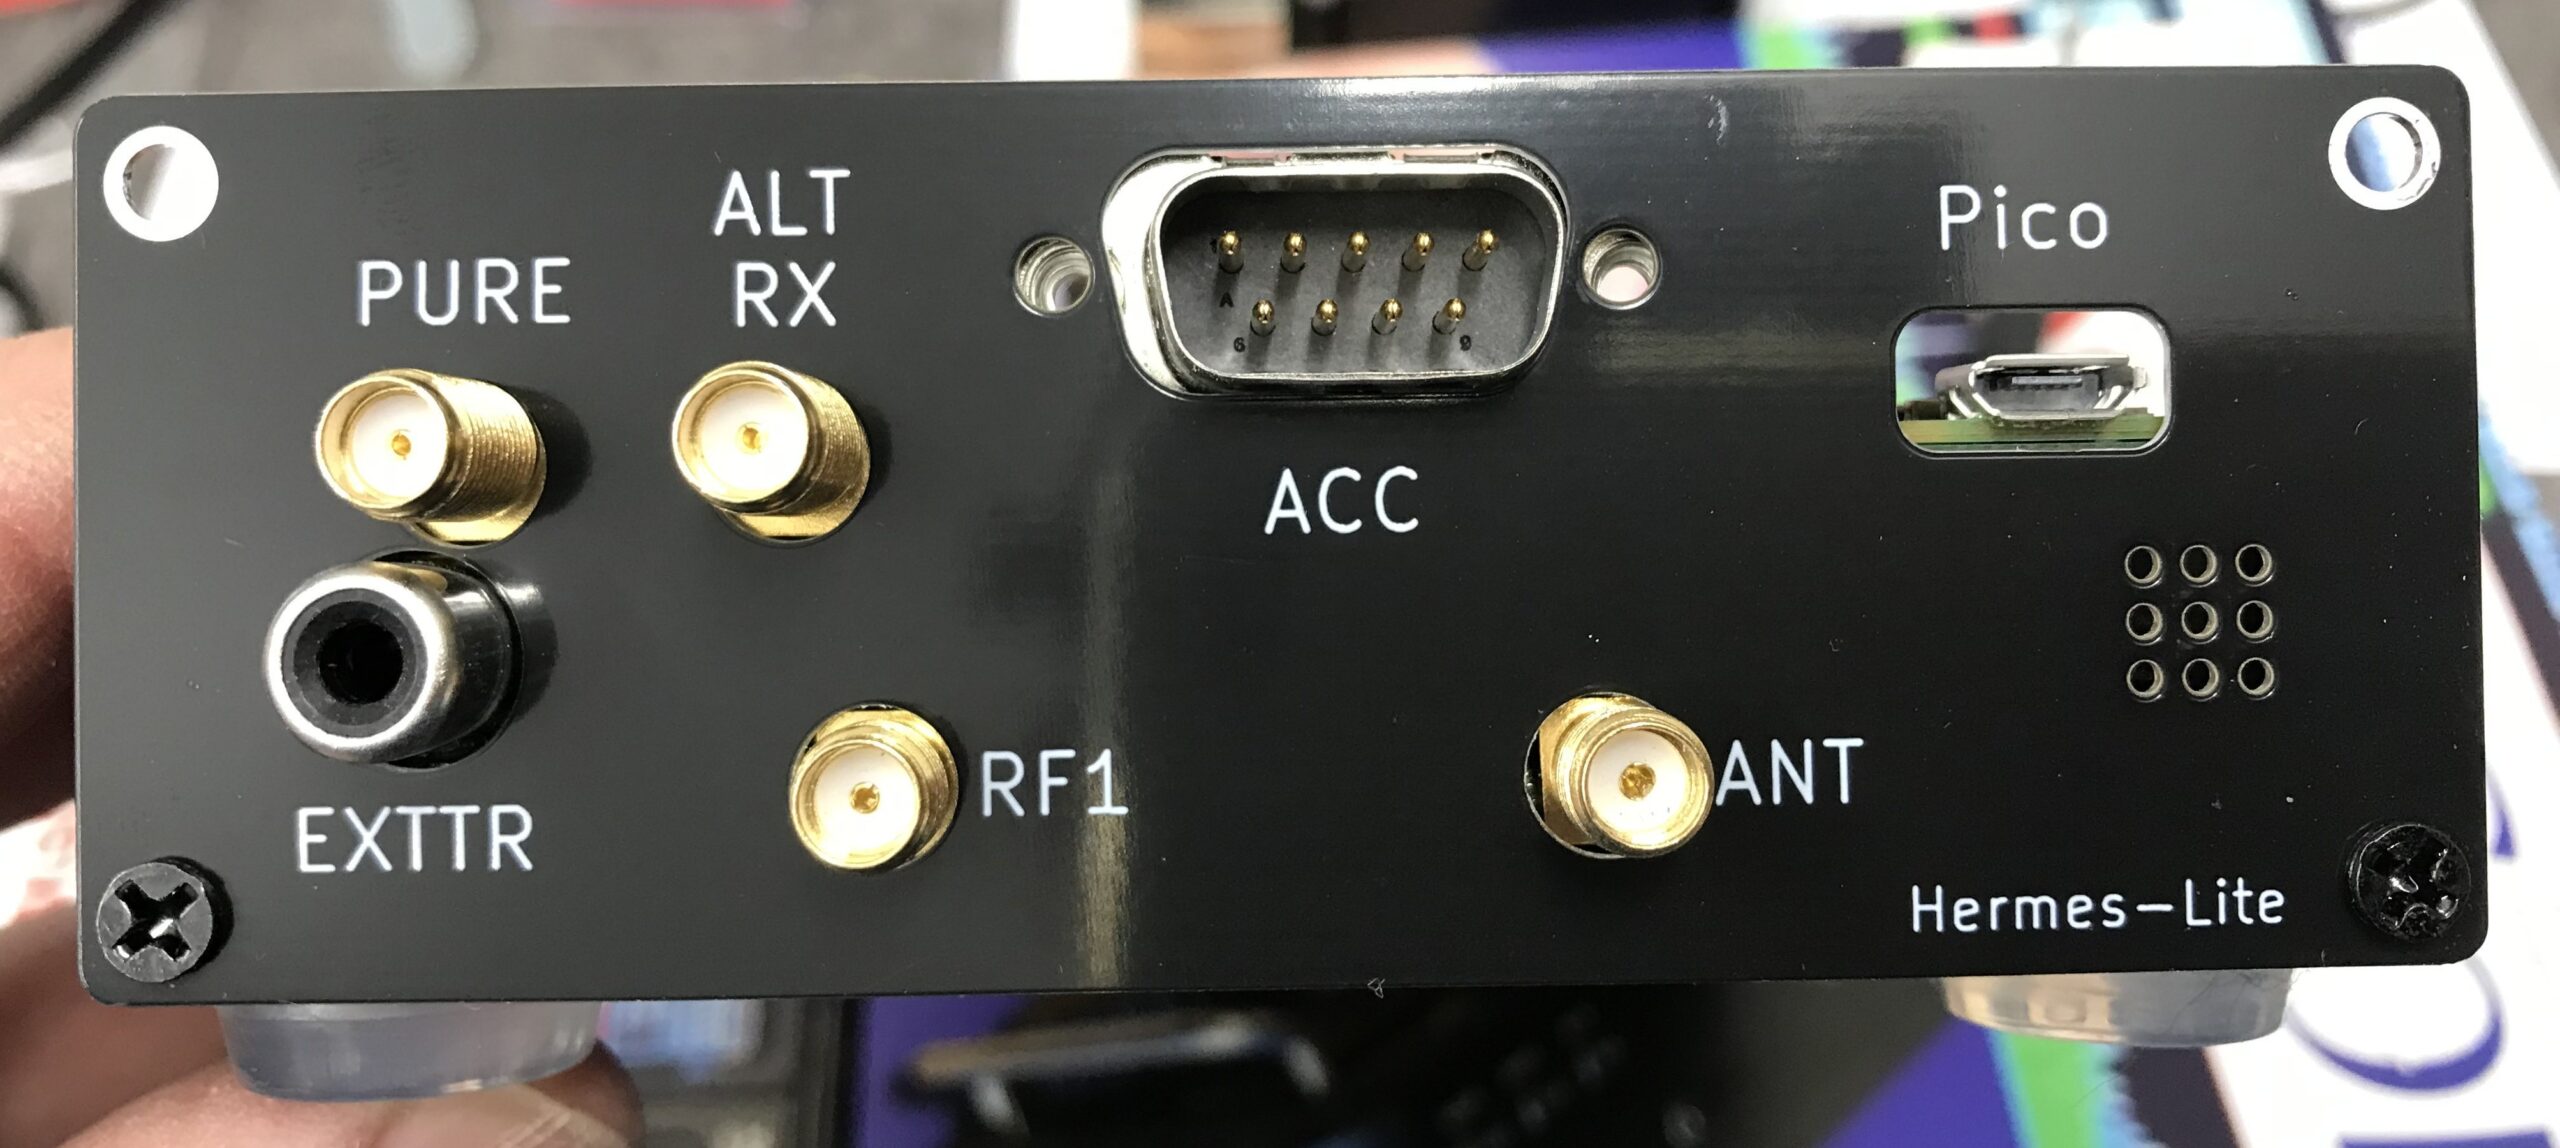
The I/O board comes with a new back panel for the HL2 to accommodate the extra connectors on the rear. Refit the top of the HL2 case and then attach the new rear panel using the original 4 counter sunk screws.

Supplied HL2 I/O board replacement rear panel fitted to the HL2 case
Supplied HL2 I/O board replacement rear panel fitted to the case

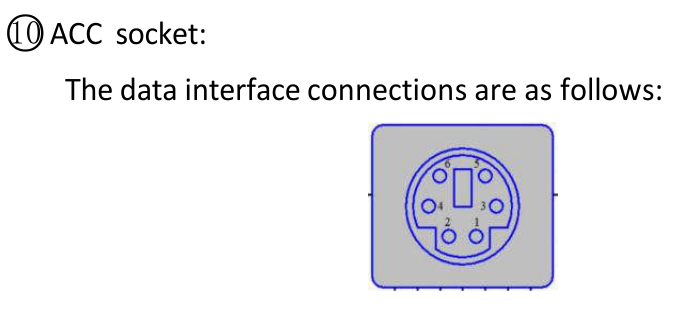
The final part of this project is to make the lead that will go from the HL2 rear DB9 ACC connector to the Xiegu XPA125B mini din ACC socket.

For this you will need a 6 pin mini din plug (AKA PS2 plug), (these are readily available on Amazon) and an old fashioned DB9 female connector from the days of RS232 serial leads..

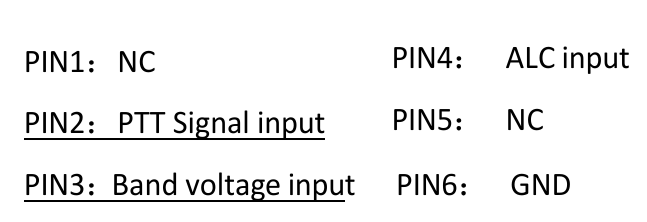
The connections are as follows:

DB9 Pin 2 (BLACK) to Mini Din Pin 6 (GND)
DB9 Pin 6 (WHITE) to mini Din Pin 2 (PTT)
DB9 Pin 8 (RED) to Mini Din Pin 3 (Band Switching Voltage)

Below are a couple of screenshots from the Xiegu XPA125B user manual showing the Mini Din pin layout and the data interface connections for the amplifier.

Xiegu XPA125B Amplifier ACC Interface Connections
Xiegu XPA125B Amplifier ACC Connector Pin Information

Before I connected the lead to the two devices, I tested the end-to-end continuity of the lead to ensure all pins were correctly connected and that there were no shorts between any of the pins.

It’s important that the wires are connected to the correct pins on each end of the lead. Failure to ensure correct connection could cause damage to your HL2 and/or amplifier.

Once the lead had been tested, I connected it to both the Hermes Lite 2 and the Xiegu XPA125B amplifier. I also had to switch the amplifier band switching to AUTO.

Now when I change band on my HL2 in the PiHPSDR software the amplifier also changes band at the same time keeping the two devices in sync. No more manual band changing for me!

I hope this article is of use to other Hermes Lite 2 users who have purchased the Xiegu XPA125B but, have yet to setup auto band switching between the two devices.

Thanks to Steve, M0XVT for all the jumper information and the RaspberryPi Pico Software to get this all working.

UPDATE:
The RaspberryPi Pico software originally came from Ramon, KP4RX. More information can found in this Google Groups article where he released the binary into the wild.

A full table of I/O resources available on the HL2 I/O board can be found on the KP4RX Guthub page.

The source code for the main.uf2 file above can be found at KP4RX.com

More soon …

Another new radio!

Many years ago when I lived in France I had a Flex-3000 transceiver, one of the first fully SDR transceivers on the market. It was paired with a proprietary Windows XP application called PowerSDR (now Opensource and called Thetis) and connected via a firewire connection.

17 years later I am once again venturing into the world of SDR transceivers in the form of a Hermes Lite 2. (HL2)

The HL2 hardware is available via the Makerfabs website in kit form. I ordered the HL2 motherboard, the N2ADR Filter Board to ensure a clean signal from the transceiver and the enclosure. Total cost for all the parts and shipping was £288.00 including all taxes.

The kit took about 10 or so days to arrive and was very easy to put together making sure to fit the PA transistor heat sink the right way round so that it doesn’t short out the main board. (There are many videos about this on YouTube)

Once the hardware was put together I needed to install some software to control/drive the HL2. Being a heavy weight Linux user my software choice had to come from the Opensource world.

M0AWS Hermes Lite 2 SDR Trasnceiver and Xiegu XPA125B Amplifier

After much research and chatting with other HAMs on the Matrix who have the HL2 I found that most people use the closed source SDR Console software to control the transceiver. Since this software is for Windows it’s not something I can use as I don’t have any Windows PCs, they’re all Linux only.

To this end I started researching Linux SDR software for the HL2 and decided that PiHPSDR was the one I was going to try first.

PiHPSDR was originally written for the RaspberryPi 3/4/5 single board computers (SBCs) but, I wanted to have a go at compiling it on my Kubunu Linux desktop PC. I found it straight forward to follow the instructions in the pihpsdr-install.pdf file and in no time at all I had the software compiled and running.

PiHPSDT running on Kubuntu Linux 22.04LTS
PiHPSDR running on Kubuntu Linux 22.04LTS

PiHPSDR is infinitely configurable and thus it feels like it has an infinite number of menus and options. Since the HL2 has two separate receivers, it’s possible to listen to two bands at the same time. This is the one feature I really missed more than anything with my FTDX10 so, I’m glad to have dual receive capability back once more!

Going through all the settings I realised that the A and B VFOs have individual settings. Initially I setup the software using just VFO A but, when I switched over to VFO B none of my settings were there. I then had the realisation that the settings apply only to the active VFO. I quickly went through all the settings again for VFO B and all was well.

In no time at all I was on the air with just 5w as my Xiegu amp hadn’t arrived. Not being perturbed I tuned up on the 15m band and started searching for stations. Interestingly it was CQWW SSB weekend and the band was full of contest stations. Working my way along the spectrum I found I was able to work quite a few stations with ease using my vertical and inverted-L antennas.

Contacts of note were VE3KG at 3406 Miles, VE3JM at 3382 Miles, RW9DX at 2380 Miles, KC1XX at 3331 Miles and N1DE at 3600 Miles. I also worked a bunch of European stations and had a great time giving away points with my little QRP rig.

Contests are a good time to try out new radios as all the big stations with good ears are on the bands and make the effort to get us QRP guys in their logs.

I have been extremely impressed with the receivers in the HL2 radio. It handles both strong and weak stations exceptionally well. PiHPSDR really does have brick-wall filtering and I was able to work the weaker stations right next to large contest stations with ease. At no time did the front-end of the receiver get overloaded.

Below is a short video clip of a conversation on the 80m band. The band was quite noisy however, with a reduction of the AGC gain and the 2700Hz filter it’s possible to remove almost all the noise.

Hermes Lite 2 SSB reception on the 80m Band

On CW the radio is a real delight. With the filtering and AGC gain control I am able to use extremely narrow receive filters without any ringing whatsoever. I would say that on CW the HL2 is as good as my FTDX10 when it comes to receiving even the weakest of stations.

I’m sure on paper the FTDX10 receiver has better numbers however, to the ear there really is no discernible difference.

Below is a short video clip of D4DX on CW on the 80m band. The band was noisy but, with the 100Hz filter enabled and clever use of the AGC Gain I was able to remove almost all the noise completely, reducing fatigue on the ears and making reception very easy even though there was some fairly deep QSB at times.

Receiving D4DX on CW on the 80m band using 100Hz filter and reduced AGC gain

A few days later my Xiegu XPA125B amplifier arrived. Unfortunately the amp didn’t come with the normal PTT lead that comes from the factory and is detailed in the user manual. For some bizarre reason this is a chargeable option when you buy the amp from Martin Lynch and Sons even though it is included from the factory.

This meant I had to make a lead which was a problem as I didn’t have one of the mini DIN plugs required for the connection to the amplifier. Jumping onto Amazon I ordered a packet of two and sat back and waited for their arrival.

A couple of days later the DIN plugs arrived and I quickly made up the necessary phono/RCA to mini DIN lead and got the amp operational.

The Xiegu XPA125B isn’t cheap but, it’s a really nice bit of kit. The neat little LCD display keeps you informed of power O/P, I/P and O/P SWR, voltage, current draw, temperature and band selected.

With just 0.7w of input from the HL2 I’m able to get a full 100w O/P from the amp. On the lower bands I have to reduce the O/P from the Hermes Lite 2 even further so that I don’t over drive the amp.

Being an avid Short Wave Listener (SWL) I wanted to see how the HL2 performed when listening to the big AM broadcast stations. To my surprise it makes an excellent SWL receiver with better AM demodulation than many of the more expensive radios. Having the option to select receive filters up to 16Khz wide I found I was able to get the best audio possible from many of the broadcast stations including Radio Caroline on 648Khz. It’s quite an improvement over the 12Khz maximum on the FTDX10.

Listening to AM Broadcast stations

What makes this project even more exciting is that both the hardware and software are from the OpenHardware/OpenSource world. The complete circuit diagram, PCB layout and information is available for all to download, something you don’t often see these days!

PiHPSDR is one of the nicest SDR applications I’ve seen in the Linux world and even comes with a 200 page downloadable user manual. Something you don’t see in many Opensource projects. The source code for the application is downloadable and you are able to make your own changes to it without restriction.

Overall I am really pleased with the Hermes Lite 2 SDR transceiver.
It has two excellent receivers, is infinitely configurable via the PiHPSDR software and performs extremely well under all conditions. Since getting the radio I haven’t even switched on the FTDX10.

More soon …