Wouxun KG-UV9K Purchase


For some time I’ve wanted a full duplex 2m/70cm handheld so I could have a go at working the LEO FM satellites during the summer months from the garden.

Searching through all the handhelds available today I came across the Wouxun KG-UV9K dual band, full duplex VHF/UHF radio.

Since I already own a Wouxun KG-UV980PL Quad bander (6/4/2m & 70cm) I’m familiar with the menu system and the very good build quality so I decided to research it further.
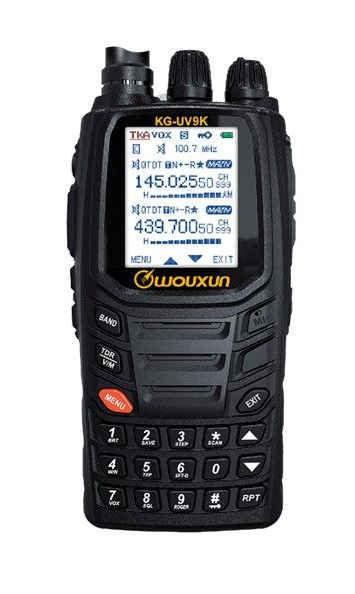
Wouxun KG-UV9K Full Duplex Hand Held
Wouxun KG-UV9K Full Duplex Handheld

Looking at the spec for the handheld it does everything I want and more whilst being reasonably priced.

Jumping onto the Martin Lynch and Sons website I found there were two listings, the radio on its own or the “Pro Pack”.

The radio on its own was £79.00 but, the Pro Pack was only £20 more at £99.00 and came with every option available for the handheld including a programming cable, 2 batteries and a rather nice carry case.
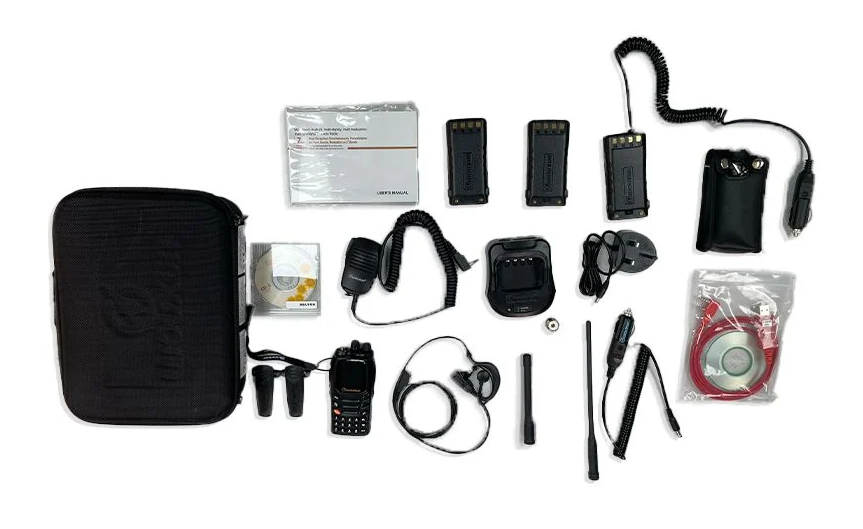
Wouxun KG-UV9K Pro Pack

The full specification and other details for the “Pro Pack” can be found on the ML&S website but, here’s a brief summary:

Pro pack contains:

KG-UV9K Transceiver with 2 antennas

Two batteries
Two belt-clips
Software and transfer data Cable
Fast charger dock and Power Supply
Hand speaker mic
Battery eliminator
Manual
Wrist strap
Leather case
In-car charger
SMA-SO239 adaptor
Hands-Free kit

Like my Wouxun quad bander the handheld can also be configured as a cross-band repeater, something I’ve not yet found a use for but an interesting feature. Of course being a full duplex radio with two receivers you can listen to signals on 2m and 70cm simultaneously or transmit on one and listen on the other, a feature I’ve wanted for LEO satellite operations.

The radio is really easy to programme using CHIRP and easy to setup via the very logical menu layout. The hand held has a good solid feel to it and I’ve found the battery lasts a good 3-4 days even though I use it to chat with other stations via my AllStarLink node most mornings and the radio is left monitoring all day.

The larger of the two supplied antennas works extremely well having a relatively good gain. I can now easily get into my two local repeaters on 2m & 70cm from within the house, something I’ve never been able to do with my old Retevis RT85 even with a high gain antenna on it.

The receivers in the UV9K are head and shoulders better than that of the Retevis RT85, I’m hearing signals much stronger now and can even get into repeaters that I’ve never even heard on the old Retevis handheld.

The display on the Wouxun is bright and easy to read, even in bright sunshine which is great as I plan to use it outside a lot during the summer months.

The supplied speaker mic gets good unsolicited audio reports on transmit and has clear audio on receive with plenty of volume. The speaker mic doesn’t have any radio control buttons on it sadly, something I really like about the Wouxun UV980PL quad bander as you can control every aspect of the radio without touching the front panel. Would be a nice upgrade for the handheld if it every became available.

Overall I’m really impressed with the Wouxun UV9K Pro Pack. The radio performs very well, comes with every optional extra available and is a bargain at just £99.00.

If you’re looking for a full duplex handheld radio then I recommend you grab the Pro Pack before the offer ends.

More soon …

FreeDV audio routing with PiHPSDR and Hermes Lite 2

I’ve recently been trying out the FreeDV RADEv1 digital voice mode on the HF bands with great success. The audio quality is astounding when compared to the normal analog SSB mode. Using only 20w I’ve been surprised how successful I’ve been talking to stations in the UK and Europe as can be seen in my FreeDV Log.

FreeDV has been around for quite a few years with development being funded by an ARDC grant and financial sponsorship from the Software Freedom Conservancy.

So what is FreeDV?

To quote the FreeDV website:

FreeDV is a suite of digital voice modes for HF radio. Our flagship mode is the Radio Autoencoder (RADE). You can run RADE using a free GUI application for Windows, Linux and macOS that allows any SSB radio to be used for high quality digital voice.

And the most important part:

All software is open source, released under the (a) GNU Lesser Public License version 2.1 (GUI and legacy FreeDV modes) and two-clause BSD license (RADE).

FreeDV running under KDE-Plasma on Kubuntu PC

Looking at the digital voice (DV) community in the HAM Radio world, it’s stuffed full with proprietary DV modes from small software houses and black box transceiver manufacturers with no real OpenSource alternatives, until now.

Installing FreeDV is pretty simple regardless of which operating system (O/S) you use. Being a Linux user I grabbed the AppImage from the website and set about reading up on how it works and how it is configured.

I decided to take the two sound card approach since I have 2 USB sound cards connected to my shack Kubuntu Linux PC.

Configuring the audio routing isn’t straight forward as both the receive and transmit audio to/from the radio needs to be routed via the FreeDV app. To make this even more complicated I am using my Hermes Lite 2 SDR transceiver and PiHPSDR software, a complete OpenSource/OpenHardware Amateur Radio Station.

M0AWS FreeDV and PiHPSDR Audio Routing Diagram

Trying to clearly describe the audio routing using words alone would be impossible and very confusing so, I put together the diagram above.

Using two USB sound cards I’ve configured the system such that USB Sound Card 1 (an old Griffin iMic USB sound device) handles just the audio from/to the headphones and microphone. All the audio at this point in the system is analogue.

The second USB sound card, a cheap Plug and Play (PNP) USB audio device from Amazon, handles all the digitised signals from/to FreeDV and PiHPSDR.

Taking this 2 sound card approach keeps confusion to a minimum and separates the analogue and digital components of the audio routing.

So, how does this translate to the FreeDV and PiHPSDR audio settings?

Transmit Audio Chain

FreeDV Transmit Audio Settings

Starting at the beginning of the transmit audio chain, let’s look at the transmit audio settings in FreeDV.

Looking at the FreeDV Transmit audio settings screenshot below we can see that the
Input From Microphone to Computer device is set to:

alsa_input.usb-Griffin_Technology_Inc_iMic_USB_audio_system-00.analog-stereo

This is the microphone connection on the iMic USB device (USB Sound Card 1) and is the analogue transmit audio input to FreeDV.

The Output From Computer to Radio device is set to:

alsa_output.usb-0c76_USB_PnP_Audio_Device-00.analog-stereo

This is the digitised audio output from FreeDV (via USB Sound Card 2) to PiHPSDR and is used as the transmit audio that is sent to the Hermes Lite 2 transceiver.

FreeDV Transmit Audio Settings

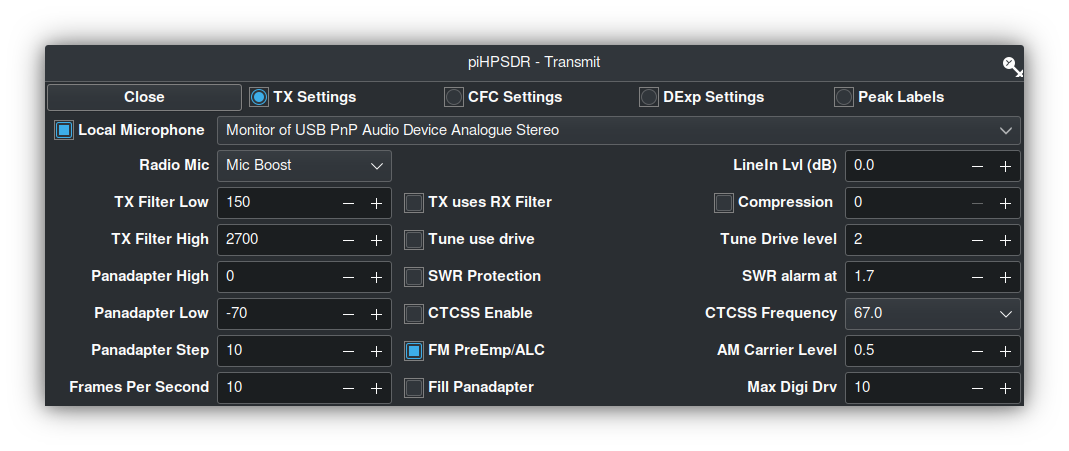
PiHPSDR Transmit Audio Setting

To complete the transmit audio path we next need to look at the PiHPSDR transmit audio setting.

PiHPSDR Transmit Audio Settings

As can be seen in the screenshot above, the Local Microphone device in PiHPSDR is set to the Monitor of USB PnP Audio Device Analogue Stereo.

This effectively routes the digitised output audio from FreeDV (Output From Computer to Radio device) to the Input audio of PiHPSDR.

The reason for using the Monitor audio feed is because FreeDV does not recognise the Mic Input in PiHPSDR as a valid output device for FreeDV to use, hence we just need to monitor the FreeDV output device and use it as our input audio device in PiHPSDR.

This completes the transmit audio chain.

Receive Audio Chain

PiHPSDR Receive Audio Setting

Starting at the beginning of the receive audio chain we first look at the PiHPSDR receive audio setting.

PiHPSDR Receive Audio Setting

In the screenshot above we can see that the receive audio output from PiHPSDR is set to
USB PnP Audio Device Analogue Stereo (USB Sound Card2). This is the DX station’s digitised audio as received by the Hermes Lite 2.

FreeDV Receive Audio Settings

Next let’s look at the receive audio setting in FreeDV.

FreeDV Receive Audio Settings

The Input To Computer from Radio device is set to the monitor of the
USB PnP Audio Output Device:

alsa_output_usb_0c76_USB_PnP_Audio_Device-00.analog-stereo.monitor

This effectively routes the digitised audio output from the PiHPSDR receiver to the digitised audio input of FreeDV.

Once again we have to use the monitor of the USB PnP Audio Output device as FreeDV does not recognise the PiHPSDR output as a valid input device.

Next, the Output From Computer To Speaker/Headphones device is set to:

alsa_output.usb-Griffin_Technology_Inc_iMic_USB_audio_system-00.analog-stereo

This is the analogue audio output on the iMic USB Sound card (Sound Card 1) that routes the analogue audio to the headphones and completes the receive audio chain.

Summary

The audio routing required by FreeDV can appear very daunting when first attempting to configure it on the Linux platform but, hopefully the diagram and screenshots above will help in understanding the complete end-to-end audio chain that is required to make this mode work.

PiHPSDR can of course be replaced by your black box radio CODEC entries that will appear in the device lists shown above if you have your radio connected via USB. The config is basically the same but, just uses a different device instead of USB sound card 2 shown in the diagram above.

I hope this article is useful to those wanting to try FreeDV on the Linux platform and I look forward to hearing you on RADEv1.

More soon …