FreeDV audio routing with PiHPSDR and Hermes Lite 2

I’ve recently been trying out the FreeDV RADEv1 digital voice mode on the HF bands with great success. The audio quality is astounding when compared to the normal analog SSB mode. Using only 20w I’ve been surprised how successful I’ve been talking to stations in the UK and Europe as can be seen in my FreeDV Log.

FreeDV has been around for quite a few years with development being funded by an ARDC grant and financial sponsorship from the Software Freedom Conservancy.

So what is FreeDV?

To quote the FreeDV website:

FreeDV is a suite of digital voice modes for HF radio. Our flagship mode is the Radio Autoencoder (RADE). You can run RADE using a free GUI application for Windows, Linux and macOS that allows any SSB radio to be used for high quality digital voice.

And the most important part:

All software is open source, released under the (a) GNU Lesser Public License version 2.1 (GUI and legacy FreeDV modes) and two-clause BSD license (RADE).

FreeDV running under KDE-Plasma on Kubuntu PC

Looking at the digital voice (DV) community in the HAM Radio world, it’s stuffed full with proprietary DV modes from small software houses and black box transceiver manufacturers with no real OpenSource alternatives, until now.

Installing FreeDV is pretty simple regardless of which operating system (O/S) you use. Being a Linux user I grabbed the AppImage from the website and set about reading up on how it works and how it is configured.

I decided to take the two sound card approach since I have 2 USB sound cards connected to my shack Kubuntu Linux PC.

Configuring the audio routing isn’t straight forward as both the receive and transmit audio to/from the radio needs to be routed via the FreeDV app. To make this even more complicated I am using my Hermes Lite 2 SDR transceiver and PiHPSDR software, a complete OpenSource/OpenHardware Amateur Radio Station.

M0AWS FreeDV and PiHPSDR Audio Routing Diagram

Trying to clearly describe the audio routing using words alone would be impossible and very confusing so, I put together the diagram above.

Using two USB sound cards I’ve configured the system such that USB Sound Card 1 (an old Griffin iMic USB sound device) handles just the audio from/to the headphones and microphone. All the audio at this point in the system is analogue.

The second USB sound card, a cheap Plug and Play (PNP) USB audio device from Amazon, handles all the digitised signals from/to FreeDV and PiHPSDR.

Taking this 2 sound card approach keeps confusion to a minimum and separates the analogue and digital components of the audio routing.

So, how does this translate to the FreeDV and PiHPSDR audio settings?

Transmit Audio Chain

FreeDV Transmit Audio Settings

Starting at the beginning of the transmit audio chain, let’s look at the transmit audio settings in FreeDV.

Looking at the FreeDV Transmit audio settings screenshot below we can see that the
Input From Microphone to Computer device is set to:

alsa_input.usb-Griffin_Technology_Inc_iMic_USB_audio_system-00.analog-stereo

This is the microphone connection on the iMic USB device (USB Sound Card 1) and is the analogue transmit audio input to FreeDV.

The Output From Computer to Radio device is set to:

alsa_output.usb-0c76_USB_PnP_Audio_Device-00.analog-stereo

This is the digitised audio output from FreeDV (via USB Sound Card 2) to PiHPSDR and is used as the transmit audio that is sent to the Hermes Lite 2 transceiver.

FreeDV Transmit Audio Settings

PiHPSDR Transmit Audio Setting

To complete the transmit audio path we next need to look at the PiHPSDR transmit audio setting.
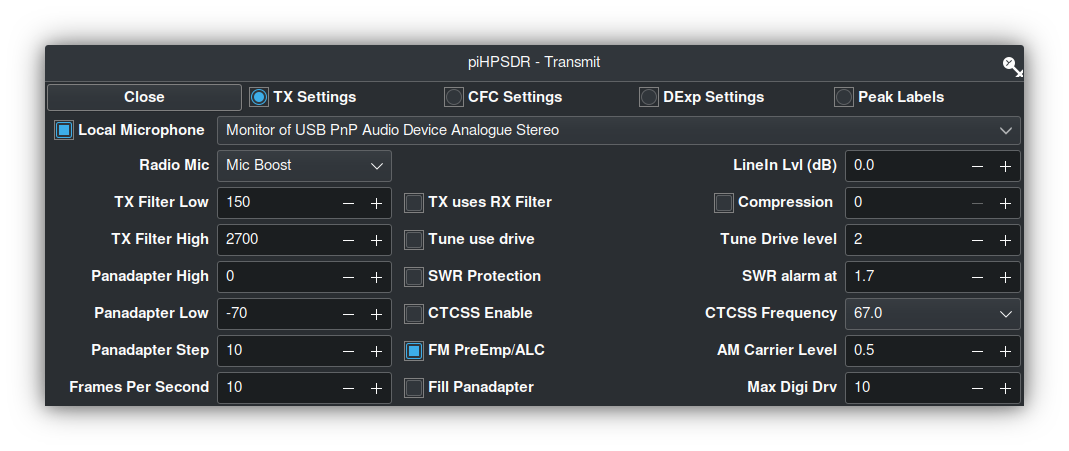
PiHPSDR Transmit Audio Settings

As can be seen in the screenshot above, the Local Microphone device in PiHPSDR is set to the Monitor of USB PnP Audio Device Analogue Stereo.

This effectively routes the digitised output audio from FreeDV (Output From Computer to Radio device) to the Input audio of PiHPSDR.

The reason for using the Monitor audio feed is because FreeDV does not recognise the Mic Input in PiHPSDR as a valid output device for FreeDV to use, hence we just need to monitor the FreeDV output device and use it as our input audio device in PiHPSDR.

This completes the transmit audio chain.

Receive Audio Chain

PiHPSDR Receive Audio Setting

Starting at the beginning of the receive audio chain we first look at the PiHPSDR receive audio setting.

PiHPSDR Receive Audio Setting

In the screenshot above we can see that the receive audio output from PiHPSDR is set to
USB PnP Audio Device Analogue Stereo (USB Sound Card2). This is the DX station’s digitised audio as received by the Hermes Lite 2.

FreeDV Receive Audio Settings

Next let’s look at the receive audio setting in FreeDV.

FreeDV Receive Audio Settings

The Input To Computer from Radio device is set to the monitor of the
USB PnP Audio Output Device:

alsa_output_usb_0c76_USB_PnP_Audio_Device-00.analog-stereo.monitor

This effectively routes the digitised audio output from the PiHPSDR receiver to the digitised audio input of FreeDV.

Once again we have to use the monitor of the USB PnP Audio Output device as FreeDV does not recognise the PiHPSDR output as a valid input device.

Next, the Output From Computer To Speaker/Headphones device is set to:

alsa_output.usb-Griffin_Technology_Inc_iMic_USB_audio_system-00.analog-stereo

This is the analogue audio output on the iMic USB Sound card (Sound Card 1) that routes the analogue audio to the headphones and completes the receive audio chain.

Summary

The audio routing required by FreeDV can appear very daunting when first attempting to configure it on the Linux platform but, hopefully the diagram and screenshots above will help in understanding the complete end-to-end audio chain that is required to make this mode work.

PiHPSDR can of course be replaced by your black box radio CODEC entries that will appear in the device lists shown above if you have your radio connected via USB. The config is basically the same but, just uses a different device instead of USB sound card 2 shown in the diagram above.

I hope this article is useful to those wanting to try FreeDV on the Linux platform and I look forward to hearing you on RADEv1.

More soon …
IC-705 – Going wireless with Apple Mac computers

Since getting my Icom IC-705 I’ve had problems with computer noise causing interference when connected via USB. I solved the problem mostly by winding both the USB and coax cables around 240-31 ferrite toroids. This resolved the problem nicely on all HF bands except 10m. With further investigation I realised that the 240-31 ferrite toroid doesn’t provide much choking resistance at 28mhz and so a 240-43 would be better for the higher bands. This would mean I’d need a longer USB cable and coax to the AH-705 so that there was enough cable to wind around two ferrite toroids to cover all the HF bands.

Whilst this will almost certainly provide a complete solution to the problem there is of course another way around this issue. The IC-705 is a rare beast in that it has wifi capability built in. The wifi on the IC-705 is capable of operating in one of two different modes, Access Point (AP) and Station, a host on an existing wifi network.

Since I connected my IC-705 to my in-shack wifi I am using the radio in station mode for connectivity via wifi. By connecting it this way my MacBook Pro will also have access to the internet at the same time as connecting to the radio giving me the best of both worlds.

You can of course put the radio into AP mode and connect your computer directly to it via wifi however, you won’t have any internet access from the computer as it will be connected directly to the radio. This is how it will be used when in the field for portable operations unless you have a portable 3/4/5g wifi router.

Getting the radio connected to my shack wifi was easy, just go into the IC-705 menus, switch the WLAN on, pick the SSID of my wifi router and enter the password, the radio connects immediately. You will also need to switch on the network control option and also set up a user and password that is used when connecting to the radio from your computer. Refer to the IC-705 manual on how to do this if you haven’t done it already.

To be able to use the radio wirelessly from any Apple Mac computer you will need 2 applications, WFview and Blackhole. Both of these applications are Opensource Software, I’m a huge fan of Opensource Software and have over the years been involved in a number of opensource projects.

I’m fully aware that there is an application called SDR Control available on the Apple App Store for around £90.00 that can be used instead to connect to the IC-705 wirelessly however, I prefer to use Opensource software where possible.

Before proceeding with the instructions below make sure you have an up to date backup of your system. This installation and configuration shouldn’t cause any issues at all, it worked fine on my MacBook Pro but, it’s always best to backup before you install more complex software like this.

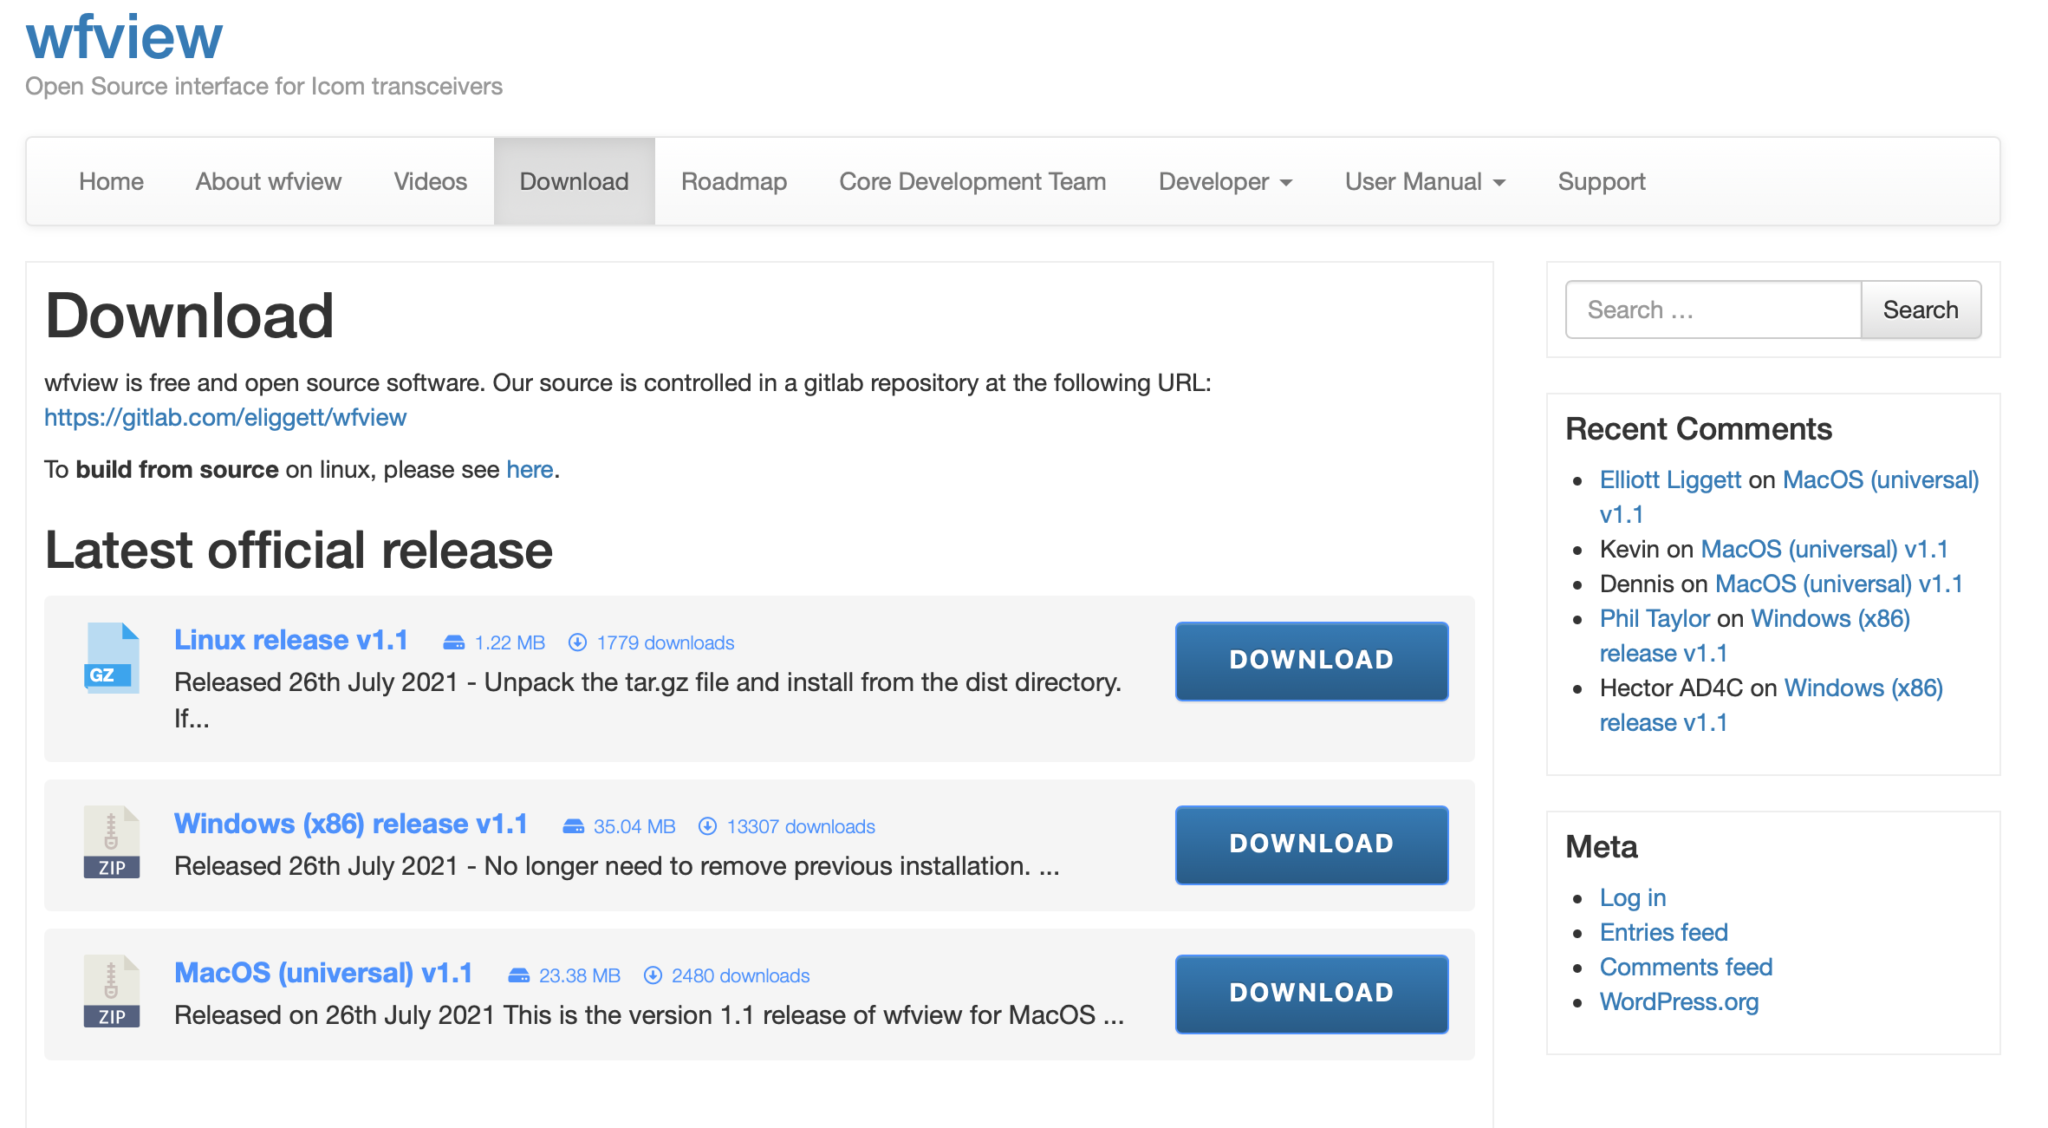
First you need to download WFView from the Download page, make sure to download the MacOS Universal package which was v1.1 at the time writing this article. Do **not** install WFView yet, the sequence of installation is important!

WFView Download page showing the MacOS (Universal) Package v1.1

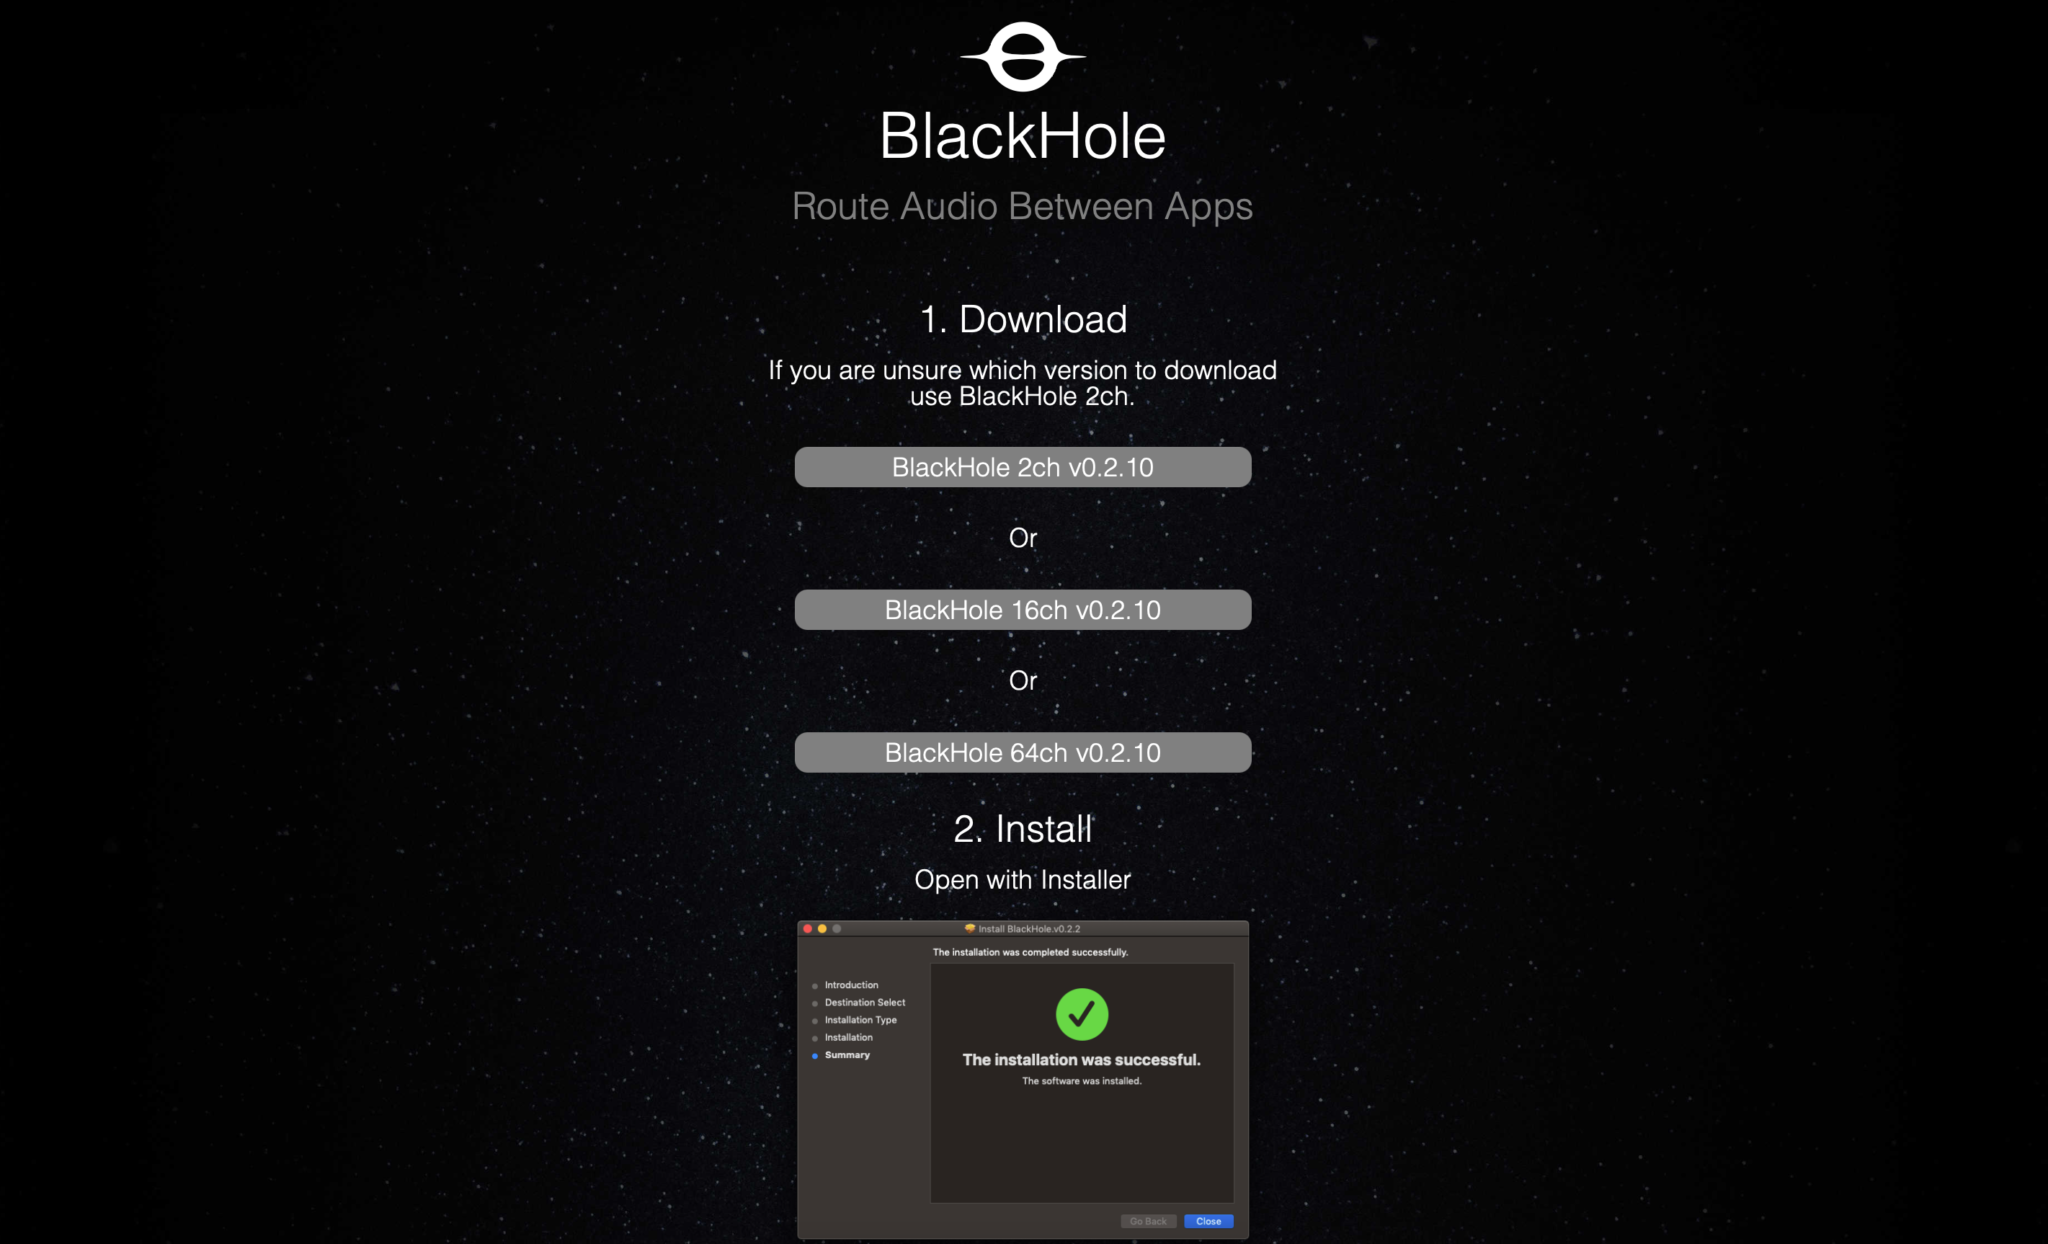
Next download the Blackhole Virtual Audio Cable application from the download page. You will need to enter an email address and your name to be able to download the application. It’s not clear how much email/spam will be sent to you but, you will need to get at least one email to obtain the download link with the authorisation code in it.

Once you’ve entered the information and submitted it you will get an email with a URL enclosed, click the URL and goto the download page. On the page there are 3 options available for download, select the “Blackhole 2 Ch” option only. At the time of writing this v0.2.10 was the current version available.

Blackhole Download page showing the 3 options available

Once downloaded you need to install the Blackhole application first as it will create the necessary virtual audio cable for WFView to use to provide sound to WSJT-X and other digital mode applications. Installation is simple and follows the normal MacOS installation process. Double click the installation package and follow the prompts accordingly.

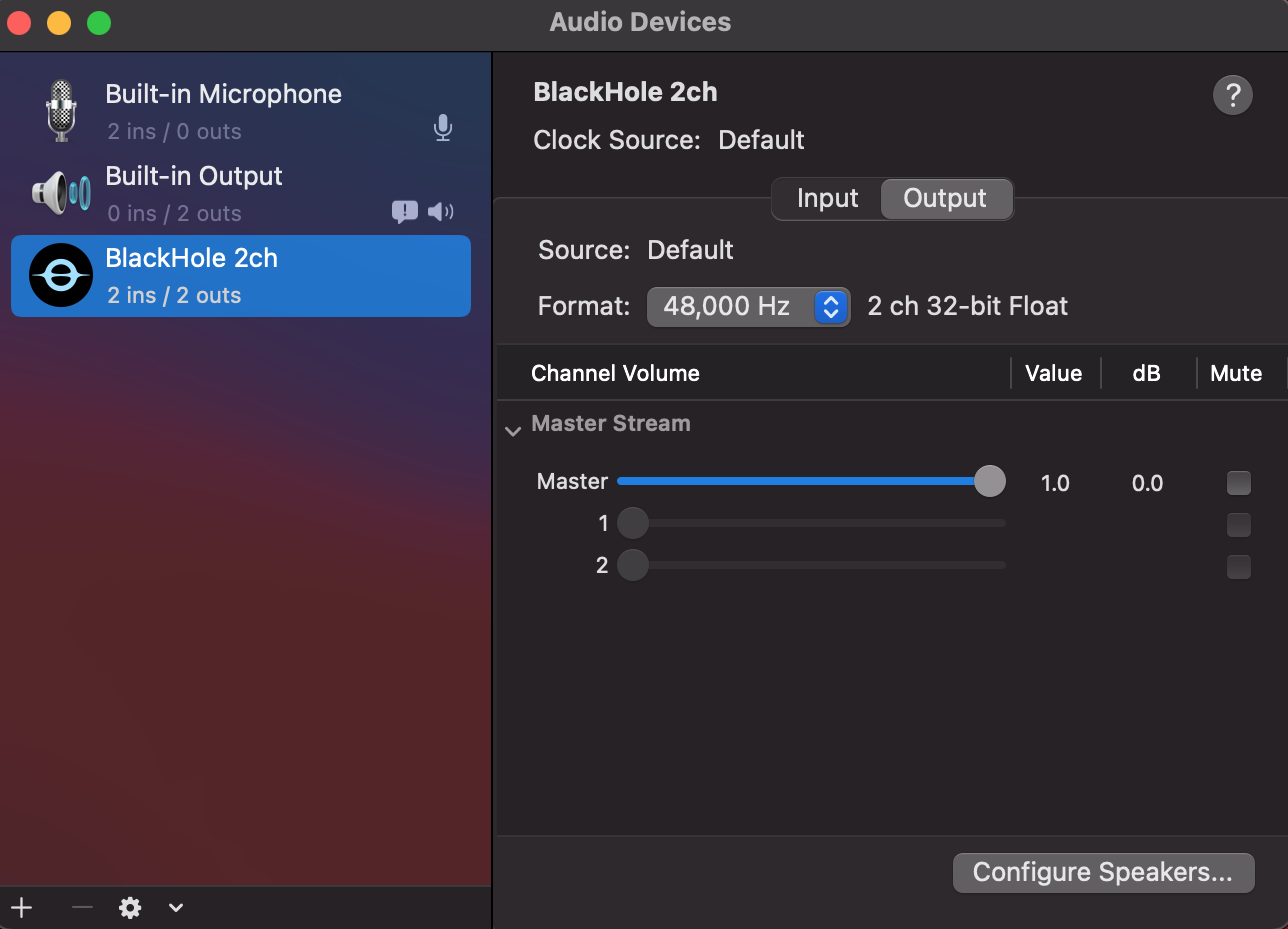
Once installed reboot your Apple computer to make sure it starts up OK with the new kernel module installed. When your system comes back up, login and open the “Audio Midi Setup” application. (The Midi app is in Applications >> Utilities)

Once the application opens you should see that you have a new audio device called “Blackhole 2ch”. On both the Input and Output tabs set the format to 48,000Hz. This setting will get the best results when using applications like WSJT-X for FT4/8 digital modes.

Apple Audio Midi Setup showing 48,000Hz selected

Leave everything else as default setting in the Audio Midi App, nothing else needs changing. Leave the Master volume at the default max as levels are controlled from the other apps.

Once you’ve set the 48,000Hz on the two tabs quit the audio midi app as it’s no longer required.

Next you need to copy the WFView app that you downloaded into the Applications folder on your Mac. Once in the applications folder you can create a shortcut to it on the dock by dragging and dropping the app icon onto your dock bar.

Next goto your IC-705 and go into the WLAN settings and make a note of the IP Address assigned to the radio from your wifi router. You will need this IP Address later.

At this point you are half way to having wireless control of your IC-705.

Start the WFView application and goto the settings tab.

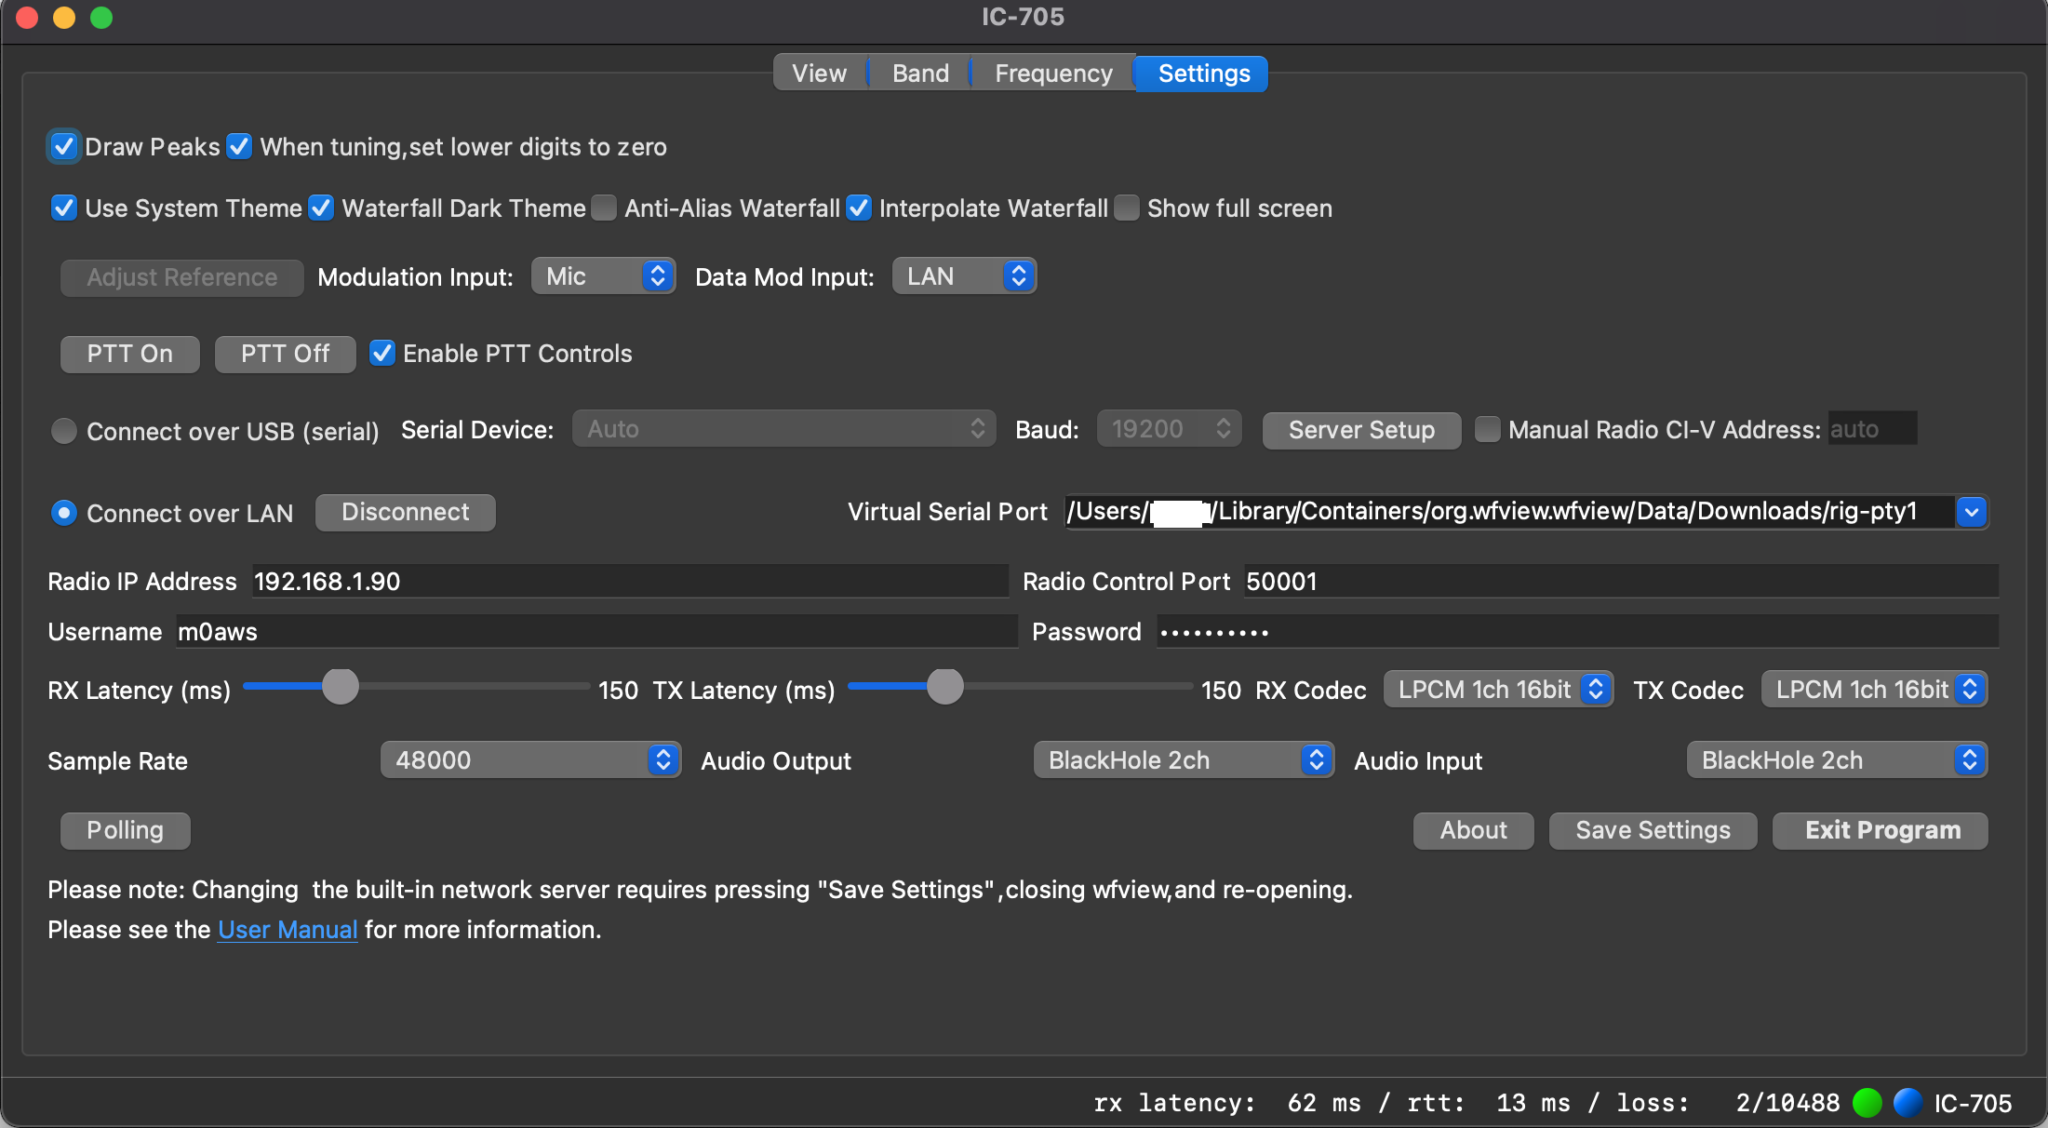
The following settings need to be made:

1: Set Data Mod Input to LAN

2: Click the Connect Over LAN radio button.

3:Enter the IP Address from your IC-705 into the Radio IP Address field.

4: Make sure Radio Control Port is set to 50001

5: Enter the Username you configured on your IC-705 into the Username field

6: Enter the Password you configured on your IC-705 into the Password Field

7: Set Sample Rate to 48000

8: Set Audio Output and Input fields to BlackHole 2ch

9: Select the first option available in the Virtual Serial Port field. This should be as shown below:

/Users/username/Library/Containers/org.wfview.wfview/Data/Downloads/rig-pty1

Note: Replace username with your login username.

Leave all other settings as default and click Save Settings and then Exit Program.

You must exit the application in order to restart it with all the new settings.

WFView Settings tab showing all the necessary settings whilst connected to the radio

Start the WFView application again and goto the Settings tab. Click on the Connect Button.

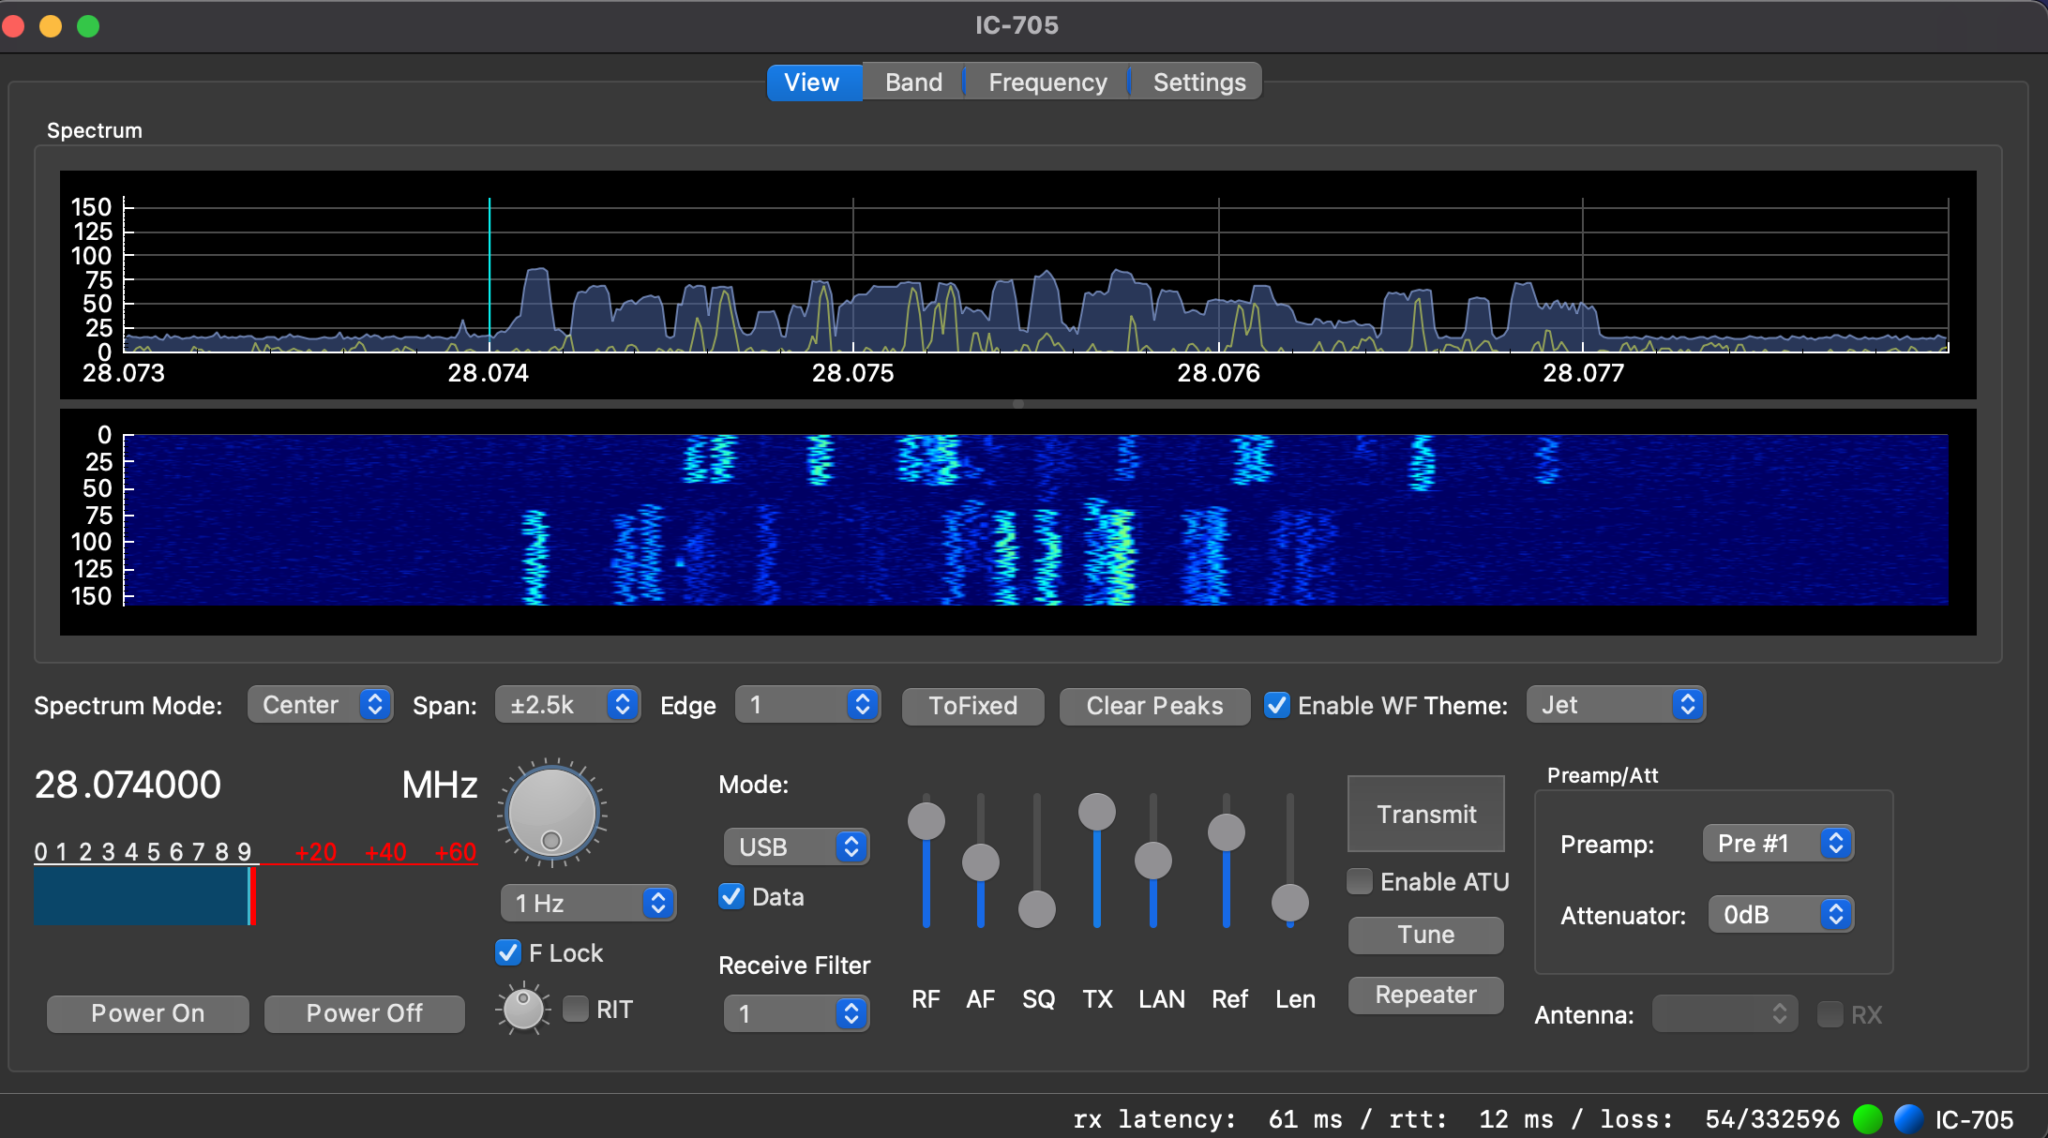
Once it has connected to the radio you will see the RX Latency details etc on the bottom right of the window. Click on the View tab and you should now have an active waterfall.

At this point you have full control of your IC-705 wirelessly. Have a play with the application and get familiar with it.

Fully operational WFView connected to my IC-705 receiving FT8 on 10m

Once I had WFView operational I set about getting WSJT-X connected to the radio wirelessly. This is actually really simple to do and just needs a couple of changes to the settings to make it work.

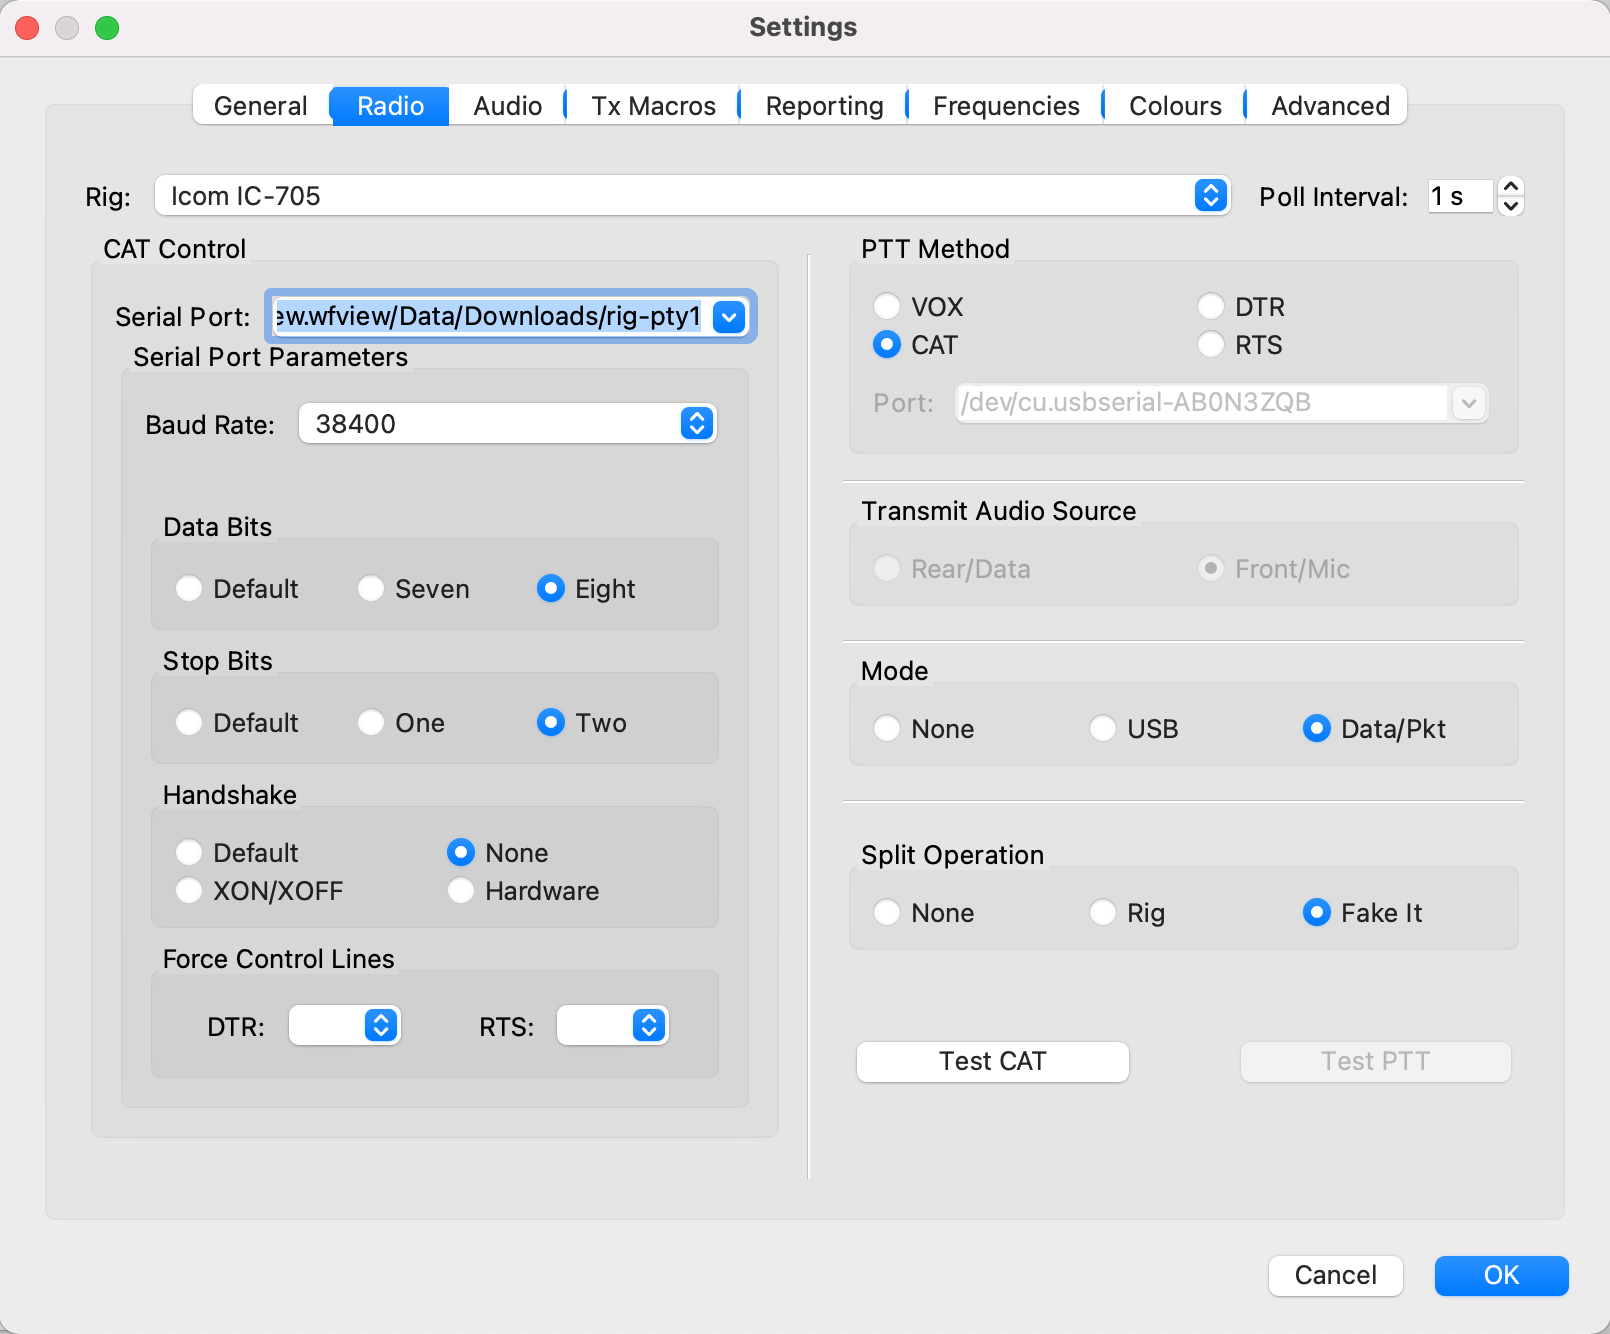
Start up the WSJT-X application and goto the Radio Settings tab. On this page you need to set the radio to IC-705, serial port to that shown below (Also shown in point 9 in the WFView section above) and Baud Rate to 38400.

/Users/username/Library/Containers/org.wfview.wfview/Data/Downloads/rig-pty1

Note: Replace username with your login username.

WSJT-X Settings showing Serial Port and Baud Rate

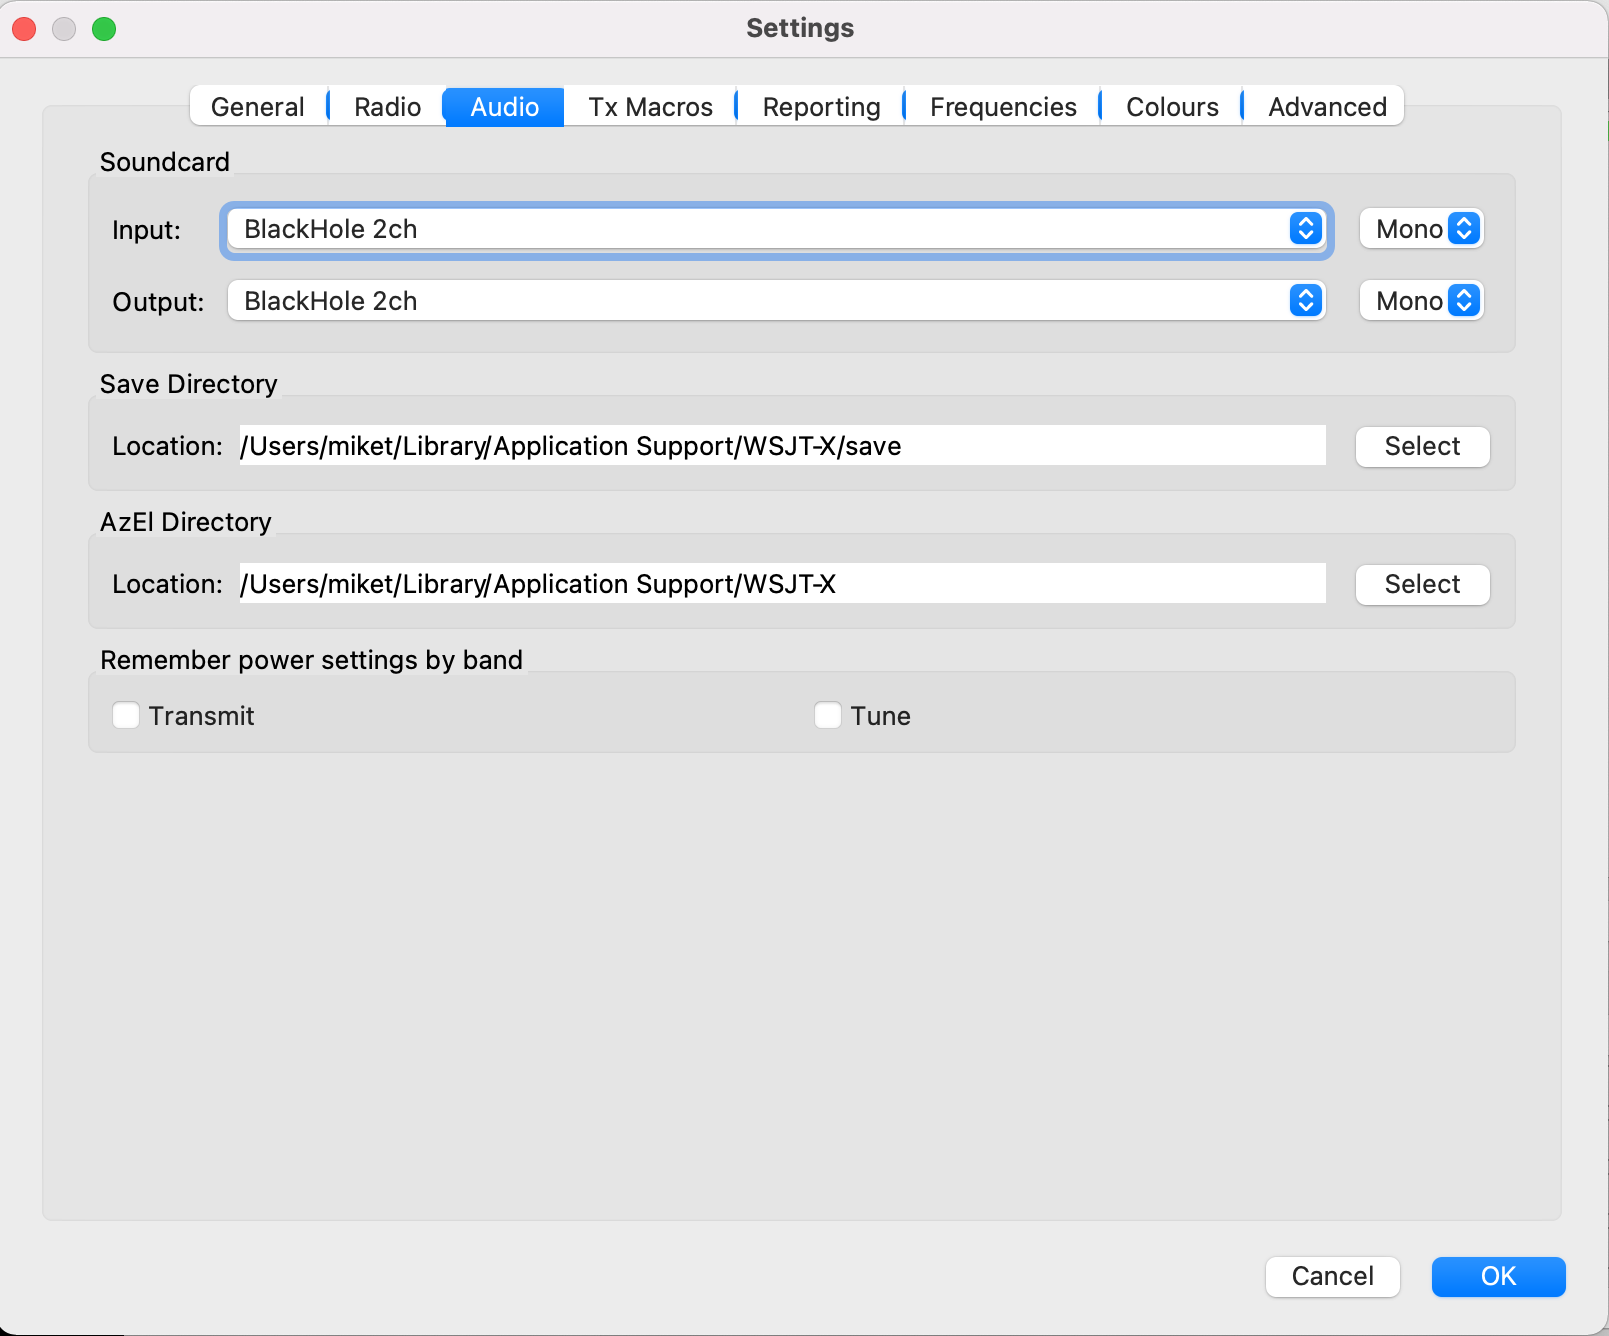
Next select the WSJT-X Audio Settings tab and set the soundcard Input/Output fields to Blackhole 2ch. Set both Input and Output to Mono as shown below.

WSJT-X Audio settings

Click OK and return to the WSJT-X main screen. You should now be fully operational for WSJT-X digital modes.

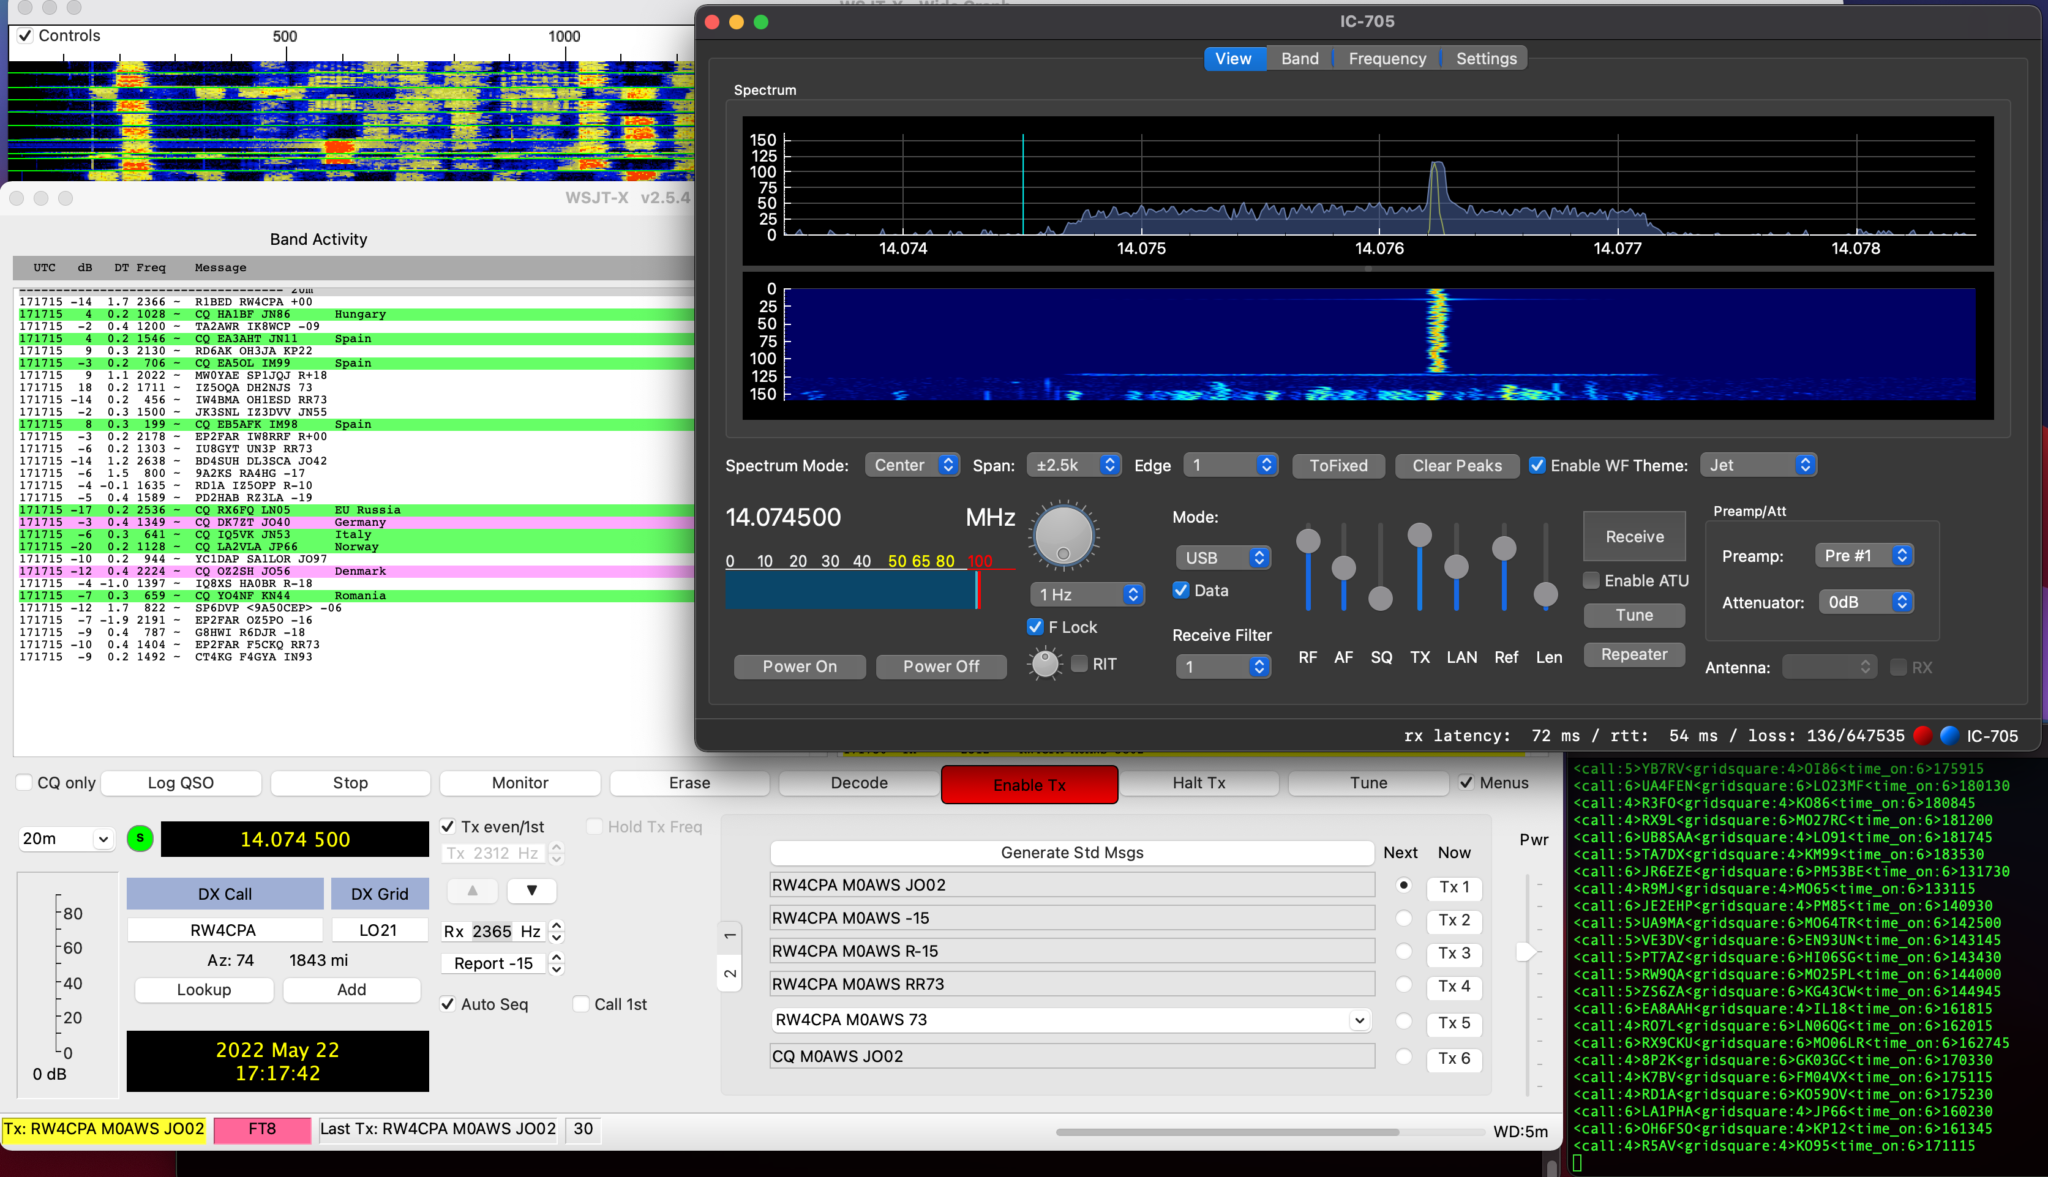
WSJT-X transmitting through WFView to the IC-705

Once I’d made a few contacts with WSJT-X in FT8 mode I went on to try and get FLDigi working with WFView as well.

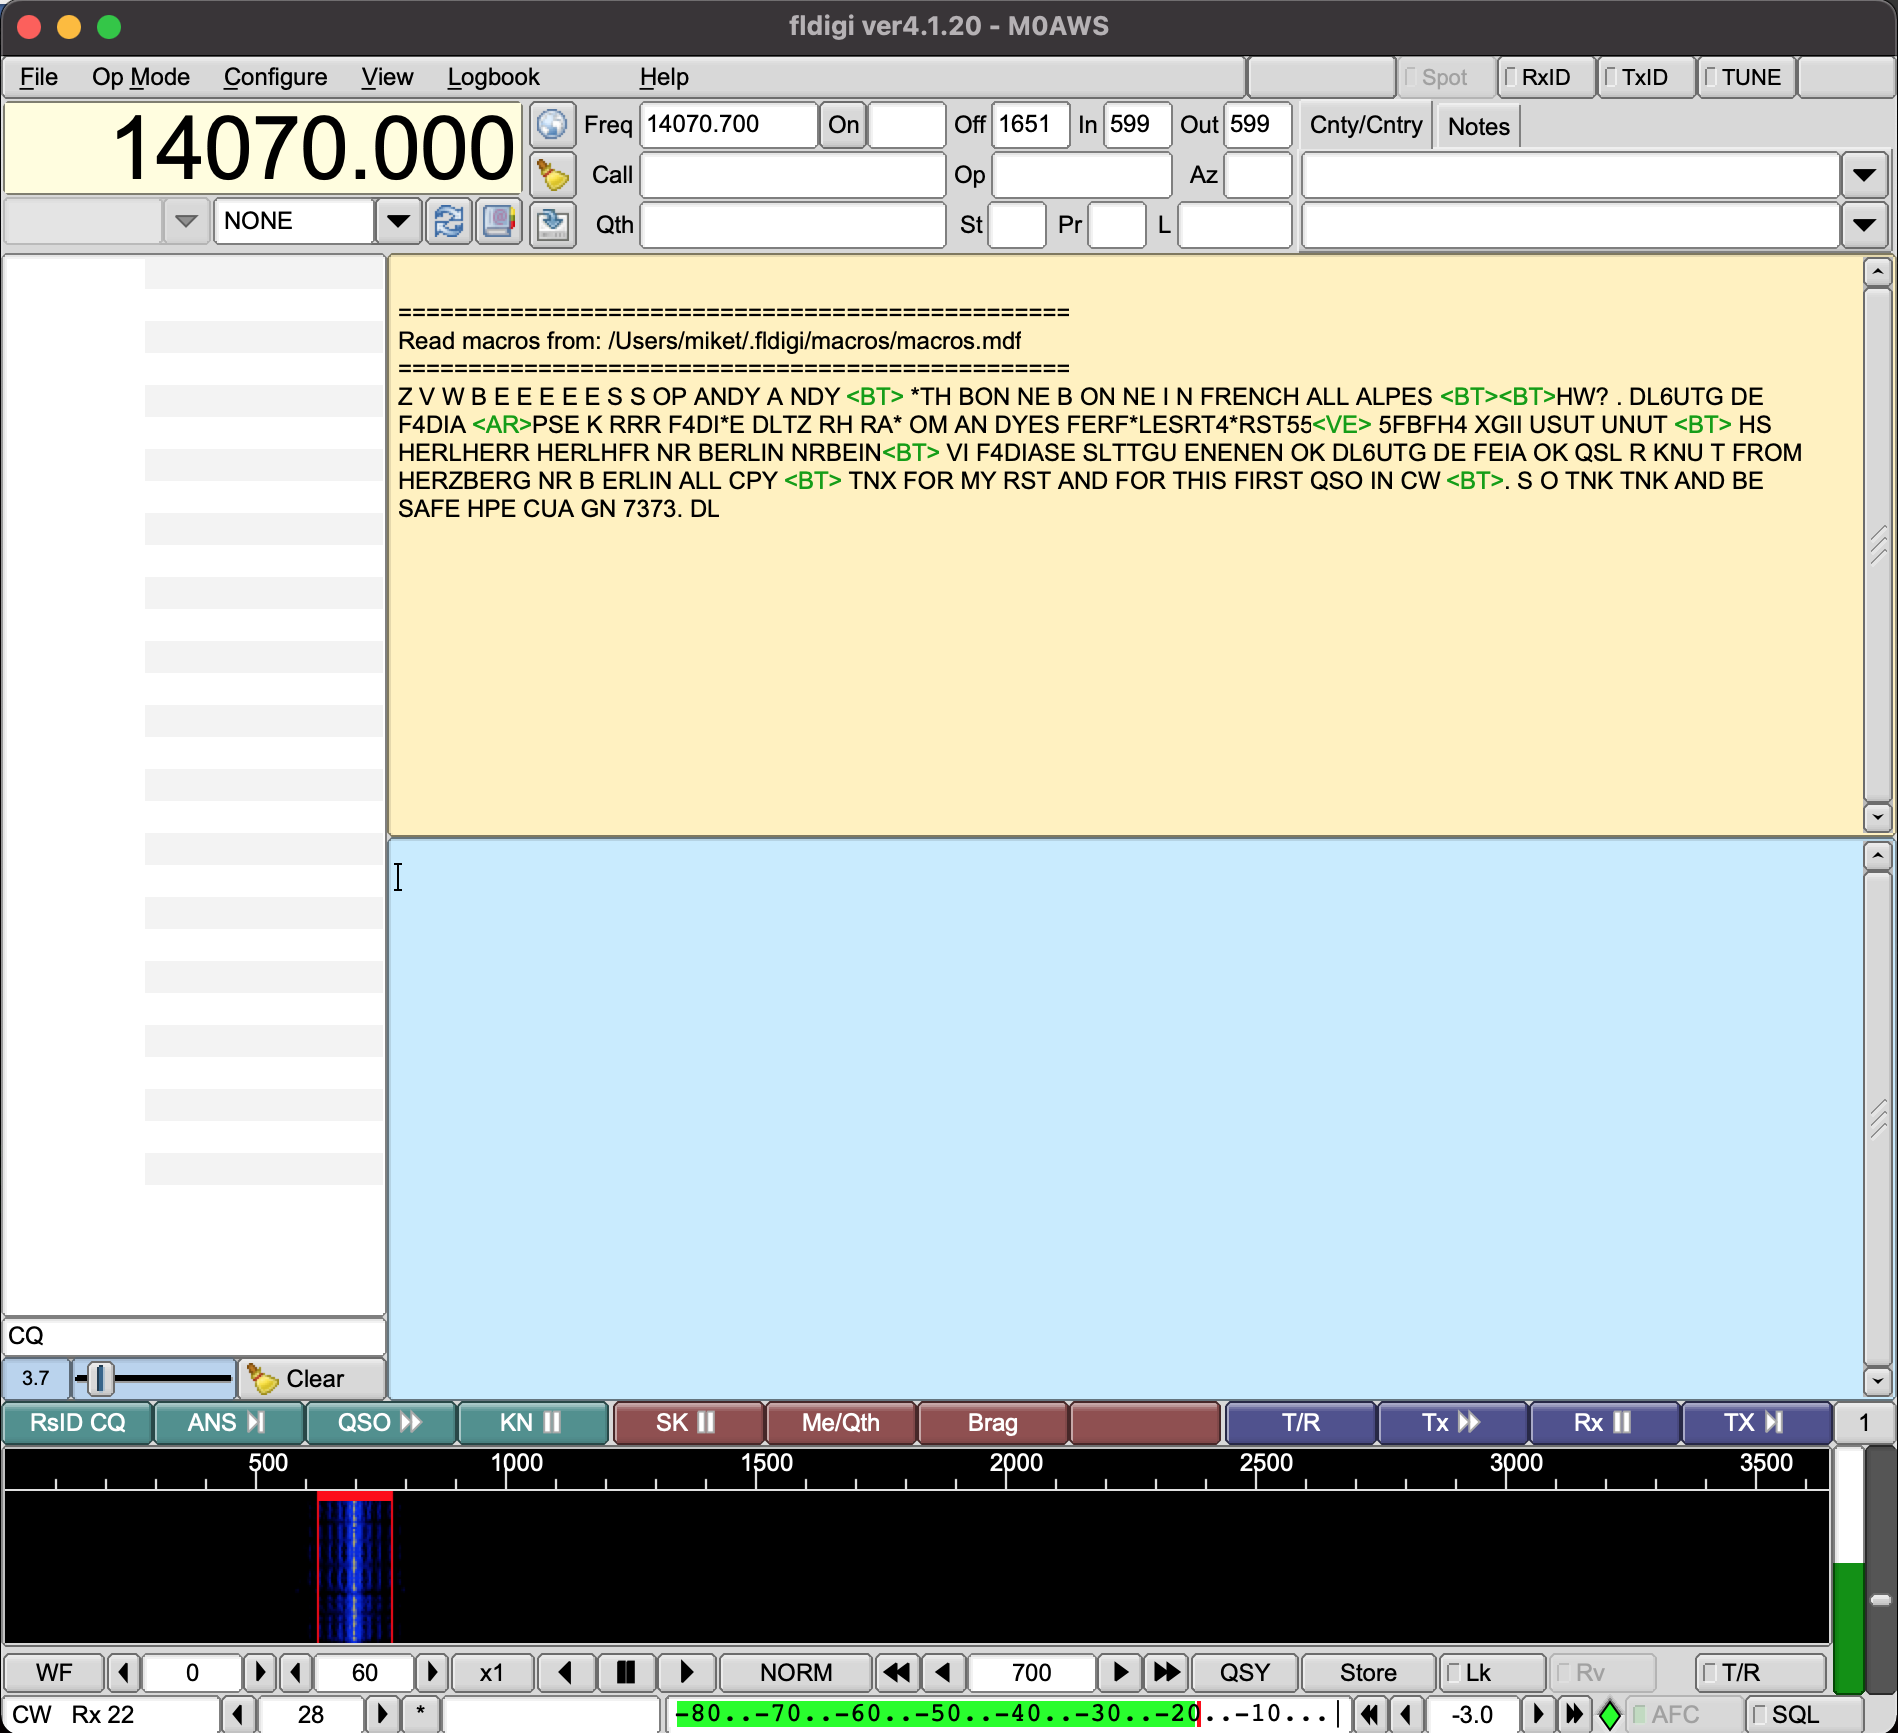
Unfortunately at the moment I cannot get CAT control working in either FLDigi or FLRig, neither will accept the /dev/ttys000 as the serial device however, I was able to get the audio working into FLDigi and even decoded some morse with it. I need to do little more work to fathom out why the CAT control doesn’t work in these two applications. I’m sure there is a way to resolve this but, I just need to put in a little more time to find the solution.

FLDigi decoding Morse code via WFView

UPDATE: There was some concern in one of the IC-705 Facebook groups that Blackhole wouldn’t work after a MacOS update. I’ve just upgraded my Macbook Pro to MacOS 11.6.6 and BlackHole is still fully functional afterwards. The MacOS update has no effect on the BlackHole service whatsoever. So you can rest easy!

More soon …

FTDX10, Apple Computers and the USB Audio Chain

One of the things I’ve had issues with ever since purchasing the Yaesu FTDX10 transceiver is control of the audio chain via the USB connection on the rear of the radio.

The output from the radio into my Macbook Pro is just too high, WSJT-X is constantly pushed beyond the green zone and often into the red zone when monitoring FT8 signals with the AGC off. The only way to cure this is to keep the AGC on Auto which sometimes results in not hearing the very weak DX stations due to the AGC not reacting fast enough. Putting the AGC on fast causes the red line to be hit far too often once more.

Sadly, the USB Audio Codec doesn’t provide any volume adjustment on audio coming from the radio into the MacBook Pro thus, it’s just full volume all the way. This is a flaw in the codec design and really does need to be resolved long term.

Looking at the audio going the other way, that is from the MacBook Pro into the radio via the USB port fortunately there are gain controls available both on the MacBook Pro and on the radio itself.

Ever since venturing into the world of WSJT-X & FT8/4 I’ve had an issue with only being able to move the PWR slider in the WSJT-X up to the first marker at the bottom of the screen, anymore and the ALC on the radio goes off the scale instantly!

So yesterday I decided to investigate the audio chain into the radio more thoroughly and see what could be done about the levels.

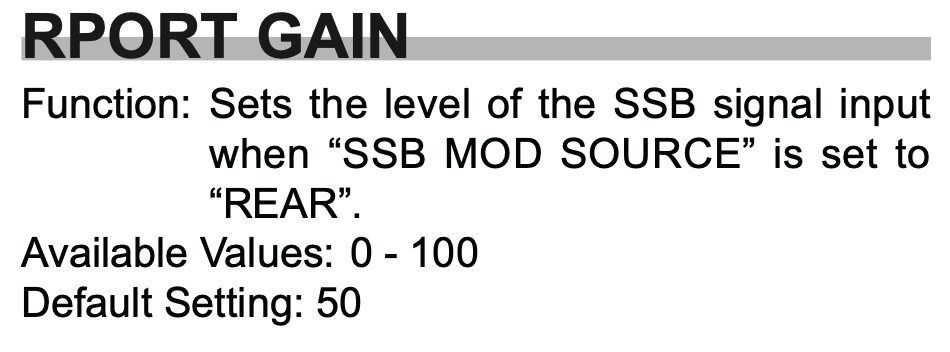
Looking at the radio manual I found that there is an RPORT GAIN setting in the menu system that can be used to alter the amount of gain applied to the incoming audio signal on the USB port in the radio.

FTDX10 Rport Gain entry in the manual

As detailed in the manual, the default setting for this is 50 in a range of 0 to 100. So that’s a 50% increase in gain applied to the incoming audio at the radio end, that’s quite a boost! (The gain is applied both in SSB and Data Modes)

I decided to experiment reducing this figure to see if it gave me greater control over the audio output from WSJT-X via the PWR control. This did indeed help however, there was still too much audio coming into the radio from the MacBook Pro and so I needed to look further along the audio chain.

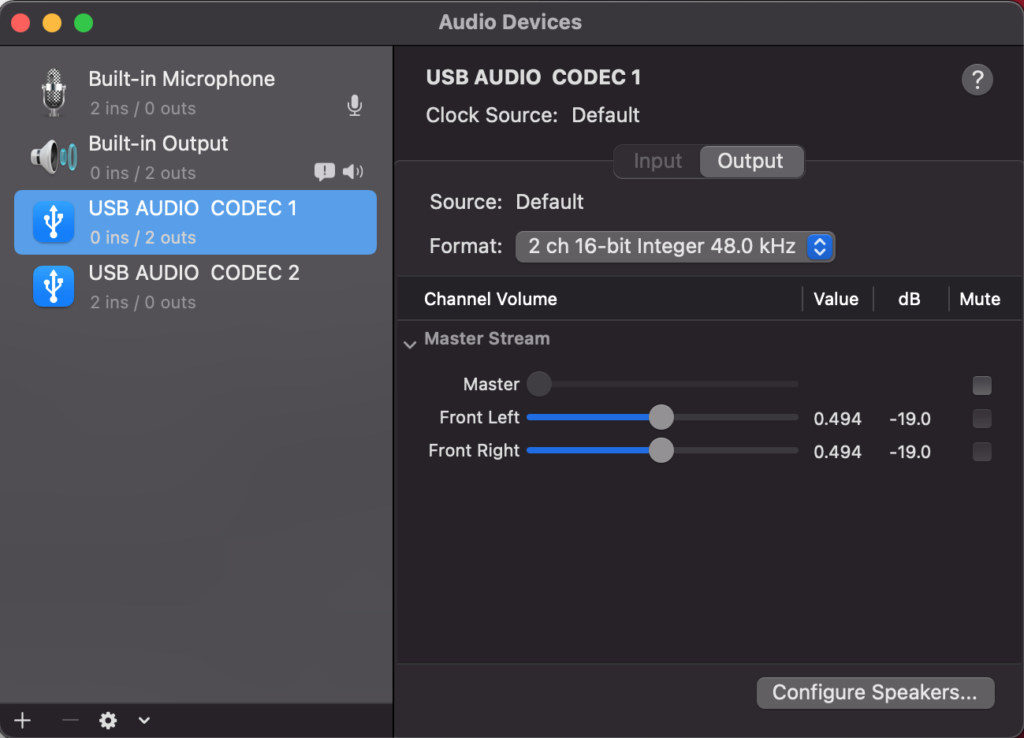
Moving back onto the MacBook I opened the Midi App and took at look at the Output controls for the USB Audio Codec, sure enough this was set to max for both channels, not good.

Reducing the levels in the midi app started to make much more of a difference, I could now raise the audio level using the PWR control in WSJT-X without things immediately going wild and could now control the levels with a far greater level of granularity than ever before.

After much tinkering I eventually found the levels whereby I could drive the rig to the selected output power (20w) without the ALC going off the scale and the signal becoming horribly distorted, there was calm in my audio chain once more.

So what settings did I settle on?

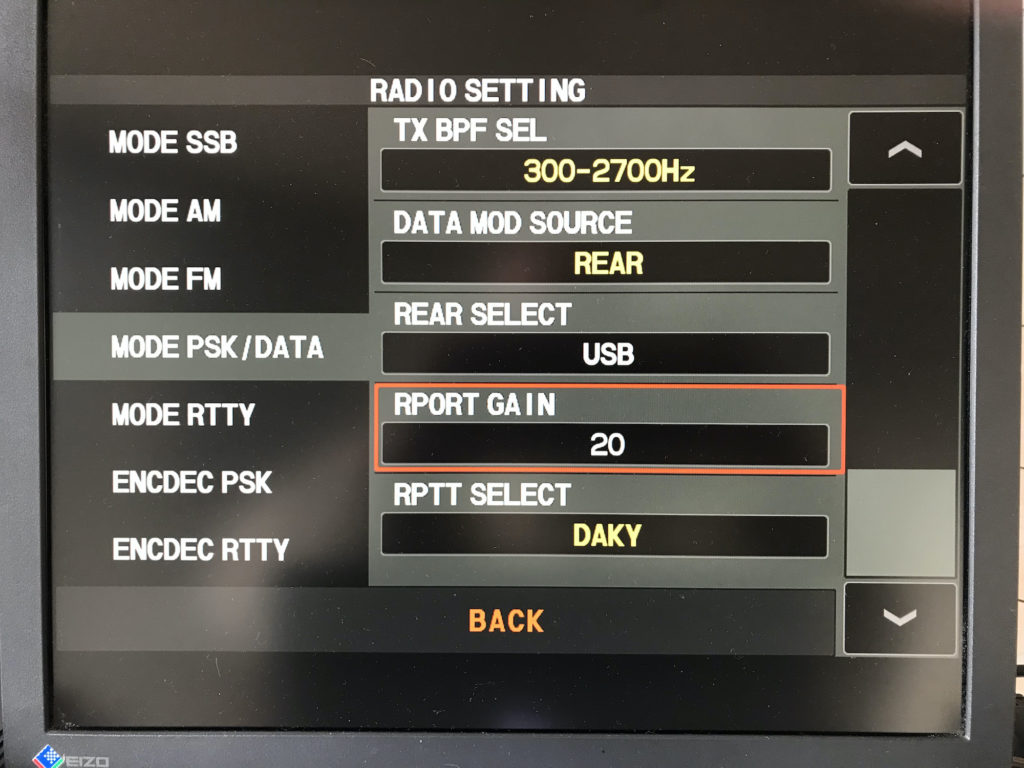
On the radio itself I wound down the RPORT GAIN setting from 50 to 20, this reduced the amount of gain applied to the audio coming in on the USB port considerably and helped to tidy up the FT8 signal.

FTDX10 RPORT GAIN Setting reduced from 50 to 20

It’s great that there is the facility on the radio to reduce the gain on the inbound audio signal, if only Yaesu would do the same for the outbound audio level.

Next, on my MacBook Pro via the Midi app I reduced the output level on the USB Audio Codec from the default maximum down to 0.494 (-19). This stops the audio level from being too high going into the radio and removes all distortion from the resulting signal.

Midi App on Macbook Pro showing reduced audio output

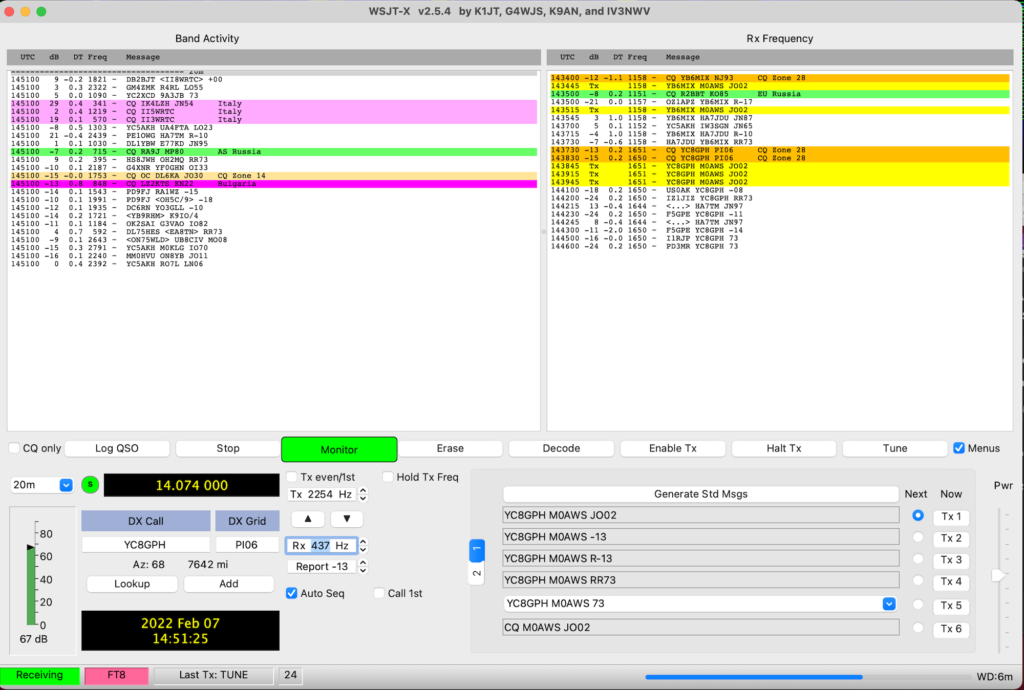
Once these small changes have been made it becomes necessary to raise the PWR level in the WSJT-X app to roughly the centre position. At this point the radio gets a clean, distortion free audio input whilst driving the radio to the full 20w output with no movement on the ALC whatsoever.

I found I could move anywhere on the frequency spectrum on FT8 without any of the levels changing and with the ALC not moving whilst the radio delivered the full 20w output.

I also checked FT4 mode as it is an MFSK mode to see if these settings worked for it too and I’m glad to say it worked perfectly! (I also found I really liked FT4!)

WSJT-X with the PWR setting at roughly 50%

Altering the PWR level in WSJT-X doesn’t have the huge effect it had before and now it’s very easy to adjust the level without the ALC going off the scale in an instant.

It took me about an hour or so to get this just right but, it was well worth the time invested.

I hope this is of use to other Apple Mac computer users in the HAM community.

More soon …