Building HAM Clock on an old RaspberryPi

I’ve got a couple of old RaspberryPi computers on the shelf in the shack and so decided it was time for me to put one of them to good use. The first model on the shelf is the oldest and is one of the very first RaspberryPi 1 computers that was released. (It’s the one with the yellow analog video signal output on the board!). This particular model is extremely slow but, I hang onto it just as a reminder of the first SBC in the line.

The second one is a RaspberryPi 2, a quad core machine that is only slightly faster than the first model but, it’s powerful enough to run HAM Clock.

It didn’t take long to install a vanilla Raspbian Desktop O/S and get it configured on the local LAN. I installed a few packages that I like to have available on all my Linux machines and then started on the HAM Clock install.

The first thing I needed to do was install the X11 development library that is required to compile the HAM Clock binary. To do this, open a terminal and enter the command below to install the package.

sudo apt install libx11-dev

You will need to type in your password to obtain root privileges to complete the installation process and then wait for the package to be installed.

The HAM Clock source code is available from the HAM Clock Website under the Download tab in .zip format. Once downloaded unzip the file and change directory into the ESPHamClock folder ready to compile the code.

cd ~/Downloads/ESPHamClock

Once in the ESPHamClock directory you can run a command to get details on how to compile the source code.

make help

This will check your system to see what screen resolutions are available and then list out the options available to you for compiling the code as shown below.

The following targets are available (as appropriate for your system)

    hamclock-800x480          X11 GUI desktop version, AKA hamclock
    hamclock-1600x960         X11 GUI desktop version, larger, AKA hamclock-big
    hamclock-2400x1440        X11 GUI desktop version, larger yet
    hamclock-3200x1920        X11 GUI desktop version, huge

    hamclock-web-800x480      web server only (no display)
    hamclock-web-1600x960     web server only (no display), larger
    hamclock-web-2400x1440    web server only (no display), larger yet
    hamclock-web-3200x1920    web server only (no display), huge

    hamclock-fb0-800x480      RPi stand-alone /dev/fb0, AKA hamclock-fb0-small
    hamclock-fb0-1600x960     RPi stand-alone /dev/fb0, larger, AKA hamclock-fb0
    hamclock-fb0-2400x1440    RPi stand-alone /dev/fb0, larger yet
    hamclock-fb0-3200x1920    RPi stand-alone /dev/fb0, huge

For my system 1600×960 was the best option and so I compiled the code using the command as follows.

make hamclock-1600x960

It’s no surprise that it takes a while to compile the code on such a low powered device. I can’t tell you how long exactly as I went and made a brew and did a few other things whilst it was running but, it took a while!

Once the compilation was complete you then need to install the application to your desktop environment and move the binary to the correct directory.

make install

Once the install is complete there should be an icon on the GUI desktop to start the app. If like mine it didn’t create the icon then you can start the HAM Clock by using the following command in the terminal.

/usr/local/bin/hamclock &

The first time you start the app you’ll need to enter your station information, callsign, location etc and then select the settings you want to use. There are 4 pages of options for configuring the app all of which are described in the user documentation.

M0AWS - HAM Clock running on RaspberryPi Computer
M0AWS – HAM Clock running on RaspberryPi Computer

Once the configuration is complete the map will populate with the default panels and data. I tailored my panels to show the items of interest to me namely, POTA, SOTA, International Beacon Project and the ISS space station track. I was hoping to be able to display more than one satellite at a time on the map however, the interface only allows for one bird to be tracked at a time.

You can access the HAM Clock from another computer using a web browser pointed at your RaspberryPi on your local LAN using either the IP address or the hostname of the device.

http://<hostname>:8081/live.html

or

http://<ip-address>:8081/live.html

You can also control the HAM Clock remotely via web browser using a set of web commands that are detailed on port 8080 of the device.

http://<hostname or ip-address>:8080/
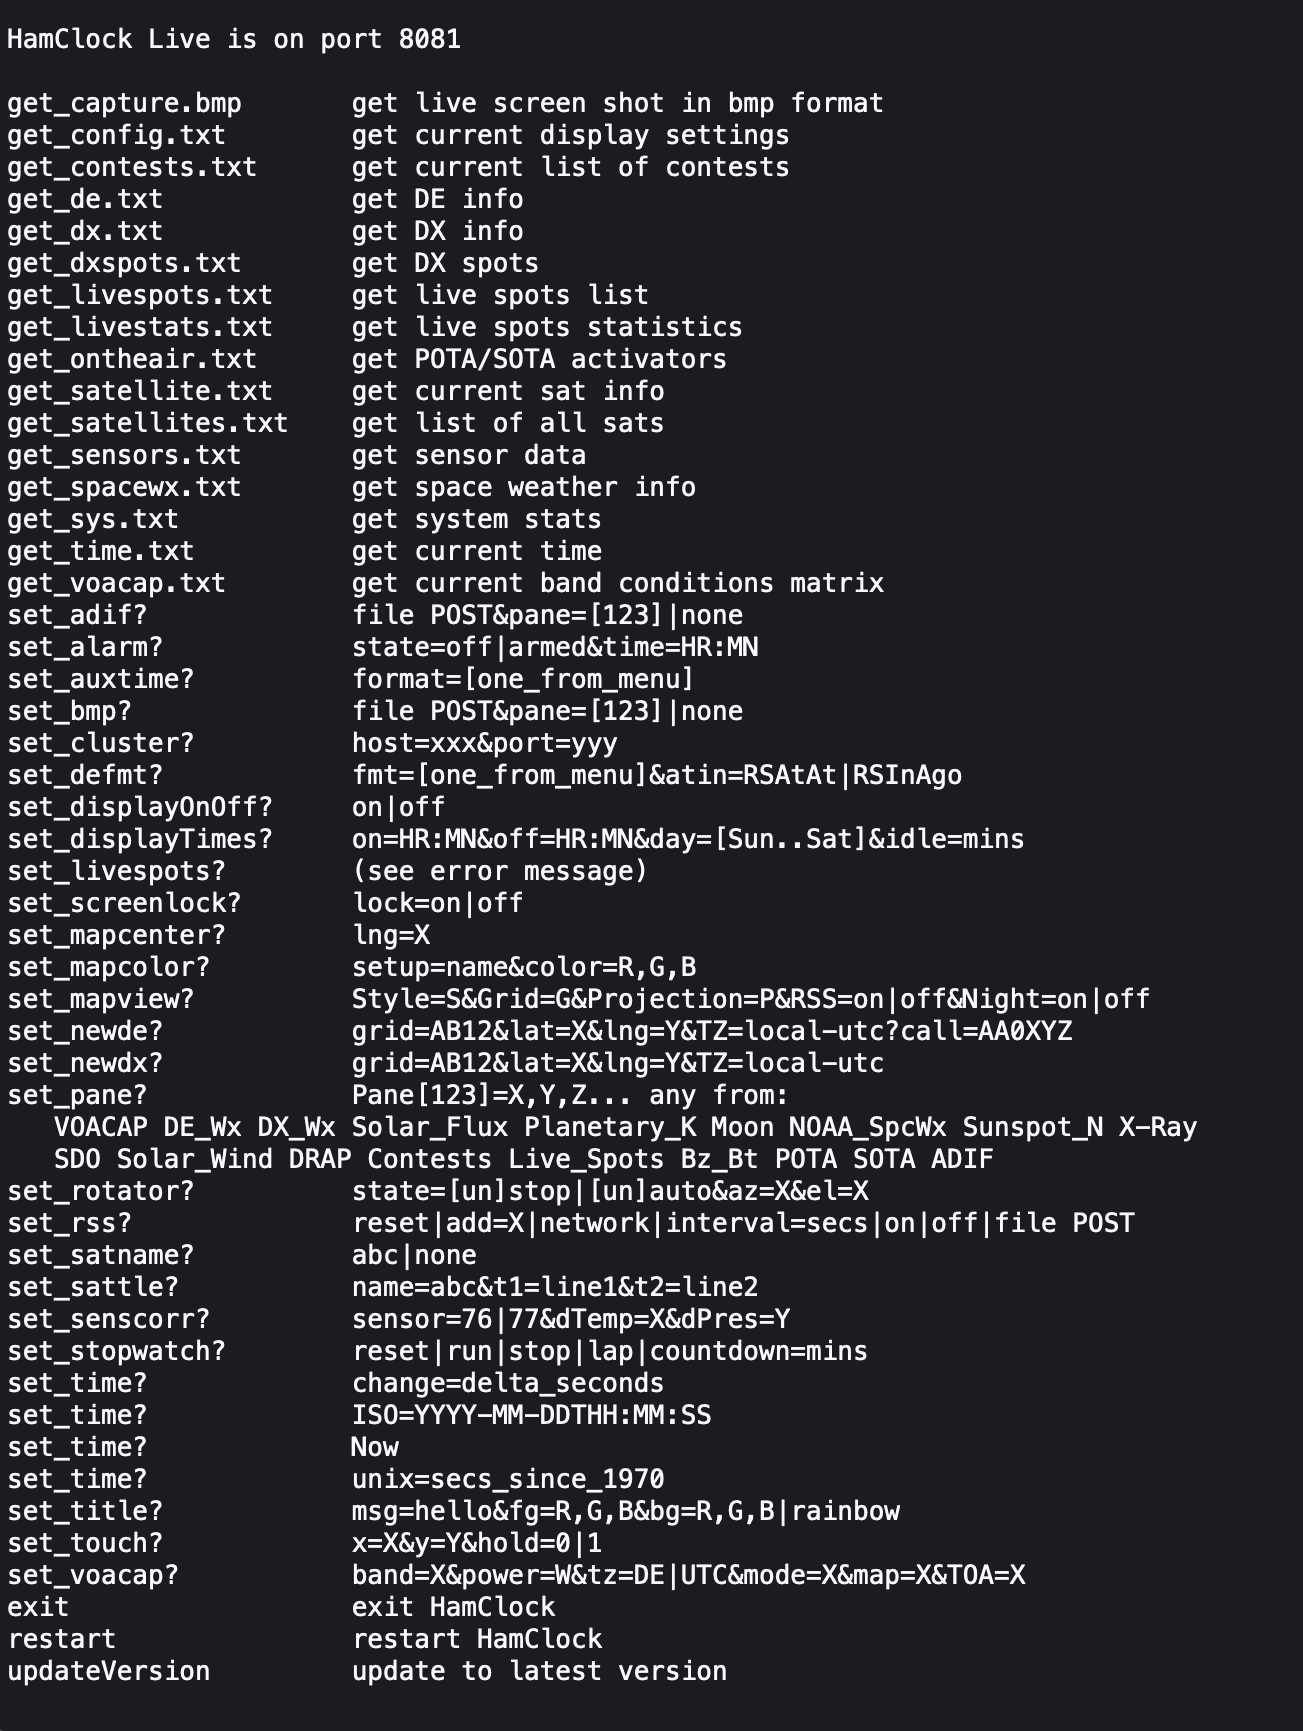
M0AWS - HAM Clock remote command set
M0AWS – HAM Clock remote command set

This is a great addition to any HAM shack especially if, like me you have an old HDTV on the wall of the shack that is crying out to display something useful.

More soon …

Loading Meshtastic Firmware onto Heltec ESP32 v3 Devices

The loading of the Meshtastic firmware on the Heltec ESP32 v3 devices is really simple if done via a Linux PC/RaspberryPi. There are of course other ways to load the firmware using a web browser that supports USB/Serial devices and this method is preferred by many however, being a Linux command line junkie I far prefer the simplicity of using the Linux command line to do the job.

So, how much experience with the Linux command line do you need?

In all honesty none at all. If you know how to use copy and paste then all you have to do is follow the simple steps I’ve detailed below. In reality it will only take a few minutes to do so, don’t be put off by the long article, I’ve just tried to cover everything and provide screen shots along the way.

To get started fire up your Linux PC/RaspberryPi and get yourself to the desktop. Next you will need to open a Linux command line terminal. This is often just called “Terminal” on most Linux desktop installations.

The first thing you need to do is check to see if you have python3 installed. This is done using the following command:

python3 --version

Running the above command you should see a result something like what is shown below.

Python3 command showing installed version

Next we need to check if pip3 is installed using the following command:

pip3 --version

If pip3 is installed then you should get a result similar to that shown below.

Pip3 command showing installed version

If your computer doesn’t have Python3 or Pip3 installed they can be easily installed from the command line. To install Python3 enter the following command into your terminal:

sudo apt install python3

You will be asked to enter your login password and then the installation will begin. You should see output in your terminal similar to that shown below.

Installing python3
Installing python3

To install Pip3 enter the following command into your terminal:

sudo apt-get install python3-pip

This will detail a long list of packages that will be installed on your computer, Enter Y to answer Yes and let the packages install.

M0AWS - Installing Pip3
M0AWS – Installing Pip3

You will see many messages scroll up the terminal screen such as getting, selecting, preparing, unpacking and setting up, this is all normal.

Once Pip3 is installed you should be dropped back at the command line with a terminal screen that looks something like the one below.

M0AWS - Pip3 install complete
M0AWS – Pip3 install complete

At this point you will now have Python3 and Pip3 available on your computer.

You are now ready to install the tool we are going to use to check your Meshtastic device is connected to your PC and install the firmware to it. (Do not connect your Meshtastic device to your PC just yet!)

Run the following command in your terminal to install the ESP Tool:

pip3 install --upgrade esptool

You will see an output from the installation process similar to that shown below.

M0AWS - Installing the ESP Tool
M0AWS – Installing the ESP Tool

Now that we have the ESP tool installed plug your Meshtastic device into your USB port on your computer and then run the following command to interrogate the device to find out what kind of device it is.

esptool chip_id

You should see the information about your device that looks similar to that shown below. This information should confirm the device type (ESP32) and which USB port it is connected on (/dev/tty/USB0).

M0AWS - Expected output from the ESPTool command showing device information
M0AWS – Expected output from the ESPTool command showing device information

Once you have this information you will need to download the firmware for your device from Github using the following URL:

https://github.com/meshtastic/firmware/releases

At the time of writing this I downloaded and used the v2.2.22.404d firmware which I have found to be extremely reliable.

In your terminal you now need to change directory (cd) into the Downloads directory where your downloaded firmware should be. (If you downloaded your firmware into another directory then you will need to cd into that directory). Use the following command to change directory into the Downloads directory.

cd ~/Downloads

Now we need to find the filename of the firmware we have just downloaded, we can use the list directory contents command to find the file using the simple command below.

ls -la firm*.zip
M0AWS - List firmware file name from the Linux command line
M0AWS – List firmware file name from the Linux command line

In the screenshot above we can see that the filename is called
firmware-2.2.22.404d0dd.zip.
We now need to unzip the file using the unzip command.

unzip firmware-2.2.22.404d0dd.zip

You’ll see lots of output from the unzip command about inflating files etc, this is normal.

Once the file has been unzipped you are ready to load the firmware onto your Heltec device. First you need to find the .bin file for your Heltec device. Use the following ls command to list the files available.

ls -la firmware-heltec*

This will list out all the firmware file options for the Heltec device as shown below.

M0AWS - List of Heltec firmware files
M0AWS – List of Heltec firmware files

The file you need to use for a new firmware installation on a Heltec v3 device is
firmware-heltec-v3-2.2.22.404d0dd.bin. (If you downloaded a different version then the version number in the file will be different).

Using the filename you found above enter the following command into your terminal.

./device-install.sh -f firmware-heltec-v3-2.2.22.404d0dd.bin

This will now clear down your Heltec device and will load the Meshtastic firmware. This will take a little time especially on slower computers like the RaspberryPi so, just let it run until it finishes. Do not interrupt the process whilst it is running.

Installing the Meshtastic firmware onto my Heltec ESP32 v3 using the Python command line tool

Once the firmware is loaded the Heltec device will reboot and you will see the Meshtastic banner on the OLED screen. Your device is now ready for configuration.

Now that you have Python3 and Pip3 installed you can load the firmware onto other devices just by downloading the firmware and then running the device-install.sh script file, you won’t need to install Python3 or Pip3 again.

If you want to update your device in the future to a newer version of the firmware then just use the update script and update binary file as shown below.

./device-update.sh -f firmware-heltec-v3-2.2.22.404d0dd-update.bin

That’s it, you are now a Linux Command line junkie!

More soon …

WSPR update

For the last 24hrs I’ve had the RaspberryPi2 transmitting WSPR on 20m and 10m connected to my EFHW Vertical antenna. So far not a single spot on the 10m band, I’m assuming the band hasn’t opened in the UK over the test period.

WSPR 20m band reports over the last 24hrs

Results on 20m continue to impress with reports from the USA, West Africa coast and as far east as Georgia.

I’ll check the signal on 10m later today using my IC705 to ensure it is transmitting ok and then will leave it running for another 24hrs to see what happens.

UPDATE:

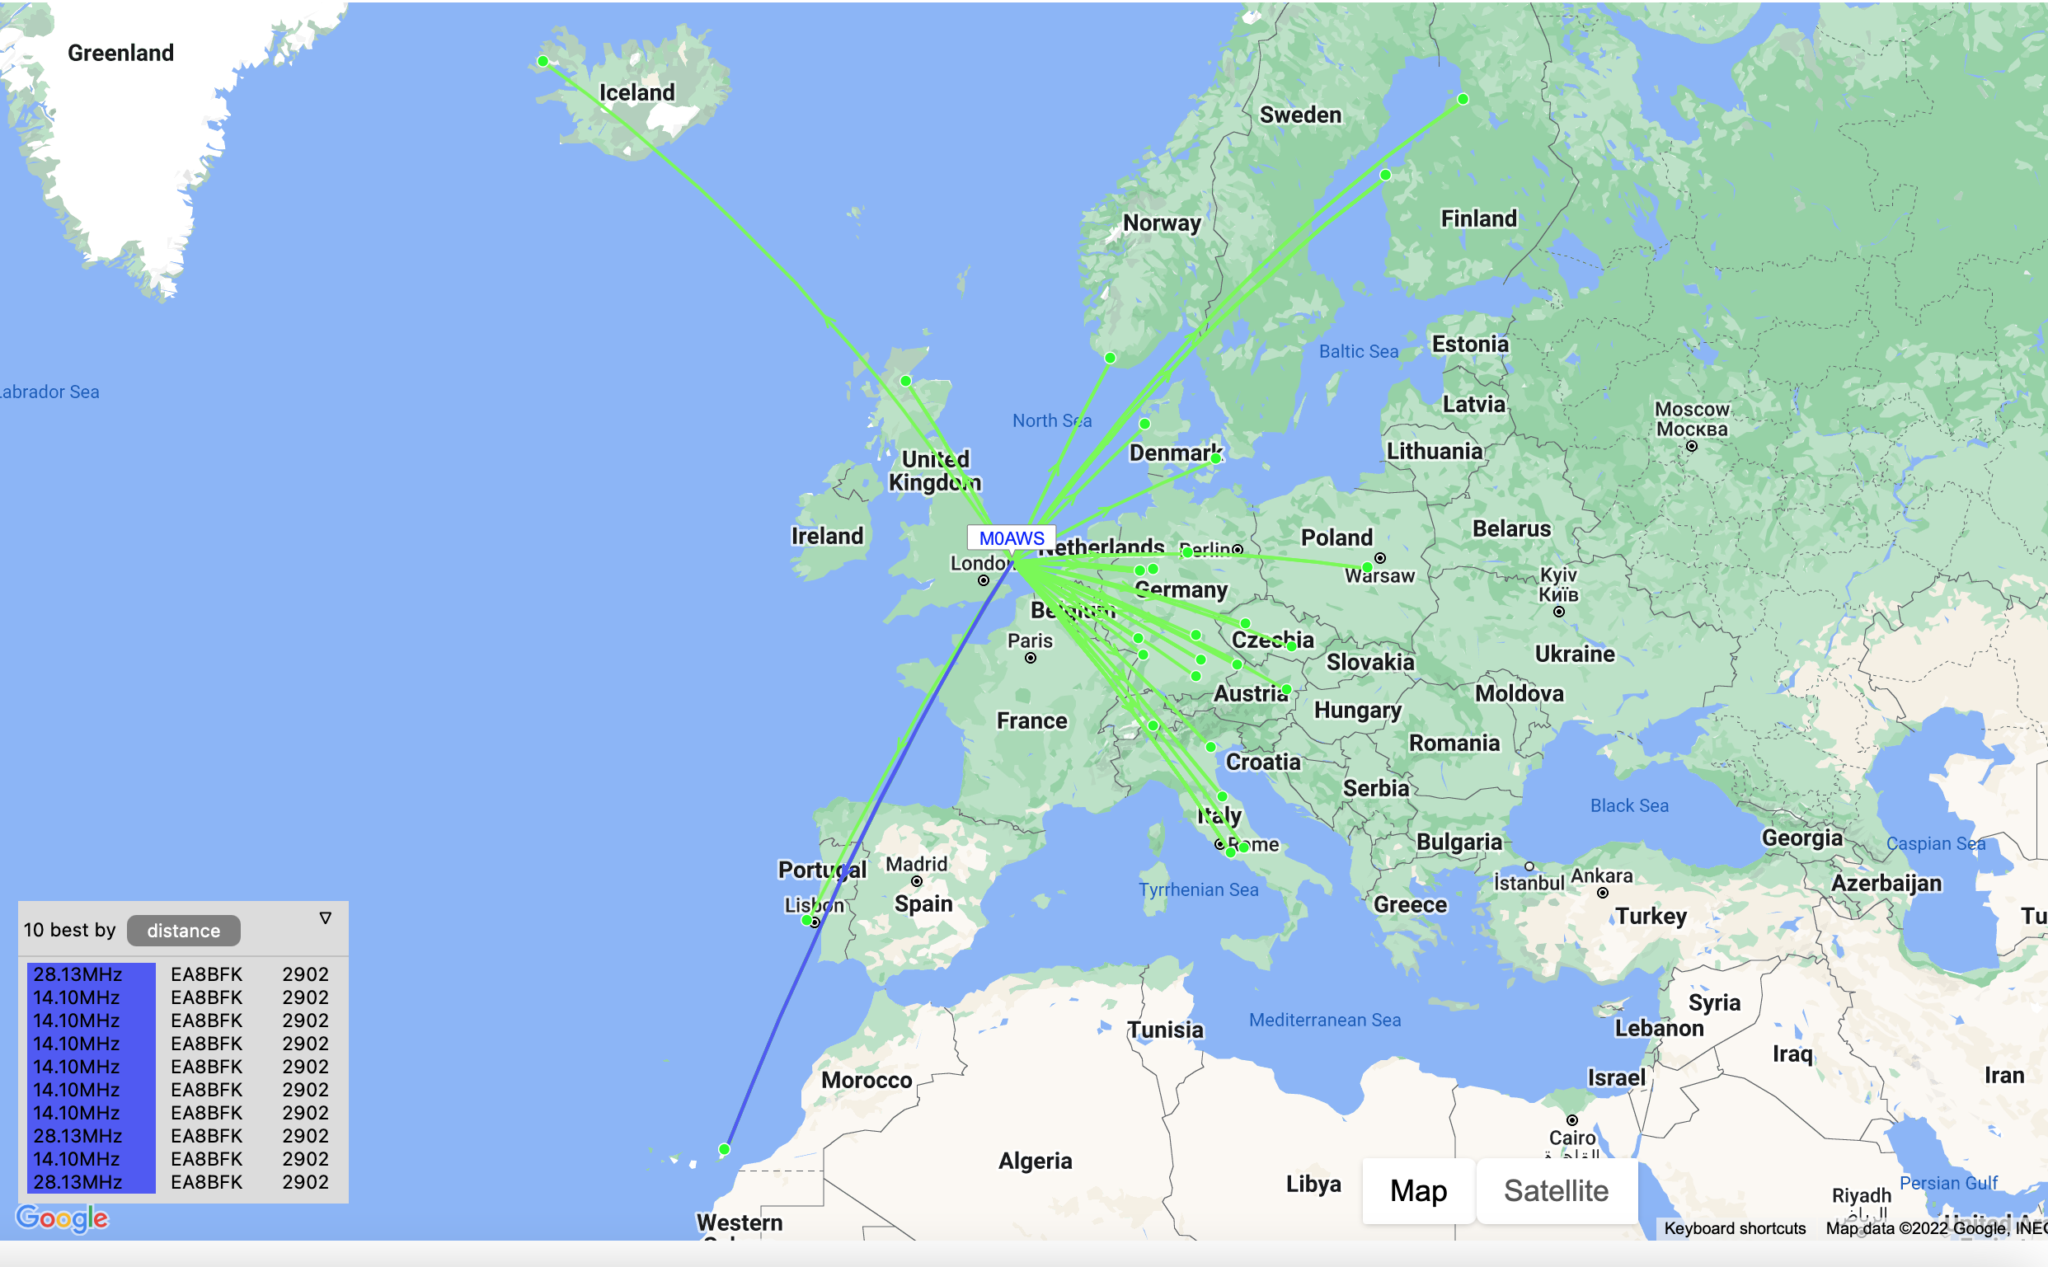
It appears there’s been a reliable opening on both 10m and 20m to the Canary Islands just off the west coast of Africa so far today.

The last 48hrs looks like this:

10mW WSPR from M0AWS JO02QC on 10m and 20m bands

More soon …

Whispering around the world

The Weak Signal Propagation Reporting Network (WSPR) known as “Whisper” in the HAM community is a QRP/QRPp beacon mode that is used by many HAMs around the world to see pretty much realtime propagation on the HF bands.

I first started using WSPR when I lived in France some years ago and it proved invaluable for assessing antenna performance and directivity. It’s not a new mode by any means and nowhere near as popular as it used to be as it’s really been superseded by FT4/8 these days that provides the same functionality but, with QSO capability too.

Having an old RaspberryPi hanging around and reading about the WSPR software that’s available for it now I decided to put the Raspi to good use and build a WSPR beacon for the 20m band that I could leave on 24/7.

Having the EFHW Vertical at the end of the garden means that I can connect it directly to the Raspi without the need for an ATU as it’s fully resonant. (It’s actually resonant on 20m and 10m)

I normally run both my RaspberryPi mini computers completely headless and then SSH in to them from my MacBook Pro and decided this was the best way to go with the WSPR beacon too since the WSPR software is command line based and doesn’t require a GUI.

First thing to do was to upgrade the OS from Debian Buster to Bullseye. It’s been a while since I used the Raspi but, it fired up perfectly and connected to the LAN without issue.

After a little time I had the O/S updated to Bullseye and the Raspi was ready for the software build.

The WSPR program comes in source code only so, this means you have to compile it yourself. This isn’t a big job as it comes complete with a makefile.

Using a terminal run the following commands to download and compile the WSPR source code.

So first thing to do is install git.

sudo apt-get install git

Once git is installed I downloaded the software from the git repository.

git clone https://github.com/JamesP6000/WsprryPi.git

It only takes a few seconds to download the software which is stored in a new directory called “WsprryPi”.

Before the code can be compiled there’s a small issue with the includes in one of the source code files that needs to be resolved so that the code compiles without error.

cd WsprryPi
vi mailbox.c

Using your favourite command line editor, ‘vi‘ in my case I added the following line into the include statement at the top of the code.

#include <sys/sysmacros.h>

Once added the full include statement looked like this:

#include <stdio.h>
#include <string.h>
#include <stdlib.h>
#include <fcntl.h>
#include <unistd.h>
#include <assert.h>
#include <stdint.h>
#include <sys/mman.h>
#include <sys/ioctl.h>
#include <sys/stat.h>
#include <sys/sysmacros.h>

#include "mailbox.h"

Once done, I saved the file ready for compilation.

Compiling the code is easy, just run the make command and sit back and watch all the compiler messages scroll across the screen.

make
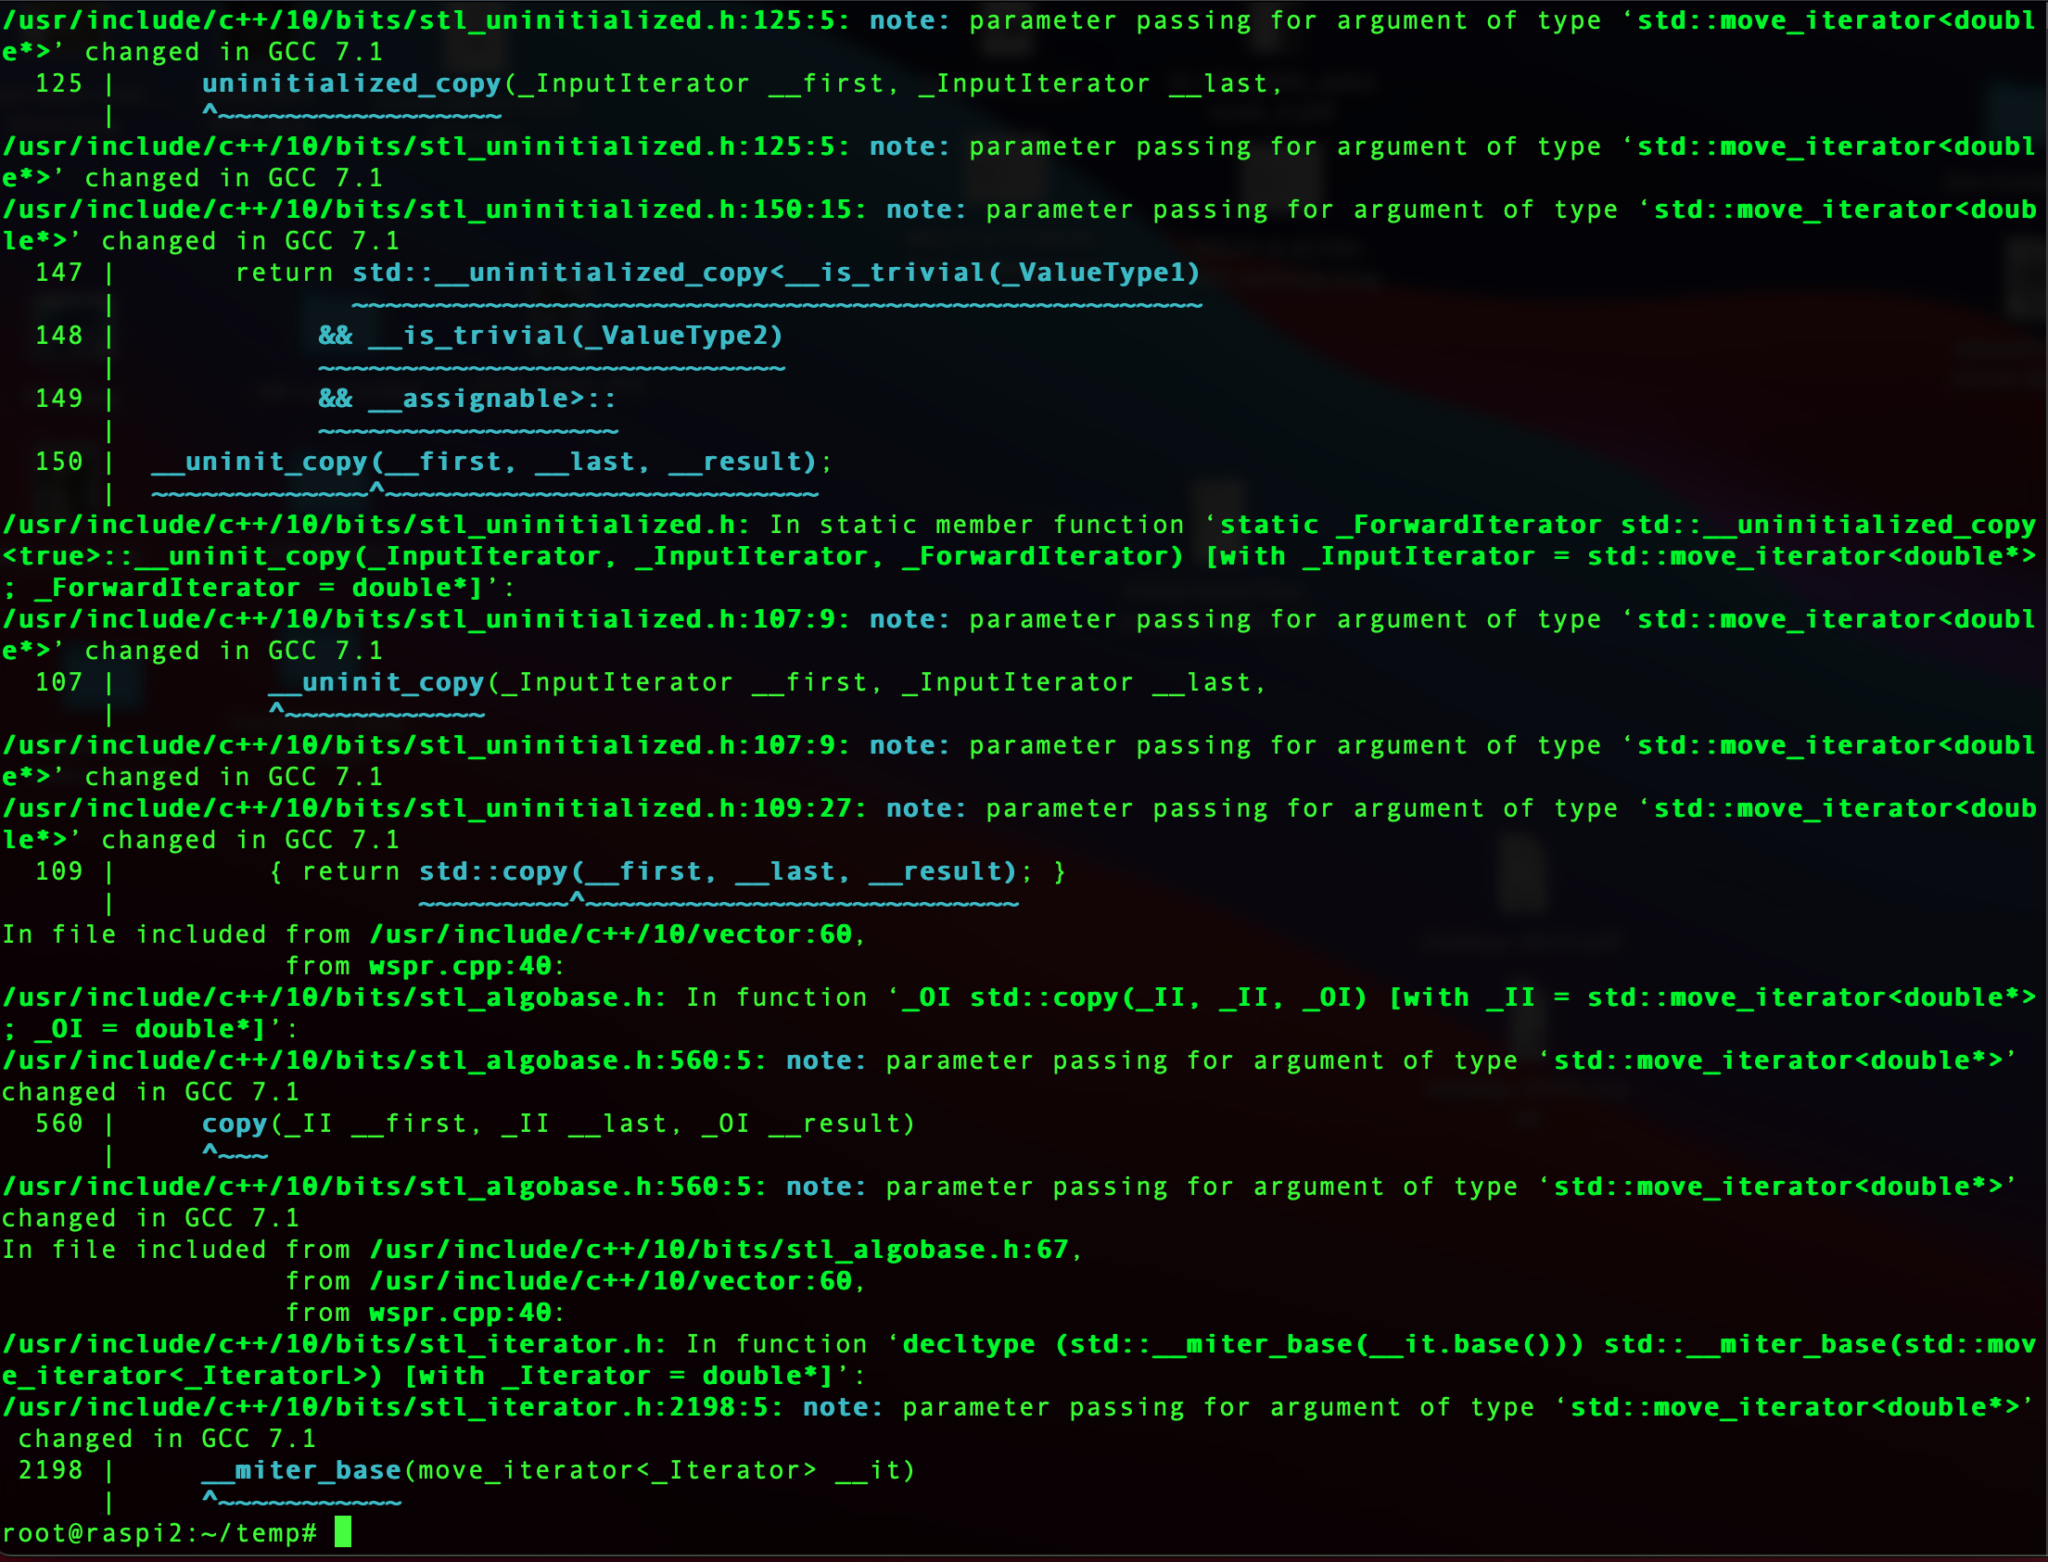
Compiling the WSPR source code

Once compiled without errors, I just needed to install the binary.

make install

At this point the software is ready to go.

I quickly soldered up a lead to go from the RaspberryPi GPIO pins to the Coax cable that is connected to the EFHW vertical antenna in the garden and connected it all up ready to test.

RaspberryPi 2 WSPR Beacon connected to EFHW vertical for 20m/10m bands

Pins 7 and 9 on the Raspberry Pi’s GPIO pins are where the signal is output. Pin 9 is the Ground pin, and pin 7 is the Signal pin. Pin 7 goes to the inner of the coax and pin 9 to the ground side of the coax.

The purple cable is the ethernet cable connecting the Raspi to my local LAN so that I can access it remotely via SSH. I’ve powered the Raspi off of the USB port on the wifi access point in the radio shack which is always on.

Once it’s all connected it’s just a case of starting the WSPR program from the command line as user root.

wspr -s -r M0AWS JO02 10 20m > ./wspr.log &

I run the WSPR program as root user so that it has the correct privileges to access the devices to communicate with the GPIO headers, if you want too start it as your normal user then you’d need to use sudo to gain the root privileges.

The command line options I’ve used are as follows:

-s

Check NTP before every transmission to obtain the PPM error of the crystal

-r


Repeatedly, and in order, transmit on all the specified command line freqs.

M0AWS

My Callsign

JO02

My Locator Square

10

The power being used in dBm

> ./wspr.log &

Redirects all output to wspr.log in the current directory and then puts the program into the background so that it is left running when I log out.

Once the program is started you can monitor progress by using tail on the log file.

tail -f ./wspr.log

The output you will see will be something like this.

Desired center frequency for WSPR transmission: 14.097100 MHz
  Waiting for next WSPR transmission window...
  TX started at: UTC 2022-07-17 16:06:01.015
  TX ended at:   UTC 2022-07-17 16:07:51.638 (110.623 s)
Desired center frequency for WSPR transmission: 14.097100 MHz
  Waiting for next WSPR transmission window...
  TX started at: UTC 2022-07-17 16:08:01.015
  TX ended at:   UTC 2022-07-17 16:09:51.639 (110.624 s)
Desired center frequency for WSPR transmission: 14.097100 MHz
  Waiting for next WSPR transmission window...
  TX started at: UTC 2022-07-17 16:10:01.015
  TX ended at:   UTC 2022-07-17 16:11:51.642 (110.627 s)
Desired center frequency for WSPR transmission: 14.097100 MHz
  Waiting for next WSPR transmission window...
  TX started at: UTC 2022-07-17 16:12:01.015
  TX ended at:   UTC 2022-07-17 16:13:51.639 (110.624 s)
Desired center frequency for WSPR transmission: 14.097100 MHz
  Waiting for next WSPR transmission window...
  TX started at: UTC 2022-07-17 16:14:01.015
  TX ended at:   UTC 2022-07-17 16:15:51.639 (110.624 s)
Desired center frequency for WSPR transmission: 14.097100 MHz
  Waiting for next WSPR transmission window...
  TX started at: UTC 2022-07-17 16:16:01.014
  TX ended at:   UTC 2022-07-17 16:17:51.639 (110.624 s)
Desired center frequency for WSPR transmission: 14.097100 MHz
  Waiting for next WSPR transmission window...
  Obtained new ppm value: 4.09996
  TX started at: UTC 2022-07-17 16:18:01.015
  TX ended at:   UTC 2022-07-17 16:19:51.640 (110.624 s)
Desired center frequency for WSPR transmission: 14.097100 MHz
  Waiting for next WSPR transmission window...
  TX started at: UTC 2022-07-17 16:20:01.014
  TX ended at:   UTC 2022-07-17 16:21:51.638 (110.624 s)
Desired center frequency for WSPR transmission: 14.097100 MHz
  Waiting for next WSPR transmission window...
  TX started at: UTC 2022-07-17 16:22:01.004
  TX ended at:   UTC 2022-07-17 16:23:51.628 (110.624 s)

You can pass multiple bands on the command line if you want to hop around bands.

It’s also recommended that you add a low pass filter between the Raspi and coax connection to help suppress any harmonics that may be generated. You can make one easily enough using just a capacitor or there are a number of prebuilt low pass filters specifically made for the GPIO hat on the Raspi online.

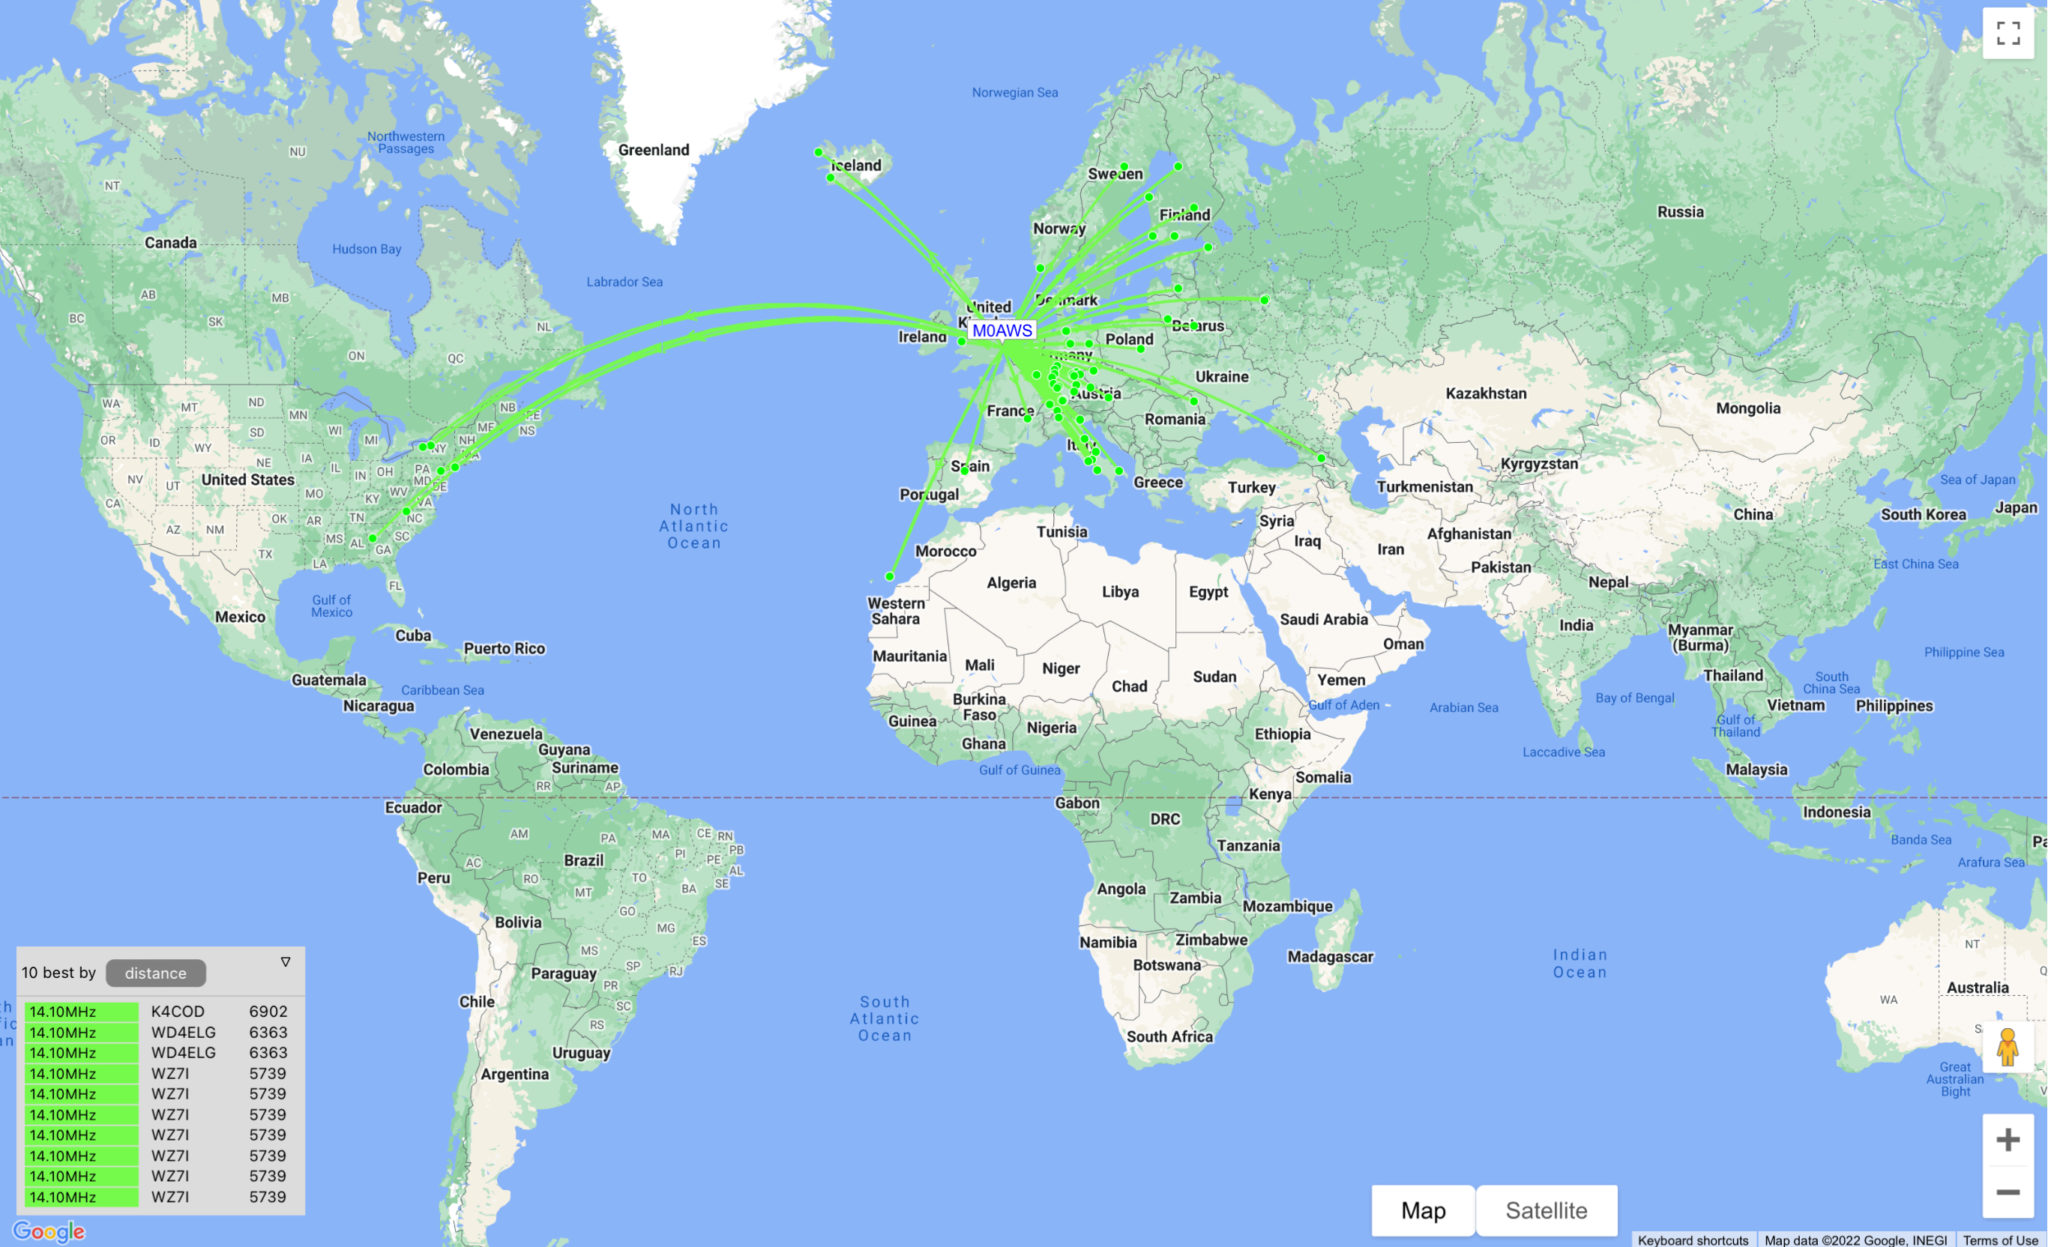
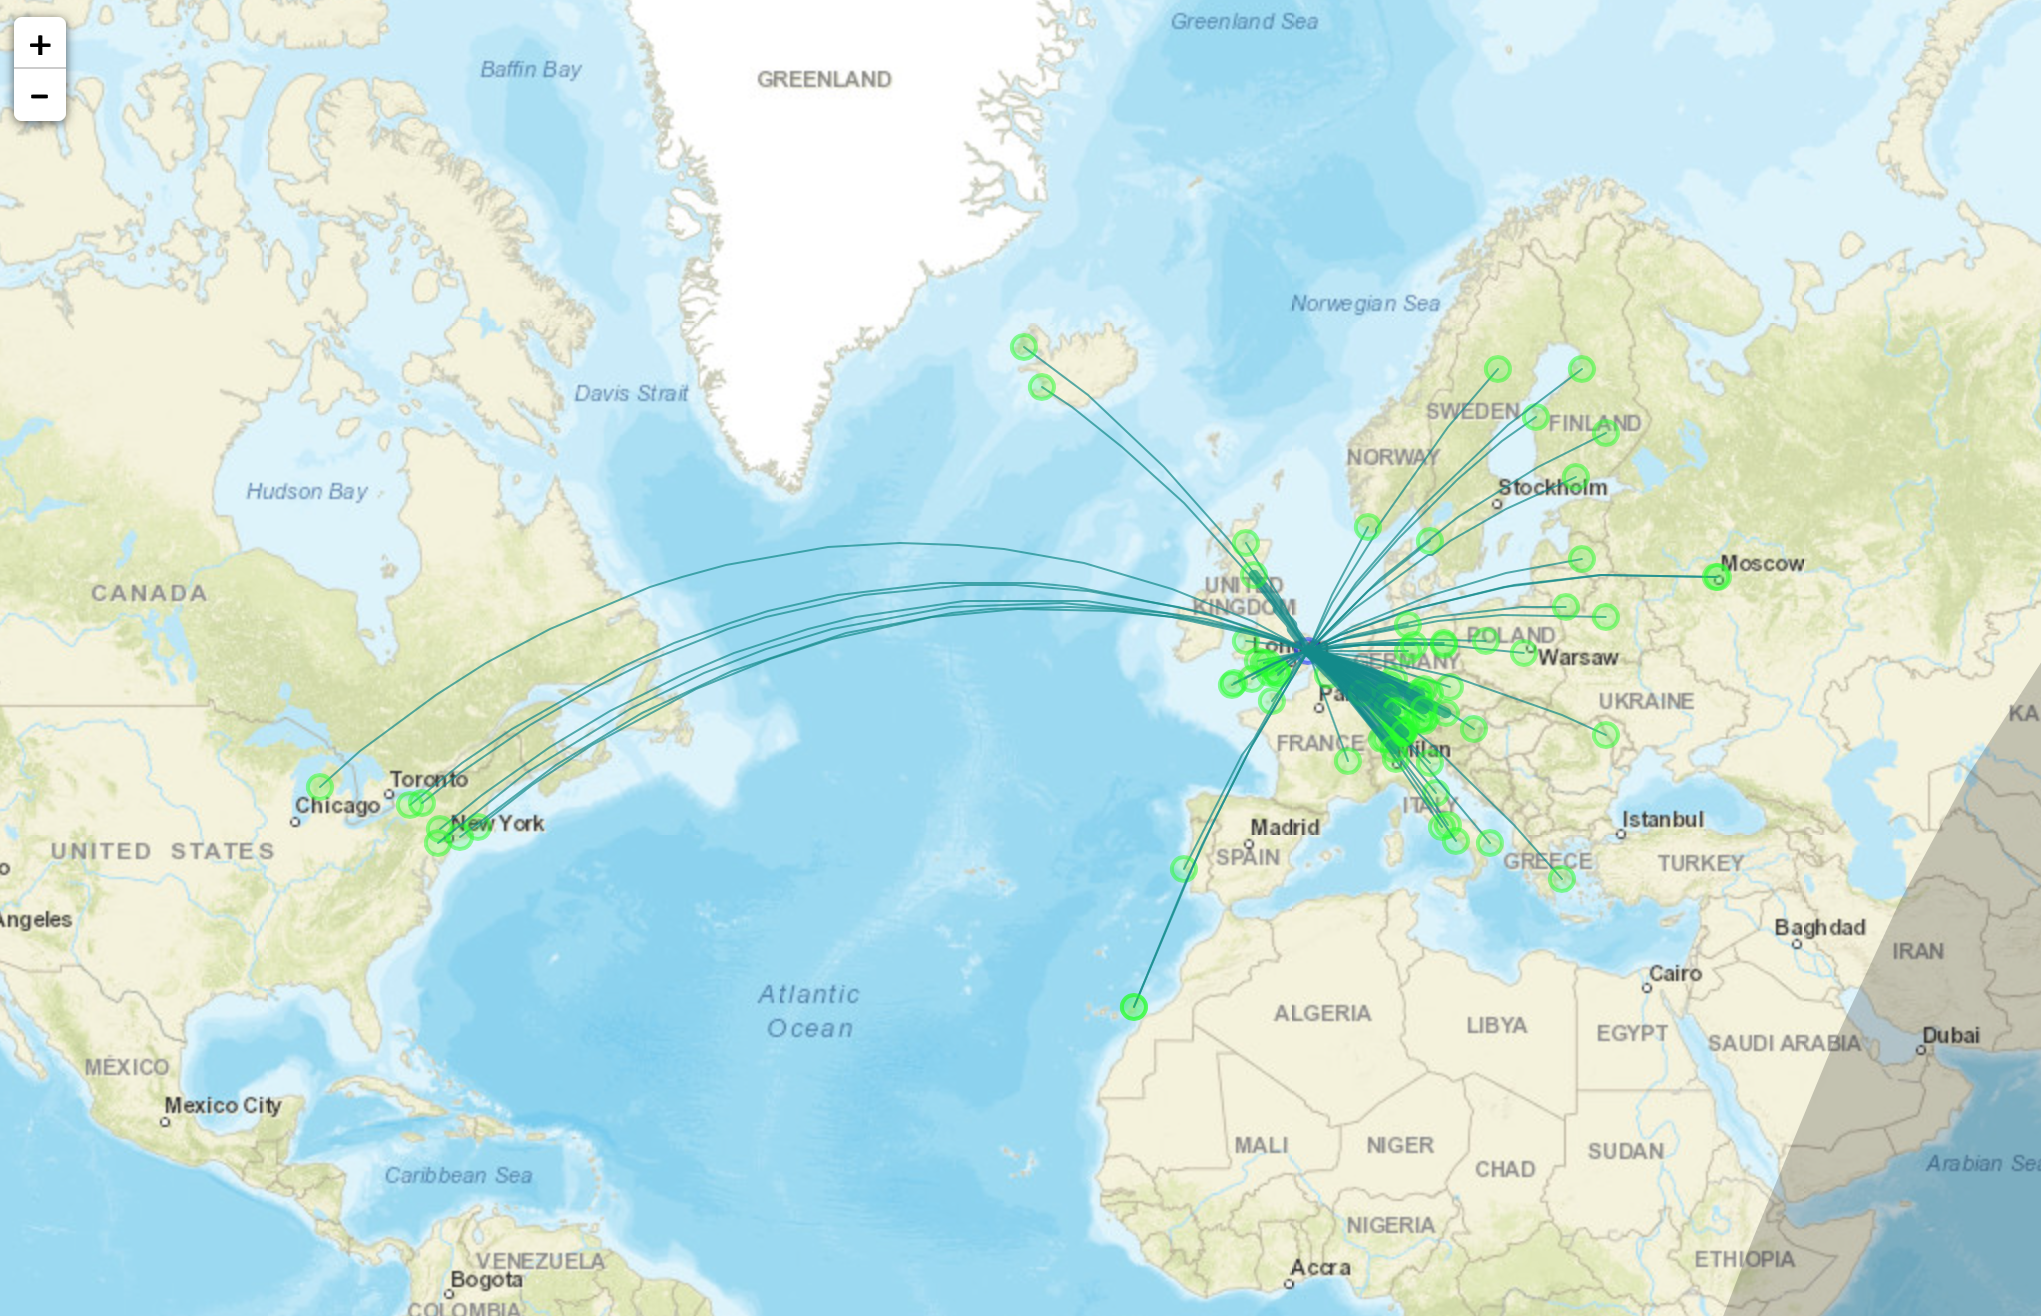
With only 10dBm (10mW) output from the RaspberryPi it’s surprising the distances that the signal travels. In no time at all I had reports from all over Europe and as the day progressed reports started coming in from Iceland, the USA and Russia.

Map showing stations that heard M0AWS on WSPR

I used http://wspr.aprsinfo.com WSPR monitoring website to watch progress as the day went on and after 24hrs had been heard by a number of stations over 3000 miles away.

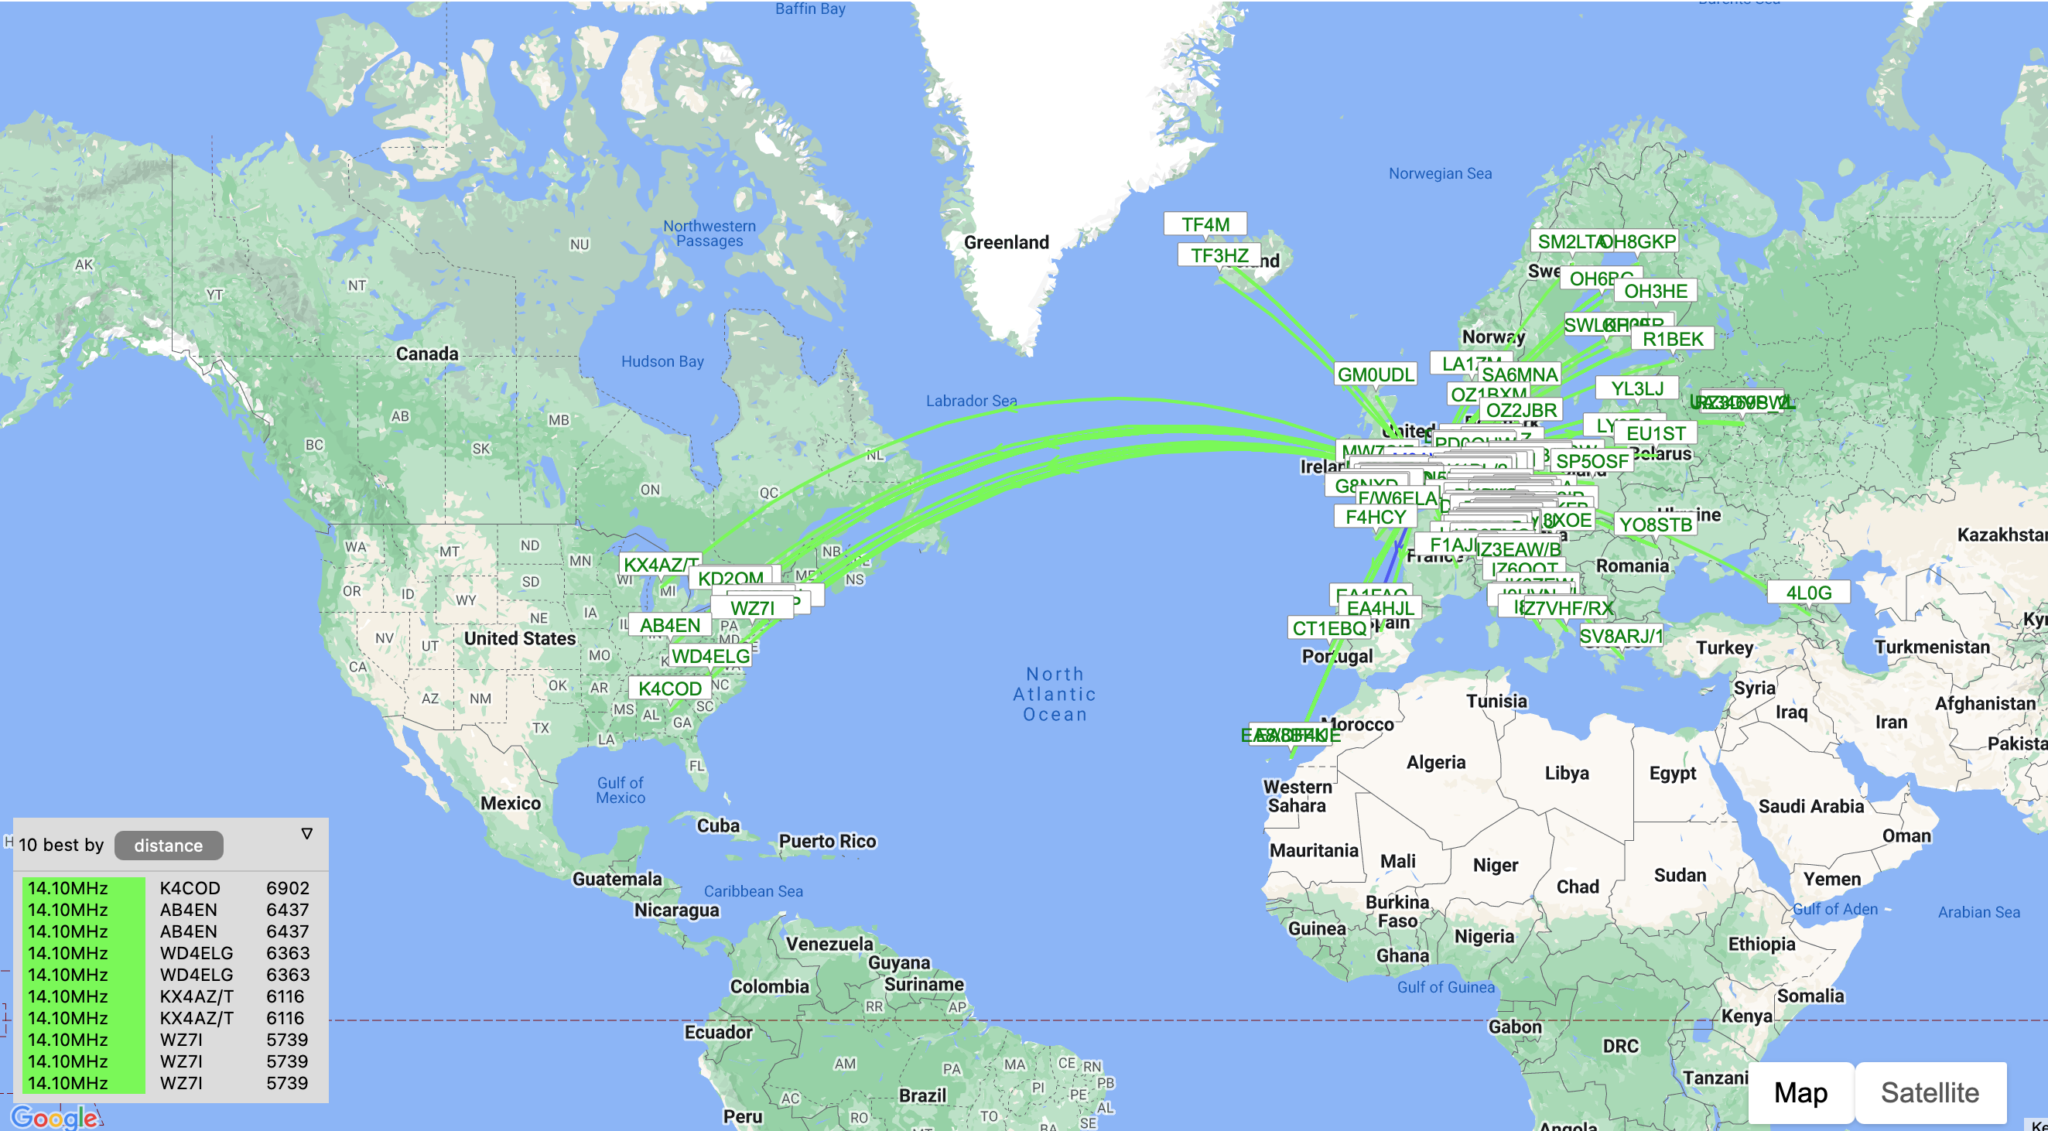
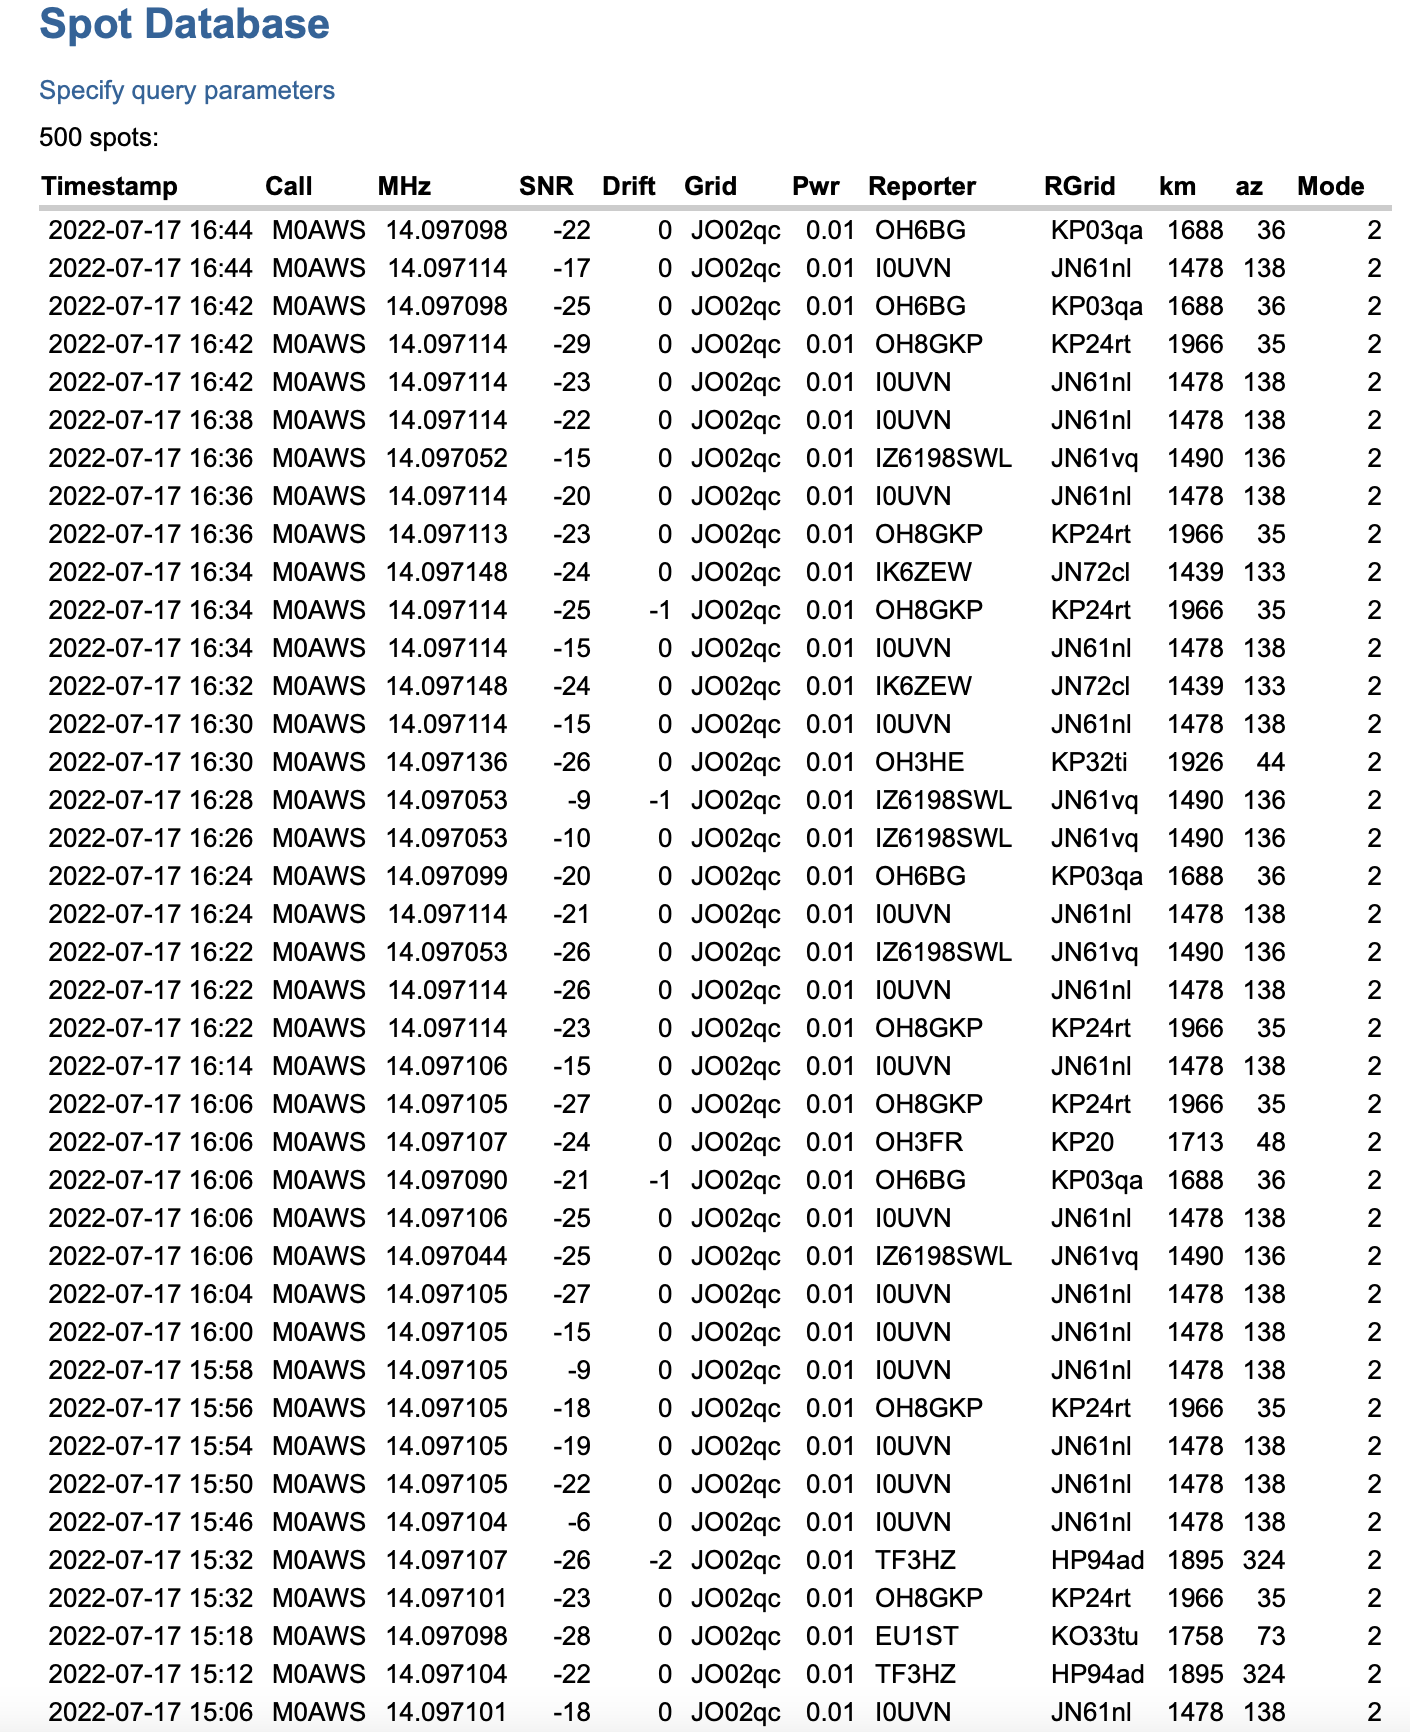
You can also get a more detailed view of reports from the WSPRnet website where you can query the database and create a detailed list of all decodes over a set period of time.

Detailed list of WSPR decodes

Since my EFHW Vertical is resonant on both 20m and 10m I’ll now run it for the next 24hrs on both bands to see what results I get.

More soon …

How to make a webpage from your WSJT-X log file

Map showing all M0AWS FT4/8 contacts

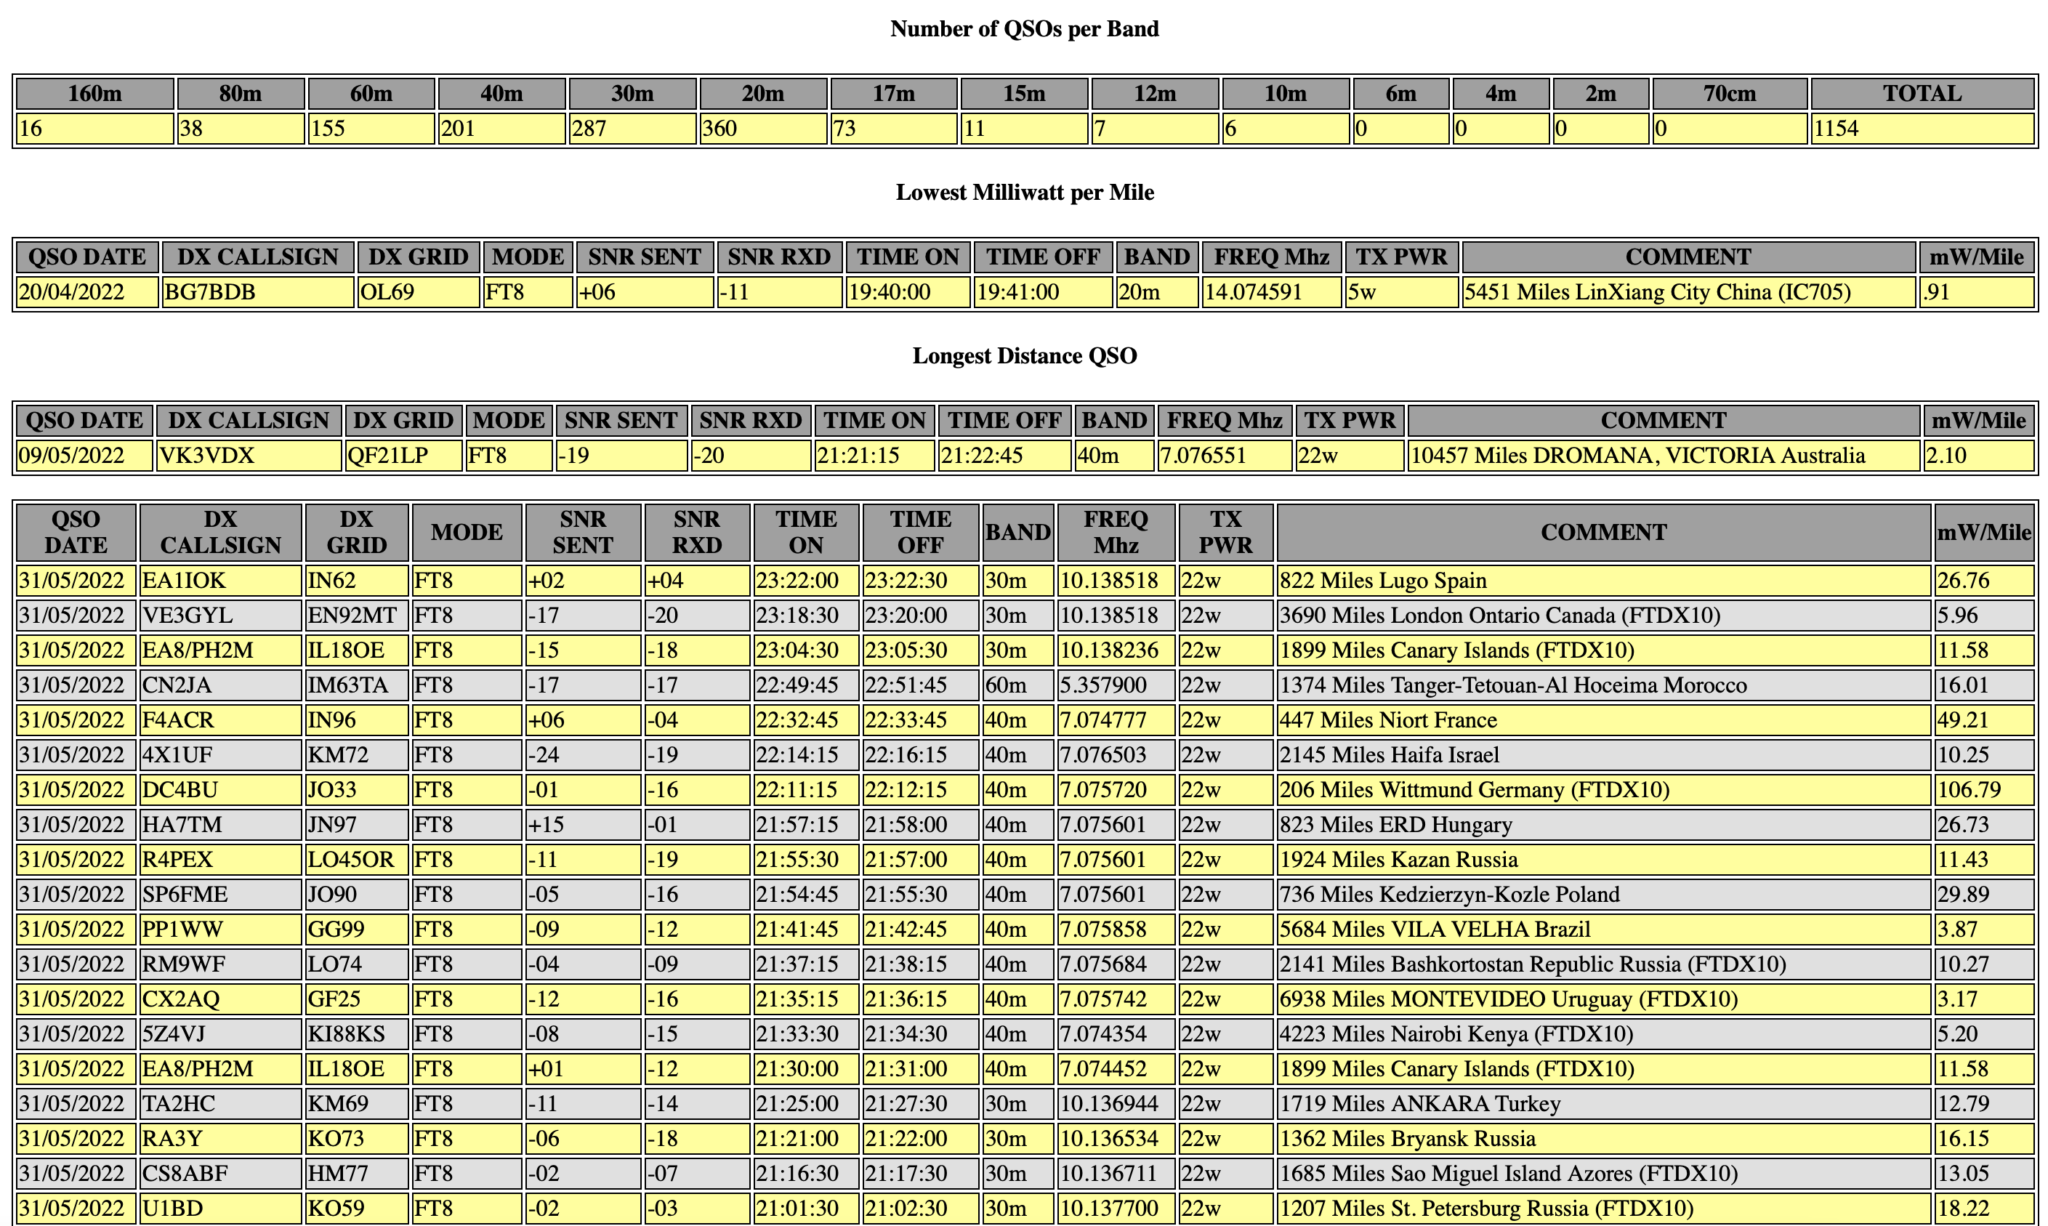
I’ve had a few messages of late asking how I generate my WSJT-X log web pages for my website. The answer is pretty simple, I use a little BASH script that I started writing some time back and have gradually improved over the last few months.

If you have a PC running Linux or a RaspberryPi running any of the normal Debian/Ubuntu/Redhat/Fedora based Linux distro’s that are available today then, this script should work just fine.

I originally wrote this program using Python but, a friend of mine bet me that I couldn’t write it in BASH and so, I took up the challenge and this is the result. It’s pretty simple and uses all the normal UNIX command line goodies like grep, sed and awk.

The script also uses WWL to calculate the distance between two Maidenhead locator grid squares and so it’s important to have it installed before running the script. (The script checks for it at runtime and will exit if it is not installed!). You can install WWL using your package manager on your Linux distro or from the command line directly. Details are in the READ-ME.txt file.

Screen grab from my M0AWS WSJT-X Log web page

It’s important that you READ the READ-ME.txt included in the zip file before trying to run any of the scripts included as it details the variables that you need to enter values for to make the script run on your PC/Server. (Example entries are in place as supplied).

The variables are mainly just paths to files on your system and whether you want distances calculated in miles or kilometres. Other than that there’s nothing else required for it to run.

I’ve also included details on how to run the script automatically from a crontab so that your webpage can be updated automatically every few minutes/hours etc.

The script also includes code to add a PNG map file into the generated webpage so that there is a graphical representation of all your QSOs. The map isn’t generated by the script (something I need to add in the coming few months) so you’ll need to generate it yourself and then add it to the website either via the crontab script included in the zip file or manually.

I use the QSOMap website to generate my map image files and then have them uploaded to my web server via the crontab script.

The script processes 100 entries per second on my web server (Headless virtual machine running Ubuntu Server 64bit Edition) and so should be pretty fast on most PCs. It will run somewhat slower on a RaspberryPi so be patient!

You can download the script and associated information using the button below.


If you do use my script please send me a link to your website so that I can take a look at your log file.

More soon …