I’ve been making a few improvements to my QO-100 Node Red Dashboard whilst waiting for the 2.4Ghz hardware to arrive. I’ve added the ability to split the RX and TX VFOs so that I can tune away from the TX frequency for working split stations or for tuning to slightly off frequency stations. I also added a series of tuning buttons to the top of the GQRX side of the dashboard to enable easy tuning using the trackball connected to my Kubuntu PC. This worked well but, I really missed having a real VFO knob like a conventional radio.
As I had a Griffin Powewrmate USB VFO from a previous SDR radio I added it to the flow as well so that I had a physical VFO knob for the SDR receiver. Details on how I got it working using evtest and a simple BASH script are in the Griffin Powermate article.
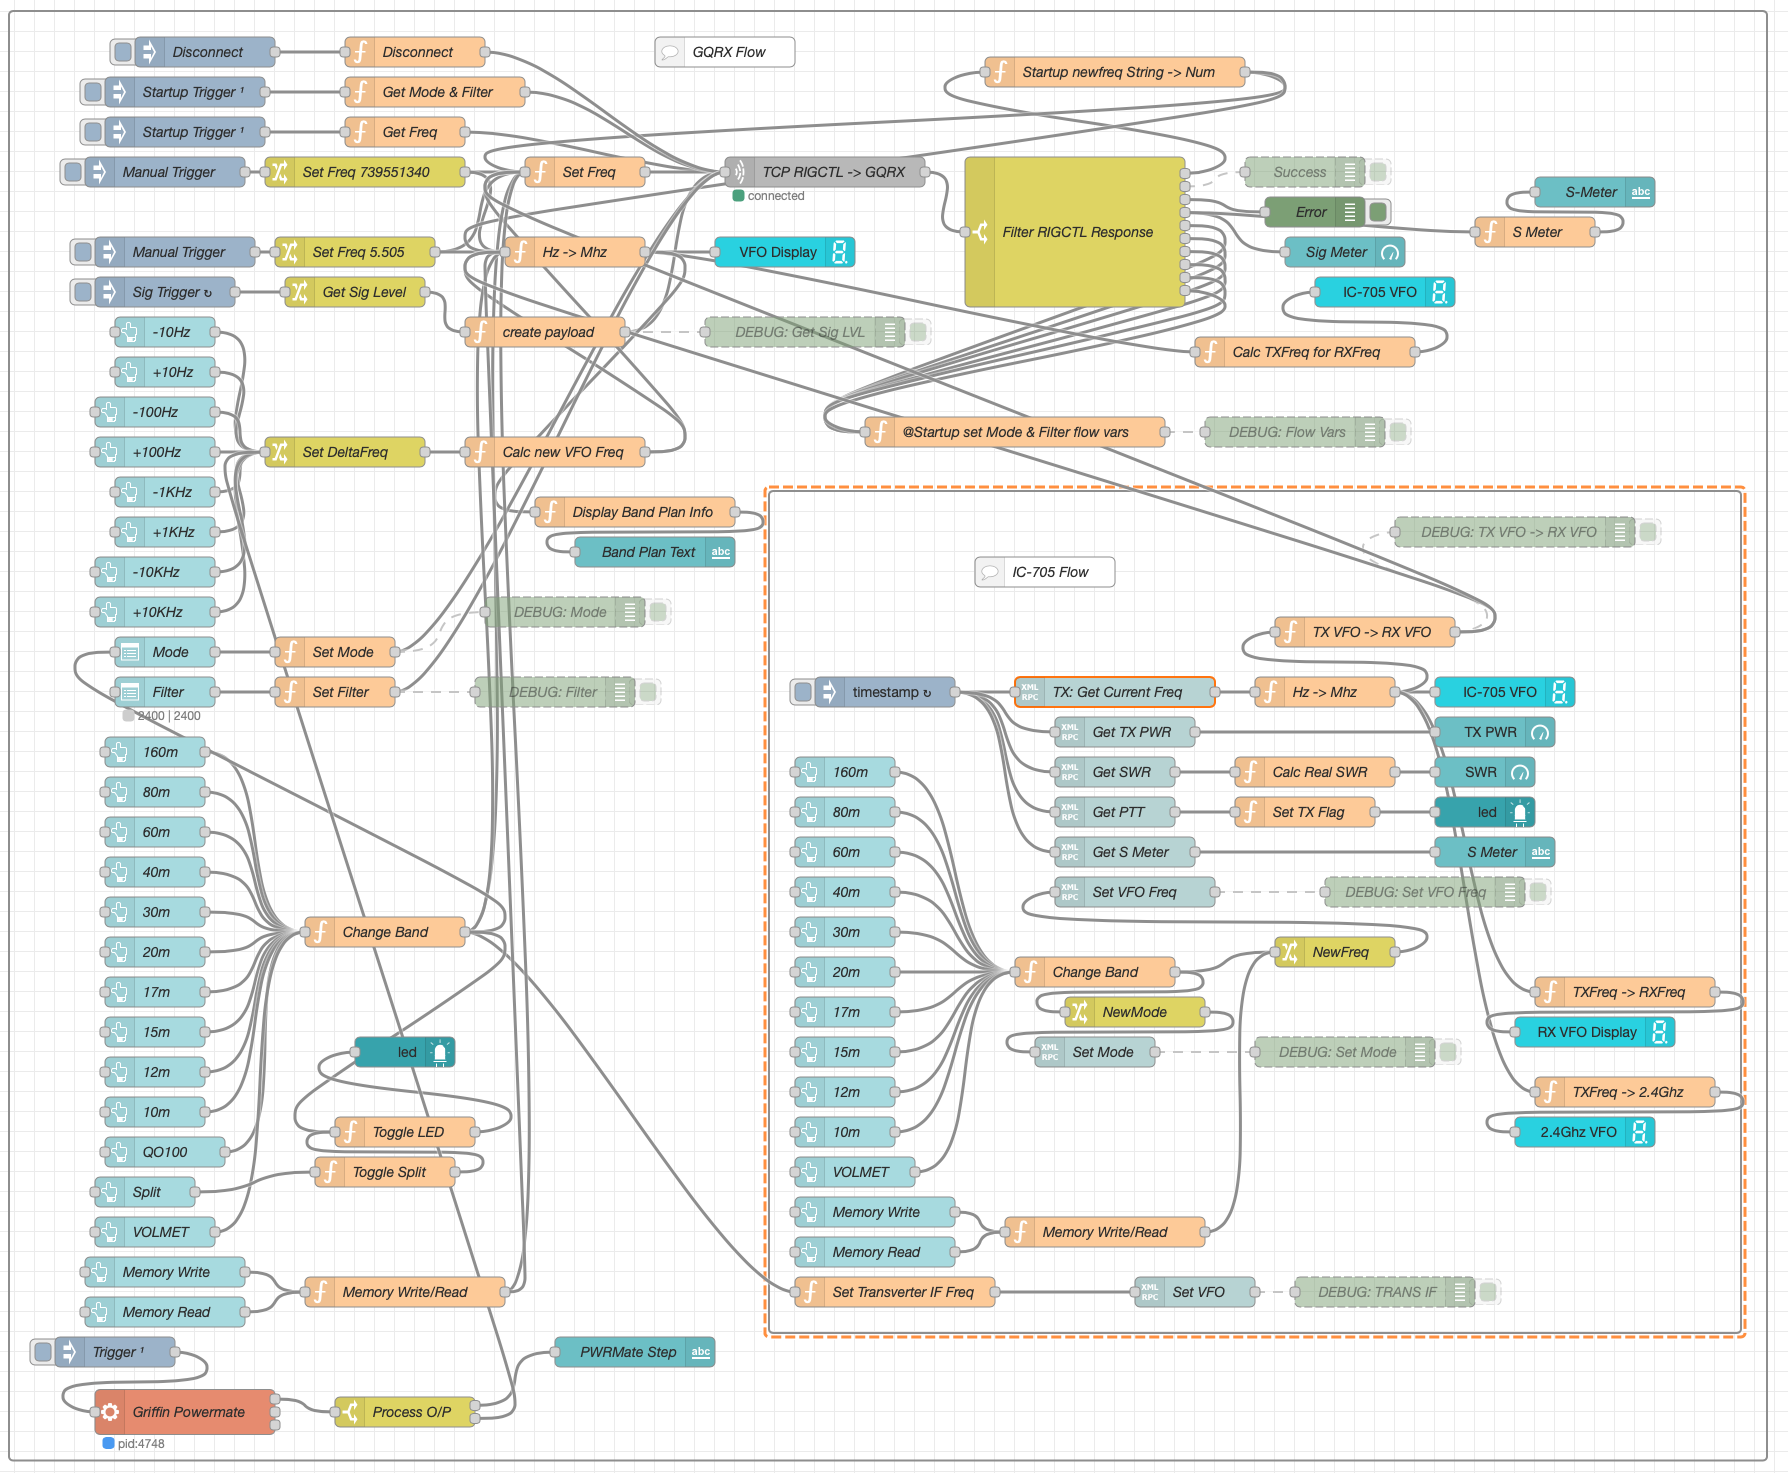
M0AWS QO-100 Node Red Dashboard Flow
The Node Red flow is looking a little busier with the addition of split mode and the Griffin Powermate USB VFO which has really enhanced the useability of the solution. It’s very impressive what can be achieved with Node Red with a little imagination. You really don’t need to be a heavy weight programmer to make things work.
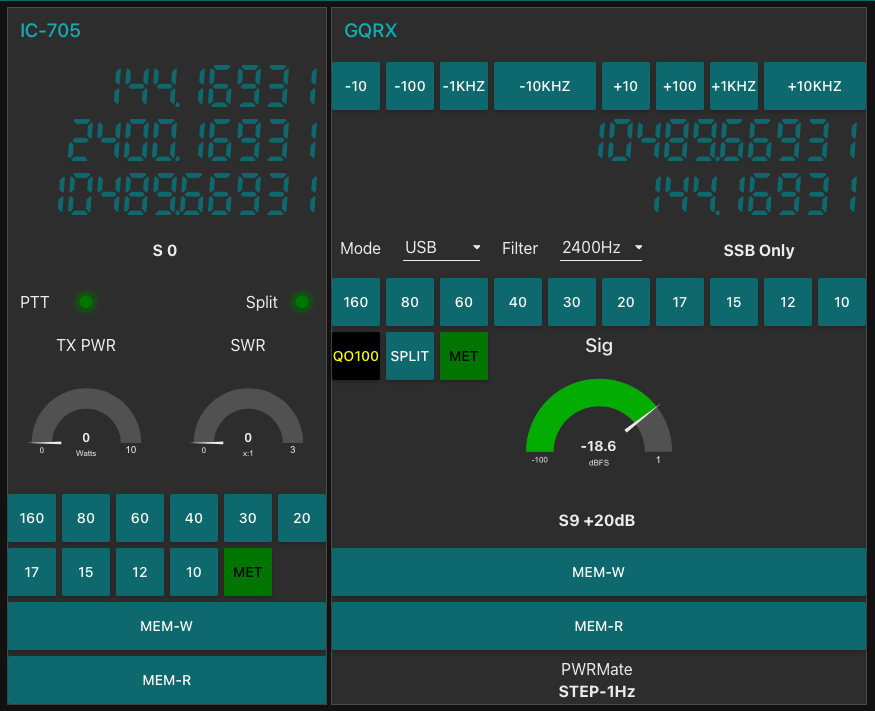
M0AWS QO-100 Node Red Dashboard as of 07/06/23
I also put together some code to calculate the S Meter reading from the dBFS data the GQRX SDR software generates. It’s not 100% accurate but, it’s close enough to be useful.
On the IC-705 side of the Dashboard I also now display the 2.4Ghz uplink frequency so that it’s available for logging.
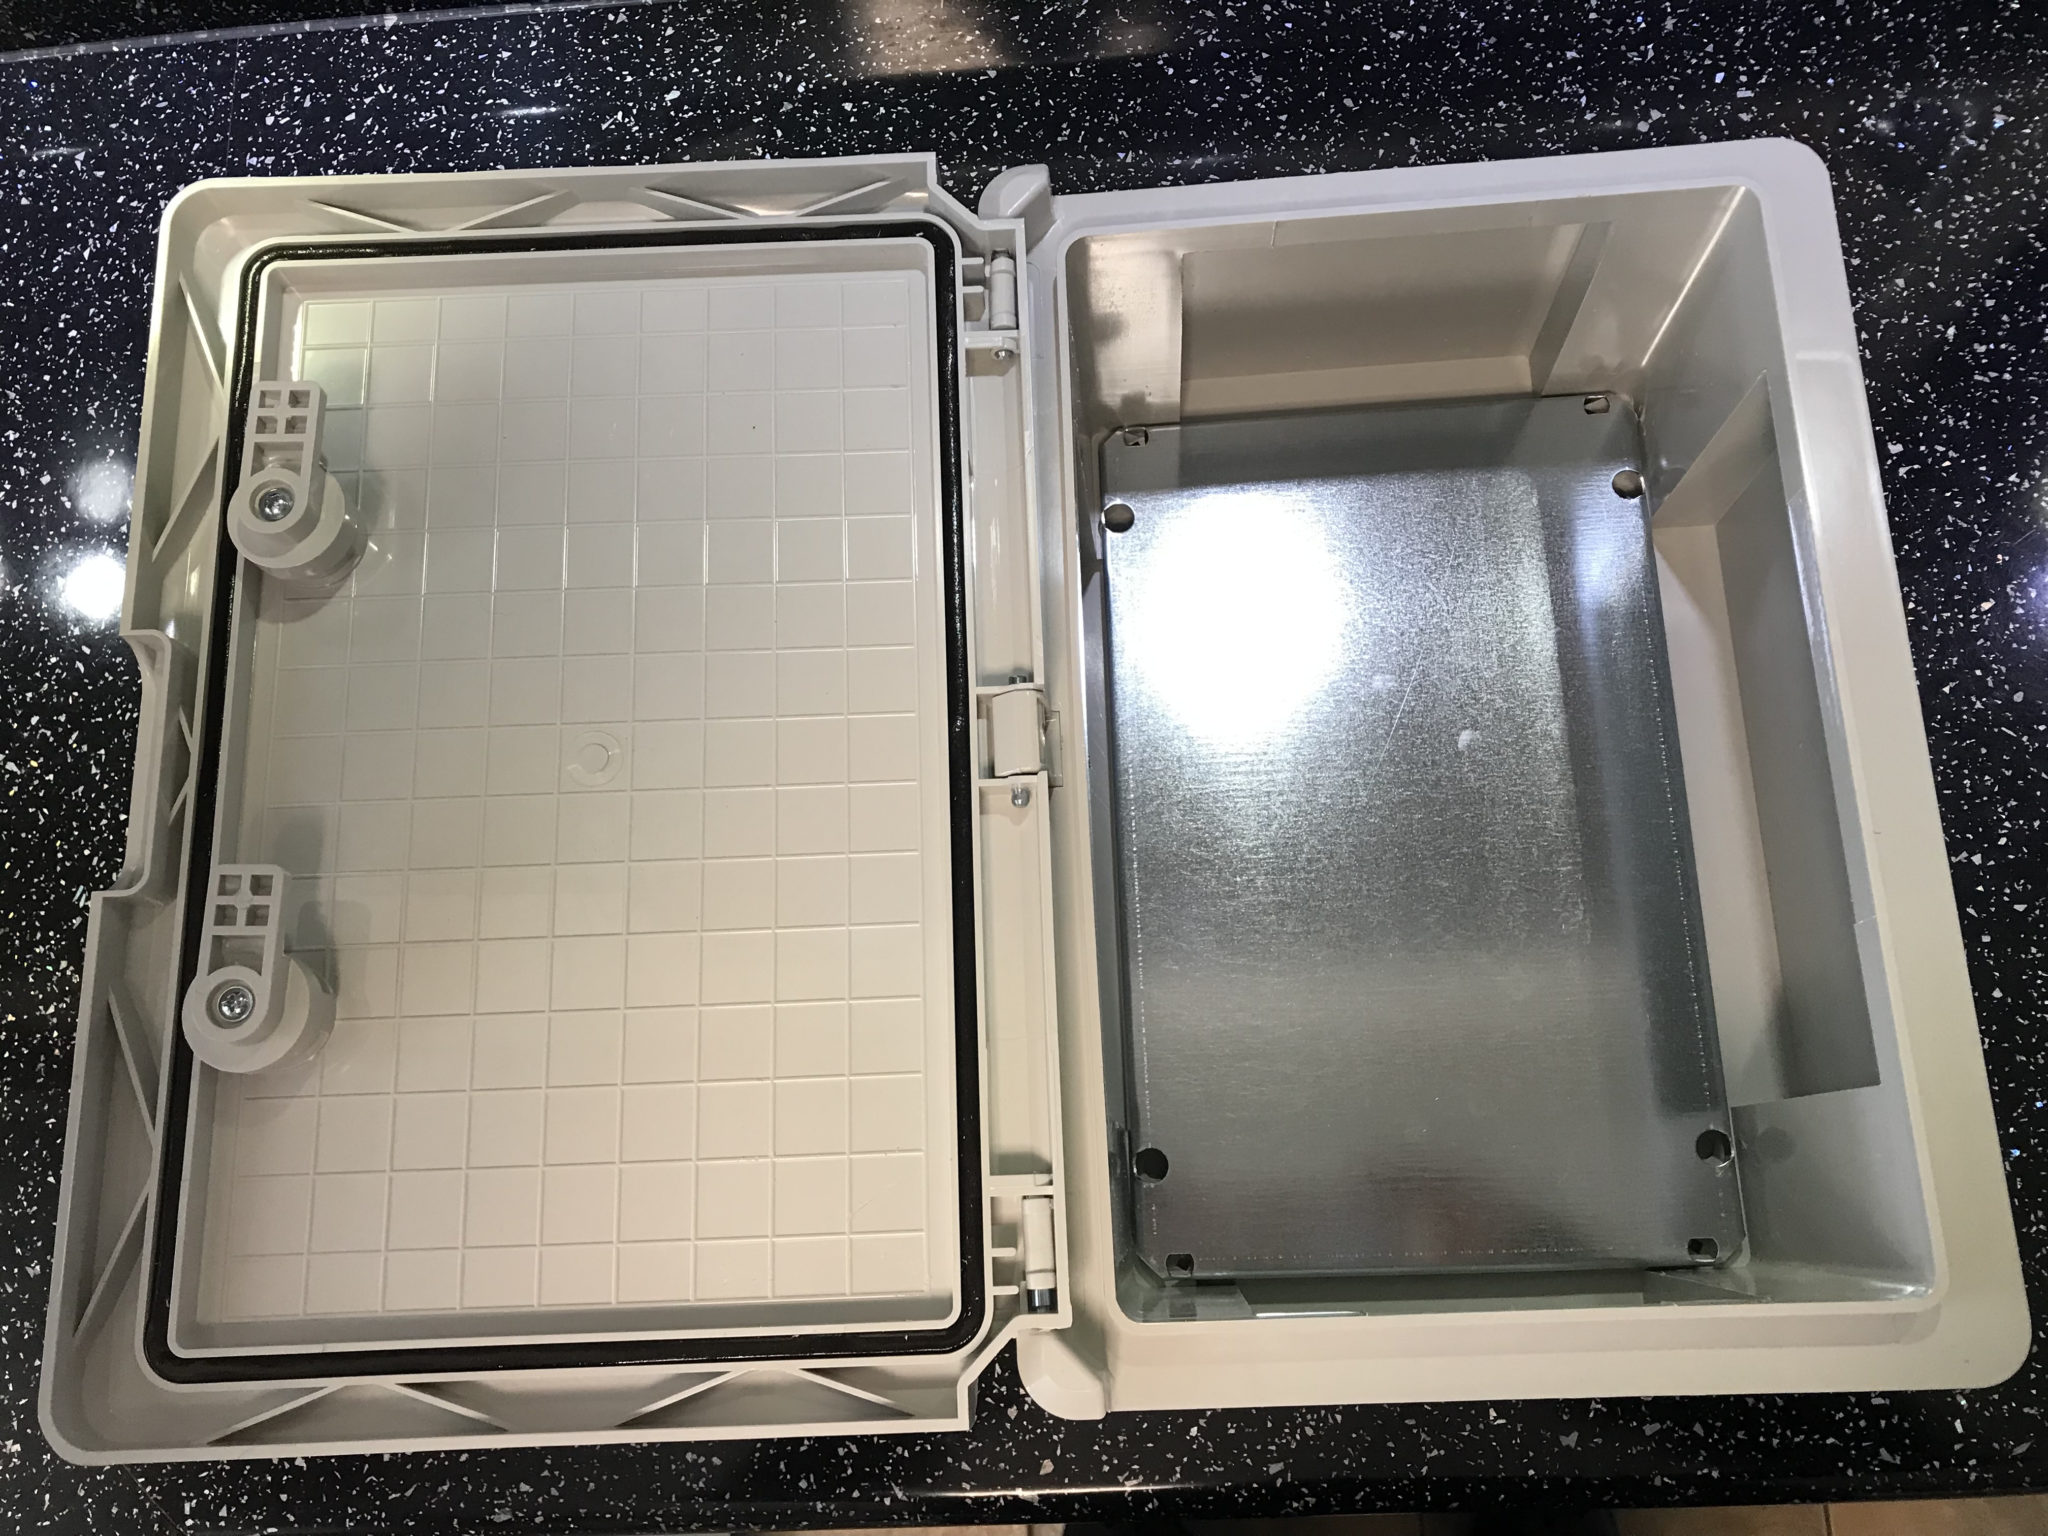
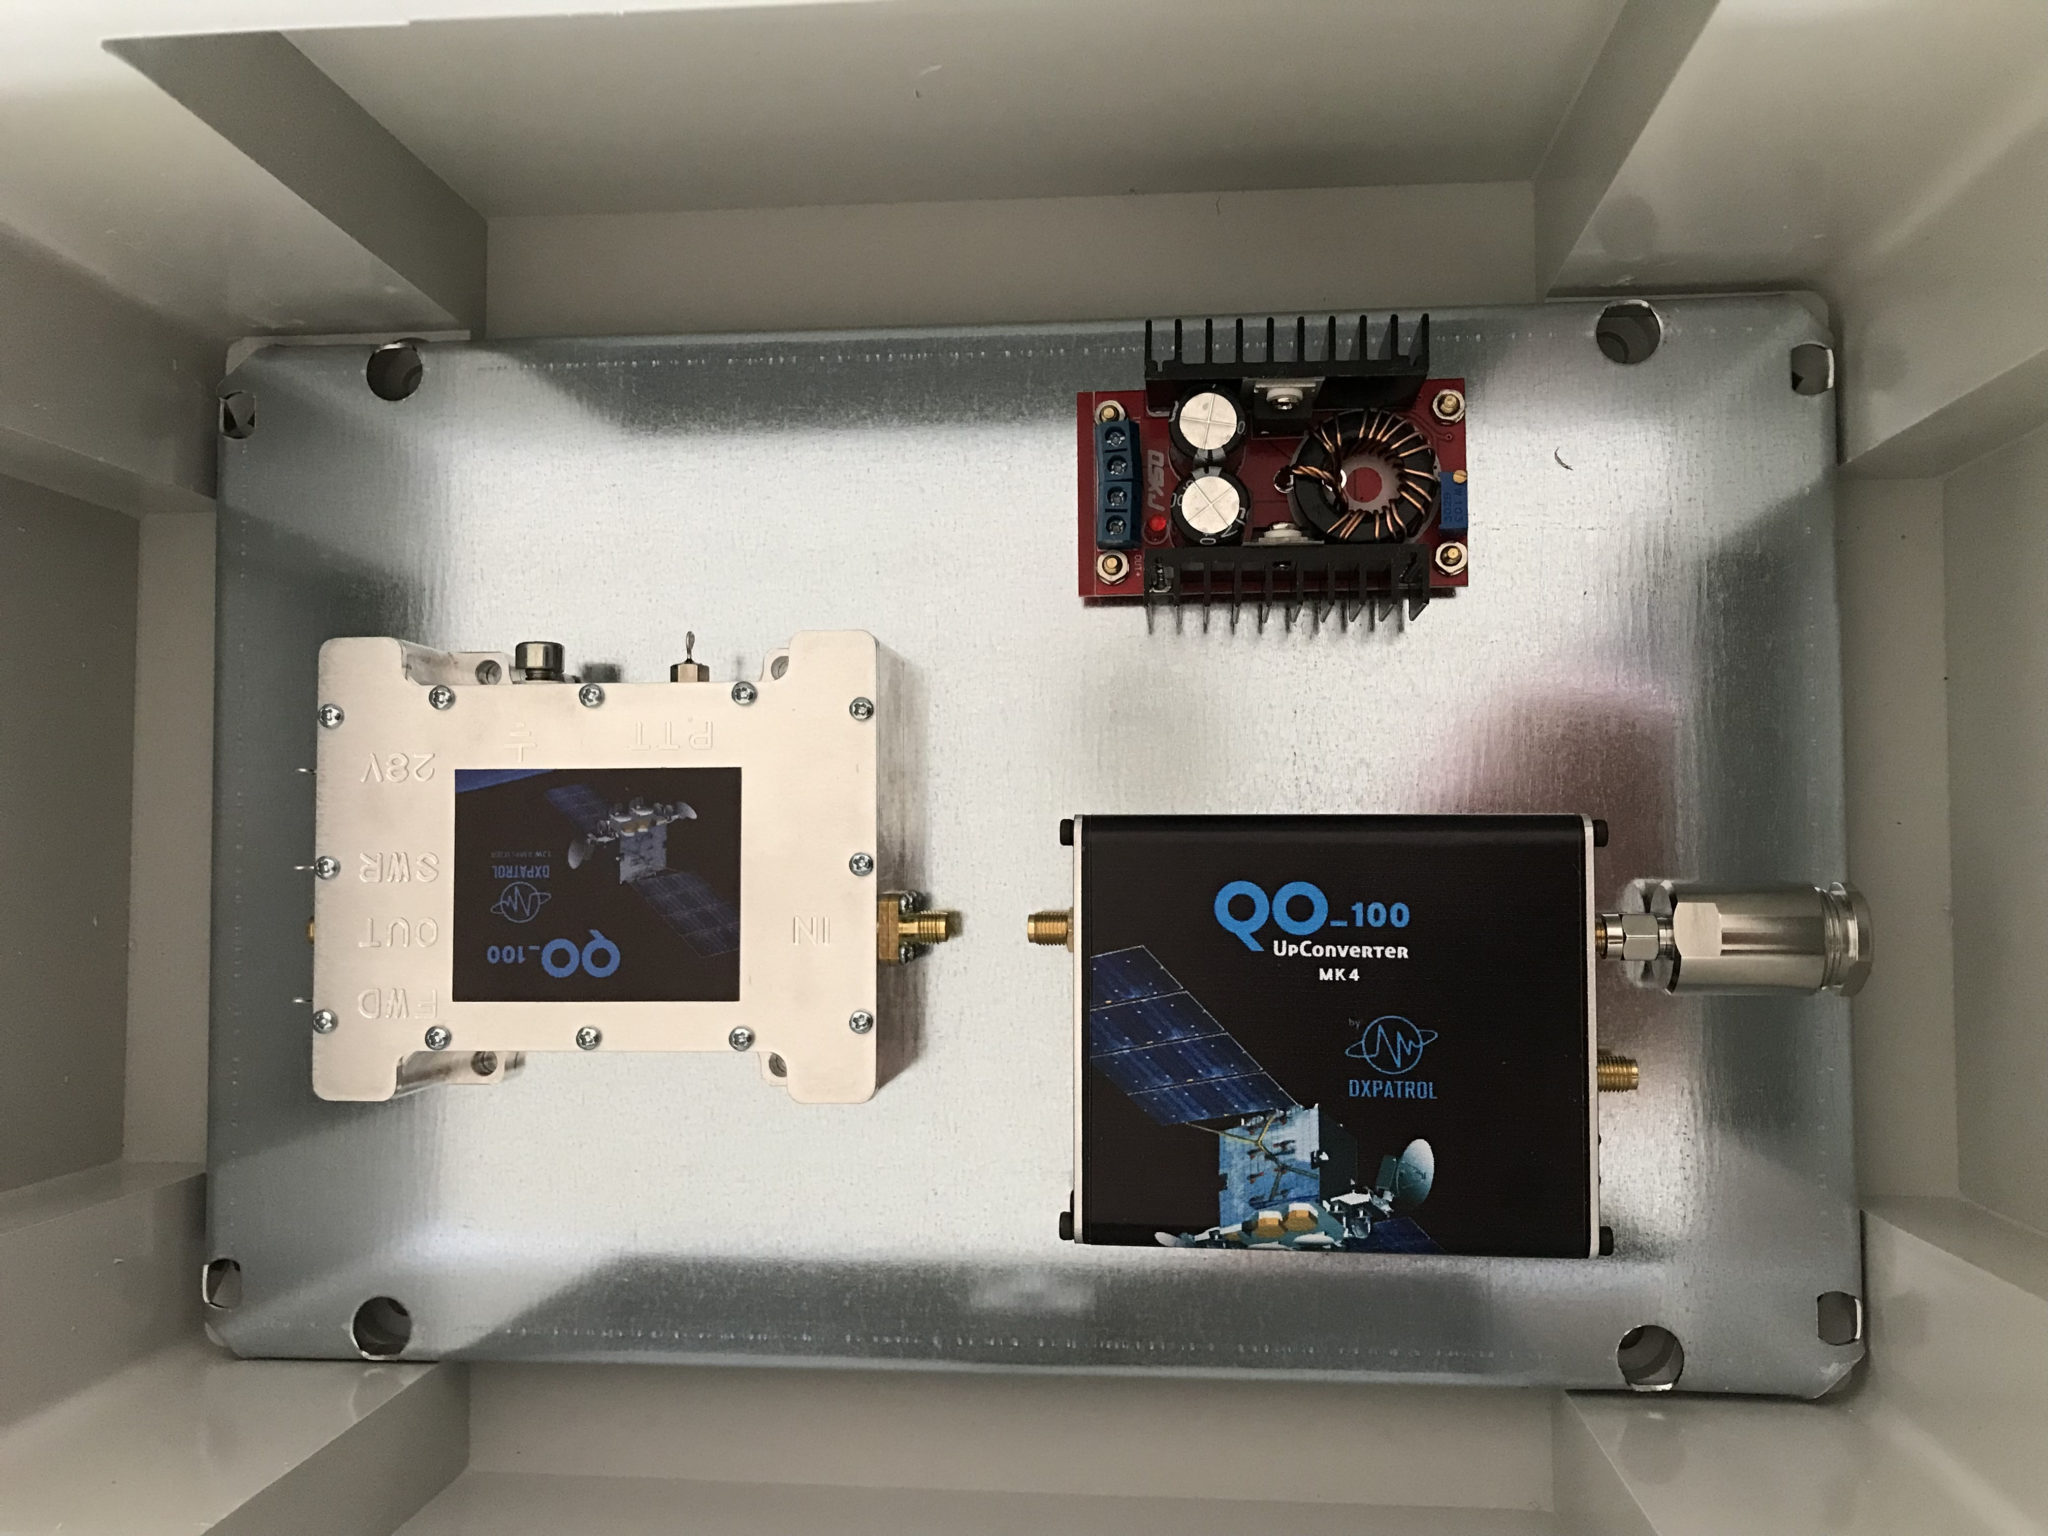
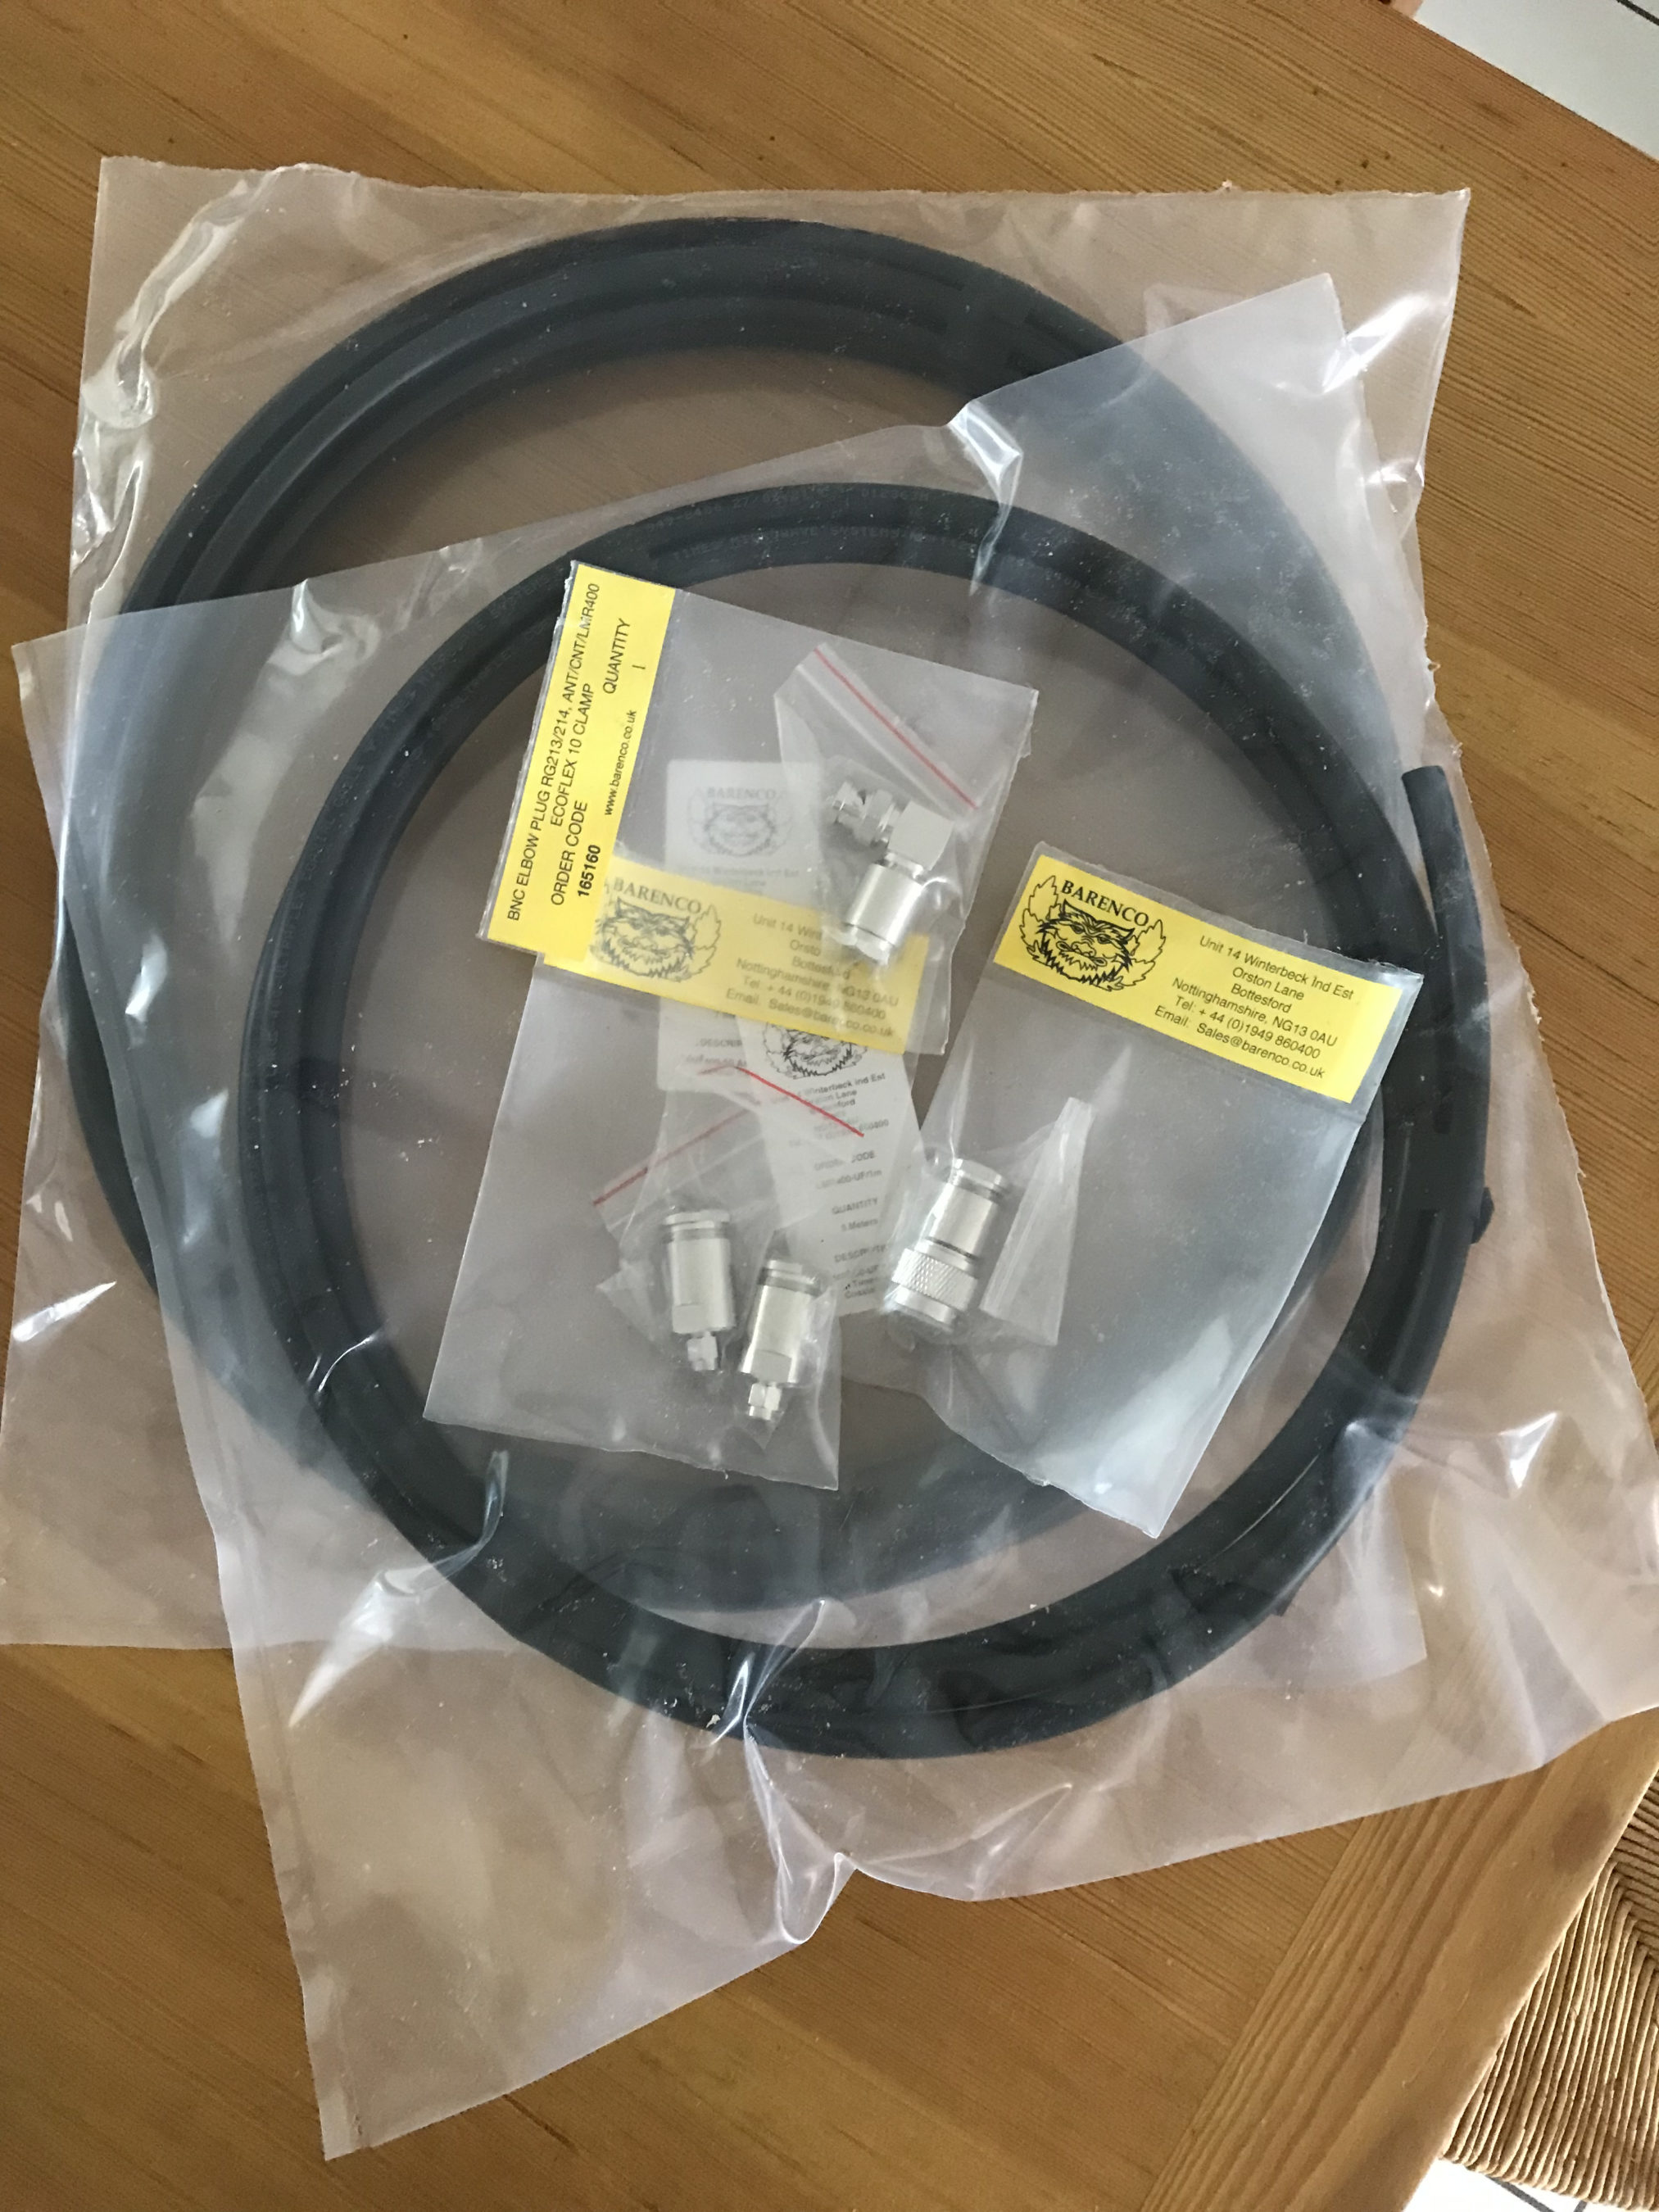
So with the QO-100 Dashboard ready to go live I have now started putting together the 2.4Ghz transmit path of the ground station. I have the 2.4Ghz transverter and matching 12w amplifier from DXPatrol, the IceCone Helix 2.4Ghz antenna from Nolle Engineering, some LMR-400-UF and connectors from Barenco and an appropriate water proof enclosure from Screwfix to fit all the kit into however, I’m now being held up by one simple little SMA male to SMA male connector that I need to connect the transverter and amp together.
M0AWS Waterproof enclosure from ScrewfixM0AWS Laying out the 2.4Ghz TX kit in the enclosureM0AWS LMR-400-UF coax from Barenco
The SMA connector has been ordered but, is taking a month of Sundays to arrive! Hopefully it’ll arrive soon and I’ll finally get on the QO-100 satellite and start enjoying the fun.
I’ve been gradually building my QO-100 ground station over the last few months and have had the receive path working for some time now. One of the things I really miss with the Funcube Dongle Pro+ (FCD) SDR is a real VFO knob for changing frequency.
My QO-100 Node Red dashboard is configured so that I can have the FCD track the uplink frequency from the IC-705 but, sometimes I use the FCD without the IC-705 in the shack and so a physical VFO would be handy.
Many years ago when I lived in France (F5VKM) I had a Flexradio Flex-3000 SDR, a great radio in it’s time and one that gave me many hours of enjoyment. One addition I bought for that station was a Griffin Technology Powermate VFO knob. It worked extremely well with the PowerSDR software for the Flex-3000 and I used it for many years.
Many years later I’m back in the UK and much of my equipment is packed away in the attic, including the Griffin Technology Powermate VFO.
I decided to dig it out and see if I could get it working with GQRX SDR software. Sadly I couldn’t get it working with GQRX however, I did find a way of getting it working with Node Red and thus could add it to my QO-100 Node Red Dashboard and then control GQRX with it via a simple Node Red flow.
Griffin Technology Powermate VFO
Plugging the Powermate VFO into my Kubuntu PC it wasn’t immediately recognised by the Linux O/S. After a little searching I found the driver on Github. I added the PPA to my aptitude sources and installed the driver using apt.
Once installed the default config for the Powermate device is to control the default audio device volume. To make the device available for use as a VFO knob you need to change the configuration so that the default setting is disabled. To do this is relatively easy, just edit the config file using your favourite command line editor (Vi/Vim in my case) and add the following entry.
vi /etc/powermate.toml

# Entry to control HDMI volume with Powermate
#sink_name = "alsa_output.pci-0000_01_00.1.hdmi-stereo"

# Set powermate not to work with volume control
sink_name = ""
As shown above, comment out the default “sink_name” entry (Yours may be different depending on audio device in your PC) and add in the Powermate “sink_name” entry that effectively assigns it to nothing.
Once this is done, save the file and exit your editor and then reboot the PC.
Next you’ll need to install a small program called evtest.
sudo apt install evtest
To check the evtest program has installed correctly, plugin your Powermate VFO to any available USB port and run the following command in a terminal.
evtest /dev/input/powermate
Turning the Powermate knob you should see output on the screen showing the input from the device. You should also see BTN events for each press of the Powermate device.
Input driver version is 1.0.1
Input device ID: bus 0x3 vendor 0x77d product 0x410 version 0x400
Input device name: "Griffin PowerMate"
Supported events:
  Event type 0 (EV_SYN)
  Event type 1 (EV_KEY)
    Event code 256 (BTN_0)
  Event type 2 (EV_REL)
    Event code 7 (REL_DIAL)
  Event type 4 (EV_MSC)
    Event code 1 (MSC_PULSELED)
Properties:
Testing ... (interrupt to exit)
Event: time 1685816662.086666, type 2 (EV_REL), code 7 (REL_DIAL), value -1
Event: time 1685816662.086666, -------------- SYN_REPORT ------------
Event: time 1685816662.318638, type 2 (EV_REL), code 7 (REL_DIAL), value -1
Event: time 1685816662.318638, -------------- SYN_REPORT ------------
Event: time 1685816662.574615, type 2 (EV_REL), code 7 (REL_DIAL), value -1
Event: time 1685816662.574615, -------------- SYN_REPORT ------------
Event: time 1685816663.670461, type 2 (EV_REL), code 7 (REL_DIAL), value 1
Event: time 1685816663.670461, -------------- SYN_REPORT ------------
Event: time 1685816664.030421, type 2 (EV_REL), code 7 (REL_DIAL), value 1
Event: time 1685816664.030421, -------------- SYN_REPORT ------------
Event: time 1685816664.334389, type 2 (EV_REL), code 7 (REL_DIAL), value 1
Event: time 1685816664.334389, -------------- SYN_REPORT ------------
Event: time 1685816665.334255, type 1 (EV_KEY), code 256 (BTN_0), value 1
Event: time 1685816665.334255, -------------- SYN_REPORT ------------
Event: time 1685816665.558230, type 1 (EV_KEY), code 256 (BTN_0), value 0
Event: time 1685816665.558230, -------------- SYN_REPORT ------------
Event: time 1685816666.030161, type 1 (EV_KEY), code 256 (BTN_0), value 1
Event: time 1685816666.030161, -------------- SYN_REPORT ------------
Event: time 1685816666.182151, type 1 (EV_KEY), code 256 (BTN_0), value 0
Event: time 1685816666.182151, -------------- SYN_REPORT ------------
At this point you’re ready to stop evtest (CTRL-C) and then create the following little BASH shell script that Node Red will run to collect the O/P from the Powermate USB device.
#!/bin/bash

###############################################
# Griffin Technology Powermate control script #
# for Node Red.                               #
#                                             #
# 04/06/23 - M0AWS - v0.1                     #
#                                             #
###############################################

VAL="1"
echo "STEP-1Hz"

/usr/bin/evtest /dev/input/powermate | while read LINE
do
   case $LINE in

      *"(REL_DIAL), value 1") echo "$VAL"
           ;;

      *"(REL_DIAL), value -1") echo "-$VAL"
           ;;

      *"(BTN_0), value 1") case $VAL in

                              "1") VAL="10"
                                   echo "STEP-10Hz"
                                      ;;

                             "10") VAL="100"
                                   echo "STEP-100Hz"
                                      ;;

                             "100") VAL="1000"
                                    echo "STEP-1Khz"
                                       ;;

                             "1000") VAL="10000"
                                     echo "STEP-10Khz"
                                         ;;

                             "10000") VAL="1"
                                       echo "STEP-1Hz"
                                          ;;
                              esac
                                 ;;
        esac
done
Once the BASH script is copied and pasted into a file called powermate.sh you need to make it executable by using the following command.
chmod 700 ./powermate.sh
If you now run the shell script in a terminal you’ll see a similar output to that shown below from the device when used.
As you can see above the shell script outputs a positive or negative number for VFO tuning and changes the VFO step size each time the Powermate is depressed.
Getting this output from the BASH shell script into Node Red is really simple to achieve using just 3 or 4 nodes.
In the Node Red development UI create the following nodes.
Griffin Powermate Node Red Nodes
The first node in the flow is a simple inject node, here I called it trigger. This sends a timestamp into the next node in the flow at startup to set the flow running.
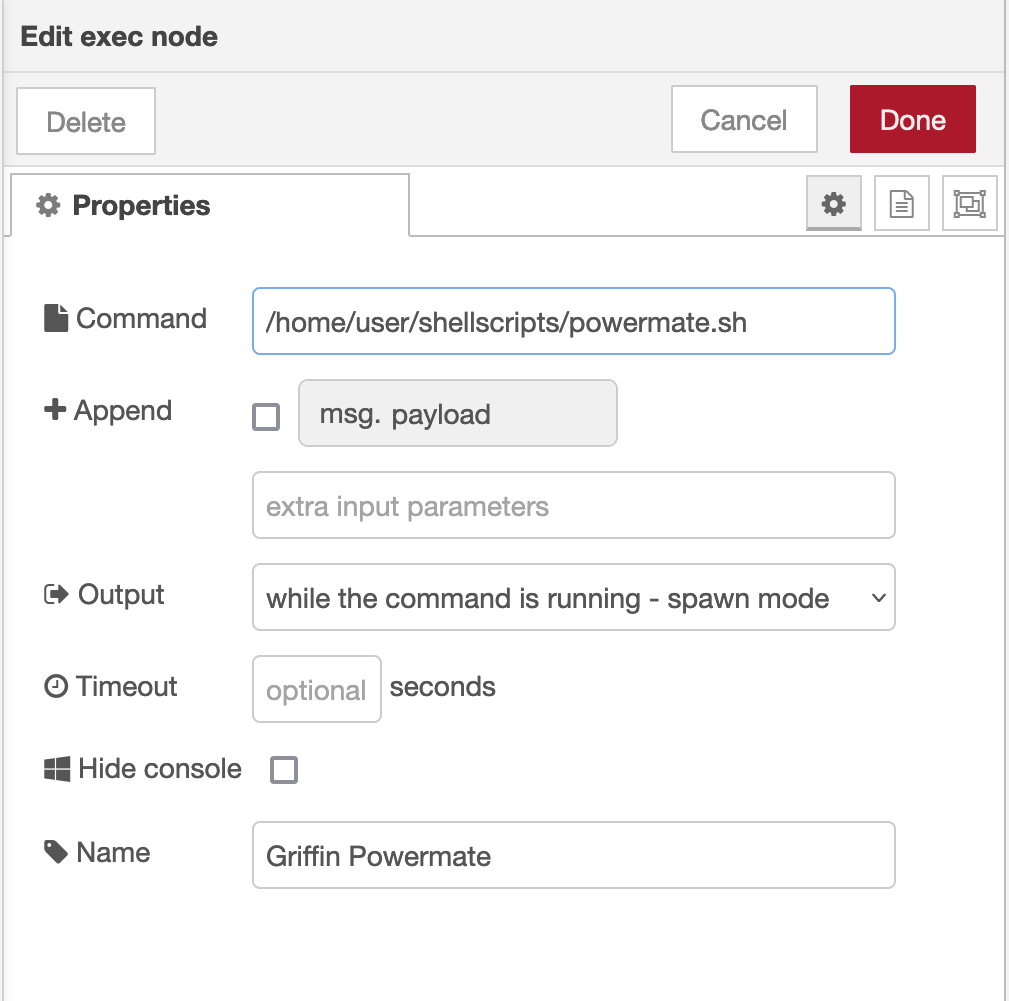
The Griffin Powermate node is a simple exec node that runs the script we created above.
M0AWS Powermate exec node
Configure the node as shown above and connect it to the inject node that’s used as a trigger. Note: Change “user” in the Command field shown above to that of your username on your Linux PC)
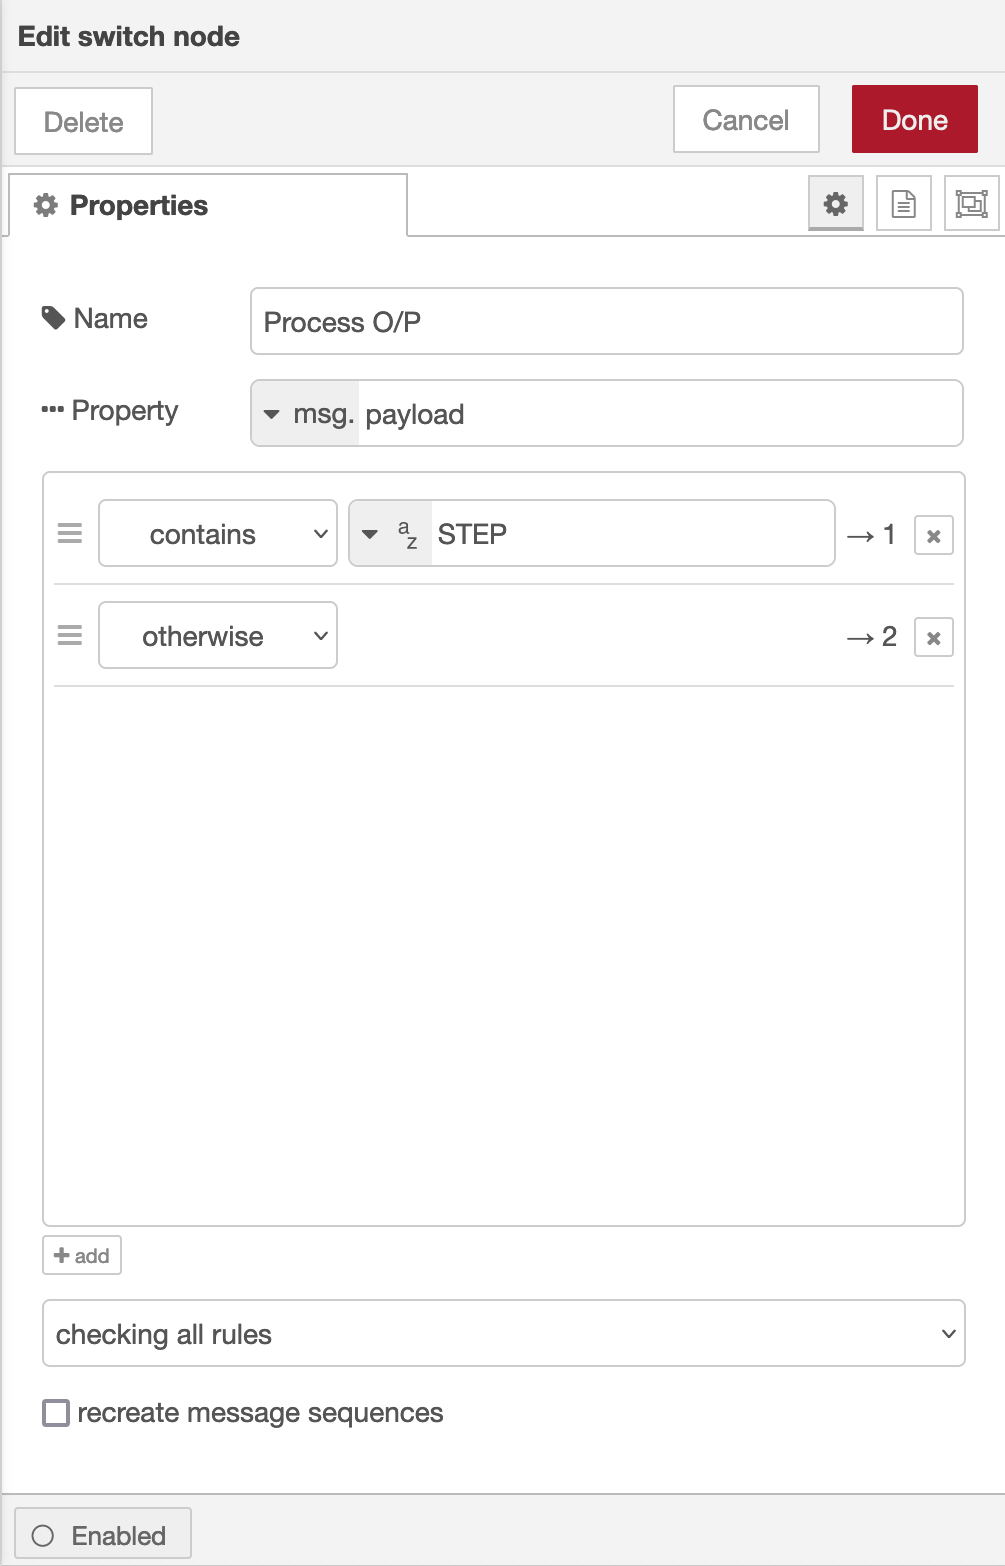
Once done create the third node in the flow, a simple switch node and configure as shown below.
Switch Node for Powermate
The switch node has two outputs, the top one is a text output that is fed into a text field to show the current step size of the Powermate device and the lower output is the numeric output that must be fed into your VFO control flow so that the VFO value is incremented/decremented by the amount output by the Powermate device.
I’ve found the Griffin Technology Powermate USB device works extremely well with Node Red and GQRX that I use for controlling the FCD SDR radio and it’s now part of my QO-100 ground station build.
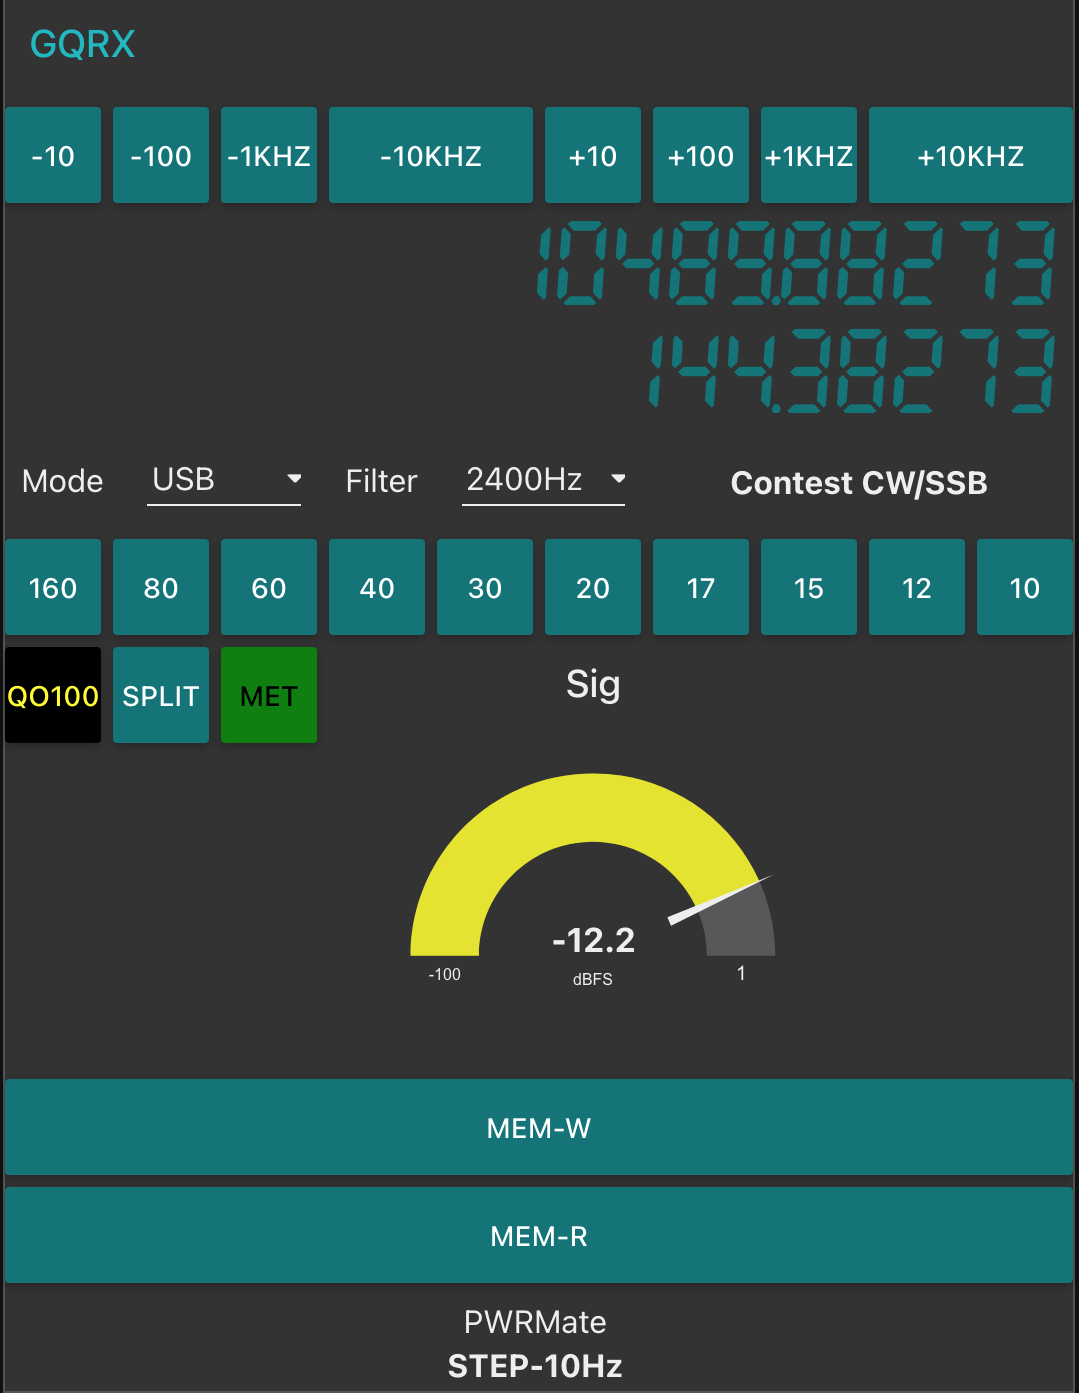
M0AWS QO-100 Dashboard with Powermate Step Display at bottom
As shown above you can see the Powermate Step size at the bottom of the dashboard, this text changes each time the Powermate device is depressed and will set a step size of 1Hz, 10Hz, 100Hz, 1Khz, 10Khz in a round-robin fashion.
The next stage of the build is the 2.4Ghz transmit path. I now have all the necessary hardware and so this part of the build can finally commence.
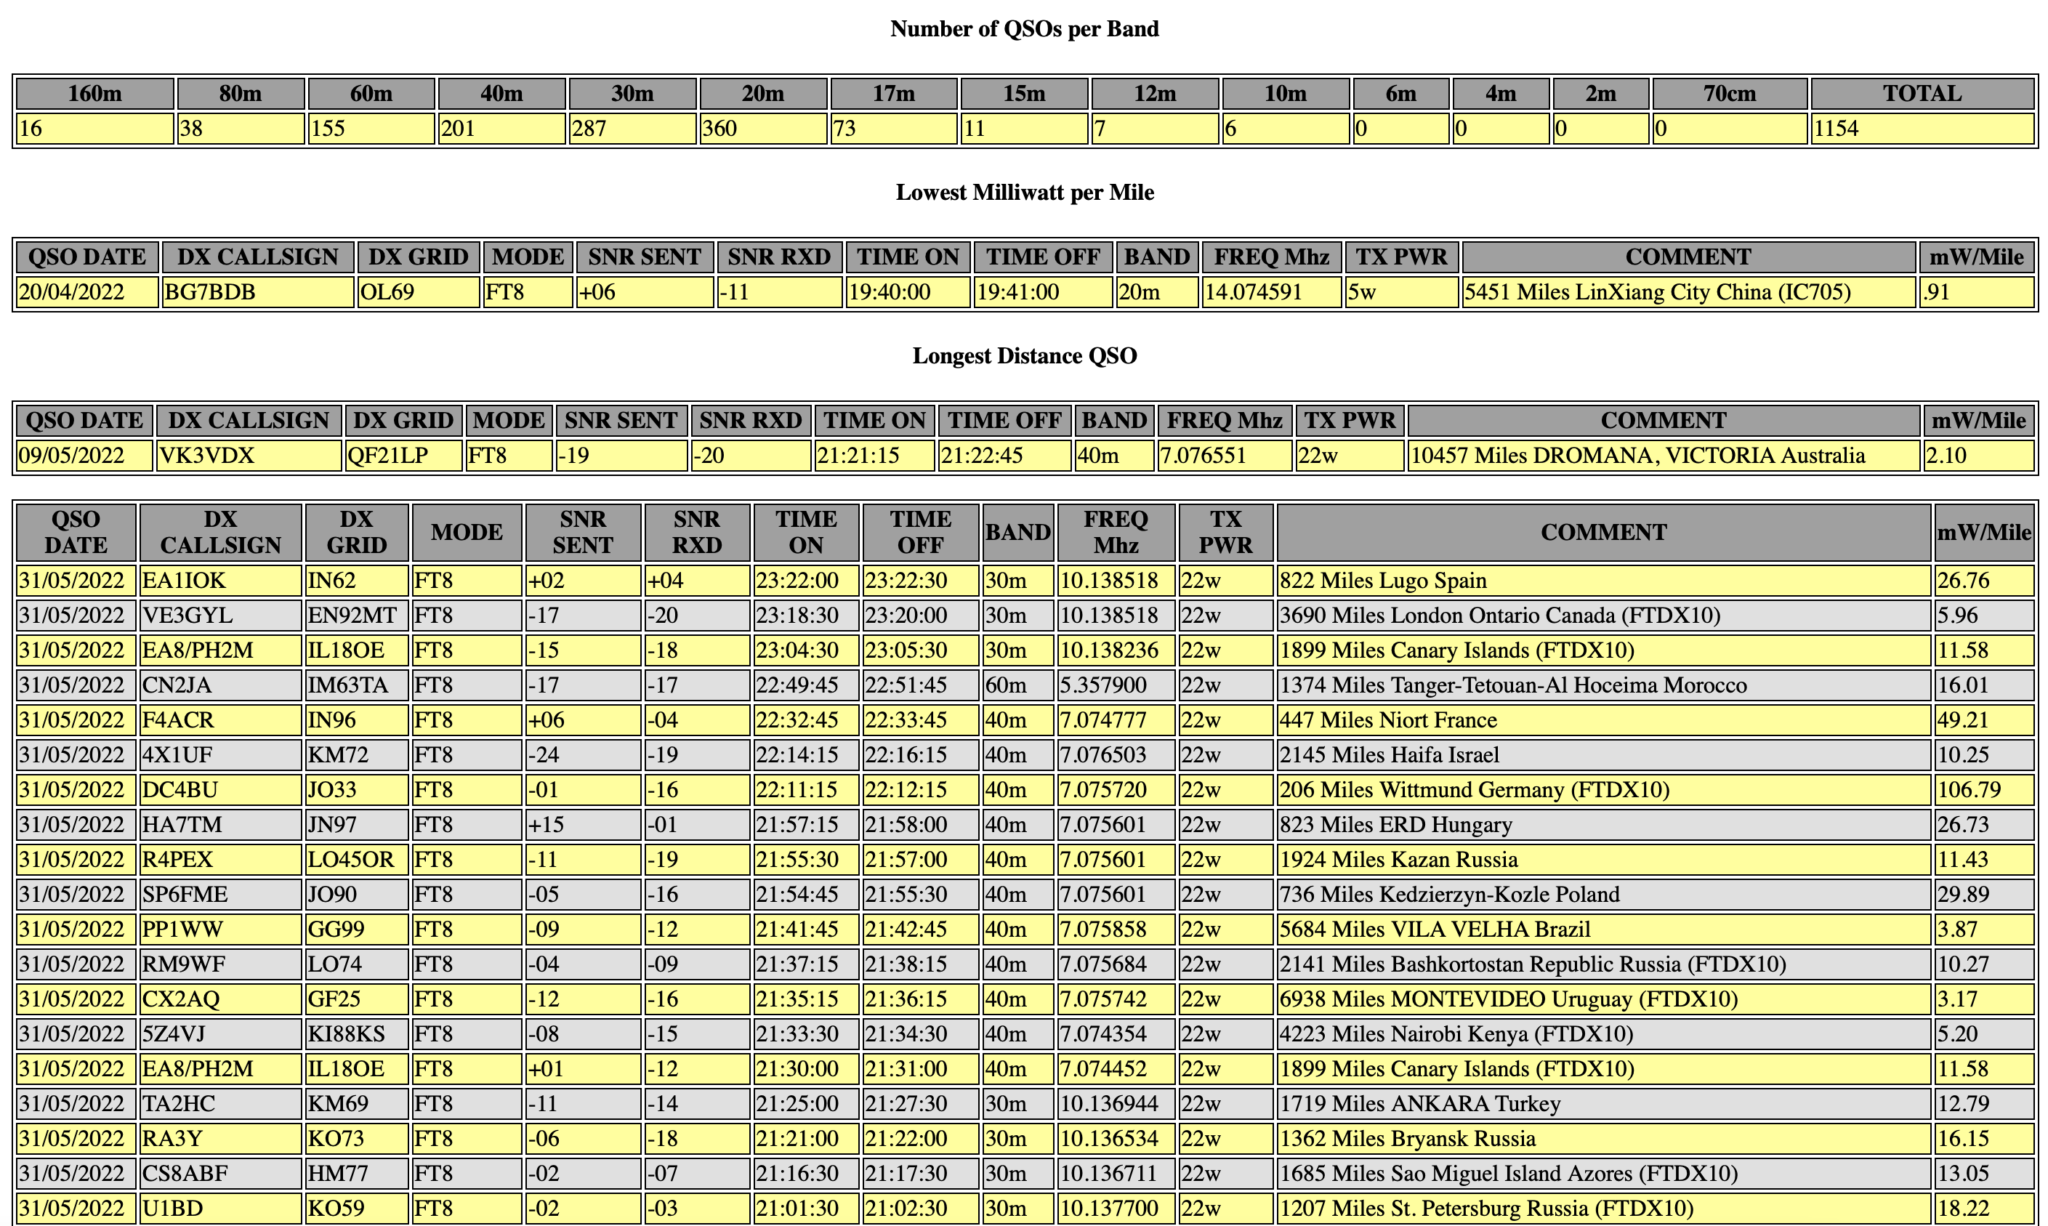
I’ve had a few messages of late asking how I generate my WSJT-X log web pages for my website. The answer is pretty simple, I use a little BASH script that I started writing some time back and have gradually improved over the last few months.
If you have a PC running Linux or a RaspberryPi running any of the normal Debian/Ubuntu/Redhat/Fedora based Linux distro’s that are available today then, this script should work just fine.
I originally wrote this program using Python but, a friend of mine bet me that I couldn’t write it in BASH and so, I took up the challenge and this is the result. It’s pretty simple and uses all the normal UNIX command line goodies like grep, sed and awk.
The script also uses WWL to calculate the distance between two Maidenhead locator grid squares and so it’s important to have it installed before running the script. (The script checks for it at runtime and will exit if it is not installed!). You can install WWL using your package manager on your Linux distro or from the command line directly. Details are in the READ-ME.txt file.
Screen grab from my M0AWS WSJT-X Log web page
It’s important that you READ the READ-ME.txt included in the zip file before trying to run any of the scripts included as it details the variables that you need to enter values for to make the script run on your PC/Server. (Example entries are in place as supplied).
The variables are mainly just paths to files on your system and whether you want distances calculated in miles or kilometres. Other than that there’s nothing else required for it to run.
I’ve also included details on how to run the script automatically from a crontab so that your webpage can be updated automatically every few minutes/hours etc.
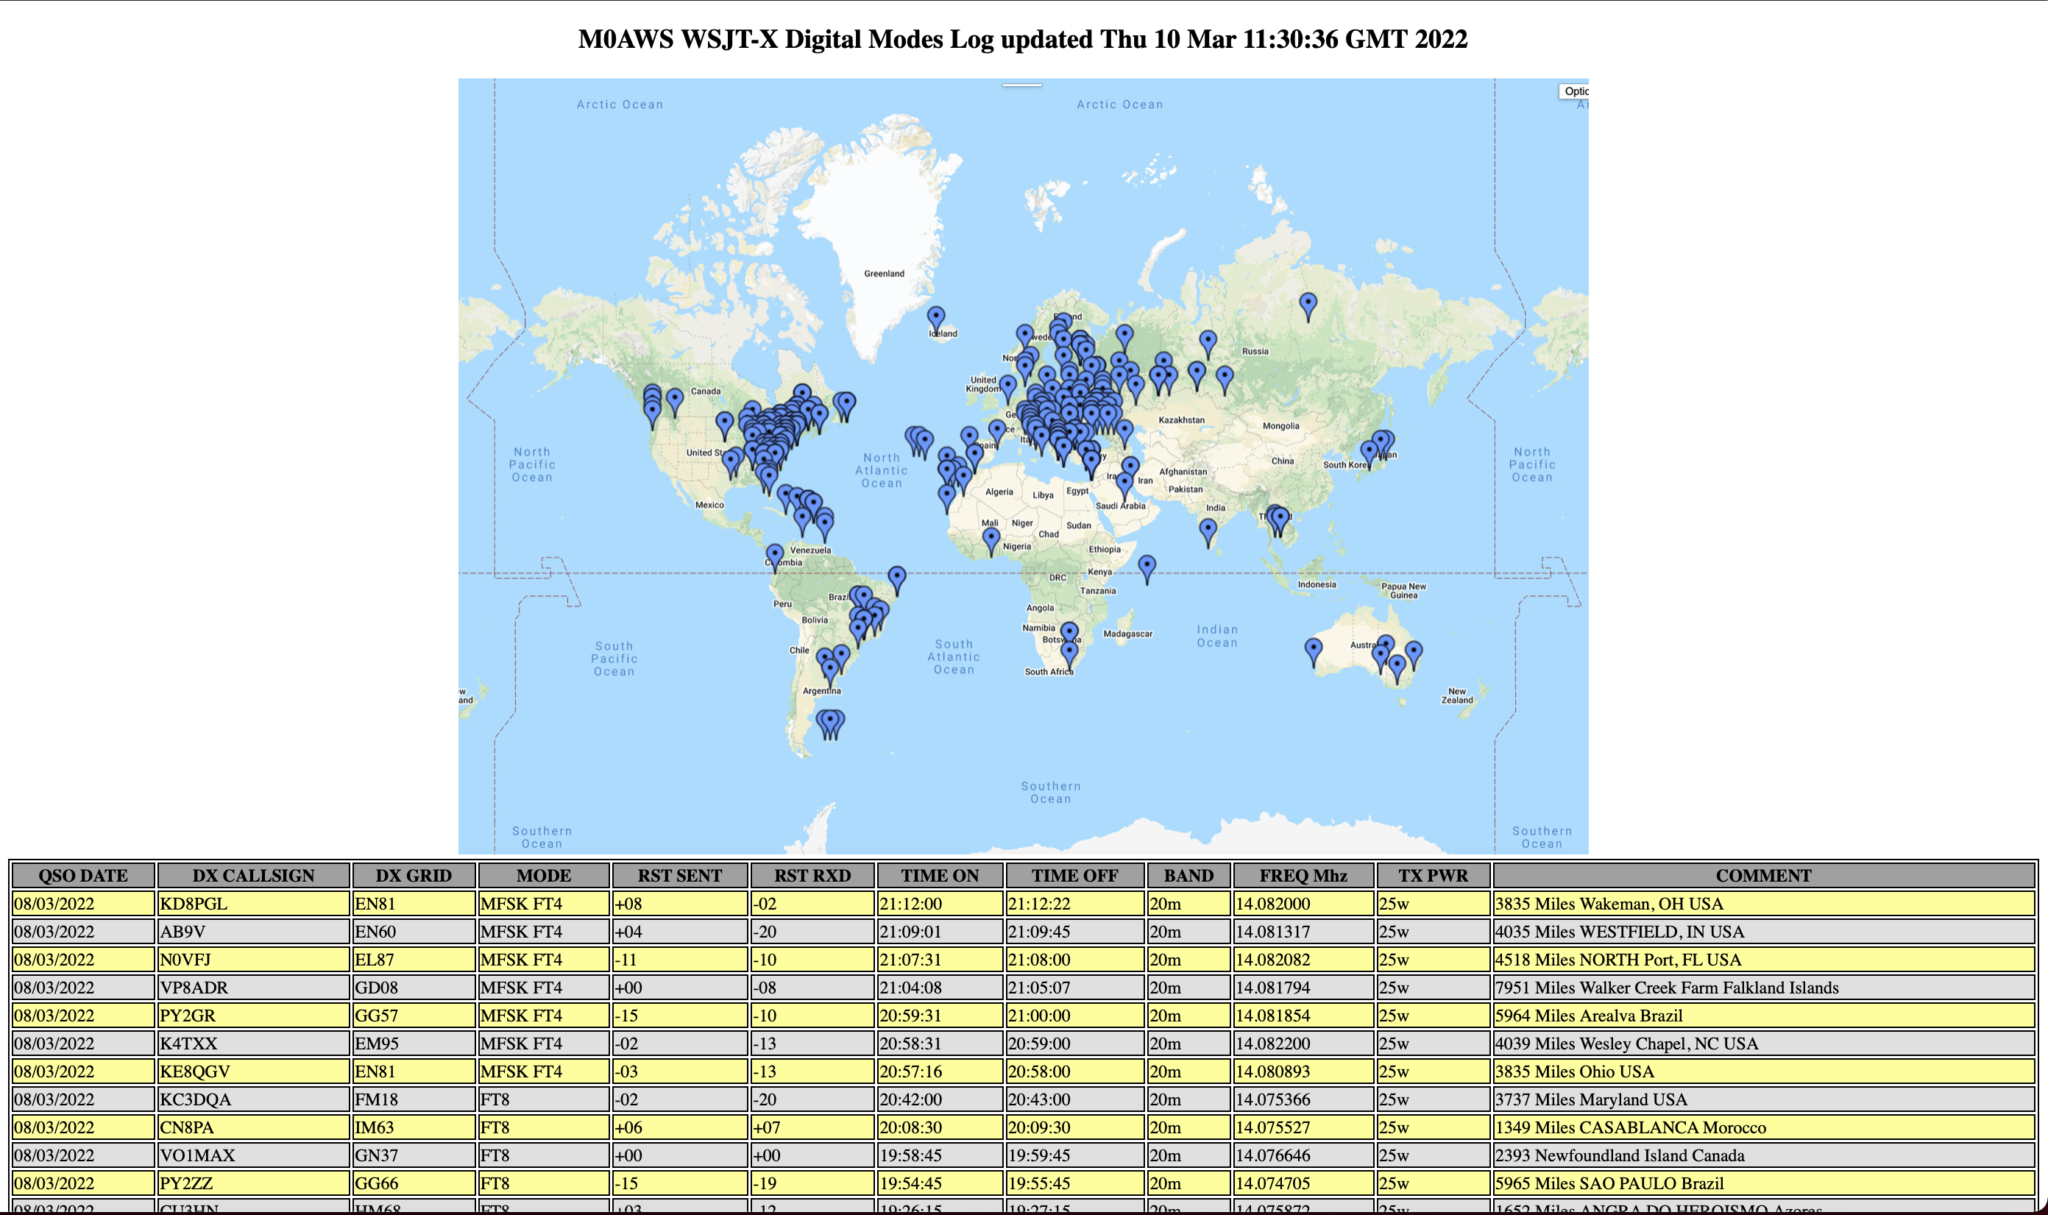
The script also includes code to add a PNG map file into the generated webpage so that there is a graphical representation of all your QSOs. The map isn’t generated by the script (something I need to add in the coming few months) so you’ll need to generate it yourself and then add it to the website either via the crontab script included in the zip file or manually.
I use the QSOMap website to generate my map image files and then have them uploaded to my web server via the crontab script.
The script processes 100 entries per second on my web server (Headless virtual machine running Ubuntu Server 64bit Edition) and so should be pretty fast on most PCs. It will run somewhat slower on a RaspberryPi so be patient!
You can download the script and associated information using the button below.
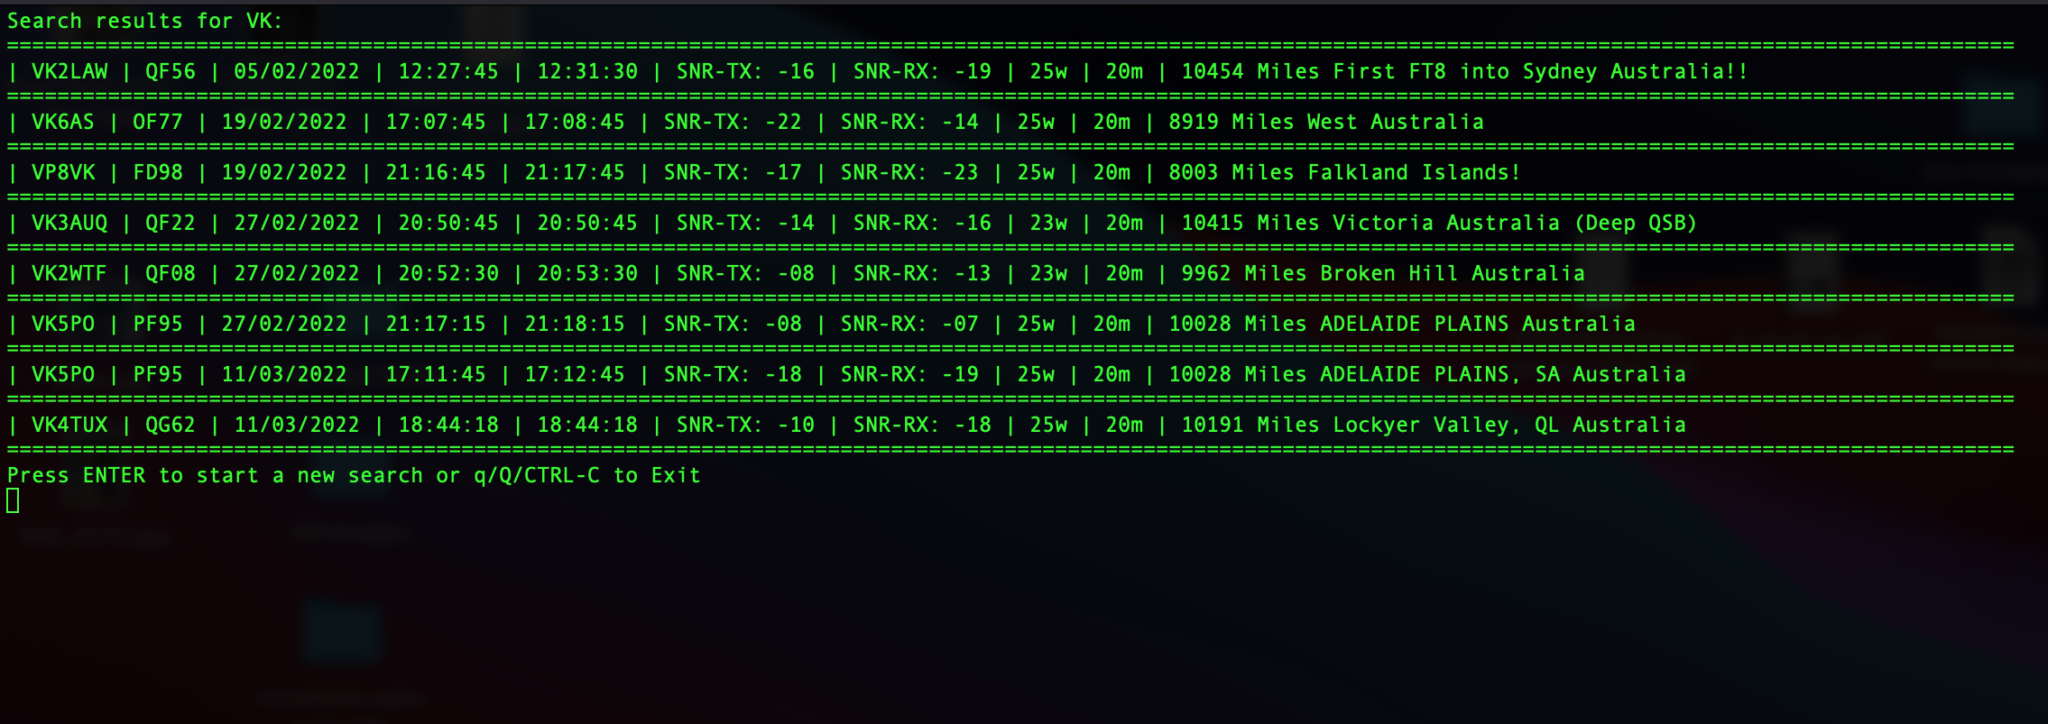
searchwsjtxlog v0.4 showing search for partial callsign
Being a UNIX/Linux command line guy I’m not a fan of a lot of these GUI based logging programs that are full of functionality I’ll never use. I currently have RumLogNG for the MacBook Pro but, I really don’t like it. It does many things I don’t need and not the things I really need when on air.
So I decided to write a bunch of command line based programs that do exactly what I want with minimal fuss. The first of these programs was adi2html, a simple program that converts the WSJT-X ADI log file into HTML so I can easily put it on my website.
I’ve now written a new program using the same BASH shell technique to allow me to search the WSJT-X log file quickly and easily whilst on air.
searchwsjtxlog is a simple little shell script that searches for either a full or partial callsign and presents the results instantly. I use this script a lot when working FT4/8 as I can see if I’ve worked a station before and on what bands easily and quickly.
The script works on Linux and MacOS Big Sur (Not got Monterey to test but, should work fine). If you find a bug please let me know and I’ll fix it as soon as possible.
Note: Since MacOS uses such an old version of the BASH it cannot handle spaces in the path to the wsjtx_log.adi file. On MacOS you’ll need to create a softlink to the file and then put the path to the soft link into the script for it to work properly. CD into the directory where you have saved the searchwsjtxlog.sh file and then run the following command:
Following on from the adi2html v0.5 release I’ve now added a little more code to include a map of the contacts detailed in the wsjtx_log.adi file so that there is a visual representation of the data included in the webpage. (Map must be generated externally and JPEG/GIF/PNG uploaded to website to be included in the webpage).
I’ve started using RUMLogng for logging on my MacBook Pro as it seems to be the most common logbook to use on the Apple Mac platform. I must admit that I’m not sure if I’ll carry on using it going forward as I’m not overly enamoured by it but, for the time being it’s all I have.
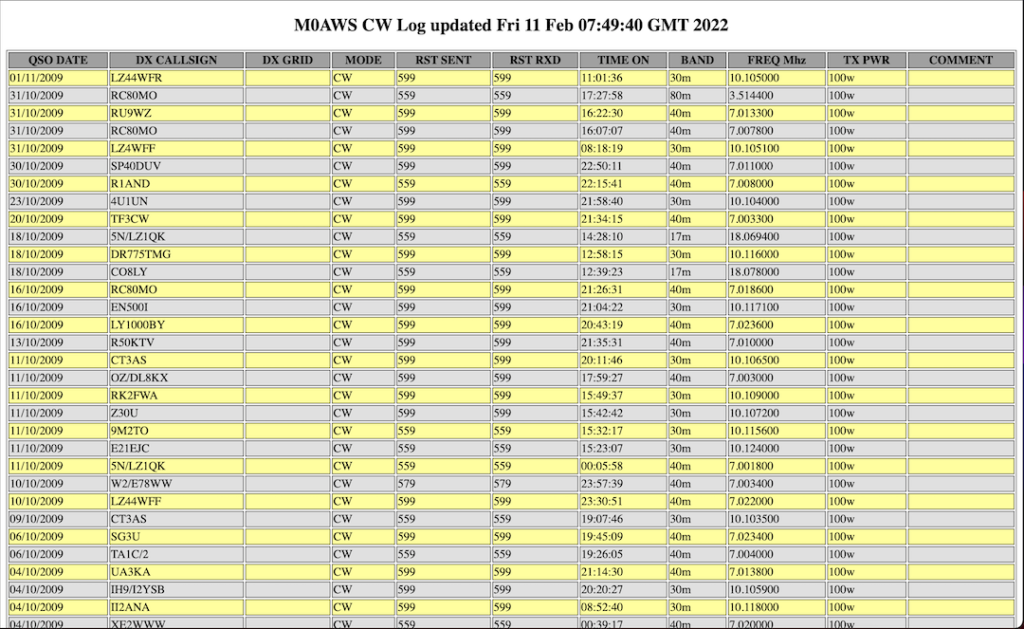
To get my logs on the blog I’ve written a small BASH shell script that reads the exported ADIF file from RUMLogng and creates a log in HTML format for each different mode.
You can see the output of the BASH script by selecting a log from the Logs menu at the top of this page.
If you want to be able to add your log to your own website then I’ve made the script available for download below.
Currently I’ve only tested the script with the few different modes that I have log entries for but, it should work for all modes. If you find any issues please contact me with all the details and I’ll look into resolving any problems.
As always, if you use my code to generate webpages on your website please consider leaving the footer in place so I get some credit, thanks!
Following on from my original article where I detailed the adi2htmlBash script that reads in the WSJT-X log and creates an HTML version of the data so that it can be presented in a palatable format on websites (See my WSJT-X log here), I’ve now released v0.5 for public consumption.
In adi2html v0.5 I’ve added colour to the webpage that is generated to make it easier on the eyes and rewritten the function process_log() so that it uses the column name to identify each field instead of the row position.
By making this change it should cope just fine if the order of the fields is ever altered in the WSJT-X log during its development.
As before the code can be downloaded using the link below.
If you use my code please consider leaving the footer in place so I get some credit, thanks!
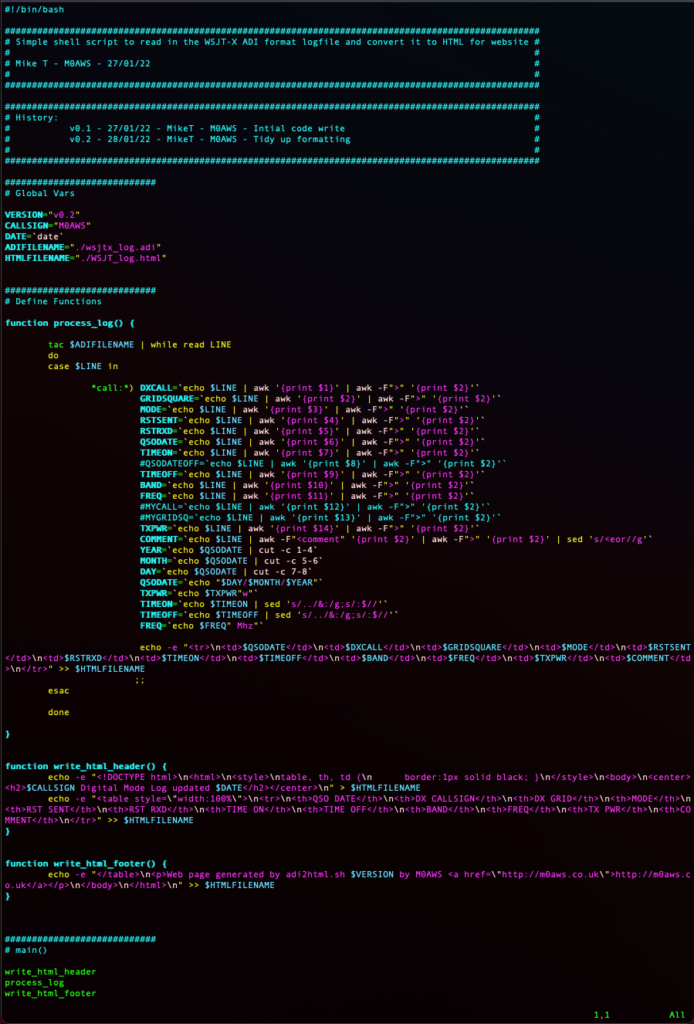
I had some spare time today so I finished a small BASH program that I started writing yesterday that reads the wsjtx_log.adi file and writes the data out in HTML format so that it can be incorporated into my website (See the Logs Menu).
(Sorry the font is so small but WordPress is crap at displaying code!)
It’s a fairly simple piece of code that anyone who is into Linux and has a basic understanding of the BASH shell will easily be able to comprehend. (Yes there’s a little awk and sed in it just to add to the entertainment value!).
There are a few places where the code can be improved which I’ll address in v0.3 when I have time but, for now I’ll put it online just incase anyone is interested in using it.
If you do use the code please consider leaving the footer in place so I get some credit.
We use cookies to ensure that we give you the best experience on our website. If you continue to use this site we will assume that you are happy with it.